background image

48

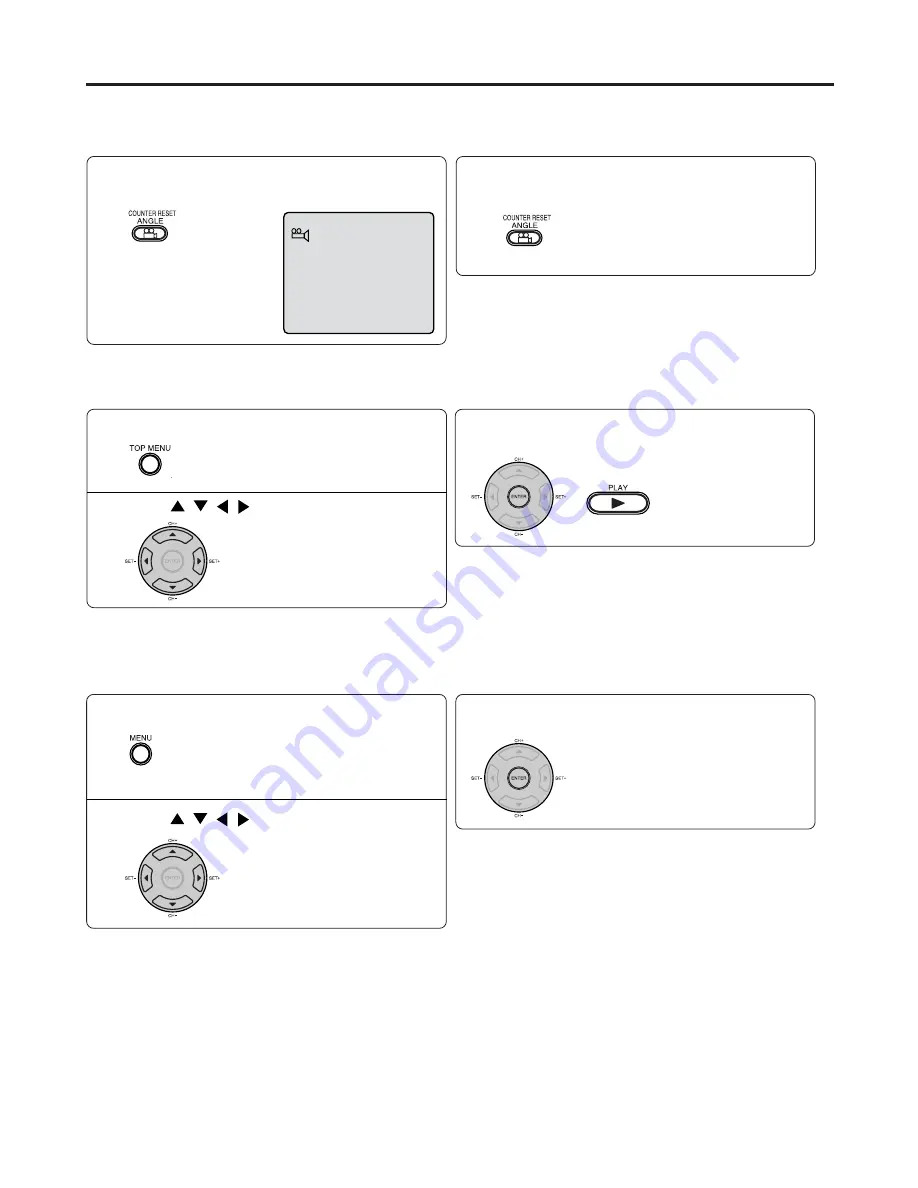
Press MENU during playback.

The DVD menu appears on the screen.
• Press 

MENU

 again to resume

playback at the scene when you
pressed 

MENU

.

Press 

/

/

/


to select the desired title.

Press ANGLE during playback.

The current angle will appear.

When playing back a disc recorded with multi-angle facility, you can change the angle that you are viewing the scene from.

1

1/9

Press ANGLE repeatedly until the desired angle
is selected.

2

Note:

Depending on the DVD, you may not be able to change the
angles even if multi-angles are recorded on the DVD.

Title selection

Two or more titles are recorded on some discs. If the title menu is recorded on the disc, you can select the desired title.

1

Press ENTER or PLAY.

The playback of the selected title will
start.

3

Note:

Depending on the DVD, you may not be able to select the title.
Depending on the DVD, a “title menu” may simply be called a
“menu” or “title” in the instructions supplied with the disc.

2

DVD menu

Press 

/

/

/


to select the desired item.

Some DVDs allow you to select the disc contents using the menu.
When you play back these DVDs, you can select the subtitle language and sound-track language, etc. using the menu.

1

Press ENTER.

The menu continues to another
screen. Repeat steps 

2

 and 

3

 to set

the item completely.

3

2

Press TOP MENU during playback.

Title menu appears on the screen.

Note:

Depending on the DVD, you may not be able to resume playback
from the scene point when you pressed the MENU button.

Changing angles/Title selection/DVD menu

Changing angles

Содержание SD46VSR

Страница 1: ...FOLLOWING CAUTION LABEL IS LOCATED ON THE REAR PANEL OF THE DVD VCR WHEN THIS DVD VCR IS PLUGGED INTO THE WALL OUTLET DO NOT PLACE YOUR EYES CLOSE TO THE OPENING OF THE DISC TRAY AND OTHER OPENINGS TO LOOK INTO THE INSIDE OF THIS DVD VCR USE OF CONTROLS OR ADJUSTMENTS OR PERFORMANCE OF PROCEDURES OTHER THAN THOSE SPECIFIED HEREIN MAY RESULT IN HAZARDOUS RADIATION EXPOSURE DO NOT OPEN COVERS AND DO...

Страница 2: ...nit near appliances which may causeelectromagneticinterferencesuchasloudspeak ers amplifiers electric motors mobile phone etc Magnetic fields may affect picture or sound quality of video recordings Avoid extreme moisture and dust Leave repairs to a qualified service technician Avoid locations subjected to extreme heat and cold Avoid placing to place the unit on any surfaces that may be subjected t...

Страница 3: ...dripping or splashing or objects filled with liquids such as vases to be placed on the equipment DON T place hot objects or naked flame sources such as lighted candles or nightlights on or close to equipment High temperatures can melt plastic and lead to fires DON T use makeshift stands and NEVER fix legs with wood screws to ensure complete safety always fit the manufacturer s approved stand or le...

Страница 4: ...ents Others Memory Card Reader This product incorporates copyright protection technology that is protected by U S patents and other intellectual property rights Use of this copyright protection technology must be authorized by Macrovision and is intended for home and other limited viewing uses only unless otherwise authorized by Macrovision Reverse engineering or disassembly is prohibited Consumer...

Страница 5: ...resetting 18 Mapping TV stations 19 Manual TV station presetting 22 Setting up the VCR section Disc 39 Media card 40 Playing a disc 41 Zooming Locating desired scene 44 Marking desired scenes 45 Repeat playback A B Repeat playback 46 Program playback Random playback VCD CD 47 Changing angles Title selection DVD menu 48 Changing soundtrack language Setting surround sound Subtitles 49 Disc status To...

Страница 6: ...EO IN jacks L3 CHANNEL M M M M M buttons FWD button Remote sensor VCR indicator REV button DVD indicator REC button PLAY button STOP button OPEN CLOSE button Disc tray VCR DVD mode selector button Cassette Loading Slot EJECT button Display window COMPONENT VIDEO OUT Y PB PR jacks Media card slot SD memory card MMC MultiMediaCard xD Picture Card Memory Stick PRO Media card slot CompactFlash memory ...

Страница 7: ...VCR DVD by minute second at CD Track number display for CD TV channel position display External input display Timer recording display Video tape is in the unit Track display for CD Normal recording display flashes during One touch Timer Recording OTR Note Some discs may not playback correctly or chapter number playback time etc may not be displayed Display window 1 2 3 4 5 6 7 8 9 10 1 2 3 7 8 9 1...

Страница 8: ...5 30 41 42 PAUSE STEP Still picture Recording pause on off 26 30 38 42 43 PLAY Playback 25 27 41 43 INDEX Search for the INDEX mark of a tape 29 SKIP Skip chapter to forward or reverse direction 43 REV Rewind Review playback 25 26 43 FWD Fast Forward Forward search playback 25 26 43 REC OTR Recording OTR 30 32 38 TIMER REC Timer recording On Off 32 34 SP LP Sets the tape speed for recording 30 32 ...

Страница 9: ...ectrolyte will damage the remote control handset Leak proof batteries will not leak immediately when they are flat As long as the handset is still working there is no danger of leakage To prevent damage remove the batteries if you do not use the handset for several months Damage because of leakage is not covered by the guarantee Distance of Remote Control Operation Effective angle approx 60 approx...

Страница 10: ...e tuned The video recorder switch the television to video operation through the scart cable automatically The stereo playback is possible only through a scart cable If your TV set does not switch to video playback operation automatically please turn your TV s video switch to VIDEO position manually Note Make sure that both the television and the DVD VCR are switched off before connecting the cable...

Страница 11: ...or Premiere Programs Decoder RF Output SCART cable not supplied Cable TV connection TV unit SCART cable not supplied DVD VCR To record from Satellite Receiver press AUX on the remote control of DVD VCR L1 will appear on the front display Select the desired TV program at Satellite Receiver Satellite Antenna Satellite Receiver DVD VCR TV SCART cable not supplied CLOCK SET SYSTEM SETUP LANGUAGE üáúIK...

Страница 12: ...cting to an audio system and TV equipped with component video inputs Note In connecting to a TV that are not capable of reproducing a progressively scanned video signal using the component sockets do not select Progressive in Output menu If you do it the component video outputs does not feed the correct signals and you can not see any picture see page 58 Notes Actual labels for component video inp...

Страница 13: ...or video playback Please see the owner s manual for your television If the playback picture is of ten distorted you must select another program position for DVD VCR Preparation Turn on the TV Press VCR to select the VCR mode Make sure the power of DVD VCR has been turned off Switch your television to the program position on which the video playback is seen Start the channel search of your televisi...

Страница 14: ...e player s operation Disconnect the AC power cord once then connect it again If no buttons are pressed for more than 60 seconds the MENU screen will re turn to normal TV operation automati cally Preparation Press the button to turn on the DVD VCR Press VCR to select the VCR mode The VCR indicator will light You can choose from two different languages English or Rus sian for the on screen displays ...

Страница 15: ...1 Press VCR MENU Press or to select SYSTEM SETUP then press ENTER 2 Press or to select RF OUT 3 Press or ENTER to se lect the Sound System G K or I according to your TV set Set the Sound System according to your TV set or residential area 4 Press VCR MENU repeatedly to return to the normal screen TIMER REC SET AUTO REPEAT CHANNEL SETUP SYSTEM SETUP SELECT ENTER ENTER OFF MENU EXIT VCR SETUP ...

Страница 16: ...and date Preparation Turn ON the TV and set to the AV input mode Press VCR to select the VCR mode The VCR indicator will light Example Setting the clock to 11 30 October 29 SAT 2005 Press VCR MENU The VCR menu screen will appear If the clock is not set SYSTEM SETUP menu of step 3 will appear automatically Press or to select SYS TEM SETUP then press EN TER Press or to select CLOCK SET then press EN...

Страница 17: ...etting chan nels AUTO TUNING appears When the automatic scanning has finished the CHANNEL MAPPING menu will appear Press VCR MENU repeatedly until the TV picture appears on the screen TIMER REC SET AUTO REPEAT CHANNEL SETUP SYSTEM SETUP SELECT ENTER ENTER OFF MENU EXIT VCR SETUP Note To cancel skipping select the skipped channel using number buttons then press CANCEL The channel No will stop blink...

Страница 18: ...blink If you want to turn over the page when the blinking spot is in the left or right edge of on screen press or repeat edly until the next page s 12 stations appears Press number button 1 The first display line will change to CHANGE BROADCAST NAME Press or repeatedly until the desired character appears Then press Use or to select the next character Then press Up to four char acters can be used t...

Страница 19: ...press ENTER 1 2 Press to select the CHANNEL MAPPING then press the ENTER 3 Press or to se lect the TV station to be moved 4 Press number button 2 to select the MOVE CHANNEL option EXAMPLE Move the TV station from position 4 to position 6 TO MOVE THE TV STATION TO ANOTHER CHANNEL POSITION 5 Press or to select the position number to which the selected TV station is to be moved then press ENTER Press...

Страница 20: ... MENU Press or to select CHANNEL SETUP Then press ENTER Press or to select CHAN NEL MAPPING Then press ENTER Press or repeat edly until the TV station to be skipped blinks Then press CANCEL Thenumbertobecancelled e g 12 will be bracketed Canceling the skip function Press or repeat edly until the skipped TV station blinks thenpressCANCEL The brackets will disappear Press VCR MENU repeatedly until t...

Страница 21: ... in Then you memorize this station into the chosen channel memory Repeat this procedure for each station Preparation Turn ON the TV and set to the AV input mode Press VCR to select the VCR mode The VCR indicator will light Example Preset one station on program position 5 Press VCR MENU Press or to select CHAN NEL SETUP Then press EN TER Press or to select CH TUNING Then press ENTER DEC OFF will bl...

Страница 22: ...ed Orenter5withnumberbuttons Then press ENTER Repeat the steps 3 and 7 to preset other TV stations Press VCR MENU repeatedly until the TV picture appears on the screen The Fine Tuning adjustment Under a normal receiving condition the station search will stops automatically at the best receiving position That picture will appear without disturbance This receiving position will be memorized automati...

Страница 23: ...you insert a cassette tape the DVD VCR power will turn ON automatically Automatic playback When loading a cassette tape without an erase prevention tab playback will start automatically Unloading Press EJECT on the DVD VCR Even if a tape is being played press this button only once Remove the cassette tape Automatic tape eject ThisVCRwillautomaticallyrewindthetapewhenthetapehasended Andwhenthetapei...

Страница 24: ...recorded tape When loading a cassette tape without the erase prevention tab playback will start auto matically To start playback Press PLAY Playback will start If the cassette has not loaded yet will blink for 4 seconds on the screen To rewind the tape Press REV To forward the tape Press FWD To stop the tape winding press STOP To switch to playback directly without STOP press PLAY Forward Reverse ...

Страница 25: ...djustment Whenever you insert a tape and start playback automatic tracking starts working and continuously analyzes the signal to enable optimum picture quality during playback Manual tracking adjustment If automatic tracking cannot eliminate noises well during playback press SET or SET to eliminate the noises MANUAL TR will appear Press it briefly for a fine adjustment or press and hold for a coa...

Страница 26: ...ted the playback will be repeated endlessly Press VCR MENU until the menu screen is cleared To start the playback press PLAY The playback will be repeated endlessly TIMER REC SET AUTO REPEAT CHANNEL SETUP SYSTEM SETUP SELECT ENTER ENTER OFF MENU EXIT VCR SETUP TIMER REC SET AUTO REPEAT CHANNEL SETUP SYSTEM SETUP SELECT ENTER ENTER ON MENU EXIT VCR SETUP To cancel normal repeat mode Follow the abov...

Страница 27: ...red tape position The counter display will be reset to the 00 00 00 position e g the beginning of recording Press STOP when playback or recording is finished Press ZERO RETURN The tape will be rewinded or fast forwarded and automatically stop at the 00 00 00 position The CLOCK COUNTER button Press CLOCK COUNTER during the playback The clock and tape counter alternate with each other in the display...

Страница 28: ... off STOP may be pressed This short recording process will be sufficient to set an index mark This will result in about 10 seconds of the TV commercials to be overwritten by another recording Due to the system the end of this recording will be followed by a recording gap noise signal of approx 5 seconds Recording several Index Marks Due to the system only one index mark will be recorded at the beg...

Страница 29: ...cassette tape with the erase prevention tab intact The DVD VCR will auto matically turn on Select the program e g 29 you want to record with CH or number buttons 1 9 e g 5 press 5 10 80 e g 29 press 2 and 9 If a recording in Long Play mode is intended press SP LP to display LP Press REC OTR to start recording If the erase prevention tab is removed the tape will eject when REC OTR is pressed for re...

Страница 30: ...o Display VCR operation Status Press CALL The clock day of the week and more informations will be indicated To cancel the indicating Press CALL until all indicator disappear REC 4 8 4 To find unrecorded blank areas on a tape The DVD VCR searches for blank sections of tape in the direction of fast forwarding and automatically stops the tape when one is found Press BLANK SEARCH The tape automaticall...

Страница 31: ...te tape with the erase prevention tab intact The DVD VCR will automatically turn on Select the program e g 29 you want to record with CH or number buttons 1 9 e g 5 press 5 10 80 e g 29 press 2 and 9 If a recording in Long Play mode is intended press SP LP to dis play LP Press REC OTR twice The recording will start and stop after 30 minutes Each additional press of REC OTR will increase the record...

Страница 32: ...l change to that the timer setting will have to be set Preparation Turn ON the TV and set to the AV input mode Press VCR to select the VCR mode The VCR indicator will light Load a video cassette with the erase prevention tab intact Make sure with CALL that the time and date are correct see page 31 Example Timer recording for channel 1 13 00 to 14 30 with Tape speed LP on timer program number 1 Pre...

Страница 33: ...e DVD VCR to remove the cassette tape During timer recording standby mode the VCR mode cannot be selected To use the VCR press TIMER REC at first then press VCR to change to VCR mode After you use the VCR press TIMER REC again to put the VCR into timer recording standby mode Timer Recording Special Case Weekly e g WKL TUE each Tuesday or daily e g MON SAT Monday to Saturday Timer recording Follow ...

Страница 34: ...output from the RF OUT jack is monaural Preparation Turn ON the TV and set to the AV input mode Press VCR to select the VCR mode The VCR indicator will light NICAM stereo sound reception Press VCR MENU Press or to select VCR SETUP Then press ENTER Press or to select NICAM Then press or ENTER to select AUTO Press VCR MENU repeatedly until the TV picture appears NICAM programmes are divided into 4 t...

Страница 35: ...annel signal output from both loudspeakers Left channel signal output from both loudspeakers STEREO BILINGUAL Note When playing Hi Fi cassette tapes re corded on another VCR the sound out put may be distorted This is normal and no indication of a unit malfunction Try to minimize sound distortions by using SET orchangetoMONObypressing AUDIO SELECT German A2 stereo sound reception Stereo program ind...

Страница 36: ...T CHANNEL SETUP SYSTEM SETUP SELECT ENTER ENTER OFF MENU EXIT VCR SETUP Colour system selection 1 Press VCR MENU Press or to select VCR SETUP Then press ENTER Press or to select COLOUR SYSTEM 2 Press or ENTER to select AUTO MESECAM or PAL Colour system usually used in AUTO position But when you play back the tape recorded in the MESECAM colour system select the MESECAM position 3 This unit can als...

Страница 37: ...owyoucanseethestillpictureofthescenethat you wish to duplicate Press PAUSE STEP of both units simultaneously to start the duplicating Note Beforestartingtheduplicatingprocess selecttheproper tape speed using SP LP For a pre recorded tape the correct tape speed will be set automatically during playback Duplicating a disc material onto a video tape You can record disc material in DVD Video CD Audio ...

Страница 38: ...contain several items These are assigned to tracks On handling Discs Do not touch the playback side of the disc Do not attach paper or tape to discs Removing Disc from Case Be sure to hold the edge of disc Do not touch the surface of the disc Pick up the disc gently from the case Do not scratch the disc Do not get dirt on the surface of the disc Do not stick a label or adhesive tape on the disc Do...

Страница 39: ...brand of Media card Do not use commercially sold labels which can cause a malfunction when the card is inserted or ejected When ejecting the Media card after extended use it may feel warm to the touch This is normal The Me dia card is not malfunctioning For instructions on using your Media card refer to the owner s manual for your Media card This unit can play the following cards Do not insert any...

Страница 40: ...selected and play commences Press OPEN CLOSE The disc tray opens Place the disc on the disc tray With the playback side down Basic playback 4 2 5 To start playback in the stop mode Press PLAY OR Reading Disc This section shows you the basics on how to play a disc 3 Preparations When you want to view a disc turn on the TV and select the corresponding AV input connected to the DVD VCR This may inclu...

Страница 41: ... unit during playback Doing so may damage the disc Use OPEN CLOSE to open and close the disc tray Do not push the disc tray while it is moving Doing so may cause the unit to malfunction Do not push up on the disc tray or put any objects other than discs on the disc tray Doing so may cause the unit to malfunction In many instances a menu screen will appear after playback of a movie is completed Pro...

Страница 42: ...e or fast forward directions Press REV or FWD during playback REV Fast reverse playback FWD Fast forward playback Each time you press the REV or FWD button the playback speed changes To resume normal playback Press PLAY Note The sound is muted during frame by frame playback Playback starts from the beginning of the current chapter or track When you press twice in quick successions playback starts ...

Страница 43: ...n the case of VCD CD disc time and track are used to locate the desired point to playback To check the title chapter and time press DISPLAY 1 4 2 3 Note In case of the Video CD playback with PBC the Search Jump function does not work To turn off PBC see page 50 Press SEARCH during playback or stop mode Time only works in playback or resume stop mode Press or to select the Time Title or Chapter Pre...

Страница 44: ... fail to appear To cancel the Marker Follow the above steps 1 2 then press CLEAR Marker 2 Marker 1 Marker 3 Enter Clear Marker Marker 2 Marker 1 Marker 3 Enter Clear Marker 27 00 54 Marker 2 Marker 1 Marker 3 Enter Clear Marker 27 16 08 54 25 31 00 01 02 Marker 2 Marker 1 Marker 3 Enter Clear Marker Press MARKER during playback Press MARKER to remove this display Press ENTER Playback starts from t...

Страница 45: ...le to set A B Repeat during certain scenes of the DVD A B Repeat does not work with an interactive DVD MP3 JPEG CD A B Repeat is prohibited when PBC is on To resume normal playback Press A B RPT again Off appears on the screen A B Repeat Off Play Mode Play Mode Off Repeat Off Play Mode Notes Some discs may not work with the repeat operation In case of Video CD with PBC repeat functions are prohib ...

Страница 46: ... Number buttons 0 9 to select the track number to be replaced To clear the program one by one In the program mode press to select the track number Then press CLEAR To clear all the programs In the program mode press to select Clear Then press ENTER Press to select Play Mode then press to select Program Press or to select the program ming position Use Numbered buttons 0 9 to input the track or file...

Страница 47: ...an select the desired title 1 Press ENTER or PLAY The playback of the selected title will start 3 Note Depending on the DVD you may not be able to select the title Depending on the DVD a title menu may simply be called a menu or title in the instructions supplied with the disc 2 DVD menu Press to select the desired item Some DVDs allow you to select the disc contents using the menu When you play b...

Страница 48: ...n display will disappear after a few seconds 1 2 To cancel Surround mode Follow the left steps 1 2 then press B or A to select the Off position Notes The QSound is effective only for the sound of disc The QSound setting can also be changed in the function setting see page 57 During disc playback press AUDIO QSound On 1 8 Eng Dolby Digital Manufactured under license from QSound Labs Inc U S patent ...

Страница 49: ...ngDolby Digital Eng 00 12 04 32 00 12 04 32 Track PBC 34 56 71 33 Track 11 99 To make status display disappear press DISPLAY again Audio CD Disc status To turn off the PBC Disc status To turn off the PBC Press to select Play Mode then press to select Off 1Press PLAY MODE in the stop mode 2 Press PLAY MODE again to make the screen disappear 3 Follow the above steps 1 2 then press or to select PBC N...

Страница 50: ... to a maximum of 50 directories per disc MP3 JPEG DivX files cannot be used for the purpose of recording If the CD Card has both audio tracks and MP3 JPEG DivX files only audio tracks are played It may take more than one minute for this unit to read MP3 JPEG DivX files depending on its structure Music recorded by Joliet Recording Specification can be played back the file name is displayed within 1...

Страница 51: ...t JPEG DivX file is played back 3 0 9 Enter Play Mode 1 72 2 3 4 5 Japan CD Bay Bridge CLOSE MY EYES DIVE TO BLUE Honey 8 9 10 11 12 flower Lies and Truth winter fall Rain Strawberry 6 BLUE EYES 13 Welcome party 7 Blurry Eyes 14 Thailand Pops 0 9 Enter Play Mode 15 72 16 Mother CD Hold Your Last Pops Press ENTER The selected file starts playing back 4 Press STOP to end playback The unit records th...

Страница 52: ...ed starting file for the slide show in the step 3 as left 2Press ENTER to start slide show from the se lected file If you press PAUSE during the slide show the slide show stops temporary 4 appears briefly on the pic ture If the picture appears upside down or sideways press ANGLE repeatedly until it s right side up or appears briefly on the screen Press PLAY or SKIP again to resume the slide show W...

Страница 53: ...rst file is an MP3 file only MP3 files are played back in order MP3 JPEG DivX operation If the incorrect DRM file is loaded Authorization Error This player is not authorized to play this video will appear on the screen When you attempt to play DivX VOD the number of plays is limited and the right message will appear on the screen If you wish to play it select YES If the number of plays goes over t...

Страница 54: ...er Setup Return Setting details Page 56 57 58 Section Customizing the function settings Details To select the language of Menu Subtitle and Audio if more than one language are available on the disc To select On or Off for E B L Enhanced Black Level To select a picture size according to the aspect ratio of your TV To turn on or de activate the operational status display on the screen To select a pr...

Страница 55: ...5 IRE cut off TV Screen You have the following screen sizes to choose from 4 3 Letter box Select this mode when connecting to a conven tional TV When playing back a wide screen DVD disc it displays the wide picture with black bands at the top and bottom of screen 4 3 Pan scan It displays the wide picture on the whole screen with left and right edges automatically cut off 16 9 Wide Select this mode...

Страница 56: ...ctures in the progressive output format appropriately Suitable for playback of film content pictures The progressive output feature will be most effective under this selection Video The DVD player filters video signal and converts it in the progressive output format appropriately Suitable for playback of video content pictures Note Depending on the disc pictures may be cut off or doubled In this c...

Страница 57: ...ry disabling of rating level by DVD disc on page 59 Notes Depending on the discs the unit cannot limit playback Some discs may not be encoded with specific rating level information though its disc jacket says adult For those discs the age restriction will not work Output You can select the video output signal of the DVD VCR to the TV from RGB Component or Progressive RGB Select when connecting to ...

Страница 58: ... YES with the ENTER key Your disc exceeds the parental control level screen will then appear If you wish to cancel the set rating level temporar ily select Parental Control Level with or then press ENTER If the 4 digit password at step 2 on page 58 has been set the password entering screen will appear as shown in step 4 Alternatively if the password has not been set playback will commence If you d...

Страница 59: ...bi 2611 Tigrinya 3019 Bulgarian 1217 Indonesian 1924 Pashto Pushto 2629 Tonga 3025 Burmese 2335 Interlingua 1911 Persian 1611 Turkish 3028 Byelorussian 1215 Irish 1711 Polish 2622 Turkmen 3021 Cambodian 2123 Italian 1930 Portuguese 2630 Twi 3033 Catalan 1311 Japanese 2011 Quechua 2731 Ukrainian 3121 Chinese 3618 Javanese 2033 Rhaeto Romance 2823 Urdu 3128 Corsican 1325 Kannada 2124 Romanian 2825 U...

Страница 60: ... not set to the AV input mode Check the unit is connected correctly The video input selector of the TV is not set to VIDEO Set to VIDEO or equivalent Channel is set to the external mode No sound Check the unit is connected correctly Check the input selector of the amplifier is set properly The unit is in the Special playback mode 11 14 11 13 11 13 26 43 Select proper language in the menu options D...

Страница 61: ... disc 15 58 56 Video Head Clogging The video heads record and playback pictures and sound on the video tape In the event that they become dirty you won t beabletodoaperfectrecordingandtheplaybackpicturewill be extremely snowy Also keep in mind that a poor tape quality and a damaged cassette may contribute to the rapid accumulation of dirt on the heads Automatic Head Cleaning System The Automatic H...

Страница 62: ... Vp p 75 SCART socket VIDEO 1 Vp p 75 AUDIO 500 mV 1 k Audio OUT jack 500 mV 1 k 20Hz to 20 000Hz More than 75dB PAL MESECAM 4 Rotary Heads Hi Fi Sound 2 Tracks MONO Sound 1 Track E2 E12 X Z 2 S1 S41 E21 E69 UHF channel 60 23 to 69 Approx 1minute and 48 seconds with E 180 Cassette Tape PAL NTSC DVD 12cm 8cm CD 12cm 8cm DVD 4Hz 22KHz CD 4Hz 20KHz 90dB 0 06 Below Measurable Level Audio RCA 12dB 1 k ...

Страница 63: ...ld waste disposal service or the shop where you purchased the product ɋɥɟɞɭɸɳɚɹ ɢɧɮɨɪɦɚɰɢɹ ɬɨɥɶɤɨ ɞɥɹ ɝɨɫɭɞɚɪɫɬɜ ɱɥɟɧɨɜ ȿɋ Ⱦɚɧɧɵɣ ɫɢɦɜɨɥ ɨɡɧɚɱɚɟɬ ɱɬɨ ɷɬɨɬ ɩɪɨɞɭɤɬ ɧɟ ɦɨɠɟɬ ɪɚɫɫɦɚɬɪɢɜɚɬɶɫɹ ɜ ɤɚɱɟɫɬɜɟ ɛɵɬɨɜɵɯ ɨɬɯɨɞɨɜ ɍɞɨɫɬɨɜɟɪɢɜɲɢɫɶ ɱɬɨ ɭɬɢɥɢɡɚɰɢɹ ɩɪɨɞɭɤɬɚ ɩɪɨɢɡɜɟɞɟɧɚ ɩɪɚɜɢɥɶɧɵɦ ɨɛɪɚɡɨɦ ȼɵ ɬɟɦ ɫɚɦɵɦ ɩɨɦɨɠɟɬɟ ɩɪɟɞɨɬɜɪɚɬɢɬɶ ɩɨɬɟɧɰɢɚɥɶɧɵɟ ɧɟɝɚɬɢɜɧɵɟ ɩɨɫɥɟɞɫɬɜɢɹ ɞɥɹ ɨɤɪɭɠɚɸɳɟɣ ɫɪɟɞɵ ɢ ɡɞɨɪɨɜɶɹ ɱɟɥɨɜɟɤɚ ...

Отзывы: