background image

English

25

Digital

on-screen information and

Programme Guide

When viewing in 

digital

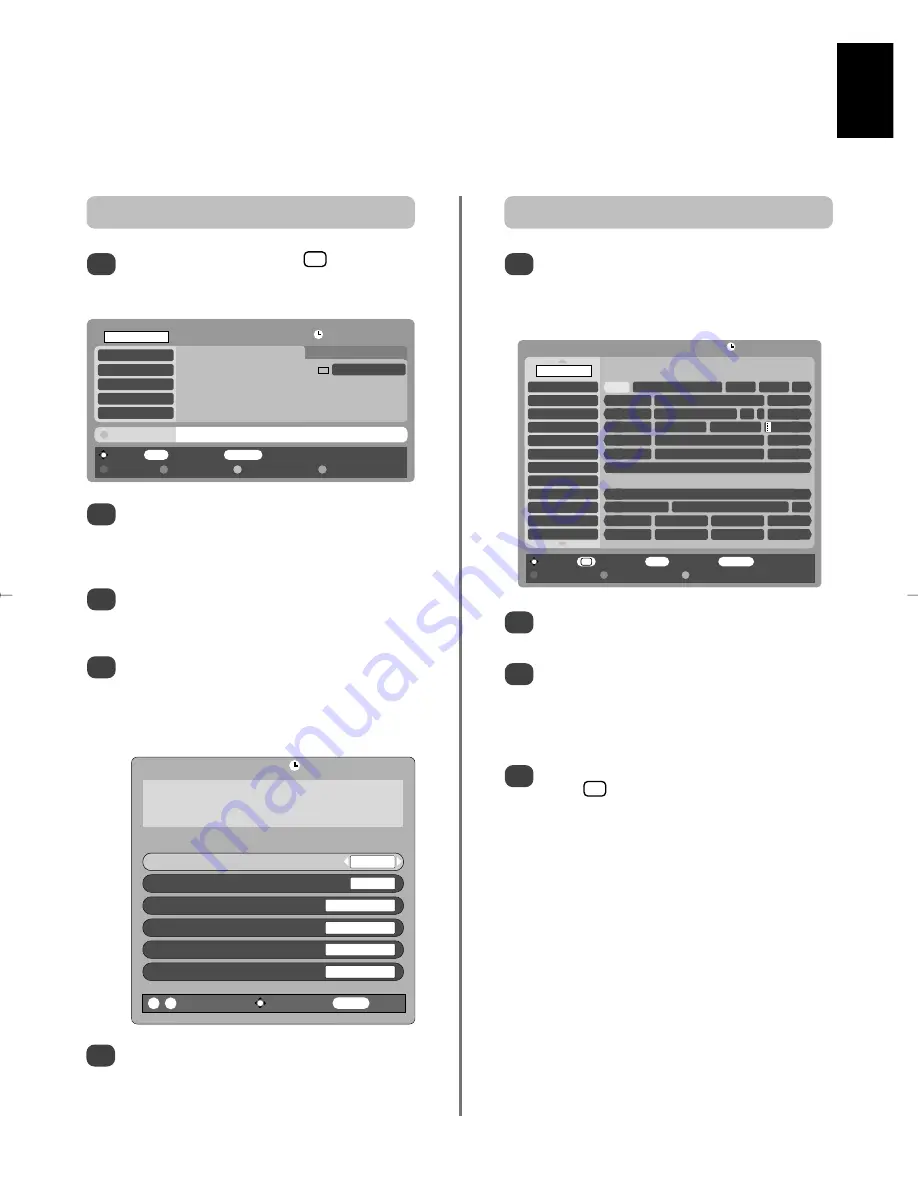
mode, the on-screen information and programme guide give access to programme

details for all available channels. 

The details of the programme will have been
added to the screen. Press 

OK 

to save.  

5

Information

Select information by pressing       , the
information screen will appear giving details of the
channel and programme currently being viewed. 

1

12:14 Fri, 13 Jan.

11:30   Bargain Hunt             

x

12:15 Cash in the Attic

1 minute left                           

I/II

ENTERTAINMENT

A bargain bought at Peterborough Fair makes double
its money at auction. [S] Then BBC News and Weather.

Showing also     Bobinogs starting in 5 minutes on CBeebies…

Guide

Select the on-screen guide by pressing 

GUIDE

, the

guide screen will appear highlighting details of the
channel and programme currently being viewed.
This may take a few moments to appear. 

1

Press 

S

or

R

for information of other programmes

scheduled for the channel selected. 

For details of other channels currently available,
press 

P

and 

Q

to scroll up and down the

channel list. As the channel is selected details of
the programme currently being broadcast will
appear, then press 

S

or

R

.

For information on a highlighted programme
press       . To set the timer for that programme
press the 

BLUE

button to bring up the

PROGRAMME TIMERS

menu.

NOTE:

Recording can be set from 

both

the

information screen and guide. In order for the
recording operation to work the media recorder
must be AV link compatible.

2

3

4

To see details of any of the other channels currently
available, press 

P

and 

Q

to scroll up and down the

channel list. As the channel is selected details of the
programme currently being broadcast will appear.

Pressing the 

YELLOW

button will activate 

Showing

also

, giving details of programmes which have

started on other channels.

To record the following programme, with the
information guide showing, press 

R

. The 

Tune

option in the bottom section of the screen will
change to 

Record

, press 

OK

. The 

SET TIMER

screen will appear.

2

3

4

SET TIMER

Start Time                                                01:25

End Time                                                 

02:55

Repeat

ONCE

Auto-start VCR

NO

Subtitles

NONE

Audio Language

ENGLISH

0

-

9

Enter Number         Save Timer   

MENU

Cancel

12:18 Fri, 13 Jan.

BBC News

001     BBC ONE           13:00-13:28    Fri, 13 Jan.  

12.18 Fri, 13 Jan.

Page Up               Page Down               Timers 

i

+

i

+

Bargain Hunt

ALL PROGS

BBC ONE

BBC TWO
ITV1
Channel 4
five
ITV2
BBC THREE
8
BBC FOUR
ITV3
Sky Travel
UKTV History

Friday

12:00           12:30           13:00            13:30

Barga    

Cash in the Attic               BBC Ne   Spotli     Neig

The Daily Po   Working Lunch    

World Prof

This Mornin    ITV News                       We  It   Today Wit

News at No    Whats in

Cheers                The Way 

Home and A   Brainteaser                                 Born to S

Judge Judy     The Jeremy Kyle Show              Airline

This is BBC THREE

This is BBC FOUR

Kojak                      Quincy     

Quin

Canaries on    Douglas Che      Floyd Around    Beauty Sch

What the St    What the Vi       Fred Dibnah'     Fred Dibna

Tune      

EXIT

Watch TV     

TV/FAV

Change progs

Page Up         Page Down          Showing also         Languages

Record              More info     

EXIT

Watch TV     

TV/FAV

Change progs

i

+

ALL PROGS         

BBC ONE

BBC TWO
ITV1
Channel 4
five

g

Содержание Regza 26WLG66

Страница 1: ...WLG66 67 Series Owner s manual Manuel de l utilisateur Bedienungsanleitung TOSHIBA ...

Страница 2: ...n viewing 18 Picture controls picture position analogue only back light 20 Picture controls picture preferences contrast brightness colour tint sharpness black stretch MPEG noise reduction MPEG NR digital noise reduction DNR colour temperature 21 Picture controls 3D colour management base colour adjustment cinema mode antenna amplifier 22 Picture controls automatic format widescreen blue screen si...

Страница 3: ... switch off withdraw the mains plug and consult your dealer ABOVE ALL NEVER let anyone especially children push or hit the screen push anything into holes slots or any other openings in the case NEVER guess or take chances with electrical equipment of any kind it is better to be safe than sorry Leave at least 10cm clearance around the television to allow adequate ventilation This will prevent over...

Страница 4: ...LUSION CLAUSE Toshiba shall under no circumstances be liable for loss and or damage to the product caused by i fire ii earthquake iii accidental damage iv intentional misuse of the product v use of the product in improper conditions vi loss and or damage caused to the product whilst in the possession of a third party vii any damage or loss caused as a result of the owner s failure and or neglect t...

Страница 5: ...fective range of the remote To alter the volume To display digital on screen information To call up text services in analogue mode Text To exit Menus Selectable picture preferences To mute the sound To select input from external sources To select mode Widescreen viewing On screen Menus To change programme positions and text pages To display the digital on screen Programme Guide To switch between T...

Страница 6: ...y pressing the desired programme position button To recall external equipment press Bto select between DTV EXT1 EXT2 EXT3 C HDMI1 HDMI2 PC or ATV The cable holder can be used for aerial media recorder and audio cables Do not use the cable holder as a handle and make sure all cables are removed before moving the television HDMI the HDMI logo and High Definition Multimedia Interface are trademarks o...

Страница 7: ... x 480 60 Hz VESA SVGA 800 x 600 60 Hz VESA XGA 1024 x 768 60 Hz VESA SXGA 1280 x 1024 60 Hz VESA IMPORTANT NOTE SXGA will display but it will not be to VESA standard PLEASE NOTE Some PC models cannot be connected to this television An adaptor is not needed for computers with a DOS V compatible mini D sub 15 pin terminal A band may appear at the edges of the screen or parts of the picture may be o...

Страница 8: ... the Input press Buntil the display shows EXT3 as described on page 31 The television will automatically sense the type of signal Please always refer to the owner s manual of the equipment to be connected for full details Please note Inserting the headphone plug will mute the sound from all speakers Switching on Using the controls and connections Standby GREEN LED Active standby RED LED Power on I...

Страница 9: ...K to view When the search is complete the television will automatically select programme one The AUTO TUNING screen will display the total number of services found NOTE The time will be set automatically by transmission but can be advanced or decreased by up to 2 hours using Local Time Settings Change Watch Page Up Page Down Sort AUTO TUNING 86 programmes found 55 TV 24 Radio Press OK to watch pro...

Страница 10: ...arch for all available stations You must allow the television to complete the search When the search is complete the AUTO TUNING screen will display the total number of services found Auto tuning 1 Press MENU the SETUP MENU will appear Use Q to highlight Auto tuning Press OK A screen will appear warning that previous digital programmes and settings will be deleted Press OK to continue with the Aut...

Страница 11: ...sary then press EXIT 1 2 3 Select Manual tuning from the SETUP MENU and press OK Enter the multiplex number using the number buttons and then press OK The television will automatically search for that multiplex When the multiplex is found any channels not currently on the programme list will be added and the programme information at the top of the screen will be updated Repeat as necessary Press E...

Страница 12: ...search progresses You must allow the television to complete the search When the search is complete the television will automatically select programme position 1 and the Manual tuning screen will appear Use Q or P to move through the list to select a programme then press EXIT to view The station order may be changed using the Manual tuning screen see the analogue Sorting programme positions section...

Страница 13: ...up and down for a signal Manual fine tuning Only used if interference weak signal is experienced See page 35 Station Station identification Use the P or Q and Sor Rbuttons to enter up to seven characters Station Programme System Colour system Channel Search Programme skip Manual fine tuning Use P or Q to highlight the programme position required e g we suggest Prog 0 for a media recorder Press MEN...

Страница 14: ... With P Q S and R put in the required characters e g VCR This television has direct channel entry if the channel numbers are known Select the Manual tuning screen in Step 3 Enter the Programme number the System then C for standard terrestrial channels or S for cable channels and the Channel number Press OK to store 8 Press OK to store Repeat for each programme position you want to tune or press ME...

Страница 15: ...n can be skipped The remote control must be removed as the channels will still be available using the number buttons Programmes can then be watched as normal using the controls on the television but the television will not show the skipped programme position Programme skip Select Manual tuning from the SET UP menu 1 Channels may be moved and stored on the programme position of your choice Sorting ...

Страница 16: ...tions can also be selected using Pfand P e To revert to the previous programme position press To display on screen information i e programme position channels or stereo mono signal press Press again to cancel Selecting programme positions Sound controls The time display facility allows the current text service time to be seen on the television screen Press 8 9whilst watching a normal television br...

Страница 17: ...o suit your preference 1 2 Bass boost enhances the depth of the sound The difference will only be noticeable on sound with a strong bass 1 2 Press MENU and select the SOUND menu Use P or Q to highlight WOW then press OK 3 4 5 Press Q to highlight SRS 3D and using S or Rselect between On or Off Then press Q to highlight FOCUS and press S or Rto select between On or Off Highlight TruBass and use S o...

Страница 18: ... Exact Scan Wide Super Live 2 Cinema 2 4 3 Super Live 1 Cinema 1 Subtitle and 14 9 SUPER LIVE 2 If a side panel format signal is being received this setting will enlarge the image to fit the screen by stretching the image horizontally and vertically holding the correct proportions at the centre of the image Some distortion may occur CINEMA 1 When watching letterbox format films video tapes this se...

Страница 19: ... to change the size of the displayed image i e changing the height width ratio for the purposes of public display or commercial gain may infringe on copyright laws Exact Scan Wide Super Live 2 Cinema 2 4 3 Super Live 1 Cinema 1 Subtitle 14 9 Use this setting when watching a 1080i source it will display the image as transmitted without scaling or cropping the picture EXACT SCAN This option is only ...

Страница 20: ...3 In the Picture settings menu press Q to select Back light Press S or R to adjust 2 3 In the PICTURE menu press Q to select Picture settings then press OK 1 Adjusting the Back light can improve the clarity of the screen when viewing Back light Picture position Horizontal position 0 Vertical position 0 Reset OK MENU Back EXIT Watch TV Picture settings Back light 100 Contrast 100 Brightness 50 Colo...

Страница 21: ...Using the MPEG NR feature reduces this effect by smoothing out the edges MPEG NR Noise Reduction Select MPEG NR from the Picture settings menu Use S or R to select a setting to suit your preference 1 Black Stretch increases the strength of dark areas of the picture which improves the definition Black stretch Press S or R to select between Onand Off The effect depends on the broadcast and is most n...

Страница 22: ...ase colour adjustment feature to become available 3D Colour management In the PICTURE menu press Q to select 3D Colour management Press S or R to select On or Off 1 2 To return to the original factory settings select Reset and press OK Base colour adjustment Hue Saturation Brightness Red 2 6 4 Green 0 0 0 Blue 0 0 0 Yellow 0 0 0 Magenta 0 0 0 Cyan 0 0 0 Reset OK MENU Back EXIT Watch TV In the PICT...

Страница 23: ...so make viewing in bright or dark conditions more comfortable Picture controls continued panel lock Automatic format Widescreen When this television receives a true Widescreen picture and Auto format is On it will automatically be displayed in Widescreen format irrespective of the television s previous setting Blue screen When Blue screen is selected the screen will turn blue and the sound will be...

Страница 24: ...ed then press OK The SET TIMER menu will now appear on screen Press P and Q to go through the list adding the details of the programme to be timed by using the number buttons and S and R to make selections 2 3 4 When all the details have been entered press OK to save the timer Auto start VCR If your Toshiba media recorder is AV link compatible setting this feature to YES will auto start stop a rec...

Страница 25: ...e In order for the recording operation to work the media recorder must be AV link compatible 2 3 4 To see details of any of the other channels currently available press P and Q to scroll up and down the channel list As the channel is selected details of the programme currently being broadcast will appear Pressing the YELLOW button will activate Showing also giving details of programmes which have ...

Страница 26: ... press Q to select Mode 2 Use S or R to choose between ON OFF LOCK MENU and LOCK INSTALL When menus that have been locked are now selected they will only become available when the PIN is entered 2 Use Q to select Parental Control then press OK Press Q to highlight Change Pin then press OK 3 4 Using the number buttons enter a four digit number when these have been entered the screen will ask you to...

Страница 27: ...ed Programme Yes 1 BBC ONE 2 BBC TWO 7 BBC THREE 10 BBC FOUR 30 CBBC Channel 31 CBeebies Favourite Programmes creates a list of the digital channels that are watched most Four lists can be created these can be a mixture of television text and radio channels Selecting favourite programmes 1 From the FEATURE MENU press Q to select Favourite and Locked Programmes 2 3 4 Use P and Q to go through the l...

Страница 28: ...t the CAM and card into the Common Interface Slot following the instructions provided with the CAM A box will appear on screen to confirm that the CAM is loaded From the FEATURE MENU press P or Q to select Common Interface Slots 3 Details of the CAM should now be available Use OK to select it If two CAMs are inserted use S or R to select between the two Press MENU and then press Q until Reset TV i...

Страница 29: ...oftware upgrade for this TV Searching EXIT Stop NO UPGRADE AVAILABLE There is no upgrade available at this time Continue 1 2 In the SOFTWARE UPGRADE menu press P or Q to select Auto upgrade Use S or R to select ON or OFF If preferred software upgrades can be searched for manually using Search for New Software Searching for new software 1 In the SOFTWARE UPGRADE menu press P or Q to select Search f...

Страница 30: ...Connecting a PC section and ensure that a picture is showing on the television screen The picture position may now be adjusted to suit personal preference Press Bto select PC then select PC Setting from the SET UP menu 1 Press OK Press P and Q to select an option then S or R to adjust the settings 2 3 Press OK In the SET UP menu press Q until PC Setting is highlighted Press OK to select then Q to ...

Страница 31: ...il AV connection is highlighted then press OK With S or R select either AV or S VIDEO as the required input for EXT2 If the colour is missing try the alternative setting INPUT signal selection 1 2 2 Press Bto select B1 B2 B3 C EXT1 3 HDMI1 HDMI2 or PC HDMI displays equipment connected to Input HDMI on the back of the television It is designed for best performance with 1080i high definition signals...

Страница 32: ...arks or registered trademarks of HDMI Licensing LLC HDMI1 audio If the connected HDMI source does not support digital audio plug the audio cable into PC HDMI1 audio on the back of the television as shown in the Connecting a computer section then use the HDMI1 audio settings In the AV connection menu press Q to highlight PC HDMI1 audio and using R select HDMI1 Then highlight HDMI1 audio and using S...

Страница 33: ...loured buttons or pressing P fto advance to the next page and P eto go back to the previous page Sub pages If there are sub pages they will automatically load into memory without changing the page on screen To access the sub pages press Xthen use P fand P e to view them A bar with numbers will appear on the side of the screen Navigating pages using Auto Text information The four coloured choices a...

Страница 34: ...y The news flash page must be cancelled before changing programmes To display the index initial page T At times it is convenient to hold a page of text Press q and qwill appear in the top left of the screen The page will be held on screen until the button is pressed again To hold a wanted page q To discover the solutions on quiz and joke pages press the rbutton To reveal concealed text r Press 6 7...

Страница 35: ... Auto to automatically display the best colour system To check that you have the best colour There is a picture but why is there little or no colour Q With the external source playing select Manual setting from the SET UP menu With P or Q choose between Auto PAL SECAM NTSC 4 43 or 3 58 1 2 Questions and Answers Select the Manual tuning menu Highlight the station and press OK then press R to select...

Страница 36: ... highlight Sampling clock and adjust until the lines clear Why are there vertical stripes on the screen when in PC mode Q A The digital programme being viewed is not broadcasting digital text Try another digital programme Why is there no digital text service Q A The channel has been selected in Locked Programmes see Digital settings section Why is the digital channel locked Q A A Favourite list ha...

Страница 37: ...ased the product A Text has been selected whilst viewing an external source i e DVD or VCR No text will appear on screen or a box may appear stating no information is available Select a broadcasting channel and press 6 7to access Why are the four coloured text numbers visible but no text Q A Connect the source via a SCART lead and play Select Manual setting from the SET UP menu Why are the colours...

Страница 38: ...cts Division European Service Centre Admiralty Way Camberley Surrey GU15 3DT UK Specification is subject to change without notice Originated by Zushi Illustration Visualisation Bristol UK Toshiba Information Systems U K Limited All rights reserved Reproduction in whole or part without written permission is strictly prohibited Printed on recycled paper 100 Chlorine free Stereo Nicam 2 carrier syste...

Страница 39: ......

Страница 40: ...age position de l image analogique seulement rétroéclairage 58 Commandes de l image préférences d image contraste lumière couleur teinte définition étirage du noir réduction du bruit MPEG MPEG NR réduction numérique du bruit DNR température des couleurs 59 Commandes de l image gestion de la couleur 3D réglage des couleurs de base mode cinéma amplificateur d antenne 60 Commandes de l image format a...

Страница 41: ...rité de votre appareil FAITES ATTENTION aux panneaux ou aux portes en verre de l appareil Ventilation Chaleur excessive Alimentation secteur Conseils N OBSTRUEZ PAS les ouvertures de ventilation de l appareil par exemple par des journaux nappes rideaux etc Une surchauffe endommagera l équipement et réduira sa durée de vie NE LAISSEZ PAS l appareil exposé à des gouttes ou éclaboussures et n y place...

Страница 42: ... sont affichés sur l écran de télévision pendant un certain temps il est vivement conseillé de réduire les réglages de luminosité et de contraste Placez le téléviseur à l abri de la lumière directe du soleil et des éclairages puissants Un éclairage doux et indirect est recommandé pour un meilleur confort de visualisation Utilisez des rideaux ou des stores pour empêcher que la lumière du soleil n é...

Страница 43: ...icher des informations numériques à l écran Pour appeler les services de texte en mode analogique Touches de commande de texte Pour quitter les Menus Sélection des préférences d affichage Pour couper le son Pour sélectionner une entrée parmi des sources externes Pour sélectionner le mode Représentation grand écran Menus à l écran Pour modifier les positions de programme el les pages texte Pour aff...

Страница 44: ...bles péritel Raccordez la prise IN OUT de l enregistreur média au téléviseur Raccordez la prise TV du décodeur au téléviseur Raccordez la prise SAT de l enregistreur média à la prise MEDIA REC du décodeur Avant de démarrer la Recherche automatique mettez votre décodeur et votre enregistreur média en mode Veille Les prises phono à côté des prises ENTRÉE VIDEO COMPOSANT accepteront des signaux audio...

Страница 45: ...e partie de l image soit obscurcie du fait de la mise à l échelle effectuée par le téléviseur Ceci est tout à fait normal Information de signal pour le connecteur Mini D sub à 15 broches Affectation des broches pour la borne RGB PC N de Nom du signal N de Nom du signal broche broche 1 R 9 NC 2 G 10 Terre 3 B 11 NC 4 NC non connectée 12 NC 5 NC 13 H sync 6 Terre 14 V sync 7 Terre 15 NC 8 Terre Un f...

Страница 46: ...rises phono du téléviseur Pour sélectionner l Entrée appuyez sur Bjusqu à ce que le symbole EXT3 apparaisse comme décrit page 69 Le téléviseur détectera automatiquement le type de signal Pour plus de détails référez vous toujours au mode d emploi de l appareil à brancher Veuillez noter l insertion de la fiche du casque d écoute coupera le son des haut parleurs Mise en marche Utilisation des comman...

Страница 47: ...ition de programme 1 L écran RECHERCHE AUTOMATIQUE affiche le nombre total de services détectés RECHERCHE AUTOMATIQUE 86 chaînes trouvées 55 TV 24 Radio Appuyer sur OK pour regarder le programme Prog Nom Type U VHF Qualité 1 TF1 34 BONNE 2 France 2 34 BONNE 3 France 3 31 BONNE 4 CANAL 31 FAIBLE 5 France 5 48 BONNE 6 M6 31 FAIBLE A l aide de la touche Q mettez Country en surbrillance puis utilisez ...

Страница 48: ...s Vous devez laisser le téléviseur mener la recherche jusqu à son terme Quand la recherche est terminée l écran RECHERCHE AUTOMATIQUE indique le nombre total de services détectés Recherche automatique 1 Appuyez sur MENU Le MENU REGLAGE s affiche Sélectionnez Recherche automatique à l aide de la touche Q Appuyez sur OK Un écran s affiche pour vous prévenir que les programmes et réglages numériques ...

Страница 49: ...Sélectionnez Recherche manuelle dans le MENU REGLAGE puis appuyez sur OK Entrez le numéro multiplex à l aide des touches numériques puis appuyez sur OK Le téléviseur effectue ensuite une recherche automatique de ce multiplex Une fois le multiplex trouvé tous les canaux ne figurant pas dans la liste des programmes sont ajoutés et les informations de programme en haut de l écran sont mises à jour Ré...

Страница 50: ...me 1 et l écran Recherche manuelle s affiche Utilisez Q ou P pour vous déplacer dans la liste afin de sélectionner un programme puis appuyez sur EXIT pour le visualiser L ordre des chaînes peut être modifié à l aide de l écran Recherche manuelle voir la section analogique Tri des positions de programme Si à tout moment vous appuyez sur la touche Ben la maintenant enfoncée une liste s affichera à l...

Страница 51: ...cer la recherche 7 5 6 Analogique recherche manuelle Le téléviseur peut être réglé manuellement à l aide de la Recherche manuelle quand par exemple il est impossible de raccorder un enregistreur média décodeur à l aide d un câble Péritel ou pour régler une chaîne sur un autre Système Pour affecter une position de programme du téléviseur à un décodeur et un enregistreur média mettez le décodeur sou...

Страница 52: ...our sélectionner Le téléviseur cherchera maintenant les chaînes pour votre pays Appuyez sur Q pour mettre Recherche automatique en surbrillance puis appuyez sur OK Analogique recherche manuelle suite recherche automatique Lorsque le signal de votre enregistreur média est localisé appuyez sur R pour sélectionner Chaîne A l aide des touches P Q S et R entrez les caractères requis par ex MAG 8 Appuye...

Страница 53: ...chaîne Utilisez P ou Q pour mettre en marche Saut de chaîne Appuyer sur OK Le symbole affiché à l écran indique que la position de programme est bloquée Pour empêcher la visualisation de certains programmes vous pouvez effacer la position de programme Prenez soin de dissimuler la télécommande car les chaînes bloquées continuent d être accessibles par les touches numériques Les programmes continuer...

Страница 54: ...ition de programme utilisez les touches numériques de la télécommande Vous pouvez également sélectionner une position de programme à l aide des touches Pfet P e Pour revenir à la position de programme précédente appuyez sur Pour afficher des informations à l écran comme la position du programme les chaînes ou le signal stéréo mono appuyez sur Appuyez à nouveau pour annuler Sélection d une position...

Страница 55: ... régler le niveau à votre convenance 1 2 Super basses améliore la profondeur du son La différence ne sera perceptible que sur un son très grave 1 2 Appuyez sur MENU puis sélectionnez le menu SON Avec les touches P ou Q mettez en surbrillance WOW puis appuyez sur OK 3 4 5 Appuyez sur Q pour mettre SRS 3D en surbrillance puis sur S ouR pour sélectionner Marche ou Arrêt Appuyez ensuite sur Q pour met...

Страница 56: ...choisir entre Format réel Plein écran Cinéma2 Zoom2 4 3 Cinéma1 Zoom1 Sous titre et 14 9 CINÉMA2 Lors de la réception d un signal à bandes latérales noires ce format étire horizontalement et verticalement l image pour remplir l écran Bien que les proportions correctes soient maintenues au centre de l écran des déformations peuvent se produire ZOOM1 Lorsque vous regardez des films cassettes vidéo e...

Страница 57: ...n raison de la gamme de formats grand écran 16 9 14 9 20 9 etc vous verrez peut être apparaître des bandes noires en haut et en bas de l écran PLEIN ÉCRAN Utilisez ce réglage pour voir une émission en format 4 3 véritable 4 3 Utilisez ce réglage lors de la réception d une source 1080i l image diffusée s affichera sans mise à l échelle ni troncature FORMAT RÉEL Cette option est uniquement disponibl...

Страница 58: ...les options disponsibles pour le format d image sélectionné Appuyez sur P et Q pour sélectionner une option puis sur S ou R pour ajuster les réglages Les options varient en fonction du format grand écran choisi et de l equipement éventuellement raccordé En format Zoom2 2 3 Dans le menu Réglage image appuyez sur Q pour sélectionner Profondeur de noir Appuyez sur S ou R pour ajuster 2 3 Dans le menu...

Страница 59: ...U Retour EXIT Retour TV 2 2 Quand vous regardez un DVD la compression peut parfois entraîner la distorsion ou la pixelisation de certains mots ou composants de l image La fonction Réduction du bruit MPEG permet de réduire cet effet en adoucissant les bords MPEG NR Réduction du bruit Sélectionnez Réduction du bruit MPEG dans le menu Réglage image puis S ou R pour choisir le réglage vous convenant 1...

Страница 60: ...e Q pour sélectionner Gestion de a couleur 3D Appuyez sur S ou R pour sélectionnez Marche ou Arrêt 1 2 Pour revenir aux préréglages en usine sélectionnez Raz et appuyez sur OK Dans le menu IMAGE appuyez sur la touche Q pour sélectionner Mode Cinema Appuyez sur S ou R pour sélectionnez Marche ou Arrêt 1 2 Si le film ou l émission diffusés présente des lignes ou des bords irréguliers la fonction Mod...

Страница 61: ...permettra d éviter une image rémanente de la bande et peut également rendre plus confortables les conditions de visualisation dans des conditions de lumière vive ou très sombre Réglages de l image suite blocage du clavier Format automatique Grand écran Si ce téléviseur reçoit une image en format grand écran véritable et que la fonction Format auto est activée l émission sera automatiquement affich...

Страница 62: ...nner la première émission à programmer puis sur OK Le menu REGLER LA PROGRAMMATION s affiche alors à l écran Appuyez sur P et Q pour parcourir la liste et ajoutez les détails de l émission à programmer à l aide des touches S et R 2 3 4 Une fois tous les détails saisis appuyez sur OK pour mémoriser la programmation VCR Auto démarrage Si votre enregistreur média Toshiba est compatible avec une conne...

Страница 63: ...re quelques instants pour s afficher 1 Appuyez sur S ou R pour afficher des informations sur d autres émissions listées pour la chaîne sélectionnée Pour consulter les détails des autres chaînes disponibles appuyez sur P et Q pour parcourir la liste des chaînes Quand la chaîne est sélectionnée les détails de l émission en cours de diffusion s affichent Appuyez ensuite sur S ou R Pour obtenir des in...

Страница 64: ...r sélectionner Mode 2 A l aide des touches S et R choisissez MARCHE ARRÊT VERROU MENU ou VERROU INST Quand des menus bloqués sont sélectionnés ils deviennent seulement disponibles après la saisie du code PIN 2 Appuyez sur Q pour sélectionner Contrôle parental puis appuyez sur OK Appuyez sur Q pour mettre Changer code PIN en surbrillance puis appuyez sur OK 3 4 A l aide des touches numériques entre...

Страница 65: ...ir PROGRAMMES FAVORIS ET VERROUILLES Verrouillé Programme Oui 1 TF1 2 France 2 7 France 3 10 CANAL 30 France 5 31 M6 L options Programmes favoris permet de créer une liste des chaînes numériques le plus souvent regardées Il est possible de créer quatre listes qui peuvent chacune contenir un assortiment de chaînes de télévision texte et radio Sélection des programmes favoris 1 Dans AUTRE MENU appuy...

Страница 66: ...e Ceux ci peuvent être obtenus auprès d un fournisseur de service et permettent de visualiser des émissions disponibles avec un abonnement Pour obtenir des compléments d information veuillez contacter un fournisseur de service Interface commune 1 2 Insérez le CAM et la carte dans le connecteur d interface commune en suivant les instructions accompagnant le CAM Un message s affiche à l écran pour c...

Страница 67: ... deux versions est disponible EN COURS DE RECHERCHE NOUVEAU LOGICIEL Recherche en cours d un nouvelle mise à jour logicielle pour ce TV Progrès EXIT Stop AUCUNE MISE A JOUR DISPONIBLE Aucune mise à jour disponible actuellement Continuer 1 2 Dans le menu MISE A JOUR LOGICIEL appuyez sur P ou Q pour sélectionner Mise à jour automatique Utilisez S ou R pour sélectionner MARCHE ou ARRÊT Les mises à ni...

Страница 68: ...oit mis en surbrillance Appuyez sur OK pour sélectionner puis sur Q pour mettre en surbrillance horloge 1 2 L ajustement de horloge permet de modifier le nombre d impulsions par balayage ce qui effacera les lignes verticales sur l écran Horloge d échantillonnage Position d image Connectez le PC conformément aux instructions de la section Connexion d un ordinateur et assurez vous qu une image s aff...

Страница 69: ... jusqu à ce que la fonction Connexions AV soit en surbrillance puis appuyez sur OK Avec S ou R sélectionnez soit AV ou S VIDEO comme entrée requise pour EXT2 Si vous obtenez une image en noir et blanc essayez l autre position Sélection du signal d ENTREE 1 2 2 Appuyez sur Bpour sélectionner B1 B2 B3 C EXT1 3 HDMI1 HDMI2 ou PC HDMI affiche un équipement connecté à l Entrée HDMI à l arrière du télév...

Страница 70: ...ource HDMI connectée n est pas compatible avec l audio numérique branchez le câble audio sur PC HDMI1 Audio à l arrière du téléviseur reportez vous au chapitre Connexion d un ordinateur puis utilisez les réglages HDMI1 Audio Dans le menu Connexions AV appuyez sur Q pour mettre en surbrillance PC HDMI1 audio et appuyez sur R pour sélectionner HDMI1 Mettez ensuite en surbrillance HDMI1 Audio et appu...

Страница 71: ... contenant des chiffres apparaîtra sur le côté de l écran Si Fastext est disponible vous verrez apparaître quatre titres en couleur au bas de l écran Pour accéder à l une des quatre rubriques indiquées appuyez sur la touche de couleur de la télécommande Pour de plus amples informations sur votre vos système s de texte consultez la page d index texte de la chaîne de télévision concernée ou demandez...

Страница 72: ...page utile q Appuyez sur la touche rpour découvrir les réponses aux quiz jeux concours et les pages de blagues Pour révéler du texte caché r Appuyez sur la touche sune seule fois pour agrandir la moitié supérieure de la page appuyez une nouvelle fois pour agrandir la moitié inférieure Appuyez une troisième fois pour repasser au format standard Pour agrandir la taille de l affichage texte s Tapez l...

Страница 73: ...oscope ou le lecteur DVD sont bien raccordés au téléviseur voir schéma des connexions page 45 puis sélectionnez l entrée correcte à l aide de la touche B La cassette vidéo le DVD n apparaissent pas à l écran Q R Lorsque vous utilisez une source externe par exemple une cassette vidéo de mauvaise qualité il est parfois possible d améliorer la reproduction des couleurs La couleur est réglée en usine ...

Страница 74: ...nde sonore en français Pourquoi la bande sonore est elle en français alors qu une autre langue audio a été sélectionnée Q Questions Réponses suite R L émission numérique regardée ne diffuse pas de texte numérique Essayez une autre émission Pourquoi n y a t il pas de service de texte numérique Q R La chaîne a été sélectionnée dans Verrouillé Programme voir la section Réglages numériques Pourquoi la...

Страница 75: ... sous réserve que le Auto upgrade soit MARCHE Le temps nécessaire peut varier Pourquoi l indicateur VERT de veille active met il parfois plus longtemps à s éteindre Q Nettoyage de l écran et du boîtier Après avoir débranché l appareil nettoyez l écran et le boîtier à l aide d un chiffon sec et doux Nous recommandons de ne pas utiliser de produits d entretien pour meubles ou de solvants de marque d...

Страница 76: ...prox 32 80 cm 37 94 cm Format 16 9 Sortie son distorsion de 10 Principale 10 W 10 W Consommation Modèle 26 135 W conformément à 32 159 W EN60107 1 1997 37 188 W Vielle approx Modèle 26 1 W 32 1 W 37 1 W Dimensions Modèle 26 56 cm H 66 cm L 28 cm p approx 32 61 cm H 80 cm L 30 cm p 37 69 cm H 92 cm L 30 cm p La dimension en hauteur inclut le support Poids approx Modèle 26 15 kg 32 20 kg 37 25 kg Pr...

Страница 77: ......

Страница 78: ... im Breitbildformat 94 Bildeinstellung Bildposition nur analog Hintergrundbeleuchtung 96 Bildeinstellung Bildvoreinstellungen Kontrast Helligkeit Farbe Farbton Schärfe Schwarzwert MPEG Rauschunterdrückung MPEG NR Digitale Rauschunterdrückung DNR Farbtemperatur 97 Bildeinstellung 3D Colour Management Farbinstellungen Kinomodus Antennenverstärker 98 Bildeinstellung automatische Formatierung Breitbil...

Страница 79: ...n spezieller Funkentstörfilter integriert ist dessen Funktion anderenfalls beeinträchtigt wäre WENDEN SIE SICH IM ZWEIFELSFALL AN EINEN FACHKUNDIGEN ELEKTRIKER Die Belüftungsschlitze des Geräts dürfen NICHT mit Zeitungen Tischdecken Vorhängen oder ähnlichen Stoffen abgedeckt werden Durch Überhitzung können Schäden verursacht und die Lebensdauer des Gerätes verkürzt werden Elektrische Geräte dürfen...

Страница 80: ...Zeit angezeigt werden ist es empfehlenswert Kontrast und Helligkeit zu verringern Stellen Sie das Fernsehgerät an einem Platz auf der möglichst nicht der direkten Sonneneinstrahlung ausgesetzt ist und sich nicht in der Nähe starker Lichtquellen befindet Um ein optimales Fernseherlebnis zu gewährleisten wird ein Ort mit weichem indirektem Licht empfohlen Ziehen Sie gegebenenfalls die Vorhänge zu od...

Страница 81: ...ng Zum Anzeigen der digitalen Bildschirminformationen Zum Aufrufen von Videotextdiensten im analogen Modus Steuerungstasten für Videotext Verlassen der Menüs Wählbare Bildvoreinstellungen Stummschaltun Wahl des Eingangs für externe Quelle Zur Moduswahl Anzeige im Breitbildformat Bildschirmmenüs Tasten für Programmwahl und Wechsel der Videotextseiten Zum Anzeigen des digitalen Programmführers auf d...

Страница 82: ...externe Gerät wieder aufzurufen drücken Sie die Taste B Mit dieser Taste können Sie zwischen DTV EXT1 EXT2 EXT3 C HDMI1 HDM2 PC oder ATV umschalten Der Kabelhalter kann für Antennen Scart und Audiokabel verwendet werden Der Kabelhalter ist kein Tragegriff Vergewissern Sie sich vor dem Transport des Fernsehers stets dass alle Kabel entfernt wurden HDMI das HDMI Logo und High Definition Multimedia I...

Страница 83: ...rbton DNR und Schwarzanp Verbinden Sie das PC Kabel des Computers mit dem PC Anschluss an der Rückseite des Fernsehgerätes Schließen Sie das Audiokabel an die PC HDMI1 Audiobuchse an der Rückseite des Fernsehgerätes an Wählen Sie im Menü EINSTELLUNG das Untermenü AV Anschluss aus Wählen Sie dann in den Optionen PC HDMI1 Ton die Einstellung PC aus Drücken Sie die Taste B um den PC Modus auszuwählen...

Страница 84: ...EXT3 muss der Audioausgang des jeweiligen Gerätes mit den Phono Anschlussbuchsen am Fernseher verbunden werden Drücken Sie zur Auswahl des Eingangs die Taste B bis gemäß der Beschreibung auf Seite 107 die Einstellung EXT3 angezeigt wird Der Signaltyp wird vom Fernsehgerät automatisch erkannt Genauere Informationen entnehmen Sie bitte der Bedienungsanleitung des anzuschließenden Gerätes Hinweis Wen...

Страница 85: ... gestellt kann aber mit Hilfe der Ortszeiteinstellung bis zu zwei Stunden vor oder nachgestellt werden Nach Abschluss der Suche schaltet das Fernsehgerät automatisch auf den ersten Programmplatz um Im Bildschirmfenster des AUTOMATISCHE ABSTIMMUNG werden alle gefundenen Sender in einer Übersicht angezeigt Wechs Betrachten Seite Seite Sortieren AUTOMATISCHE ABSTIMMUNG 86 Programme gefunden 55 TV 24 ...

Страница 86: ...schlossen hat Nach Abschluss der Suche werden im Bildschirmfenster des AUTOMATISCHE ABSTIMMUNG alle gefundenen Sender in einer Übersicht angezeigt Automatische Sendersuchlauf 1 2 Mit dem Automatische Abstimmung wird eine komplett neue Sendereinstellung am Fernsehgerät durchgeführt so dass auf diese Weise die Senderliste aktualisiert werden kann Es wird empfohlen den automatischen Abstimmungen in r...

Страница 87: ... im EINSTELLUNGEN MENÜ die Option Manuelle Abstimmung aus und drücken Sie dann OK Geben Sie die Multiplexnummer mit den Zifferntasten der Fernbedienung ein und drücken Sie dann OK Der Fernseher sucht daraufhin automatisch nach dem entsprechenden Multiplexkanal Sobald der Multiplexkanal gefunden wurde werden alle derzeit noch nicht in der Programmliste enthaltenen Kanäle hinzugefügt und die Program...

Страница 88: ... das Fernsehgerät den Suchlauf abgeschlossen hat Nach Abschluss der Suche wählt das Fernsehgerät automatisch den ersten Programmplatz aus und ruft das Bildschirmfenster Manuelle Sendersuche auf Mit der Taste Q oder P können Sie durch die Liste blättern und bei Bedarf einen Sender auswählen Drücken Sie dann EXIT um den ausgewählten Sender anzuzeigen Die Senderreihenfolge kann im Bildschirmfenster M...

Страница 89: ... Die Nummer des Kanals auf dem ein Sender übertragen wird Suchen Suche nach einem Signal im Frequenzbereich Feineinstellung Wird nur verwendet wenn Störungen auftreten bzw das Empfangssignal zu schwach ist Siehe Seite 111 Sender Sendername Verwenden Sie die Tasten P oder Q und Soder Rzur Eingabe einer Senderbezeichnung die aus bis zu sieben Zeichen bestehen kann Drücken Sie P oder Q um den gewünsc...

Страница 90: ...den Cursor in das Feld Sender zu setzen Geben Sie mithilfe der Tasten P Q S oder R die gewünschten Zeichen ein z B VCR 8 Drücken Sie zum Speichern die Taste OK Wiederholen Sie den Vorgang für jede Programmposition die Sie einstellen möchten oder drücken Sie die Taste MENU um zur Liste der Kanäle zu wechseln und wählen Sie die nächste einzustellende Nummer Drücken Sie nach Abschluss des Vorgangs di...

Страница 91: ...ngen von Programmen Wählen Sie aus dem Menü EINSTELLUNG die Option Manuelle Sendersuche 1 Kanäle lassen sich verschieben und auf beliebigen Programmplätzen speichern Sortieren von Programmplätzen Wählen Sie aus dem Menü EINSTELLUNG die Option Manuelle Sendersuche Die Senderliste wird jetzt angezeigt Markieren Sie mit Hilfe der Taste Q oder P den Sender den Sie verschieben möchten und drücken Sie d...

Страница 92: ... beispielsweise den Programmplatz Kanäle oder den Stereo Mono Signalmodus drücken Sie die Taste Drücken Sie die Taste erneut um den Vorgang abzubrechen Auswahl von Programmplätzen Die Option Uhrzeitanzeige ermöglicht die Anzeige der aktuellen Videotext Uhrzeit auf dem Bildschirm Wenn Sie während einer Fernsehsendung die Tasten 8 9auf der Fernbedienung drücken wird die genaue vom Sender übertragene...

Страница 93: ...OW markiert ist Drücken Sie OK 3 4 5 Drücken Sie Q um SRS 3D zu markieren und wählen Sie mit S oder Rdie Einstellung ein oder aus Drücken Sie anschließend Q um FOCUS zu markieren und wählen Sie mit S oder Rdie Einstellung ein oder aus Markieren Sie die Option TruBass und wählen Sie mit S oder Rje nach Bedarf die Einstellung aus niedrig oder hoch HINWEIS Diese Effekte sind über Kopfhörer nicht verf...

Страница 94: ...no2 4 3 Super Live1 Kino1 Untertitel und 14 9 umzuschalten SUPER LIVE2 Bei Empfang eines Signals im Seitenwandformat kann das Fernsehbild mit dieser Einstellung vergrößert und an die Bildschirmgröße angepasst werden indem es horizontal und vertikal gestreckt wird In der Bildmitte werden dabei die realen Größenverhältnisse beibehalten Es können jedoch gewisse Verzerrungen auftreten KINO1 Wenn Sie s...

Страница 95: ...ezeigten Bildes d h Ändern des Verhältnisses der Bildhöhe zur Bildbreite zum Zweck einer öffentlichen Vorführung oder zur Erzielung eines kommerziellen Gewinns kann eine Verletzung von Urheberrechtsgesetzen darstellen Verwenden Sie diese Einstellung wenn Sie im 1080i Format schauen wollen Das Bild wird originalgetreu ohne Skalierung oder abgeschnittene Bildränder angezeigt TRUE SCAN Diese Option s...

Страница 96: ... mit Hilfe der Tasten S und R vor Die angezeigten Optionen ändern sich in Abhängigkeit vorn gewählten Breitbildformat sowie bei der Bildanzeige über angeschlossene Geräte Im Modus Kino2 2 3 Drücken Sie im Menü Bildeinstellung die Taste Q bis die Einstellung Panelhelligkeit ausgewählt ist Drücken Sie die Taste S oder R um die Feineinstellung vorzunehmen 2 3 Drücken Sie im Menü BILD die Taste Q so d...

Страница 97: ...itale Rauschunterdrückung DNR 1 Wählen Sie DNR aus dem Menü Bildeinstellung und nehmen Sie mit den Tasten S bzw R die Einstellung vor Die Unterschiede sind nicht immer wahrnehmbar die besten Ergebnisse erzielen Sie bei niedrigen Einstellungen Bei zu hohen Einstellungen kann sich die Bildqualität verschlechtern Beim Abspielen von DVDs kann es bedingt durch die Komprimierung vorkommen dass einige Wö...

Страница 98: ...alten 3D Colour Management Drücken Sie im Menü BILD mehrmals die Taste Q bis die Einstellung 3D Colour Management ausgewählt ist Drücken Sie die Taste S oder R um die Einstellung ein oder aus auszuwählen 1 2 Um das Gerät auf die werkseitigen Standardeinstellungen zurückzusetzen wählen Sie die Option Zurücksetzen und drücken Sie dann die Taste OK Drücken Sie im Menü BILD mehrmals die Taste Q bis di...

Страница 99: ...Formatierung Breitbild Wenn dieses Fernsehgerät ein Signal in einem echten Breitbildformat empfängt und die Einstellung Auto Format aktiviert ist ein wird die Sendung unabhängig von der aktuellen Bildformateinstellung des Fernsehers automatisch im Breitbildformat angezeigt Blaues Bild Bei Auswahl der Einstellung Blaues Bild wird bei einem fehlenden Empfangssignal ein blauer Bildschirm angezeigt un...

Страница 100: ...stellung festgelegt werden soll Drücken Sie dann OK Das Menü TIMER EINSTELLEN wird jetzt aufgerufen Drücken Sie die Tasten P und Q um die Liste durchzublättern Geben Sie die entsprechenden Zeitangaben für das gewünschte Programm mit den Zifferntasten ein Mit den Tasten S und R wird die jeweilige Auswahl vorgenommen 2 3 4 Drücken Sie nach erfolgter Eingabe aller Daten die Taste OK um die Einstellun...

Страница 101: ... gesendeten Programm angezeigt Drücken Sie dann S oder R Drücken Sie die Taste um Informationen zu einem markierten Programm zu erhalten Wenn Sie den Timer für dieses Programm einstellen möchten drücken Sie die BLAUE Taste um das Menü für den TIMER PROGRAMME aufzurufen 2 3 4 2 3 4 TIMER EINSTELLEN Startzeit 10 30 Endzeit 13 15 Wiederholen EINM Videorekorder automatisch starten NEIN Untertitel KEIN...

Страница 102: ...e Option Modus auszuwählen 2 Wählen Sie mit der Taste S oder R eine der folgenden Einstellungen aus EIN AUS MENÜ SICHERN oder INST SICHERN Bei der Auswahl gesperrter Menüs muss ab jetzt ein PIN Code eingegeben werden um auf diese Menüs zugreifen zu können 2 Wählen Sie mit Q die Option Kindersicherung aus und drücken Sie die Taste OK Wählen Sie mit Q die Option PIN ändern aus und drücken Sie erneut...

Страница 103: ...rogrammen 1 Drücken Sie im Menü AUSSTATTUNGS MENÜ die Taste Q um die Option Favoriten und gesperrte Programme auszuwählen 2 3 4 2 Drücken Sie die Taste EXIT Mit den Tasten fP e können Sie dann bei Auswahl der Option FAV 1 die Kanäle in der Favoritenliste 1 aufrufen 5 Ausw MENU Zurück Seite Seite Alle ausw Ausw löschen FAVORITEN UND GESPERRTE PROGRAMME Favoritenliste 1 Nein 1 Das Erste 2 ZDF 7 WDR ...

Страница 104: ...rte die bei einem Dienstanbieter erworben werden können lassen sich abonnementpflichtige Zusatzprogramme empfangen und anschauen Wenden Sie sich an einen Dienstanbieter um diesbezügliche Informationen zu erhalten Allgemeine Schnittstelle 1 2 Stecken Sie das CA Modul und die Karte in den Anschluss der allgemeinen Schnittstelle und führen Sie die in der Anleitung für das CA Modul angegebenen Schritt...

Страница 105: ...die Software bereits aktualisiert wurde stehen zwei Versionen zur Auswahl NEUE SOFTWARE WIRD GESUCHT Sucht ein Software Upgrade für dieses TV Gerät Suchen EXIT Stop KEIN UPGRADE VERFÜGBAR Es ist derzeit kein Upgrade Verfügbar Fortsetzen 1 2 Wählen Sie im Menü Software Upgrade mit P oder Q die Option Automatisches Update aus Wählen Sie mit der Taste S oder R die Einstellung EIN oder AUS Bei Bedarf ...

Страница 106: ...ste B Wählen Sie dann aus dem Menü EINSTELLUNG die Option PC Einstellung 1 Drücken Sie OK Wählen Sie die gewünschte Option durch Drucken der Tasten P und Q aus und nehmen Sie die Einstellung jeweils mit Hilfe der Tasten S und R vor 2 3 Drücken Sie OK Drücken Sie im Menü EINSTELLUNG die Taste Q um die Option PC Einstellung auszuwählen Drücken Sie OK um die Auswahl zu bestätigen Drücken Sie dann Q u...

Страница 107: ...den angeschlossenen Geräten können Sie der Bedienungsanleitung der jeweiligen Hersteller entnehmen Wählen Sie das Menü EINSTELLUNG und drücken Sie die Taste Q bis die Einstellung AV Anschluss markiert ist denn drücken Sie die Taste OK Wählen Sie mit den Tasten S oder R die Option AV oder S VIDEO als erforderlichen Eingang für EXT2 aus Falls im Bild keine Farben angezeigt werden aktivieren Sie die ...

Страница 108: ...n Buchse an der Rückseite des Fernsehgerätes an entsprechend der Abbildung im Abschnitt Anschließen eines Computers und wählen Sie dann eine der Einstellungen unter HDMI1 Ton aus Drücken Sie im Menü AV Anschluss die Taste Q um die option PC HDMI1 Ton zu markieren Wählen Sie dann mit der Taste R die Einstellung HDMI1 aus Markieren Sie anschließend HDMI1 Ton und wählen Sie mit der Taste S oder R die...

Страница 109: ... markiert Wenn durch das Fernsehgerät weitere Unterseiten geladen werden ändert sich die Farbe der Nummern Durch die neue Farbe wird angezeigt dass diese Seiten in den Speicher geladen wurden Diese Unterseiten bleiben so lange für die Anzeige verfügbar bis eine andere Seite gewählt wird oder im normalen TV Modus der Kanal gewechselt wird Videotext Informationen Falls Toptext verfügbar ist werden a...

Страница 110: ...t zu überlagern Drücken Sie erneut um zum normalen Fernsehbildmodus zurückzukehren Die Fernsehprogramme lassen sich nur im normalen Bildmodus umschalten Drücken Sie einmal die Taste s um die obere Seitenhälfte zu vergrößern Bei erneutem Drücken dieser Taste wird die untere Hälfte der Seite vergrößert Drücken Sie ein drittes Mal um wieder die normale Seitengröße einzustellen So vergrößern Sie die V...

Страница 111: ...m auto EXT2 A V C R OK speichern MENU zurück EXIT Beenden A Überprüfen Sie ob der Videorecorder oder DVD Player ordnungsgemäß am Fernsehgerät angeschlossen wurde siehe Seite 82 und wählen Sie dann den entsprechenden Eingang indem Sie die Taste Bdrücken Warum wird das Bild vom Videorecorder DVD Player nicht an das Fernsehgerät übertragen F A Überprüfen Sie ob vielleicht die Lautstärke heruntergereg...

Страница 112: ... dafür dass keine andere Person die Master PIN verwenden kann indem Sie die Bedienungsanleitung sicher verwahren Was kann ich tun wenn ich meinen PIN Code vergessen habe F A Der analoge Modus ist ausgewählt Drücken Sie B und halten Sie die Taste gedrückt um DTV auszuwählen Warum ist das Hauptmenü DTV nicht verfügbar F A Ihr Abonnement muss erneuert bzw erweitert werden Wenden Sie sich hierzu an de...

Страница 113: ...al umzuschalten Warum sind nur die vier farbigen Videotextnummern sichtbar jedoch kein Videotext F A Schließen Sie die entsprechende Quelle über ein SCART Kabel an und starten Sie die Wiedergabe Wählen Sie die Option Manuelle Einstellung aus dem Menü EINSTELLUNG Warum sind bei der Wiedergabe von einer NTSC Quelle die Farben verfälscht F Setzen Sie die Farbsystem auf auto und verlassen Sie das Menü...

Страница 114: ...Deutsch 114 Notizen Für Ihre eigenen Notizen ...

Страница 115: ...115 Deutsch Notizen Für Ihre eigenen Notizen ...

Страница 116: ...Anzeigeformat 16 9 Tonausgangsleistung Effektiv 10 W 10 W at 10 distortion Leistungsaufnahme Modell 26 135 W gemäß EN60107 1 1997 32 159 W 37 188 W Standby ca Modell 26 1 W 32 1 W 37 1 W Abmessungen Modell 26 56 cm H 66 cm B 28 cm T ca 32 61 cm H 80 cm B 30 cm T 37 69 cm H 92 cm B 30 cm T Höhe einschließlich Standfuß Gewicht ca Modell 26 15 kg 32 20 kg 37 25 kg Kopfhörerbusche 3 5 mm Stereo Zubehö...

Отзывы: