


141
Pla
ybac
k
Recor
ding
Editing
Function setup
Other
s
Intr
oduction
Librar
y
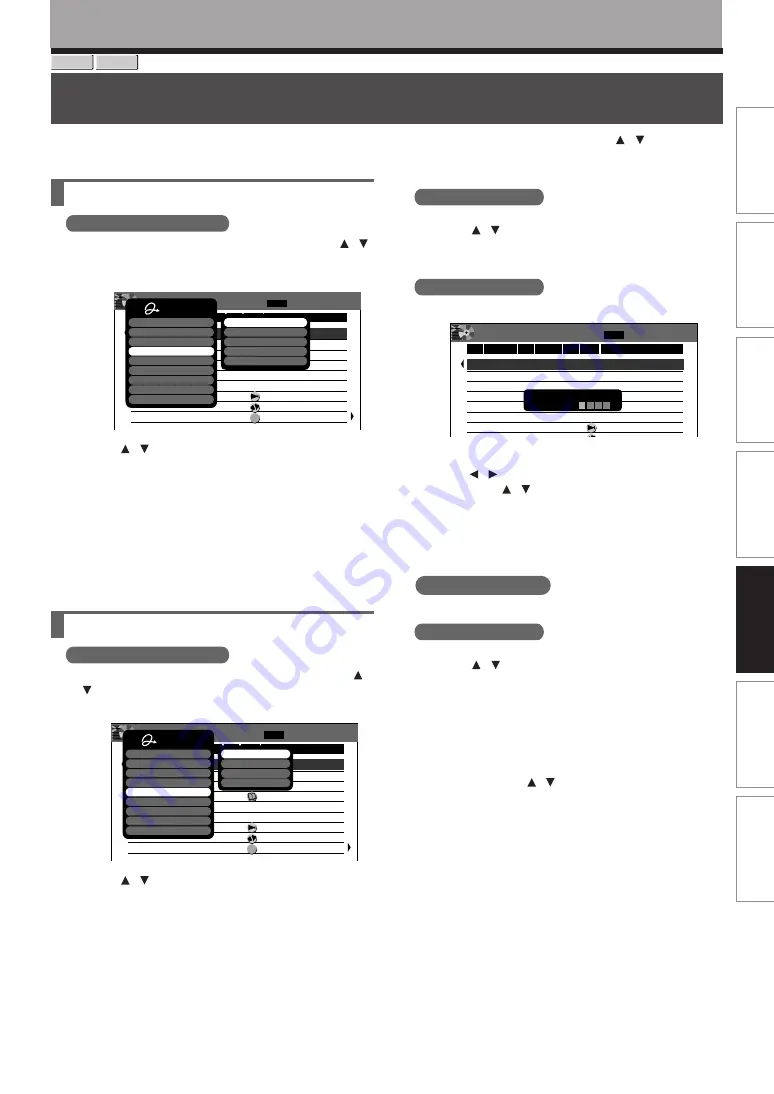
Searching for a desired title
From the “LIBRARY MENU Title Summary (All Titles)”, you can select a title by using the / buttons. If
you change the listing order or sort the titles, search may be easier.
Library
HDD
DVD-RAM
Changing the listing order
Arrange
1) From the Quick Menu, select “Arrange” by /
then press ENTER.
The sub menu appears.
2) Press / to select the listing order, then press
ENTER.
Titles are arranged in selected order.
Notes
• If you repeat the selection of different types of the listing
order, the old one precedes the new one. For example,
when you select “Arrange by genre” then “Arrange by disc
no.”, the order of genre is produced in the order of disc
number.
Searching
Narrowing
1) From the Quick Menu, select “Narrowing” by /
then press ENTER.
The sub menu appears.
2) Press / to select a narrowing condition, then
press ENTER.
Sort by genre
The submenu appears.
Press the / buttons to select a genre, then press
the ENTER button.
Titles within the selected genre are sorted.
Sort by disc(DVD)
An input window appears.
Follow steps 1) and 2) below.
1) Press / to select a location, then press
ADJUST or / to enter the disc number.
2) Press ENTER.
Titles in the specified disc are sorted. For
example, if you enter “001-”, titles in discs 001,
001A and 001B are listed.
Sort By Disc(HDD)
Titles in the HDD are sorted.
Sort by day
The submenu appears.
Press the / buttons to select the day, then press
the ENTER button.
Titles recorded on the selected day are listed.
Notes
• Press the O button to go back to the display for the
previous narrowing condition.
• If you want to display all titles, press the QUICK MENU
button, then press the / buttons to select “Cancel
narrowings” and press the ENTER button.
Title Summary
(All tTitles)
MENU
LIBRARY
1 / 2
HDD
2004/
06
/20 07:00pm ...
7:00 pm
11:00 pm
7:00 pm
9:00 pm
11:00 pm
9:00 pm
9:00 pm
9:00 pm
10:27 pm
5
2004/ 6/20
HDD
2004/06/19
11:00pm ...
4
2004/ 6/19
HDD
2004/06/18
07:00pm ...
3
2004/ 6/18
HDD
2004/06/17
09:00pm ...
3
2004/ 6/17
HDD
2004/06/13
11:00pm ...
2
2004/ 6/13
HDD
2004/06/13
09:00pm ...
4
2004/ 6/13
HDD
2004/06/11 09:00pm ...
2004/ 6/11
HDD
2004/06/ 9
09:00pm ...
L1
2004/ 6/ 9
Su
Sa
Fr
Th
Su
Su
Fr
We
Tu
HDD
2004/06/ 9
10:27pm ...
L2
2004/ 6/ 8
L1
etc
...
e.g.
2:49 pm
6/22 (Tu)
No.
Date
Day
Time
CH Genre
Title Name
Quick Menu
DVD space remaining
DVD all disc no.
Title information
Arrange
Narrowing
Jump
Disc information
Library management
Exit
Arrange by title name
Arrange by disc no.
Arrange by genre
Arrange by week
Arrange by date
Title Summary
(All tTitles)
MENU
LIBRARY
1 / 2
HDD
2004/
06
/20 07:00pm ...
7:00 pm
11:00 pm
7:00 pm
9:00 pm
11:00 pm
9:00 pm
9:00 pm
9:00 pm
5
2004/ 6/20
HDD
2004/06/19
11:00pm ...
4
2004/ 6/19
HDD
2004/06/18
07:00pm ...
3
2004/ 6/18
HDD
2004/06/17
09:00pm ...
3
2004/ 6/17
HDD
2004/06/13
11:00pm ...
2
2004/ 6/13
HDD
2004/06/13
09:00pm ...
4
2004/ 6/13
HDD
2004/06/11 09:00pm ...
2004/ 6/11
HDD
2004/06/ 9 09:00pm
L1
2004/ 6/ 9
Su
Sa
Fr
Th
Su
Su
Fr
We
L1
e.g.
2:49 pm
6/22 (Tu)
No.
Date
Day
Time
CH Genre
Title Name
Sort by disc(DVD)
Disc No.
0
0 1 –
Title Summary
(All tTitles)
MENU
LIBRARY
1 / 2
HDD
2004/
06
/20 07:00pm ...
7:00 pm
11:00 pm
7:00 pm
9:00 pm
11:00 pm
9:00 pm
9:00 pm
9:00 pm
10:27 pm
5
2004/ 6/20
HDD
2004/06/19
11:00pm ...
4
2004/ 6/19
HDD
2004/06/18
07:00pm ...
3
2004/ 6/18
HDD
2004/06/17
09:00pm ...
3
2004/ 6/17
HDD
2004/06/13
11:00pm ...
2
2004/ 6/13
HDD
2004/06/13
09:00pm ...
4
2004/ 6/13
HDD
2004/06/11 09:00pm ...
2004/ 6/11
HDD
2004/06/ 9
09:00pm ...
L1
2004/ 6/ 9
Su
Sa
Fr
Th
Su
Su
Fr
We
Tu
HDD
2004/06/ 9
10:27pm ...
L2
2004/ 6/ 8
L1
etc
...
2:49 pm
6/22 (Tu)
No.
Date
Day
Time
CH Genre
Title Name
e.g.
Quick Menu
DVD space remaining
DVD all disc no.
Title information
Arrange
Narrowing
Jump
Disc information
Library management
Exit
Sort by genre
Sort by disc(DVD)
Sort by disc(HDD)
Sort by day
Содержание RD-XS32SC
Страница 52: ......
Страница 148: ......
Страница 177: ...177 Recording Playback Others Introduction Editing Function setup Library Memo ...
Страница 178: ...178 Memo ...
Страница 179: ...179 Recording Playback Others Introduction Editing Function setup Library Memo ...


