– 2 –
EN
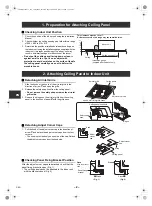
Checking Indoor Unit Position
1. Check the position of the indoor unit using the Installation
Manual.
2. Check whether the ceiling opening size falls within a range
of 860 × 860 to 910 × 910.
3. Determine the positional relation between the ceiling and
the indoor unit using the installation gauge supplied with the
indoor unit. Improper positioning of the indoor unit may
result in air/water leakage or malfunction of the louver.
• Do not put the ceiling panel facing down or lean it
against a wall, etc. or put it on an object with
projection to avoid scratches on the surface. Handle
the ceiling panel carefully so as not to deform the
movable hooks.
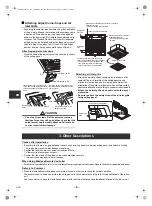
Detaching Air Inlet Grille
1. Slide the knobs of the hooks of the air inlet grille in the
direction of arrow
1
, and open the grille.
2. Release the safety strap hook from the ceiling panel.
•
Do not remove the safety strap screw on the air inlet
grille side.
3. Remove the hinges on the air inlet grille from the ceiling
panel in the direction of arrow
2
with the grille open.
Detaching Adjust Corner Caps
1. Pull the knob of the adjust corner cap in the direction of
arrow
1
, and detach the adjust corner caps from the four
corners.
• The knob is provided only on one side of the cap. Detach
the adjust corner caps from the knob side.
Checking Panel Fixing Bracket Position
After the adjust corner caps are detached, check that the
panel fixing bracket is open (Fig. 1).
• The ceiling panel cannot be attached to the indoor unit
with the bracket closed (Fig. 2).
1. Preparation for Attaching Ceiling Panel
12 to 17
This clearance must be 12 to 17.
A clearance outside this range may cause malfunction.
Indoor unit
Ceiling
Ceiling opening size
Installation gauge
(supplied with the indoor unit)
2. Attaching Ceiling Panel to Indoor Unit
2
Air inlet grille
Ceiling panel
Adjust corner cap
Knobs of air inlet grille hooks
Ceiling panel hook hole
Safety strap
hook
Hinges
Knob
Adjust
corner
cap
Ceiling panel
Adjust corner
cap
Strap
(Fig. 1)
Open
Keep the bracket
open.
(Fig. 2)
Panel fixing
bracket
Open
Closed
Close
2-EN
+00EH78970601-1_10L_CilingPanel_IM.book Page 2 Thursday, May 15, 2008 11:54 AM


