Toshiba RAV-SP562AT-E Скачать руководство пользователя страница 8

5

1000 

or more

300 

or more

1500

 or more

2000 

or more

200 

or more

300 

or more

300 

or more

1000 

or more

200 

or more

1000 

or more

1000  or more

1000  or more

150 

or more

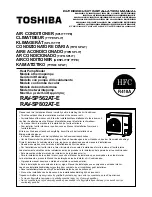
<Obstacle also at the upper side>

Obstacles at both front and rear sides

Open the upper side and both right and left sides.
The height of obstacle at both front and rear side,
should be lower than the height of the outdoor unit.

<Standard installation>

1. Single unit installation

2. Serial installation of two or more units

Serial installation at front and rear sides

Open the upper side and both right and left sides.
The height of obstacle at both front and rear sides
should be lower than the height of the outdoor unit.

<Standard installation>

600

150

150

430

365

40

400

Drain hole

Knockout hole

Drain nipple mounting hole

Drain nipple

Waterproof rubber cap

Installation of Outdoor Unit

• Before installation, check strength and horizontality of

the base so that abnormal sound does not generate.

• According to the following base diagram, fix the base

firmly with the anchor bolts.
(Anchor bolt, nut: M10 x 4 pairs)

<SP562AT-E, SP802AT-E>

15 or less

Set the out margin of the anchor bolt to 15mm or less.

• In case of draining through the drain hose, attach the

following drain nipple and the waterproof rubber cap,
and use the drain hose (Inner diam.: 16mm) sold on
the market. And also seal the screws securely with
silicone material, etc. so that water does not drop
down. Some conditions may cause dewing or drip-
ping of water.

3

SELECTION OF INSTALLATION

Содержание RAV-SP562AT-E

Страница 1: ...innen In diesem Handbuch wird die Installation der Außeneinheit beschrieben Um die Raumeinheit zu installieren folgen Sie den Anweisungen in dem Handbuch das der Raumeinheit beiliegt Prima di installare il condizionatore d aria leggere con attenzione questo manuale d installazione Questo manuale descrive il metodo d installazione dell unità esterna Per l installazione dell unità interna fare rifer...

Страница 2: ...gerante convenzionale R22 per prevenire la distruzione dello strato di ozono dell atmosfera terrestre ADOPCIÓN DE NUEVO REFRIGERANTE Este aparato de aire acondicionado es un modelo reciente que incorpora el nuevo refrigerante HFC R410A en lugar del refrigerante convencional R22 para así evitar daños en la capa de ozono ADOPÇÃO DO NOVO REFRIGERANTE Este ar condicionado é um modelo novo que adopta u...

Страница 3: ...ZA 37 2 ACCESSORI E REFRIGERANTE 38 3 SCELTA DEL POSTO D INSTALLAZIONE 39 4 TUBAZIONI DEL REFRIGERANTE 43 5 SVUOTAMENTO 45 6 ESECUZIONE DEI COLLEGAMENTI ELETTRICI 46 7 CONTRROLLI DI FINE INSTALLAZIONE 47 1 PRECAUCIONES PARA SU SEGURIDAD 49 2 ACCESORIOSY REFRIGERANTE 50 3 ELECCIONES PARA LA INSTALACIÓN 51 4 CANALIZACIONES DE REGRIGERANTE 55 5 EVACUACIÓN 57 6 TRABAJOS EN EL SISTEMA ELÉCTRICO 58 7 CO...

Страница 4: ...sistance force and impurity in it CAUTION To Disconnect the Appliance from Main Power Supply This appliance must be connected to the main power supply by means of a switch with a contact separation of at least 3 mm The installation fuse 25A D type must be used for the power supply line of this conditioner WARNING Ask an authorized dealer or qualified installation professional to install maintain t...

Страница 5: ... wires for telephone cables Conform to the regulations of the local electric company when wiring the power supply Inappropriate grounding may cause electric shock Do not install the air conditioner in a location subject to a risk of exposure to a combustible gas If a combustible gas leaks and stays around the unit a fire may occur Required tools for installation work 1 Philips screwdriver 2 Hole c...

Страница 6: ...ength of refrigerant pipe exceeds 30m add 40g m of refrigerant and the maximum total length of pipe is 50m Max amount of additional refrigerant is 800g Charge the refrigerant accurately Overcharge may cause a serious trouble of compressor Before installation Be careful to the following items before installation Length of refrigerant pipe SP562AT E Discharge guide Suction Suction hood Side Discharg...

Страница 7: ... the upper side Obstacle at front side Upper side is free 1 Single unit installation 2 Serial installation of two or more units Installation Place A place which provides a specified space around the outdoor unit A place where the operation noise and discharged air are not given to your neighbors A place that is not exposed to a strong wind A place that does not block a passage When the outdoor uni...

Страница 8: ...than the height of the outdoor unit Standard installation 600 150 150 430 365 40 400 Drain hole Knockout hole Drain nipple mounting hole Drain nipple Waterproof rubber cap Installation of Outdoor Unit Before installation check strength and horizontality of the base so that abnormal sound does not generate According to the following base diagram fix the base firmly with the anchor bolts Anchor bolt...

Страница 9: ...eating operation would be continuously performed for a long time under the condition that the outdoor temperature is 0 C or lower draining of defrosted water may be difficult due to freezing of the bottom plate resulting in a trouble of the cabinet or fan It is recommended to procure an anti freeze heater locally for a safety installation of the air conditioner For details contact the dealer Knock...

Страница 10: ...onventional tools can be used by adjusting projection margin of the copper pipe Flaring size A Unit mm In case of flaring for R410A with the conventional flare tool pull it out approx 0 5 mm more than that of R22 to adjust to the specified flare size The copper pipe gauge is useful for adjusting projection margin size Imperial Wing nut type Outer diam of copper pipe 6 4 9 5 12 7 15 9 R410A tool us...

Страница 11: ...lve at liquid side Cover NO GOOD SP80 type valve at gas side Pressure of R410A is higher than that of R22 Approx 1 6 times Therefore using a torque wrench tighten the flare pipe connecting sections which connect the indoor outdoor units at the speci fied tightening torque Incomplete connections may cause not only a gas leak but also a trouble of the refrigeration cycle Do not apply refrigerating m...

Страница 12: ...ump As shown in the figure connect the charge hose after the manifold valve are closed completely Tighten valve and caps of the charge port surely Disconnect the charge hose from the charge port Open fully the valve stem or the valve handle First at liquid side then gas side Leave the vacuum pump as it is for 1 or 2 minutes and check the indicator of the compound pressure gauge does not return Tur...

Страница 13: ...ve handling precautions Open the valve stem or the handle until it strikes the stopper It is unnecessary to apply further force Securely tighten the cap with a torque wrench Cap tightening torque Ø6 4 Valve size Ø9 5 Ø12 7 Ø15 9 Charge port 14 to 18N m 1 4 to 1 8kgf m 33 to 42N m 3 3 to 4 2kgf m 33 to 42N m 3 3 to 4 2kgf m 20 to 25N m 2 0 to 2 5kgf m 14 to 18N m 1 4 to 1 8kgf m For the air conditi...

Страница 14: ...cted to the mains Connection to the fixed wiring A switch which disconnects all poles and has a contact separation of at least 3 mm must be incorporated in the fixed wiring 7 FINAL INSTALLATION CHECKS Check and Test Operation For R410A use the leak detector exclusively manufactured for HFC refrigerant R410A R134a etc The conventional leak detector for HCFC refrigerant R22 etc cannot be used becaus...

Страница 15: ... Gas leakage detector Applicable to R22 model X Changes As pressure is high it is impossible to measure by means of conventional gauge In order to prevent any other refrigerant from being charged each port diameter is changed In order to increase pressure resisting strength hose materials and port size are changed to 1 2 UNF 20 threads per inch When purchasing a charge hose be sure to check the po...

Страница 16: ...den Questo prodotto è conforme alla direttiva 2002 95 CE e per disfarsene non deve essere gettato con la spazzatura della casa Este producto cumple con la Directiva 2002 95 EC y no se puede desechar como la basura municipal Este produto respeita a Directiva 2002 95 EC e não pode ser deitado fora como lixo municipal Dit product is in overeenstemming met richtlijn 2002 95 EC en mag niet als huishoud...

Отзывы: