


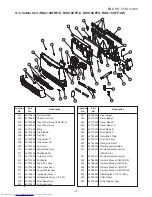


FILE NO. SVM-02008
– 75 –
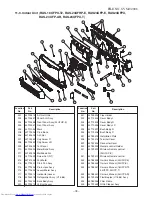
10-3. Outdoor Unit (Heat pump: RAS-24UAH-E)
(Cooling: RAS-18UAX-T2, RAS-24UA-E, RAS-24UAX, RAS-24UA-AR,
RAS-24UAX-T)
No.
Part name
Procedures
Remarks
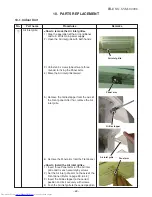
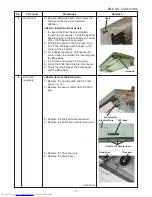
1
1) Stop the operation of the air conditioner
and turn off its main power supply or
remove the power supply wires.
2) Remove the electrical parts cover.
(4 screws 4 x 10)
3) Remove the side cabinet (front).
(2 screws 4 x 10)
4) Disconnect the connecting cables after
removing 7 screws on the terminal block.
5) Remove the side cabinet (back).
(10 screws 4 x 10)
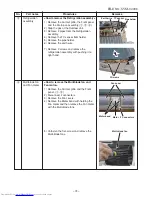
2
1) Remove the capacitor band. (1 screw)
2) Disconnect the lead wires from the
capacitor terminal.
3
1) Remove the capacitor band. (1 screw)
2) Disconnect the lead wires from the
capacitor terminal.
4
1) Remove the relay. (2 screws)
2) Disconnect the lead wire from the terminal.
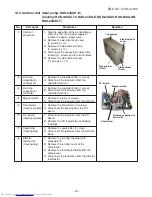
5
1) Remove the transformer. (2 screws)
2) Disconnect the housing from the P.C.
board.
6
1) Disconnect the lead wire from the P.C.
board.
2) Remove the P.C. board after unhooking
4 clamps.
7
1) Remove the spark killer. (1 screw)
2) Disconnect the lead wire from the terminal
block.
8
1) Remove the running capacitor with
procedure
2
.
2) Remove the terminal cover of the
compressor.
3) Remove the thermostat holder from the
compressor.
4) Disconnect the lead wires from the bimetal
thermostat.
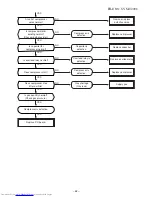
Top cabinet
Electrical parts
cover
Side cabinet
(Front)
Side cabinet
(Back)
P.C. Board
Magnet switch
Running capacitor for
Fan motor
Transformer
Common
procedure
Running
capacitor for
compressor
Running
capacitor for
fan motor
Magnet switch
Transformer
(Heat pump only)
P.C. board
(Heat pump only)
Spark killer
(Cooling only)
Bimetal
thermostat
(Cooling only)


