background image

Safety Precautions

Operating Instructions

Troubleshooting Tips

Care and Cleaning

Warning notices: Before using this product,
please read this manual carefully and keep
it for future reference.

change without prior notice for product
improvement. Consult with your dealer or
the manufacturer for details.

Remote control and App 

instructions

T

r

o

u

b

les

hoo

Care aanndd CClle

version A - 01 - 2020 (PREVIEW01)

Installation Instructions


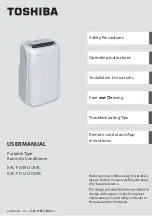
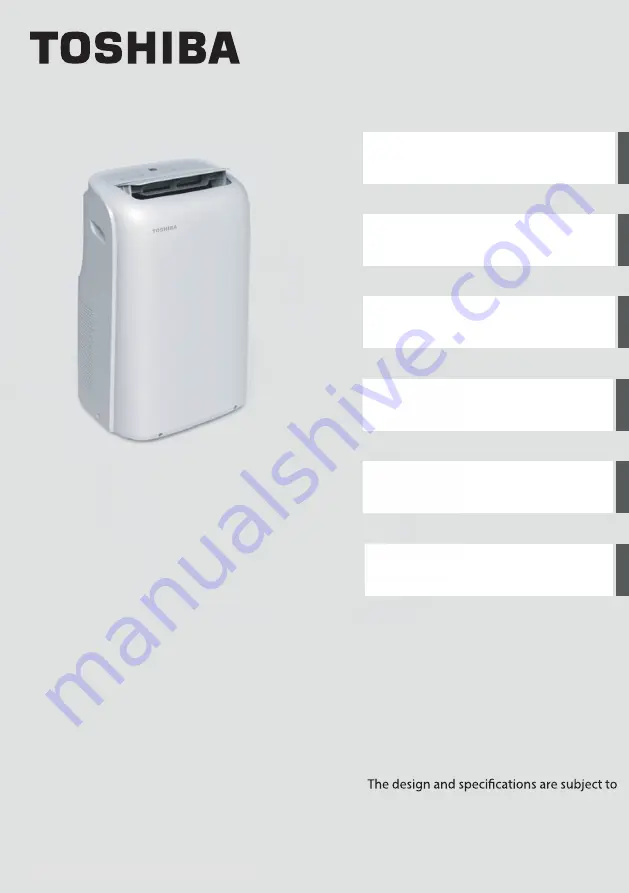
USER MANUAL


Portable Type
Room Air Conditioner

RAC-PD0812CRRC

RAC-PD1213CWRC

Содержание RAC-PD0812CRRC

Страница 1: ...refully and keep it for future reference change without prior notice for product improvement Consult with your dealer or the manufacturer for details Remote control and App instructions Troubleshoo Care a an nd d C Cl le version A 01 2020 PREVIEW01 Installation Instructions USER MANUAL Portable Type Room Air Conditioner RAC PD0812CRRC RAC PD1213CWRC ...

Страница 2: ... Manual Safety Precautions 3 Operating Instructions 8 Installation Instructions 13 Care and Cleaning 18 Troubleshooting Tips 19 Remote Control and App Instructions 20 For support please call the Service Center at 1 855 238 5607 This appliance is not intended for use by persons including children with reduced physical sensory or mental capabilities or lack of experience and knowledge unless they ha...

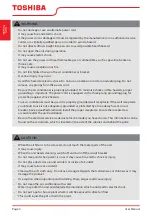
Страница 3: ...cess heat generation Do not modify power cord length or share the outlet with other appliances as it may cause electric shock or fire due to overheating Always ensure effective grounding Incorrect grounding may cause electric shock Unplug the unit if you notice unusual sounds or smells or smoke coming from it A damaged product may cause fire and electric shock Ventilate room before operating the a...

Страница 4: ...ceptacle If the wall receptacle you intend to use is not adequately grounded or protected by a time delay fuse or circuit breaker have a qualified electrician install the proper receptacle Ensure the receptacle is accessible after the unit installation Be sure the electrical service is adequate for the model you have chosen This information can be found on the serial plate which is located on the ...

Страница 5: ... gas stove or other gas burning appliances as air flow may affect gas combustion Do not use for any purpose other than room comfort Do not use this air conditioner to preserve precision devices food pets plants and art objects It may cause deterioration Turn off the main power switch if the unit is not to be used for an extended time Always insert the filters securely Clean filter once every two w...

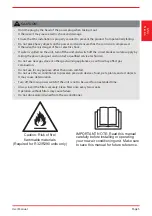
Страница 6: ...n operating gas appliance or an ignition source for example an operating electric heater close to the appliance The appliance shall also be stored in a room without ignition sources Do not pierce or burn Be aware that the refrigerants may not contain an odor Keep ventilation openings clear of obstruction Unit is only to be serviced by a Toshiba authorized servicer please call Customer Service at 1...

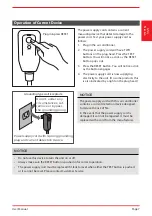
Страница 7: ... Grounding type wall receptacle Do not under any circumstances cut remove or bypass the grounding prong Power supply cord with 3 prong grounding plug and current detection device The power supply cord contains a current measuring device that detects damage to the power cord Test your power supply cord as follows 1 Plug in the air conditioner 2 The power supply cord will have TWO buttons on the plu...

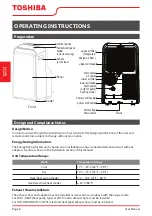
Страница 8: ...ergy Rating for this unit is based on an installation using an unextended exhaust duct without adaptors A or B as shown in the Installation section of this manual Unit Temperature Range e g n a R e r u t a r e p m e T e d o M F 5 9 F 2 6 C 5 3 C 7 1 l o o C F 5 9 F 5 5 C 5 3 C 3 1 y r D Heat heat pump mode 5 C 30 C 41 F 86 F Heat electrical heat mode 30 C 86 F Exhaust Hose Installation The exhaust...

Страница 9: ... for 3 constant fan light will illuminate identifying the fan continuous run for cooling When the function is onstant fan light will go out identifying the fan cycle run with compressor stop Cool VENT CONSTANT Presse 3s Press 3s Presse 3s Mode button Selects the desired operating mode Each time you press the button a mode is selected in a sequence that goes from AUTO COOL DRY FAN and HEAT cooling ...

Страница 10: ...cator light illuminates Press the Up or Down button to select the desired time Press the TIMER button again within 5 seconds The Auto on start program is initiated and the TIMER ON indicator light illuminates Press the Up or Down button to select the desired Auto on start time press the Timer button to initiate the Auto on start program Pressing it ve seconds will initiate the Auto stop program Pr...

Страница 11: ...n the power resumes WAIT 3 MINUTES BEFORE RESUMING OPERATION After the unit has stopped it cannot be restarted until 3 minutes time has elapsed This is to protect the unit Operation will automatically resume after 3 minutes AIRFLOW DIRECTION ADJUSTMENT The louver can be adjusted automatically Adjust the airflow direction automatically When the Power is ON the louver opens fully Press the SWING but...

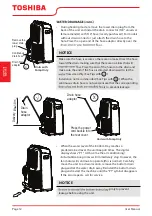
Страница 12: ...d let the water drain away Reinstall the bottom drain plug and restart the machine until the P1 symbol disappears If the error repeats call for service NOTICE rmly to prevent leakage before using the unit NOTICE Make sure the hose is secure so there are no leaks Direct the hose toward the drain making sure that there are no kinks that will ow Place the end of the hose into the drain and make sure ...

Страница 13: ...the Collection Tray Drain found on the back of the unit must be accessible the nearest wall to ensure proper air conditioning DO NOT cover the Intakes Outlets or Remote Signal Receptor of the unit as this could cause damage to the unit NOTICE About Fluorinated Gasses c information on the type of gas and the amount please refer to the relevant label on the unit itself ed technician Product recyclin...

Страница 14: ...adaptor For heat pump mode only 1 pc 1 pc 1 pc 1 pc 1 pc 1 pc 2 pc 1 set 1 set Quantity Remote controller and battery For remote control models only 1 pc Power Cord Buckle Accessories ts windows 19 4 62 2 49 3 158 1cm Installation Instructions Tools Needed Medium Phillips screwdriver Tape measure or ruler Knife or scissors Saw optional to shorten window adaptor for narrow windows 3 pc 2 pc 4 pc Pa...

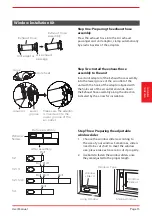
Страница 15: ...nstallation Step Three Preparing the adjustable window slider 1 Choose the window sliders according to the size of your window Sometimes sliders need to be cut short to meet the window size please take extra care to cut it properly 2 Use bolts to fasten the window sliders once they are adjusted to the proper length Hook Hole Seat Lower groove Adaptor Make sure the adaptor is inserted into the lowe...

Страница 16: ...the glass and the window frame to prevent air and insects from getting into the room 4 If desired install the security bracket with 2 screws as shown 5 Insert the window slider adaptor into the hole of the window slider NOTICE Once the Exhaust Hose assembly and Adjustable Window Slider are prepared choose from one of the following two installation methods Foam seal B Adhesive type shorter Foam sea...

Страница 17: ... with 2 screws as shown 5 Insert the window slider adaptor into the hole of the window slider Window slider A Window slider B if required Foam seal B Adhesive type shorter Foam seal A Adhesive type Foam seal C Non adhesive type 2 Screws Security Bracket NOTICE To ensure proper functioning DO NOT overextend or bend the hose Make sure that there is no obstacle around the air outlet of the exhaust ho...

Страница 18: ... it and prevent mold the unit and unplug it Clean the a ter according to the instructions in the previous section Reinstall the clean dry ter before storing Remove the batteries from the remote control Unit Cleaning NOTICE Be sure to store the unit in a cool dark place Exposure to direct sunlight or extreme heat can shorten the lifespan of the unit Maintenance Tips Be sure t ter every 2 weeks for ...

Страница 19: ... not cool well the unit and clean the lter according to the instructions the unit disconnect the hose check for blockage and reconnect the hose Temperature setting is too high decrease the set temperature Make sure all windows and doors are closed The room area could be too large doublecheck the cooling area Check the room for possible heat sources and remove them if possible The unit is noisy and...

Страница 20: ...TIMER OFF Sets timer to turn unit off see How to Use Basic Functions for instructions LED Turns indoor unit s LED display on and off If you are sensitive to light while sleeping you can press the LED button to turn off the LED display on the unit Press the button again to turn it back on SWING Starts and stops louver movement SLEEP Saves energy during sleeping hours TEMP Decreases temperature in 1...

Страница 21: ...e the back cover of the remote control downward exposing the battery compartment 2 Insert the batteries paying attention to align the and ends of the batteries with the symbols inside the battery compartment 3 Slide the battery cover back into place BATTERY DISPOSAL Do not dispose of batteries as unsorted municipal waste Refer to local laws for proper disposal of batteries TIPS FOR USING REMOTE CO...

Страница 22: ...isplay Not available on this unit FAN SPEED display Displays selected FAN SPEED HIGH MED LOW This display is blank when set to AUTO speed Temperature Timer display Displays the set temperature by default or timer setting when using TIMER ON OFF functions Temperature range 17 30 C 62 F 86 F Timer setting range 0 24 hours This display is blank when operating in FAN mode FOLLOW ME display Indicates t...

Страница 23: ... COOL operation 1 Press the MODE button to select COOL mode 2 Set your desired temperature using the Temp or Temp button 3 Press the FAN button to select the fan speed AUTO LOW MED or HIGH 4 Press the ON OFF button to start the unit DRY operation dehumidifying 1 Press the MODE button to select DRY mode 2 Set your desired temperature using the Temp or Temp button 3 Press the ON OFF button to start ...

Страница 24: ... MODE button to select FAN mode 2 Press FAN button to select the fan speed AUTO LOW MED or HIGH 3 Press the ON OFF button to start the unit HEAT operation 1 Press the MODE button to select HEAT mode 2 Set your desired temperature using the Temp or Temp button 3 Press the FAN button to select the fan speed AUTO LOW MED or HIGH 4 Press the ON OFF button to start the unit Basic Functions cont 1 2 3 1...

Страница 25: ...urn on after 2 5 hours 2 Press the TIMER ON button repeatedly to set the time that you want the unit to turn on 3 Wait 2 seconds then the TIMER ON function will be activated The digital display on your remote control will then return to the temperature display 2sec x10 ON OFF MOD E FA N SH OR T CU T TIMER ON TIMER OF F TE MP SLEE P 1sec 1 3 2 4 TIMER OFF TIMER OFF Example Setting unit to turn off ...

Страница 26: ...ON 5 TIMER OFF X16 6 TIMER OFF 3 7 Setting both TIMER ON and TIMER OFF at the same time Keep in mind that the time periods you set for both functions refer to hours after the current time For example say that the current time is 1 00 PM and you want the unit to turn on automatically at 7 00 PM and want it to operate for 2 hours then automatically turn off at 9 00 PM Do the following side figure Ex...

Страница 27: ...s activated Used to restore the current settings or resume previous settings Push this button when remote controller is on the system will automatically revert back to the previous settings including operating mode setting temperature fan speed level and sleep feature if activated By pressing for more than 2 seconds the system will automatically restore the current operation settings including ope...

Страница 28: ...he QR code your smart phone must have at least a 5 megapixel camera 5 Due to unstable network connectivity requests may time out If this happens re run the network guration 6 Due to unstable network connectivity commands may time out If this happens the smartphone icting information The information displayed on the actual product is always the most accurate available Refresh the app to re sync DEC...

Страница 29: ... code Apple QR code Scan to download app You can also go to Google Play or App Store and search for Toshiba NA AC For more information please refer to Toshiba Lifestyle website us toshiba lifestyle com All the images in this manual are for reference only your product and app may look slightly different The actual product and app instructions have to be considered NOTICE Remote control and App inst...

Страница 30: ...y email 6 1 Press Sign Up 6 2 Enter your email address and password 6 3 Press Registration 6 4 If you forget your password press Forgot password on the main menu and enter your email address Then press Reset Password Make sure your smartphone is able to connect to the wireless network which will be used Make sure also that the device is not connecting to other networks in range NOTICE Remote contr...

Страница 31: ...ONAL APP AND SMART HOME FUNCTIONS For additional instructions regarding the features of the app and Smart Home skill capabilities scan the QR code below Remote control and App instructions User Manual Page 31 ...

Страница 32: ......

Страница 33: ... pour plus de détails us toshiba lifestyle com Instructions d exploitation Instructions d installation Instructions de la télécommande et de l application Conseils de dépannage Entretien et nettoyage Instructions d I In nstructions d Conseils de d E En ntretien et n GUIDE D UTILISATEUR GUIDE D UTIL LI IS SA AT TE EUR Type Portable Climatiseur de pièce RAC PD0812CRRC RAC PD1213CWRC version A 01 202...

Страница 34: ...étaire Veuillez lire ce guide Vous y trouverez de nombreux conseils utiles sur la manière d utiliser et d entretenir correctement votre climatiseur Quelques soins préventifs vous permettront d économiser beaucoup de temps et d argent sur la durée de vie de votre climatiseur Vous trouverez de nombreuses réponses à des problèmes communs dans le chapitre Conseils de Dépannage et vous devriez être en ...

Страница 35: ...rtagez pas la prise avec d autres appareils car cela pourrait provoquer un choc électrique ou un incendie en raison d une surchauffe Assurez vous toujours une mise à la terre efficace Une mise à la terre incorrecte peut provoquer un choc électrique Débranchez l appareil si vous remarquez des sons des odeurs ou de la fumée inhabituels Un produit endommagé peut provoquer un incendie et un choc élect...

Страница 36: ...s une prise murale correctement mise à la terre Si la prise murale que vous avez l intention d utiliser n est pas correctement mise à la terre ou protégée par un fusible temporisé ou un disjoncteur demandez à un électricien qualifié d installer la prise appropriée Assurez vous que le réceptacle est accessible après l installation de l unité Assurez vous que le service électrique est adéquat pour l...

Страница 37: ...d incendie ou d électrocution Ne l utilisez pas à d autres fins que le confort de la pièce N utilisez pas ce climatiseur pour conserver des appareils de précision de la nourriture des animaux domestiques des plantes et des objets d art Cela peut entraîner une détérioration Éteignez l interrupteur d alimentation principal si l appareil ne doit pas être utilisé pendant une période prolongée Insérez ...

Страница 38: ...ctrique à proximité de l appareil L appareil doit également être stocké dans une pièce sans source d inflammation Ne pas percer ni brûler Sachez que les réfrigérants peuvent ne pas contenir d odeur Gardez les ouvertures de ventilation libres de toute obstruction L unité ne doit être réparée que par un réparateur agréé Midea veuillez appeler le service clientèle au 1 855 238 5607 pour obtenir de l ...

Страница 39: ...z en aucun cas la broche de mise à la terre Cordon d alimentation avec prise de terre à 3 broches et dispositif de détection de courant Le cordon d alimentation contient un appareil actuel qui détecte les dommages sur le cordon d alimentation Testez votre cordon d alimentation comme suit 1 Branchez le climatiseur 2 Le cordon d alimentation aura DEUX boutons sur la tête de la fiche Appuyez sur le b...

Страница 40: ...s Informa tion Énergétique cation énergétique de cette unité est basée sur une installation utilisant un conduit d évacuation non étendu sans adaptateurs A ou B comme indiqué dans la section Installation de ce manuel Plage de Température de l Unité e r u t a r é p m e t e d e g a l P e d o M Cool Refroidissement 17 C 35 C 62 F 95 F Dry Séchage 13 C 35 C 55 F 95 F age mode pompe à chaleur 5 C 30 C ...

Страница 41: ...0 24hrs Bouton d Alimentation Interrupteur marche arrêt Bouton Sommeil À utiliser pour lancer le mode SLEEP La température peut être en degrés Fahrenheit ou Celsius Pour passer de l une à l autre appuyez et maintenez enfoncés les boutons Haut et Bas en même temps pendant 3 secondes Instructions d e xploitation REMARQUE Bouton Minuteur Bouton d oscillation Bouton d alimentation Bouton de veille eco...

Страница 42: ...E3 Erreur du capteur de température du condenseur certains modèles E4 Erreur de communication du panneau d affichage P1 Le bac inférieur est rempli Connectez le tuyau de vidange et évacuez l eau collectée Si le code de protection se répète appelez le service d assistance Instructions d e xploitation Lorsque l un des dysfonctionnements suivants ez s il n y a pas d obstructions Redémarrez l Unité Si...

Страница 43: ...uton Fan pendant trois secondes pour activer ou désactiver la fonction de ventilation constante Lorsque la fonction est activée le témoin lumineux du ventilateur s allumera confirmant le fonctionnement continu du ventilateur pour le refroidissement Lorsque la fonction est désactivée le témoin lumineux du ventilateur s éteint confirmant que le cycle de ventilation en cours avec le compresseur est e...

Страница 44: ...raison d une panne de courant elle redémarrera automatiquement dans la fonction précédemment réglée à la reprise du courant ATTENDEZ 3 MINUTES AVANT DE REPRENDRE L OPÉRATION Après l arrêt de l unité vous devrez attendre au moins 3 minutes avant de la redémarrer Ceci sert à protéger l unité Le fonctionnement reprendra automatiquement après 3 minutes RÉGLAGE DE LA DIRECTION DU FLUX D AIR ux d air Qu...

Страница 45: ...dange retirez le bouchon de vidange inférieur et laissez l eau s écouler Réinstallez le bouchon de vidange inférieur et redémarrez la machine jusqu à ce que le symbole P1 disparaisse Si l erreur se répète appelez le service Instructions d e xploitation Assurez vous de réinstaller fermement le bouchon de vidange inférieur pour éviter les fuites avant d utiliser l unité Adaptateur de tuyau de draina...

Страница 46: ... à au moins 50 cm 19 7 po du mur le plus proche pour assurer une bonne climatisation NE COUVREZ PAS les entrées les sorties ou le récepteur de signal à distance de l unité car cela pourrait endommager l unité AVIS À propos des gaz fluorés uorés Pour obtenir ques sur le type et la quantité de gaz veuillez consulter l étiquette correspondante sur l unité é ectué conformément aux réglementations local...

Страница 47: ...illips moyen Ruban à mesurer ou règle Couteau ou ciseaux Scie en option pour raccourcir l adaptateur de fenêtre pour les fenêtres étroites Instructions d installation 1 pièce 1 pièce 2 pièce 1 jeu 1 jeu 1 jeu Joint en mousse A adhésif Joint en mousse B adhésif Joint en mousse C Non adhésif Support de sécurité et 2 vis Tuyau de drainage Adaptateur de tuyau de drainage Pour le mode pompe à chaleur T...

Страница 48: ...chappement glissez vers le bas dans la direction indiquée par la flèche pour l installation Troisième étape Préparation du adaptateur de fenêtre réglable 1 Sélectionnez le curseur de fenêtre en fonction de la taille de la fenêtre Parfois le curseur doit être coupé pour répondre à la taille de la fenêtre 2 Après ajustement de la glissière de fenêtre sur une longueur appropriée elle est fixée au moy...

Страница 49: ...pour empêcher l air et les insectes d entrer dans la pièce 4 Si vous le souhaitez installez le support de sécurité avec 2 vis comme indiqué 5 Insérez l adaptateur de l adaptateur de fenêtre dans le trou de l adaptateur de la fenêtre Lorsque le tuyau d échappement et l adaptateur de la fenêtre ajustable sont prêts choisissez l une des deux méthodes d installation suivantes Joint en mousse B Type d ...

Страница 50: ...vec 2 vis comme indiqué 5 Insérez l adaptateur du curseur de fenêtre dans le trou du curseur de la fenêtre Adaptateur de la fenêtre A Adaptateur de la fenêtre B si nécessaire Joint en mousse B type adhésif plus court Joint en mousse A type adhésif Joint en mousse C type non adhésif 2 Vis Sécurité Support Instructions d installation Pour assurer un bon fonctionnement assurez vous de NE PAS trop éte...

Страница 51: ... éviter les moisissures Dans les maisons où des animaux sont présents vous devrez périodiquement essuyer la gr d air bloqué par des poils d animaux MISE EN GARDE ltre car la saleté et les peluches l obstruent et réduisent les performances ENTRETIEN ET NETTOYAGE Entretien et nettoyage Vidangez le bac collecteur d eau de l unité en suivant les instructions de la section suivante Faites fonctionner l...

Страница 52: ...loqué par de la poussière ou des poils d animaux L appareil et le nettoyeur conformément aux instructions Le tuyau d échappement n est pas connecté ou est bloqué Tournez l unité débranchez le Le réglage de la température est trop élevé diminuer la température de consigne Assurez vous que toutes les fenêtres et portes sont fermées L appareil est bruyant et ou vibre trop Theor n est pas de niveau Pl...

Страница 53: ...Si vous êtes sensible à la lumière quand vous dormez appuyez sur le bouton LED pour éteindre l affichage LED de l appareil Appuyez sur le bouton à nouveau pour le rallumer Bouton de détection de température et d affichage de la température ambiante OSCILLATION Commence et arrête les mouvements de persienne VEILLE Economise de l énergie pendant les heures de sommeil TEMP Réduire la température de 1...

Страница 54: ...rtiment des piles 2 Insérez les piles en faisant attention à l extrémité positive et négative les symboles se trouvent dans le compartiment des piles 3 Replacez le couvercle des piles ÉLIMINATION DE PILES Ne jetez pas de piles dans les déchets municipaux non triés Renseignez vous auprès de la législation locale pour l élimination appropriée des piles CONSEILS POUR L UTILISATION DE LA TÉLÉCOMMANDE ...

Страница 55: ...e sur cet appareil L affichage VITESSE DU VENTILATEUR Affichage sélectionné VITESSE DU VENTILATEUR ÉLEVÉ MOYEN FAIBLE Cet affichage est vide quand la vitesse AUTO est activée Température Affichage de minuterie Affiche la température choisie par défaut ou les réglages de minuterie quand vous utilisez les fonctionnalités MINUTERIE ALLUMÉE ÉTEINTE Plage de température 17 30 C 62 F 86 F Plage de régla...

Страница 56: ...onner le mode COOL REFROIDIR 2 Choississez la température souhaitée en utilisant le bouton Temp ou le bouton Temp 3 Appuyez sur le bouton FAN VENTILATEUR pour sélectionner la vitesse du ventilateur AUTO FAIBLE MOYEN ou ÉLEVÉ 4 Appuyez sur le bouton ALLUMER ÉTEINDRE pour allumer l appareil Fonctionalité SEC DÉSHUMIDIFICATION 1 Appuyez sur le bouton MODE pour sélectionner le mode DRY SEC 2 Choississ...

Страница 57: ...ENTILATEUR pour sélectionner la vitesse du ventilateur AUTO FAIBLE MOYEN ou ÉLEVÉ 4 Appuyez sur le bouton ALLUMER ÉTEINDRE pour allumer l appareil Fonctionnalités de base suite Vous ne pouvez pas régler la température dans le mode FAN VENTILATEUR Par conséquent l affichage LCD de votre télécommande n affichera pas la température Lorsque la température extérieure baisse la performance de la fonctio...

Страница 58: ...ple si vous réglez MARCHE ON pour 2 heures 2 0h apparaitra sur l écran et l unité se mettra en marche après 2 heures 2 Appuyez plusieurs fois sur le bouton MARCHE ON pour régler l heure à laquelle vous souhaitez que l unité se mette en marche 3 Attendez 2 secondes puis la fonction MARCHE ON sera activée L écran numérique sur la télécommande reviendra alors sur l écran de la température La fonction...

Страница 59: ...erie est réglée Pour se mettre en marche 6 heures après L heure actuelle La minuterie est réglée Éteindre 8 heures après L heure actuelle Heure actuelle 13 00 14 00 15 00 16 00 17 00 18 00 19 00 20 00 21 00 L unité est en mode ON L unité est en mode OFF 6 heures après 8 heures après Début de la minuterie L écran de votre télécommande Lors du réglage des fonctions MINUTERIE ALLUMÉE MARCHE ON ou MIN...

Страница 60: ...nement la température réglée le niveau de vitesse du ventilateur et la fonction de veille si activée Si vous maintenez enfoncé le bouton pendant plus de 2 secondes le système reviendra automatiquement sur les réglages de fonctionnement actuel en incluant le mode de fonctionnement la température réglée le niveau de vitesse du ventilateur et la fonction de veille si activée La fonction VEILLE n est ...

Страница 61: ...ilité ou des problèmes de réseau 3 Ce climatiseur intelligent prend uniquement en charge le cryptage WPA PSK WPA2 PSK recommandé Veuillez consulter le site Web Toshiba Lifestyle us toshiba lifestyle com pour obtenir des informations actualisées 4 Pour assurer une numérisation correcte du code QR votre téléphone intelligent doit disposer d un appareil photo d au moins 5 mégapixels 5 t i u d o r p e...

Страница 62: ...intelligent 1 Téléphone Intelligent avec système compatible iOS ou Android 2 3 Climatiseur Intelligent Routeur Sans fil Il faut un réseau de 2 4 GHz pour se connecter 5 TELECHARGEMENT ET INSTALLATION DE L APPLICATION Code QR Android Code QR Apple Numérisez pour télécharger l application Vous pouvez également aller sur Google Play ou App Store et rechercher Toshiba Climatiseur Intelligent Pour plus...

Страница 63: ... d une connexion Internet opérationnelle Il est recommandé d activer votre compte immédiatement pour pouvoir récupérer votre mot de passe par courriel Instructions de la télécommande et de l application Page 63 Guide d Utilisateur 6 3 Appuyez sur Inscription 6 4 Si vous avez oublié votre mot de passe appuyez sur Mot de Passe oublié dans le menu principal et entrez votre adresse de courriel Puis ap...

Страница 64: ...pareil ne se connecte pas à d autres réseaux à portée Instructions de la télécommande et de l application Page 64 Guide d Utilisateur APPLICATION SUPPLÉMENTAIRE ET FONCTIONS SMART HOME Pour obtenir des instructions supplémentaires concernant les fonctionnalités de l application et les capacités de compétences Smart Home scannez le code QR ci dessous ...

Отзывы: