background image

Configuration Software

Page 36

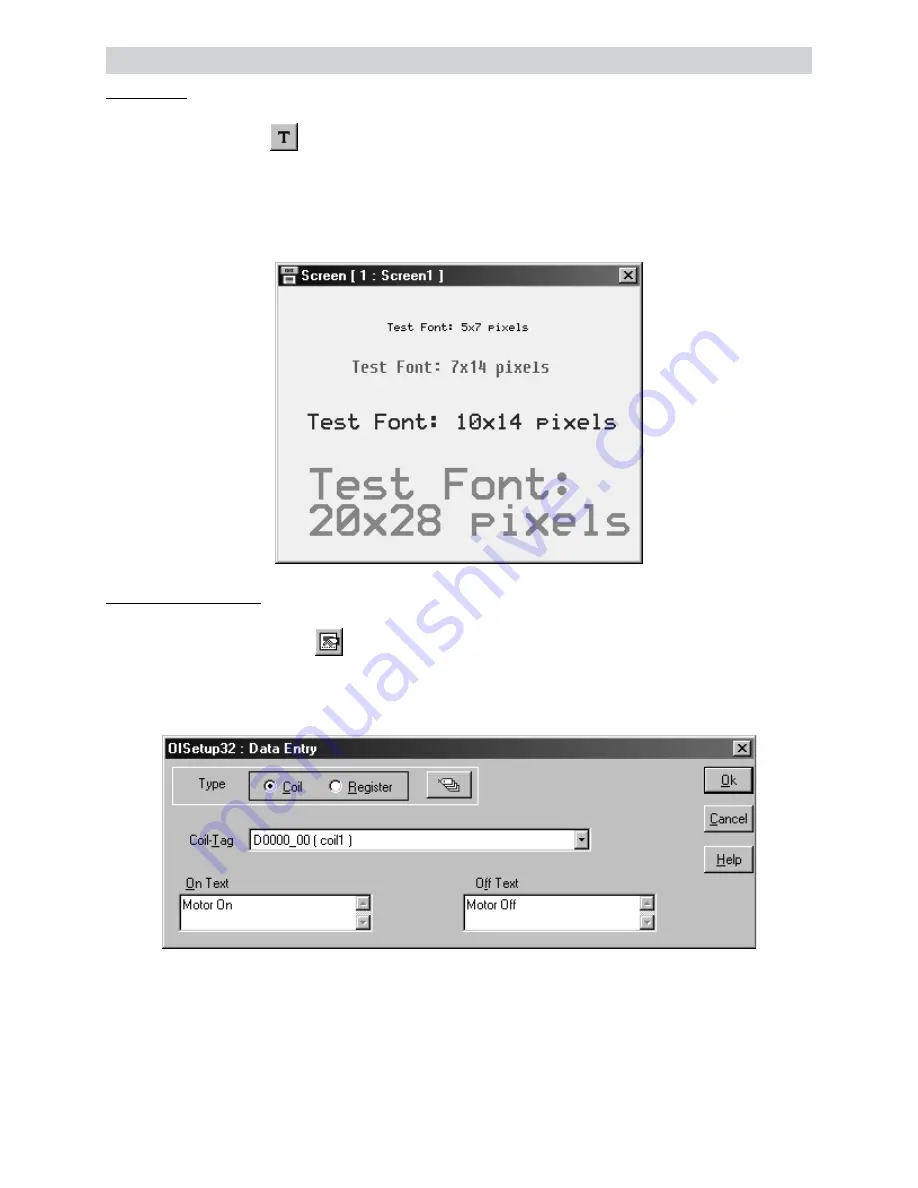
Text Object:

Click on the Text button 

. The shape of the mouse pointer will change. Select the required Font Size

Text Foreground color, Text Background color. Now place the mouse pointer at desired location and mark
the area of text object while holding the left mouse button. Even if no area is marked, user can enter the
text and later edit the object size. A block cursor will blink at the location inside the text outline. Now enter
text. The last character will be overwritten If the INSERT Mode (Computer Keyboard) is disabled, else
new character will not be accepted.

Coil Data Entry Object:

Click on the Data Entry button 

. The mouse pointer will change to the tool shape. Now place the

mouse pointer at desired location and click the left mouse button. The data entry dialog box will appear.
This box will allow user to select between Coil and Register Data entry.  If Coil data entry is selected
fields to be completed are Coil Tag and on / off text.

Содержание OIS Series

Страница 1: ...Contents i UMAN OIS60 0603 Operator Interface Station OIS60 USER S MANUAL Setup and Operation CONTENTS For Toshiba T Series Programmable Logic Controllers Toshiba International Corporation ...

Страница 2: ...ope that you find this manual informative If additional information or technical assistance is needed please contact Toshiba International Corporation 13131 W Little York Road Houston TX 77041 Tel 1 800 231 1412 Fax 713 896 5218 Website www tic toshiba com Email plc tic toshiba com Manual Revisions If you contact us in reference to this manual please include the following document number Name User...

Страница 3: ...ommunications 12 4 Understanding OIS Features 13 4 1 Screens 14 4 2 Alarms 20 4 3 Application Task List 20 5 Configuration Software 23 5 1 Introduction to Configuration Software OISetup32 24 5 2 Installing OISetup32 Software 24 5 3 OISetup32 Software Basic 25 5 3 Create New Application 31 5 4 Save and Download Application 51 6 Applications Examples 53 6 1 Installations and Setup 54 6 2 Define Node...

Страница 4: ...Contents iv 8 Diagnostics and Maintenance 69 8 1 Diagnostics 70 8 2 Maintenance 71 Appendix v A Cable Diagrams vi B Order Numbers for OIS Converters Cables viii ...

Страница 5: ...Introduction Page 1 1 INTRODUCTION In this Chapter Purpose of this Manual Introduction to OIS60 How OIS60 works OIS60 Specifications Ø Ø Ø Ø ...

Страница 6: ...es described herein may not be present in all hardware Toshiba reserves the right to update information in this publication without prior notice 1 2 Introduction to OIS60 OIS Series operator interfaces provide man machine interface to the PLC system The OIS communicates with the PLC using on its serial communications port Configuration of OIS Each OIS has to be configured using the OISetup32 Softw...

Страница 7: ...in the application The sequence is as shown below Power up Message Power up Task START IBM Comm A Complete IBM Communication PLC Comm Error Y N N Y Re establish PLC Communication Re Start Global Task Check Screen Number N Y Same Screen Number C Perform After Hiding Task for Previous Screen Password Protected Screen N Y D B ...

Страница 8: ...Upload Alarm Block Serv Alarm Display Screen Display Associated Screens Serv While Showing Task Y N Key Release task Same key Pressed Load new keys I Valid Screen password N Y Perform Before Showing Task List for new Screen F D C Upload Tag Block B ...

Страница 9: ...Introduction Page 5 Y N New key Pressed A I Y N Valid Key Password A Serv Key Press Task Password Protected Key Y G N G A ...

Страница 10: ...25 20 mm Humidity 10 to 90 Non condensing Communication Ports Two ports one for connecting to the PLC and one for programming serial printing Immunity to ESD Level 3 as per IEC1000 4 2 Immunity to Transients Level 3 as per IEC1000 4 4 Radiated Susceptibility Level 3 as per IEC1000 4 3 Emissions EN55011 CISPR A System Components OIS60 unit with LCD display and Touch Screen Power Supply connector In...

Страница 11: ...Hardware Page 7 2 HARDWARE In this Chapter Installation Instructions Power Requirements Serial Port PLC Port Ø Ø Ø Ø ...

Страница 12: ...igh humidity causes condensation of water in the unit Location Considerations Care should be taken when locating equipment behind the OIS to ensure that AC power wiring PLC output modules contactors starters relays and any other source of electrical interference are located away from OIS60 Particular care should be taken to the position of Variable speed drives and switching power supplies away fr...

Страница 13: ...en below while making power supply connections for models Follow the wiring diagram on the sticker of the unit which shows terminals for the positive DC negative DC and Earth To make a connection strip about 1 4 of insulation of the wire turn the connector screw counter clock wise until the gap is wide open Insert the wire all the way in and turn the screw clockwise until it is tight Wire lengths ...

Страница 14: ...ows TX RS485 DB9 Female 1 5 9 6 DO NOT CONNECT TO GROUND Signal Ground RX RS485 RXD RS232C TXD RS232C TX RS485 TXD CMOS RX RS485 6 8 9 7 2 4 5 3 1 DB9 Female 1 5 9 6 Signal Ground RXD RS232C TXD RS232C 2 3 5 2 4 PLC Port The cable connecting PLC to OIS is attached to PLC Port Different cables are required for different PLCs controllers Cable details for any particular PLC are given in the Operatio...

Страница 15: ...Getting Started Page 11 3 GETTING STARTED In this Chapter Introduction Application Tags Screens Keys and Tasks PLC Communications Ø Ø Ø ...

Страница 16: ... be first defined in the Tag data base The LCD display on OIS60 unit displays the PLC data on a Screen PLC data can be arranged on a screen using different objects Operator can control the process by actually changing the value of PLC registers This is possible with the help of the Touch Screen keys Different tasks can be assigned to keys on the OIS60 keypad Any register can be constantly monitore...

Страница 17: ...Understanding OIS Features Page 13 4 UNDERSTANDING OIS FEATURES In this Chapter Screens and Touch Screen Keys Alarms Application Task List Ø Ø Ø ...

Страница 18: ...rammer Please note Only one screen can be associated to any screen No data entry object can be placed in the screen to be associated No PLC tag embedding in the screen to be associated To embed a PLC tag In Global Task List the required PLC tag should be copied to an internal tag The internal tag should be embedded in the screen to be associated 4 1 3 Screen Task List Tasks are operations performe...

Страница 19: ...sion Screen is changed to display the previous screen If two screens are not successive there is a gap between two screens then Screen not defined message will be displayed This message will stay on the screen till a valid screen is called Again this task does not work when a PLC tag is used as a STR 4 Write Value to a Tag A constant value can be downloaded to a tag using this task provided the ta...

Страница 20: ...ait This is a conditional delay Next task will not be performed till the specified condition is false 19 Copy Recipe block to PLC block Recipe block will be copied to PLC block using this task The block size will be set by the user 20 Copy PLC block to Recipe block PLC block will be copied to Recipe block using this task The block size will be set by the user While defining double Tag operations m...

Страница 21: ...e Cursor to Left Cursor is moved to left to edit next digit 11 Move Cursor to Right Cursor is moved to right to edit next digit 12 Sign Key Used for signed data entry 13 Sign Key and 0 Single key used as a sign key as well as numeric key 0 If this key is pressed immediately after data entry is initiated key is taken as sign key else it is taken as 0 key 14 Numeric Key 0 9 Enters the numeric after ...

Страница 22: ...d 0 to enter negative sign Sign will be automatically adjusted for the other models For models without numeric keypad use keys with definition Increase Digit by 1 and Shift Value to Left else use Numeric keys 0 through 9 to edit register data 3 Press key with definition Accept Data Entry to accept the data entered When a new application is created each key is assigned a default definition by the s...

Страница 23: ...lication This object is like a redefinable key without any conditions 15 Word Button User can define various tasks for the same Touch key Different tasks are defined for different states of a word tag User can also change the display of the button depending on the state of the tag Tasks of each state can further be defined for three instances press pressed and released 16 Bit Lamp Status of coils ...

Страница 24: ...ine a key to acknowl edge alarms User can also scroll through the table of alarms using keys defined as Next Alarm and Previous Alarm Acknowledged and Inactive alarm is deleted from the container New alarm is added to the bottom of the container The alarm container has the capacity to store 64 alarms Total 256 alarms can be defined To display alarm user must follow steps given below 1 Define conse...

Страница 25: ... on the screen till a valid screen is called This task does not work when a PLC tag is used as a STR 3 Goto Previous Screen This task is useful when two screens are in succession Screen is changed to display the previous screen If two screens are not successive there is a gap between two screens then Screen not defined message will be displayed This message will stay on the screen till a valid scr...

Страница 26: ...screen to be displayed 16 Copy Tag to LED LEDs of the Prizm can be used to reflect the value of a tag The tag should be copied to LED register for such functionality 17 Delay An unconditional delay can be added to the task list All the tasks after this task are delayed by the specified time 18 Wait All the tasks after this task are not performed till the condition specified by this task does not b...

Страница 27: ...n Software Page 23 5 CONFIGURATION SOFTWARE In this Chapter Introduction to OISetup32 Software Installing OISetup32 Software OISetup32 Software Basics Create a New Application Save andDownload Application Ø Ø Ø Ø Ø ...

Страница 28: ... OIS60 communicates with a PLC only after downloading the correct driver and application into the unit The OIS user should follow the procedure to configure and use the OIS 1 Create an application for required PLC 2 Apply 24VDC power to OIS60 3 Connect IBM cable to the communication port of OIS60 marked as Serial Port 4 Download Firmware i e driver for the PLC The OIS60 unit cannot communicate wit...

Страница 29: ...red in a Key Queue User can change the queue size using this option Queue full options User has a choice to select what should be done if the queue is full and another key is pressed Either the first or the last key pressed can be ignored d Float Format This option defines how float data will be stored in the unit Generally it is not required to be changed It should be changed only when float form...

Страница 30: ...e screen of the OIS60 unit Tasks can be defined for a screen Also the action for touch keys when a screen is acting can be defined 5 3 5 OIS Alarms Alarms can be defined in the Alarms Window Alarms are defined on a single bit of any one word tag All the tags must be defined before defining the Alarms Alarms can be set on each bit in any Tag 5 3 6 OIS Application Task List Application Task List is ...

Страница 31: ... displayed New Creates a new application Open Opens a saved application Close Closes currently open application Save Saves currently open application Save as Saves the current application with a different name Information Application related information can be stored here User can enter his comments here Exit Exits OISetup32 Software The Tool Station consists of icons When the mouse points to any ...

Страница 32: ...is menu OIS Settings Defines OIS settings Normally there is no need to change these settings Network Configuration Defines PLC node node ID etc Tag DataBase Defines tags to be used in the application Screens Defines screens Application Keys Defines application keys Alarms Defines alarms in the application Application Task List Defines Power on and Global Task list ...

Страница 33: ...ally useful for adding removing PLC drivers It also informs the user about the memory used for the application Add or Remove PLCs Adds removes PLCs to from the Selected PLCs list Close applications before adding or removing any PLC OIS Memory Configuration Displays statistics of the memory used by the current Font Selection User can edit the fonts by the Font Editor utility Clear Picture Library U...

Страница 34: ...Configuration Software Page 30 Index Lists all the Help topics About OIS Displays the software version number Ø Help Menu Help Menu as the name suggests offers help for the user application ...

Страница 35: ...Configuration Software Page 31 5 3 Create New Application Select New from File menu or click on the New Application button In the dialog presented select OIS60 model and press OK OR ...

Страница 36: ...utton In OIS Settings dialog box select Application memory Screen Saver Float format Key Queue Size and Serial printout options Press OK to accept the selections made Select PLC to be used in the system Select Network Configuration from Define menu or Press F4 key or click on the Network Configuration button OR OR ...

Страница 37: ... Add a Node button Now select PLC and PLC Model Assign a Node Address for the node Press OK to accept the selections made If another node has to be added repeat above steps else press Close Select Tag Database from Define menu or Press F5 key or click on the Tags button OR ...

Страница 38: ... select the Node Tag type Register enter Tag name and finally select number of bytes for the Tag Press Add to accept the Tag After adding all the tags press Close button Select Screens from Define menu or Press F6 key or click on the Screens button OR ...

Страница 39: ... Screen Task List To place an object click on the respective button in the Objects window Pointer will take the shape of the object Click the mouse at the required location on the screen to place the object All the tag dependent objects will allow user to access the Tag data base from their dialog box Clicking on the Selector button or another object button deselects the object selected Standard W...

Страница 40: ... A block cursor will blink at the location inside the text outline Now enter text The last character will be overwritten If the INSERT Mode Computer Keyboard is disabled else new character will not be accepted Coil Data Entry Object Click on the Data Entry button The mouse pointer will change to the tool shape Now place the mouse pointer at desired location and click the left mouse button The data...

Страница 41: ...ser Default format is Unsigned integer Low and High limits restrict the data that can be entered in the register Two mathematical operations can be performed on the data be entered Please ensure to place a Numeric Keypad object on the screen Display OIS PLC Data This object can be used to view PLC OIS To place embedding object click on Display OIS PLC Data Tool In the dialog box user can select ei...

Страница 42: ...ng Zero Blank option decides whether zeros preceding the value will be displayed or not If this option is enabled then register value will be displayed without Leading Zeros Register Text Object is value dependent text object User can define different text strings for different ranges of register values When the value is between a defined range corresponding text is displayed First select the regi...

Страница 43: ...t the format double click on the object In the dialog box the user can either select DD MM YY format or MM DD YY format Display Time Object Time can be displayed on the OIS display by placing a Display Time object To display the object click on the Time button Place Date Object on the screen To edit the format double click on the object In the dialog box the user can either select HH MM SS format ...

Страница 44: ...g box will enable user to select the fields to be displayed in an Alarms object Sequence and length of each field can also be varied Alarms tag and text must be defined from Define Alarm window Display Rectangle Object User can draw rectangle on the OIS display by using a Rectangle tool To draw the object click on the Rectangle button Place the tool on the screen drag till required size is reached...

Страница 45: ...nded corners on the OIS display by using a Rectangle tool To draw the object click on the Round Rectangle button Place on the screen drag till required size is reached To edit the object double click on the object In the dialog box the user can select size and location of the rectangle Display Line Object User can draw Line with rounded corners on the OIS display by using a Line tool To draw the o...

Страница 46: ...Properties defines the properties of actual button object General Attributes page is similar for all the wizard objects This page defines the label border properties Operation page defines the action for touch key and Feed back tag Feed back tag status defines the shape of the button on text off text Operation does not vary on the Feedback tag The presentation of the button on the display is decid...

Страница 47: ... screen Dialog box window will enable user to select State properties General Attributes User can define different tasks depending on different states ranges of a word tag Button display can also be varied depending on the state of the tag General attributes define the label properties and border enable disable ...

Страница 48: ...lace the tool on the screen Dialog box with three pages will be presented Lamp properties page defines the display of the actual lamp General attribute defines label properties and border enable disable Operation page defines the feedback tag coil Status of this coil changes the bitmap of the lamp ...

Страница 49: ...object dis plays various bitmaps depending on the states of a word tag Place the tool on the screen A dialog box with two pages will be presented Two tags State Properties and General Attributes decide how the object will be displayed State defines the range of the State tag word tag For each state different bitmaps can be defined ...

Страница 50: ...Object To draw the object click on the Single Bargraph button Place the tool on the screen User can select style to plot a bar for the specifies word tag Maximum and Minimum limits specify the range of tag to be plotted Select Fill color for the bar ...

Страница 51: ...Multiple Bargraph Object To draw the object click on the Multiple Bargraph button Place the tool on the screen User can select number of bars style bar width Individual bar properties sets Bar tag Bar color Maximum and Minimum limits ...

Страница 52: ...r pages Meter Foreground properties Meter Background properties General Properties Operation Foreground Properties define Meter divi sions meter text text font color display range Background Properties define needle color Meter style Color range settings General attributes define label properties and border enable disable Operation page defines meter start angle meter end angle word tag for meter ...

Страница 53: ...aw place object click on the Numeric Keypad button Place the tool on the screen This wizard helps user to edit any data Numeric keypad has to be placed on the screen which has a data entry object Various formats are available to select most appropriate format ...

Страница 54: ...oned here are performed immediately after the unit is powered on Here user has to specify the screen to be displayed after the unit is powered on User can either use Goto Screen task or Copy tag to STR task Goto task will write screen number to Screen Triggering Register STR and display the screen specified by STR Copy tag task will copy the speci fied PLC tag to Screen Triggering Register Screen ...

Страница 55: ...keyboard Application has to be downloaded to OIS60 From Communicate menu click Communication Port select appropriate communication port of your IBM PC Attach IBM PC to OIS60 cable From Communicate menu click Download OR OR A dialog box will be presented Select required directory to save the application Enter the name to save the application Click Save button ...

Страница 56: ...Configuration Software Page 52 In the download dialog box check Application radio button Press OK button to download application to OIS60 unit Now application will be executed ...

Страница 57: ...Page 53 Applications Examples 6 APPLICATIONS EXAMPLES In this Chapter Installations and Setup Define Node and Tags Define Screens Define Alarms Load Applications into OIS60 Ø Ø Ø Ø Ø ...

Страница 58: ...S60 The application will be for internal tags only Do the following 6 1 1 Click on the OISetup32 icon to run OISetup32 6 1 2 When the main window is displayed click on the New Application icon 6 1 3 From the New application dialog box select the OIS60 model Click OK to accept the selection made ...

Страница 59: ...al tags only hence we will not be adding any PLC in the network If user wants to add PLC in the network click on the Network Configuration icon Click on Add a node button From the PLC list select the PLC required Select the required model for the PLC Enter the Node ID number Click OK button to accept all the selections made ...

Страница 60: ...be displayed Select required register type and register address enter your name for the tag Click on the Add button to accept the tag defined To define a coil change the selection Tag type Enter coil number tag name and click Add to accept the tag entry Click on Close button to close the Tag Database window Define an internal coil D000_000 as Coil 1 and an internal Tag D0001 as D0001 We will use t...

Страница 61: ...ground and screen type Screen type is Display Screen will be displayed and will perform all tasks Print Only Screen will only be printed after it is triggered Both Screen will be displayed and printed after it is triggered Click OK to create a new screen Screens window will now appear on the monitor On the screen we will define following objects Plain Text Data entry for Coil 1 and D0001 Bit Lamp ...

Страница 62: ...xamples Plain Text Select Text Tool Select font size 7x14 Place tool on the screen Type the characters Data entry 1 Coil Data Entry Select Data Entry Tool Select Coil Coil 1 Enter On text as On Enter Off text as Off Click OK ...

Страница 63: ...Page 59 Applications Examples 2 Register Data Entry Select Tag D0001 Set Low Limit as 10000 Set High Limit as 20000 Click OK ...

Страница 64: ...Page 60 Applications Examples Bit Lamp Select Bitmap Lamp Tool Place it at proper location Select Lamp Style and size From Operation Page select the Tag as Coil 1 ...

Страница 65: ...Page 61 Applications Examples Analog Meter Select Bitmap Lamp Tool Place it at proper location From Operation page select Tag as D0001 Set Display Range as 0 to 65535 Set End tag value as 60000 ...

Страница 66: ...ons Select Bit Button Tool Place on the screen Buttons will be used to Acknowledge alarm View Next alarm Previous alarm Clear Alarm Tag value Select appropriate tasks fro Operation page for the button Edit button text according to the task ...

Страница 67: ...Page 63 Applications Examples Alarm Object Select Alarms Object Tool Add the Number field Set Alarm text length as 10 Click OK to accept object ...

Страница 68: ...in the alarm window only if it is defined from the Define Alarm menu Close screen window Click tool Select tag as D0001 Add Alarm 0 text for Bit 0 Add Alarm 1 text for Bit 1 Select print option to enable printing for any particular alarm Click OK to accept the alarm options ...

Страница 69: ...t power on task is defined to be Goto Screen of number 00001 If user wants to display a different screen he must change this number after defining all the screens If user wants to control the screen display from the PLC he must define a task Copy tag to STR in Global task list Now screens will be displayed depending on the value in the defined tag Screens can also be changed from the touch key or ...

Страница 70: ...6 Applications Examples 6 6 Load Applications into OIS60 Click to save this application Click to download application in OIS60 Select Application from the download window presented Click OK to start Download ...

Страница 71: ...Page 67 Frequently Asked Questions 7 FREQUENTLY ASKED QUESTIONS In this Chapter How Do I Ø ...

Страница 72: ...o avoid Screen not defined message Please note that the Goto screen Goto next screen and Goto previous screen tasks will not work in this case To change the screen the value of the PLC data should be changed 5 Can I perform any task continuously To perform any task continuously define the task in Global Application Task List This task will be per formed till the unit is powered down 6 How can I Ho...

Страница 73: ...Page 69 Diagnostics and Maintenance 8 DIAGNOSTICS AND MAINTENANCE In this Chapter Diagnostics Maintenance Ø Ø ...

Страница 74: ... 2 seconds the screen will change to test Touch Screen 5 Press Blue Touch key in top right corner to continuously increment tag If pressed inside a valid boundary single beep results It indicate active touch area 6 Use Numeric keypad to enter Hexadecimal data 7 Press NEXT to go to next screen 8 Screen 3 tests PLC port of the unit When PLC communication starts COMM LED on the overlay blinks 9 Timer...

Страница 75: ...ith a message Touch here with stylus 3 Touch the center of the cross with a pointed object stylus recommended You will get a next screen showing a cross at the top right of the screen with a message Touch here with stylus 4 Touch the center of the cross with a pointed object stylus recommended The screen has now been calibrated and will return to its normal mode 8 2 Maintenance 8 2 1 Clean all sid...

Страница 76: ...v Appendix APPENDIX In this Chapter Cable Diagrams Order Numbers for Model and Cables Ø Ø ...

Страница 77: ...C P 019B 00 PLC End 8 Pin MINIDIN OIS End DB9 Male 123 123 1 6 3 4 7 8 5 2 RXD TXD GND SHIELD TXD RXD GND SHIELD RXD TXD GND SHIELD 3 2 5 9 6 8 5 Short pin 4 7 at PLC end PLC End DB9 Male OIS End DB9 Male 1 5 9 6 1 5 9 6 RXD TXD GND TXD RXD GND 2 3 5 2 3 5 1 5 9 6 1 5 9 6 1 5 9 6 123 123 123 123 123 123 RXD TXD GND SHIELD TXD RXD GND SHIELD RXD TXD GND SHIELD 3 2 5 9 3 2 5 Short pin 7 8 at PLC end...

Страница 78: ...3 RX is also known as RXA Pin Configuration for EC P 046B 00 OIS End DB9 Male RX TX GND RX TX GND TX RX GND TX RX GND SHIELD 1 4 5 8 9 2 3 7 10 11 1 Short pin 4 5 at PLC end Short pin 12 13 at PLC end PLC End DB15 Male Pin Configuration for EC P 050 00 OIS End DB9 Male RXD CMOS TXD GND CMOS TXD RXD GND 7 3 5 3 5 2 PLC End 8P8C Connector 123 123 123 123 123 123 1234 ...

Страница 79: ...ects to T1 programing port 2 meter EC P 019B 00 Cable connects to T2 programing port 2 meter EC P 046A 00 Cable connects to T1 T2E RS485 port 2 meter EC P 046B 00 Cable connects to T2N RS485 port DB15 Connector 2 meter EC P 050 00 Cable connects to VF S7_nC1 port 2 meter Programing cable common for OIS60 26 117B RdioShack RS232 Programming Cable or equivalent 9 pin D shell male female order direct...

Страница 80: ...i TOSHIBA INTERNATIONAL CORPORATION 13131 W Little York Road Houston TX77041 Tel 1 800 231 1412 Fax 713 896 5218 Website www tic toshiba com E mail plc tic toshiba com ...

Отзывы: