


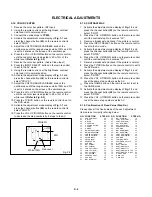


ELECTRICAL ADJUSTMENTS
D-3
1.
2.
3.
4.
Receive the VHF HIGH (70dB).
Connect the AC voltmeter to pin 6 of CP101.
Activate the adjustment mode display of Fig. 1-1 and
press the channel button (63) on the remote control to
select "LVL".
Press the VOL. UP/DOWN button on the remote control
until the AC voltmeter is 75
±
2mV.
2-11: LEVEL
2-10: OSD HORIZONTAL
Activate the adjustment mode display of Fig. 1-1.
Press the VOL. UP/DOWN button on the remote control
until the difference of A and B becomes minimum.
(Refer to Fig. 2-1)
1.
2.
B
A
Fig. 2-1
01 OSD
14
2-12: BRIGHT CENTER
1.
2.
3.
4.
5.
6.
7.
8.
9.
10.
11.
12.
13.
14.
15.
Receive the monoscope pattern. (RF Input)
Using the remote control, set the brightness and contrast
to normal position.
Activate the adjustment mode display of Fig. 1-1 and
press the channel button (18) on the remote control to
select "BRTC".
Press the VOL. UP/DOWN button on the remote control
until the white 15% is starting to be visible
Receive the monoscope pattern. (Audio Video Input)
Press the INPUT SELECT button on the remote control
to set to the AV mode.
Using the remote control, set the brightness and contrast
to normal position.
Activate the adjustment mode display of Fig. 1-1 and
press the channel button (30) on the remote control to
select "BRTCA".
Press the VOL. UP/DOWN button on the remote control
until the white 15% is starting to be visible
Press the TV/DVD button on the remote control to set to
the DVD mode.
Activate the adjustment mode display of Fig. 1-1 and
press the channel button (42) on the remote control to
select "BRTCD".
Press the VOL. UP/DOWN button on the remote control
to set the same step numbers as the AV.
Press the GAME button on the remote control to set to
the GAME mode.
Activate the adjustment mode display of Fig. 1-1 and
press the channel button (54) on the remote control to
select "BRTCG".
Press the VOL. UP/DOWN button on the remote control
to set the same step numbers as the AV.
2-13: TINT CENTER
1.
2.
3.
4.
5.
6.
7.
8.
9.
10.
11.
12.
13.
Receive the color bar pattern. (RF Input)
Using the remote control, set the brightness, contrast,
color and tint to normal position.
Connect the oscilloscope to TP024.
Activate the adjustment mode display of Fig. 1-1 and
press the channel button (27) on the remote control to
select "TNTC".
Press the VOL. UP/DOWN button on the remote control
until the section "A" becomes a straight line.
(Refer to Fig. 2-2)
Receive the color bar pattern. (Audio Video Input)
Press the INPUT SELECT button on the remote control
to set to the AV mode.
Using the remote control, set the brightness, contrast,
color and tint to normal position.
Activate the adjustment mode display of Fig. 1-1 and
press the channel button (39) on the remote control to
select "TNTCA".
Press the VOL. UP/DOWN button on the remote control
until the section "A" becomes a straight line.
(Refer to Fig. 2-2)
Press the TV/DVD button on the remote control to set to
the DVD mode.
Activate the adjustment mode display of Fig. 1-1 and
press the channel button (51) on the remote control to
select "TNTCD".
Press the VOL. UP/DOWN button on the remote control
to set the same step numbers as the AV.
Fig. 2-2
"A"
Содержание MD20P1C
Страница 1: ...SERVICE MANUAL COLOR TELEVISION DVD VIDEO PLAYER MD20P1C FILE NO 140 200421 ...
Страница 59: ...MECHANICAL EXPLODED VIEW PACKING DIAGRAM I1 3 124 125 122 121 127 129 BL001 TM101 124 123 123 ...
Страница 68: ...TOSHIBA CORPORATION 1 1 SHIBAURA 1 CHOME MINATO KU TOKYO 105 8001 JAPAN ...


