background image

Setting up Network Settings (Printing Function)    89

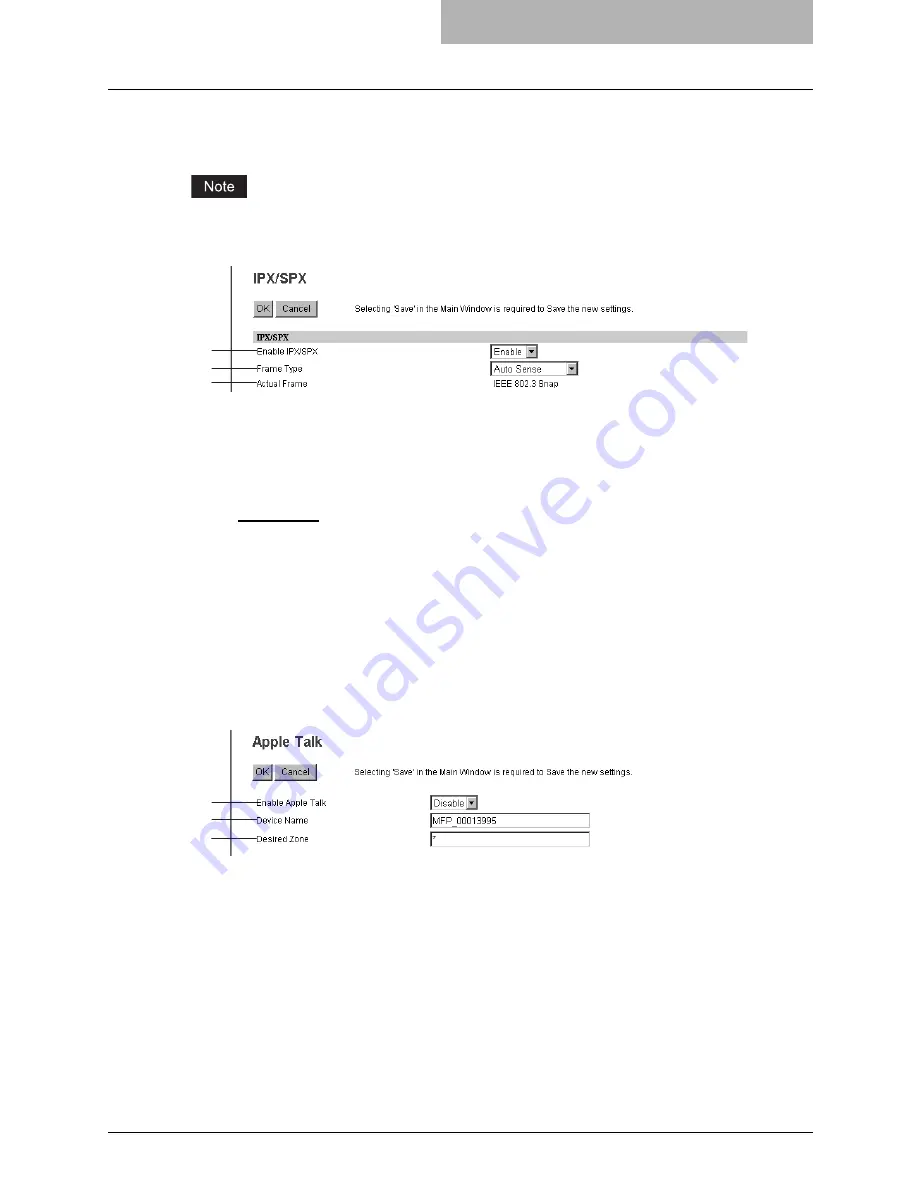
Setting up the IPX/SPX

You can set the IPX/SPX protocol to enable the communication over IPX/SPX.

The IPX/SPX must be configured to enable Novell printing with NetWare server 5.1/6.0/6.5 over 
IPX/SPX.

1) Enable IPX/SPX

Select whether the IPX/SPX protocol is enabled or disabled.  Please enable this when con-
figuring Novell printing over the IPX/SPX network.

2) Frame Type

Select the desired frame type for IPX/SPX.

-

Auto Sense

 — Select this to use an appropriate frame type that the equipment found 

first.

-

IEEE 802.3/Ethernet II/IEEE 802.3 Snap/IEEE802.2

 — Instead of “Auto Sense”, select 

the frame types to be used from these options.

3) Actual Frame

This displays the actual frame type of the equipment.

Setting up the AppleTalk

You can set the protocol to enable communication over AppleTalk.  The AppleTalk must be con-
figured to enable AppleTalk printing from Macintosh computers.

1) Enable Apple Talk

Select whether the AppleTalk protocol is enabled or disabled.  Please enable this when con-
figuring AppleTalk printing.

2) Device Name

Enter the device name of the equipment that will be displayed in the AppleTalk network.

3) Desired Zone

Enter the zone name where the equipment will connect — if required.  If you leave an aster-
isk in this field, the equipment will connect to the default zone.

1
2
3

1
2

3

Содержание GA-1190

Страница 1: ...MULTIFUNCTIONAL DIGITAL SYSTEMS Setup Guide for Printing Functions GA 1190 ...

Страница 2: ......

Страница 3: ... the following option is installed y Network Printer Kit This Setup Guide for Printing Functions describes the following y Printer related settings using the control panel of this equipment y Settings and management of this equipment from a computer using TopAccess Be sure to read this manual before using the e STUDIO165 205 or e STUDIO167 207 237 with the options above Keep this manual handy and ...

Страница 4: ...as installed System in accordance with the terms con tained in this Agreement This Software is proprietary to TTEC and or its suppliers TTEC and its suppliers disclaim responsibility for the installation and or use of this Software and for the results obtained by using this Software You may use one copy of the Software as installed on a single System and may not copy the Software for any reason ex...

Страница 5: ...ubject to restrictions set forth in subdivision b 3 ii or c i ii of the Rights in Technical Data and Computer Software Clause set forth in 252 227 7013 or 52 227 19 c 2 of the DOD FAR as appropriate Contractor Manufacturer is TOSHIBA TEC Corporation 6 78 Minami cho Mishima shi Shizuoka ken 411 8520 Japan General You may not sublicense lease rent assign or transfer this license or the Software Any ...

Страница 6: ...s safety precautions to ensure correct and safe use of this equipment Be sure to read this before you use the equip ment Operator s Manual for Facsimile Function Booklet This manual describes how to use the Fax functions Various functions both basic and advanced regarding Fax transmission reception are avail able Quick Start Guide for Printing Functions Booklet This manual gives basic information ...

Страница 7: ...on necessary for sending a Fax from a computer via a net work such as the installation of the client software use of the N W Fax driver and the co packed application software AddressBook Viewer Quick Start Guide for Scanning Functions PDF file This manual gives the basic information regarding the scanning functions such as the GA 1200 accessories necessary environmental conditions and outline of n...

Страница 8: ...zilla Firefox and Firefox logo are trademarks or registered trademarks of Mozilla Founda tion in the U S and other countries y Netscape is a trademark of Netscape Communications Corporation y IBM AT and AIX are trademarks of International Business Machines Corporation y NOVELL NetWare and NDS are trademarks of Novell Inc y TopAccess is a trademark of Toshiba Tec Corporation y Other company names a...

Страница 9: ... 18 To select each menu 19 To key in digits 21 Chapter 3 CANCELING PRINT JOBS AND PRINTING FONT LISTS EQUIPMENT To Cancel Print Jobs 24 To Print PCL PS Font List 25 PCL font list PS font list 25 Chapter 4 PRINTING LISTS EQUIPMENT To Print Lists 28 Configuration page 28 NIC status page 29 Chapter 5 CONFIGURING NETWORKS EQUIPMENT Network Configuration from Equipment 32 Ethernet Configuration 33 TCP ...

Страница 10: ...ing up an Open Mailbox 68 Deleting an Open Mailbox 74 Chapter 9 TopAccess COUNTER TAB PAGE Viewing Counters 78 Displaying the total counter 78 Displaying the department counter 79 Chapter 10 TopAccess ADMINISTRATION TAB PAGE SETUP MENU Printing Function Setting up Device Settings 83 Setting up the device information 84 Setting up the energy save 85 Setting up the time and date 85 Setting up the We...

Страница 11: ...nt 112 Setting up the LPD print 113 Setting up the IPP print 113 Setting up the NetWare print 114 Displaying Version Information 115 Chapter 11 TopAccess ADMINISTRATION TAB PAGE MAINTENANCE MENU About the Maintenance Functions 118 Switching Languages 119 Backing up Data 121 Restoring Data from Backup File 124 Importing Address Book Data 127 Exporting Address Book Data 130 Importing Department Code...

Страница 12: ...10 CONTENTS Chapter 14 APPENDIX List Print Format 144 INDEX 149 ...

Страница 13: ...1 OVERVIEW This chapter describes the contents of this manual and the required use environments of TopAccess Overview 12 Contents 12 Use environments of TopAccess 14 ...

Страница 14: ...STS EQUIPMENT Chapter 5 CONFIGURING NETWORKS EQUIPMENT Describes how to configure networks using the control panel of this equip ment P 31 CONFIGURING NETWORKS EQUIPMENT Printer related settings and management of this equipment using TopAccess The latter part of this manual describes how to set up and manage this equipment from your computer through a network using a co packed utility TopAccess To...

Страница 15: ...nction Chapter 11 TopAccess ADMINISTRATION TAB PAGE MAINTENANCE MENU Describes the maintenance of TopAccess performed by the TopAccess administrator P 117 TopAccess ADMINISTRATION TAB PAGE MAINTENANCE MENU Chapter 12 MANAGING DEPARTMENT CODES ON TopAccess FOR ADMINISTRA TORS Describes how to manage the department code by an administrator P 137 MANAGING DEPARTMENT CODES ON TopAccess FOR ADMINISTRAT...

Страница 16: ...Start Guide for Printing Functions Chapter 3 CONNECTING TO A COMPUTER Connecting to the Network y Setup Guide for Printing Functions This manual Chapter 5 CONFIGURING NETWORKS EQUIPMENT P 35 TCP IP Configuration P 44 HTTP Configuration Web browser TopAccess supports the following web browsers under Windows Macintosh or UNIX environ ments Windows Microsoft Internet Explorer 5 5 SP2 or later Mozilla...

Страница 17: ...S EQUIPMENT This chapter describes the basic operations on the control panel screens of this equipment Various Screens 16 Basic Operations on Each Screen 18 To select mode main screen 18 To select each menu 19 To key in digits 21 ...

Страница 18: ...ons the screen below appears after you turn the power ON Ready screen for Fax functions Fax mode main screen Mode main screens The mode selection main screens are 4 screens the copy mode main screen printer mode main screen user functions mode main screen and Fax mode main screen In these main screens menus selectable in the subject mode appear To select and operate the mode selection main screen ...

Страница 19: ...in this screen Example of YES NO selection screen Digit entry screen This screen appears when you key in any digits Enter digits using the digital keys on the control panel Error message screen This screen appears when an error has occurred CANCEL 1 YES 2 NO DEPARTMENT CODE ENTER DEPARTMENT NUMBER 1 99 6 DRAWER1 empty Open DRAWER1 Load paper Close DRAWER1 ...

Страница 20: ... screen copy mode main screen or printer mode main screen Also if you press the FUNCTION CLEAR button when the user function main screen is displayed the screen returns to the previously selected main screen PRINTER button and screen transition When you press the PRINTER button while you are operating each menu the screen shifts to the printer mode main screen For example when you press it while y...

Страница 21: ...sponding option is not installed Button Function Press these buttons to select menus or items The cursor moves to the menu or item selected The selected menu or item is highlighted When you press the cursor scrolls up When you press it scrolls down ENTER Press this button to execute the selected menu or item CANCEL Press this button to cancel the selected operation The screen returns to the previo...

Страница 22: ...titutes for the entry by pressing and the ENTER button With this function you can select a menu located at the bottom of the hierarchical menu tree structure by enter ing a series of numbers e g 03 03 02 PRINTER MODE 1 CANCEL JOB 2 PCL FONT LIST 3 PS FONT LIST CANCEL 1 YES 2 NO ENTER button or a digital key 1 1 ENTER button or a digital key 1 1 The selected menu is executed and the screen returns ...

Страница 23: ...this button to determine the digits keyed in Press these buttons to move the cursor to the right or left When you press the cursor moves to the left When you press it moves to the right When you want to correct a digit already keyed in move the cursor to the digit and then key in a new digit The digit is replaced with a new one CLEAR STOP Digits keyed in are all cleared ENTER button Digital keys C...

Страница 24: ......

Страница 25: ...G FONT LISTS EQUIPMENT This chapter describes how to cancel a print job in process and how to print font lists using the control panel of this equipment To Cancel Print Jobs 24 To Print PCL PS Font List 25 PCL font list PS font list 25 ...

Страница 26: ...ossible only when this equipment is actually printing a job If you attempt to cancel a print job when this equipment is not doing so Not allowed now appears in the screen 1 Press the PRINTER button when the ready screen is dis played The printer mode main screen appears 2 Press or to select CAN CEL JOB and then press the ENTER button 3 Press or to select YES and then press the ENTER button The pri...

Страница 27: ...st PS font list You can print lists for the internal PCL font and PS font to be used for printing 1 Press the PRINTER button when the ready screen is dis played The printer mode main screen appears 2 Press or to select PCL FONT LIST or PS FONT LIST and then press the ENTER button Printing accepted appears and the selected internal font list is printed out The screen returns to the printer mode mai...

Страница 28: ......

Страница 29: ...4 PRINTING LISTS EQUIPMENT This chapter describes how to print printer related lists from the control panel of this equipment To Print Lists 28 Configuration page 28 NIC status page 29 ...

Страница 30: ...Functions y You can see the printer related menu list by printing the Menu List See the Operator s Man ual for Copying Functions Configuration page You can print out the setting status of the Network Printer Kit optional See the following Operator s Manual for details of the setting items regarding printing functions Quick Start Guide for Printing Functions Default Setting List Chapter 5 APPENDIX ...

Страница 31: ...is printed out LISTS 4 ITU MAILBOX 5 CONFIGURATION PAGE 6 NIC STATUS PAGE 1 Press the USER FUNCTIONS button The user functions mode main screen appears 2 Press or to select LISTS and then press the ENTER button 3 Press or to select NIC STATUS PAGE and then press the ENTER button Printing accepted appears and the NIC status page is printed out USER FUNCTIONS 1216 01 DEFAULT SETTINGS 02 LISTS 03 INI...

Страница 32: ......

Страница 33: ...er describes how to configure networks using the control panel of this equipment Network Configuration from Equipment 32 Ethernet Configuration 33 TCP IP Configuration 35 IPX SPX Configuration 40 AppleTalk Configuration 42 HTTP Configuration 44 ...

Страница 34: ...e TopAccess Before using a web based utility TopAccess TCP IP protocol and HTTP network server service must be configured in this equipment P 35 TCP IP Configuration P 44 HTTP Configuration When TCP IP and HTTP have been configured you can use TopAccess on your computer Once TopAccess is enabled all the network configurations including the reconfiguration of TCP IP and HTTP can be executed from To...

Страница 35: ...ER button 4 Press or to select ETH ERNET and then press the ENTER button 5 Press or to select LINK SPEED DUPLEX MODE and then press the ENTER but ton 6 Press or to select the desired link speed and com munication mode USER FUNCTIONS 00001216 01 DEFAULT SETTINGS 02 LISTS 03 INITIAL SETUP INITIAL SETUP 03 DRAWER SET POP UP 04 TERMINAL ID 05 NETWORK NETWORK 01 COMPLETE 02 ETHERNET 03 TCP IP ETHERNET ...

Страница 36: ...ULL Uses 100BASE TX full duplex communication mode y When you select other than AUTO above refer to the specifications of the network to which this equipment is connected y If you are not sure of the most appropriate link speed or communication mode select AUTO 8 Press the CANCEL button once to return the screen to the NETWORK menu screen If you press the CANCEL button more than twice and exit the...

Страница 37: ...uto IP function will assign a proper IP address to this equipment Configuring TCP IP using only DHCP When you connect this equipment to a local area network including a DHCP server and config ure TCP IP for this equipment using only DHCP without the Auto IP function select NO AUTOIP for the address assignment method When you select NO AUTOIP this equipment obtains an IP address subnet mask and gat...

Страница 38: ...utton once to return the screen to the NETWORK menu screen If you press the CANCEL button more than twice and exit the NETWORK menu the NIC initialization operation in the next step becomes ineffective In this case repeat the procedure from step 1 9 Press or to select COM PLETE and then press the ENTER button The initialization starts and Initializing appears When it is completed Operation Complet...

Страница 39: ...dy screen is displayed The user functions mode main screen appears 2 Press or to select INI TIAL SETUP and then press the ENTER button 3 Press or to select NET WORK and then press the ENTER button 4 Press or to select TCP IP and then press the ENTER button 5 Press or to select ADDRESS MODE and then press the ENTER button USER FUNCTIONS 00001216 01 DEFAULT SETTINGS 02 LISTS 03 INITIAL SETUP INITIAL...

Страница 40: ...elect DEFAULT GATEWAY and then press the ENTER button 12 Key in the default gateway value as required and then press the ENTER button 13 Press the CANCEL button once to return the screen to the NETWORK menu screen If you press the CANCEL button more than twice and exit the NETWORK menu the NIC initialization operation in the next step becomes ineffective In this case repeat the procedure from step...

Страница 41: ...he screen to the user function mode main screen 14 Press or to select COM PLETE and then press the ENTER button The initialization starts and Initializing appears When it is completed Operation Completed appears and the screen returns to the one shown in step 3 NETWORK 01 COMPLETE 02 ETHERNET 03 TCP IP ...

Страница 42: ...ect NET WORK and then press the ENTER button 4 Press or to select IPX SPX and then press the ENTER button 5 Press or to select IPX SPX and then press the ENTER button 6 Press or to select ENABLE and then press the ENTER button The screen returns to the one shown in step 5 7 Press or to select FRAME TYPE and then press the ENTER button USER FUNCTIONS 00001216 01 DEFAULT SETTINGS 02 LISTS 03 INITIAL...

Страница 43: ...h IEEE802 3 SNAP If you are not sure of the most appropriate frame type select AUTO SENSE 10 Press the CANCEL button once to return the screen to the NETWORK menu screen If you press the CANCEL button more than twice and exit the NETWORK menu the NIC initialization operation in the next step becomes ineffective In this case repeat the procedure from step 1 11 Press or to select COM PLETE and then ...

Страница 44: ... Press or to select INI TIAL SETUP and then press the ENTER button 3 Press or to select NET WORK and then press the ENTER button 4 Press or to select APPLETALK and then press the ENTER button 5 Press or to select APPLETALK and then press the ENTER button 6 Press or to select ENABLE for enabling Apple Talk or select DISABLE for disabling it Then press the ENTER button The screen returns to the one ...

Страница 45: ...tton more than twice and exit the NETWORK menu the NIC initialization operation in the next step becomes ineffective In this case repeat the procedure from step 1 8 Press or to select COM PLETE and then press the ENTER button The initialization starts and Initializing appears When it is completed Operation Completed appears and the screen returns to the one shown in step 3 NETWORK 04 IPX SPX 05 AP...

Страница 46: ...d then press the ENTER button 5 Press or to select HTTP SERVER and then press the ENTER button 6 Press or to select ENABLE for enabling HTTP network server or select DIS ABLE for disabling it Then press the ENTER button The screen returns to the one shown in step 5 7 Press or to select PRI MARY PORT NUMBER and then press the ENTER but ton USER FUNCTIONS 00001216 01 DEFAULT SETTINGS 02 LISTS 03 INI...

Страница 47: ...080 is set by default If you want to change it press the Clear Stop but ton and key in the desired port number 11 Press the CANCEL button once to return the screen to the NETWORK menu screen If you press the CANCEL button more than twice and exit the NETWORK menu the NIC initialization operation in the next step becomes ineffective In this case repeat the procedure from step 1 12 Press or to selec...

Страница 48: ......

Страница 49: ...chapter describes the overview of TopAccess and how to access TopAccess TopAccess Overview 48 End user mode 48 Administrator mode 49 Accessing TopAccess from Your Computer 50 Accessing TopAccess 50 TopAccess screen structure 53 ...

Страница 50: ...ment OFF until the TopAccess screen is automatically updated End user mode The following settings and management are available in the end user mode y Checking device status Device tab page On the Device tab page you can view the various types of device information of this equip ment messages and alerts current paper size and remaining status in each drawer and option installation status P 55 TopAc...

Страница 51: ...nter settings Print service settings P 81 TopAccess ADMINISTRATION TAB PAGE SETUP MENU Printing Function Maintenance menu Installation of language Backup Address book Restore Address book Import Address book Export Address book Department code data P 117 TopAccess ADMINISTRATION TAB PAGE MAINTENANCE MENU y Managing department codes Counter tab page The administrator can view all of the registered ...

Страница 52: ...the cookies and try again y Do not perform the same setting in TopAccess from one computer at the same time using more than one web browser Accessing TopAccess The procedures to access a TopAccess on your computer are shown below The procedures are explained separately in both the end user mode and the administrator mode Do not run more than one TopAccess at a time on your computer TopAccess acces...

Страница 53: ...page for the explanation on the Counter tab page P 77 TopAccess COUNTER TAB PAGE y Administration tab The Login page is displayed Proceed to the next step 4 When you click the Administrator tab enter the administrator pass word in the Password field Then click Login The Setup menu page is displayed y Do not change the login name in the User Name field It must be always Admin to log into the admini...

Страница 54: ...menu page is displayed See the following page for the explanation on the Setup menu page P 81 TopAccess ADMINISTRATION TAB PAGE SETUP MENU Printing Func tion y Maintenance menu The Maintenance menu page is displayed See the following page for the explanation on the Maintenance menu page P 117 TopAccess ADMINISTRATION TAB PAGE MAINTENANCE MENU To log out of the administrator mode click the Logout l...

Страница 55: ...b page is displayed Device tab Registration tab Counter tab Administration tab Menu display The basic TopAccess menu page contains the following items 1 Menu bar This provides access to each menu page under the selected function tab 2 Submenu bar This provides access to each submenu page under the selected menu and function tab 3 Top link Click this to display the top of the page currently shown 4...

Страница 56: ...6 TopAccess OVERVIEW 54 Accessing TopAccess from Your Computer The TopAccess Online Help cannot be displayed in the following browsers Safari 2 0 ...

Страница 57: ...7 TopAccess DEVICE TAB PAGE This chapter describes the device information on the Device tab page of TopAccess TopAccess Device Tab Page 56 ...

Страница 58: ... Displays the contact name of the person responsible for manag ing this equipment Phone Number Displays the phone number of the person responsible for managing this equipment Message Displays the administrative message Alerts Displays the alert message Errors are shown in red and warnings are shown in yellow 3 Paper The Paper list shows the drawer status Drawer Lists the installed drawers Size Dis...

Страница 59: ...tallation status of the Automatic Duplexing Unit Error display If an error occurs a device status indicator and an error message will be displayed on the Device tab page 1 Device status indicators The device status indicators icons are displayed here When more than one error is occur ring at the same time an indicator for the first error is displayed For the details see the fol lowing page P 140 D...

Страница 60: ......

Страница 61: ...o manage the address book and Mailboxes on the TopAccess Registration tab page Managing Address Book 60 Managing contacts in the address book 60 Managing groups in the address book 64 Managing Mailboxes 67 Setting up an Open Mailbox 68 Deleting an Open Mailbox 74 ...

Страница 62: ...al for Facsimile Functions Managing contacts in the address book You can add or edit a contact by entering recipient information You can also delete the contact from the Address Book P 60 Adding or editing a contact P 63 Deleting a contact Adding or editing a contact 1 Click the Registration tab and the Address Book menu The Address Book menu page is displayed 2 Click Add Address to add new contac...

Страница 63: ...nt number between 1 to 999 One Touch Number Key in the one touch number of the recipient Up to 75 different numbers y To register contact information you must enter both Name and Fax Number Also you must key in either of ABB Number or One Touch Number y Usually enter the Fax number in Fax Number and 2nd Fax Number without a hyphen If a hyphen is entered a pause is set making a dial gap of approx 3...

Страница 64: ...the mailbox in the recipient facsimile You can enter up to 20 letters including numbers and Delayed Transmit You can specify the time 00 00 to 23 59 to transmit documents Quality Transmit Select if you want to send documents in the Quality TX mode This feature sends documents at a slower speed than a normal so that the transmission will be less affected by line condition Select the value from 4800...

Страница 65: ...a one touch number you keyed in is already registered may be displayed In this case click Return and key in the cor rect number Deleting a contact 1 Click the Registration tab and the Address Book menu The Address Book menu page is displayed 2 Click the link that you want to delete in the contacts list The Contact Properties page is displayed ...

Страница 66: ...pients This enables you to specify the groups for the destinations instead of specifying each recipient separately when operating fax transmission You can also delete groups P 64 Adding or editing a group P 66 Deleting a group Adding or editing a group 1 Click the Registration tab and the Address Book menu The Address Book menu page is displayed 2 Click the Group submenu The Group submenu page is ...

Страница 67: ...roup properties Group Number Enter the group number Group Name Enter the group name Group Type Select Fax You can select only Fax One Touch Number Key in the one touch number of the group Up to 75 different numbers y You can clear the entered values in each field by clicking Reset y You can cancel adding or editing a group by clicking Cancel 5 Check the Fax boxes of users to add the Fax recipients...

Страница 68: ...isplayed In this case click Return and key in the correct number Deleting a group 1 Click the Registration tab and the Address Book menu The Address Book menu page is displayed 2 Click the Group submenu The Group submenu page is displayed 3 Click the group link that you want to delete in the groups list The Group Properties page is displayed 4 Click Delete Selected group is deleted ...

Страница 69: ... is sent to the same Box it replaces the existing one You can set up a password requirement for accessing the Bulletin Board Box for document reservation Forward Mailbox The Forward mailbox allows you to transmit a received Fax to various destinations using the fol lowing agent Internet Fax Relay Agent When a document has been sent to a mailbox this equipment can call up the remote Fax via the pub...

Страница 70: ... tab and the MailBoxes menu The Mailboxes menu page is displayed 2 Click New to set up new mailbox or click the box number link that you want to edit in the mailboxes list y If you click New skip to step 5 y If you click the box number link that is not protected by a password skip to step 4 y If you click the box number link that is protected by a password go to the next step 3 Enter the password ...

Страница 71: ...ected 6 Click the button of each item to set the mailbox properties MailBox Setting Click this to specify the mailbox settings P 70 MailBox setting Destination Setting Click this to specify the destinations to be sent This can be set only when creating the Fax Relay agent P 71 Destination setting Mailbox Relay End Terminal Report Click this to specify where the transmission result list will be sen...

Страница 72: ...f the mailbox You can enter up to 20 letters numbers only 2 Password Enter the box password if you want to protect the mailbox by the password You can enter up to 20 letters including numbers sharp marks and asterisks 1 Click Mailbox Setting to open the Mailbox Setting page 2 Enter the box number Enter the box password as required 3 Click Save Mailbox setting is made 1 2 ...

Страница 73: ...ients from the address book in this equipment 1 Click Destination Setting to open the Recipient List page 2 Click Address Book The Address Book page is displayed 3 Check the Fax recipients and check the Fax boxes of users you want to add as the Fax recipients 4 Click ADD Selected recipients are added in the Recipient List page You can remove the contacts that you added in the recipient list before...

Страница 74: ...2 Click Address Group The Address Group page is displayed 3 Check the Group boxes that contains the desired recipients 4 Click ADD All recipients in the selected groups are added in the Recipient List page You can remove the contacts that you added in the recipient list before submitting the destination settings P 73 Removing the contacts from the recipient list 5 Click Save The contacts are added...

Страница 75: ...n specify a recipient that the transmission result list will be sent 1 Click Relay End Terminal Report The Relay End Terminal Report page is displayed 2 Enter the fax number or select Fax option button of a user that you want to send the transmission result list You can clear the selected option button by clicking Reset You cannot specify more than 1 recipient for the destination of the Relay End ...

Страница 76: ...Registration tab and the MailBoxes menu The MailBoxes menu page is displayed 2 Click the box number link that you want to delete in the mailboxes list y If you click the box number link that is not protected by a password skip to step 4 y If you click the box number link that is protected by a password go to the next step 3 Enter the password for the mailbox and click OK The MailBoxes Properties p...

Страница 77: ...Managing Mailboxes 75 5 Click OK Selected mailbox is deleted ...

Страница 78: ......

Страница 79: ... TopAccess COUNTER TAB PAGE This chapter describes how to display total counters on the TopAccess Counter tab page Viewing Counters 78 Displaying the total counter 78 Displaying the department counter 79 ...

Страница 80: ...Counters tab and the Total Count menu The Total Count menu page is displayed 2 You can check the total counter in this page The shown above is the details of the values of the print counter and the scan counter Note that these values are unresettable Print Counter Copy Displays the number of pages printed with copying operations Fax Displays the number of pages printed with the reception of fax da...

Страница 81: ... is available only when a department code is set by using this equipment The administrator can view all departments including respective counter information P 138 Managing Department Codes For Administrators 1 Click the Counters tab and the Department menu The Department menu page is displayed 2 Enter a department code that you want to display the counter in the Department Code field and click Ent...

Страница 82: ......

Страница 83: ...AppleTalk 89 Setting up the Bonjour 90 Setting up the DNS session 91 Setting up the DDNS session 92 Setting up the NetWare session 93 Setting up the HTTP network service 94 Setting up the SNMP network service 95 Setting up Copier Settings 97 Setting up the copier settings 98 Setting up Fax Settings 99 Setting up the Fax settings 101 Setting up Printer Settings 105 Setting up the general setting 10...

Страница 84: ...Setting up the NetWare print 114 Displaying Version Information 115 ...

Страница 85: ...updated by pressing the FUNCTION CLEAR button on the Control Panel or after an Auto Clear time period Setting the device settings 1 Access TopAccess in the administrator mode P 50 Accessing TopAccess 2 Click the Setup menu and General submenu The General submenu page is displayed 3 In the General submenu page set the device settings as required In the General submenu page you can set the following...

Страница 86: ...ion You can set the device information displayed in the Device tab page 1 Name This displays the equipment s device name 2 Copier Model This displays the equipment s model name 3 Location Enter the name of the department or site This is displayed in the Device tab page that appears first when accessing the TopAccess web site for users 4 Contact Information Enter the name or title of the contact pe...

Страница 87: ...ings 2 Auto Power Save Select how long this equipment can remain inactive before entering the power save mode 3 Sleep Auto Shut Off Select how long this equipment can remain inactive before entering the sleep mode or auto shut off mode Setting up the time and date You can set the date time time zone and date format 1 Date Time To adjust the date select year in the first field select month in the s...

Страница 88: ...he administrator mode P 50 Accessing TopAccess 2 Click the Setup menu and Network submenu The Network submenu page is displayed 3 In the Network submenu page click link or scroll the page to find the setting table and click the button of the setting to set the net work settings as required In the Network submenu page you can set the following P 88 Setting up the TCP IP P 89 Setting up the IPX SPX ...

Страница 89: ...lick OK to save the settings and close the sub window 6 Click Save The confirmation dialog box appears 7 Click OK to apply the changes This equipment starts initializing the NIC Network Interface Card to apply the changes When using the Internet Explorer the settings that are displayed in each field may not be changed even if you change the settings and click Save However the settings have been ch...

Страница 90: ... the DHCP Dynamic Select this to assign the IP address using the DHCP with Auto IP address ing enabled When this is selected the IP address subnet mask and default gateway can be automatically obtained from the DHCP server if the network supports the DHCP and the IP address can be also assigned using Auto IP addressing even if the network does not support the DHCP 2 IP Address Enter the static IP ...

Страница 91: ...II IEEE 802 3 Snap IEEE802 2 Instead of Auto Sense select the frame types to be used from these options 3 Actual Frame This displays the actual frame type of the equipment Setting up the AppleTalk You can set the protocol to enable communication over AppleTalk The AppleTalk must be con figured to enable AppleTalk printing from Macintosh computers 1 Enable Apple Talk Select whether the AppleTalk pr...

Страница 92: ... Bonjour you can enable or disable the Bonjour networking that is available for Mac OS X 10 3 x 10 4 x 1 Enable Bonjour Select whether the Bonjour is enabled or disabled 2 Link Local Host Name Enter the DNS host name of this equipment 3 Service Name Enter the device name of this equipment that will be displayed in the Bonjour network 1 2 3 ...

Страница 93: ... service is enabled and the DNS server supports the dynamic DNS service please set the DDNS Session as well P 92 Setting up the DDNS session 1 Enable DNS Select whether the DNS server is used or not 2 Primary DNS Server Address Specify the IP address of the primary DNS server when the DNS service is enabled 3 Secondary DNS Server Address Specify the IP address of the secondary DNS server when the ...

Страница 94: ...utomatically using DDNS y When using DDNS make sure the Allow dynamic updates option is set to Yes for Win dows 2000 Server or Nonsecure and Secure for Windows Server 2003 for the Forward Lookup Zones and Reversed Lookup Zones If Secure mode or None is selected in Win dows Server 2003 be sure to add the host name of the equipment to Forward Lookup Zones and Reversed Lookup Zones 1 Enable DDNS Sele...

Страница 95: ...onfigure a Novell printing environment with the NetWare server in bindery mode you must enable this 2 Enable NDS Select whether the NetWare NDS mode for Novell printing is enabled or disabled When you configure a Novell printing environment with the NetWare server in NDS mode you must enable this When this is enabled you should also specify the context and tree for the NDS 3 Context Enter the NDS ...

Страница 96: ...an enable or disable Web based services such as TopAccess and IPP printing 1 Enable HTTP Server Select whether the Web based TopAccess and IPP printing are enabled or disabled 2 Primary Port Number Enter the port number for the NIC HTTP server Generally 80 is used for this port 3 Secondary Port Number Enter the port number for TopAccess Generally 8080 is used for this port 1 2 3 ...

Страница 97: ...lic for the Read Community the applica tions that use MIB AddressBook Viewer will be unavailable The SNMP communication of the printer driver also will be unavailable so that the obtaining the configurations and con firming the department code will be disabled 3 Read Write Community Enter the Read Write community name for the SNMP Traps If you specify a community name other than private for the Re...

Страница 98: ...ts Trap Select whether sending a SNMP Traps when an alert condition occurs 6 IP Trap Address 1 10 Enter the IP address where the SNMP Traps will be sent You can specify up to 10 addresses 7 IP Trap Community Enter the trap community name for the IP Traps 8 IPX Trap Address Enter the IPX address where the SNMP Traps will be sent ...

Страница 99: ...e period Setting the copier settings 1 Access TopAccess in the administrator mode P 50 Accessing TopAccess 2 Click the Setup menu and Copier submenu The Copier submenu page is displayed 3 In the Copier submenu page set the copier settings as required To set the Copier Settings see the following P 98 Setting up the copier settings 4 Click Save The confirmation dialog box appears If you want to rest...

Страница 100: ...elect whether to give priority to APS or AMS or to disable the priority APS Automatic Paper Selection Automatically detects the size of the originals and selects the drawer in which paper of the same size as the originals is used AMS Automatic Magnification Selection Automatically sets the reproduction ratio to match the scanned original data to the paper size in the selected drawer No Disable pri...

Страница 101: ...ll be updated by pressing the FUNCTION CLEAR button on the Control Panel or after an Auto Clear time period y The Fax submenu page in the Setup menu is available only when the optional Fax unit is installed Setting the fax settings 1 Access TopAccess in the administrator mode P 50 Accessing TopAccess 2 Click the Setup menu and Fax submenu The Fax submenu page is displayed 3 In the Fax submenu page...

Страница 102: ...fore saving the changes 5 Click OK to apply the changes y If a valid value is not set to both Interval and Counter for redialing the error mes sage Please enter a valid value is displayed Click OK on the error dialog box and enter valid values y When using the Internet Explorer the settings that are displayed in each field may not be changed even if you change the settings and click Save However t...

Страница 103: ...splayed 1 Terminal ID Enter the terminal ID name company name to identify this equipment The name will be printed at the leading edge of all documents transmitted 2 Fax Number Enter the fax number of this equipment This fax number will be printed at the leading edge of all documents transmitted from Line 1 3 Ringer Volume Selects the volume of the ringer 1 2 3 4 5 6 7 8 9 10 11 12 13 14 15 16 17 1...

Страница 104: ...rvals and the number of times to redial when the line is busy Interval Selects the redialing interval from 0 to 15 minutes Counter Selects the number of times to redial from 0 to 14 10 Memory TX Selects whether the fax data are temporarily stored in the memory before transmission or not 11 Security TX Checks whether the number you dialed matches that of a destination or not and determines whether ...

Страница 105: ...e faxes from only limited senders or not such as the ones regis tered in the abbreviated number list or the one touch dial number list 24 Journal Auto Print Select whether automatically printing a transmission and reception journal after every trans mission is completed 25 Transmission Report Selects how the transmission report is printed out OFF Does not print out the transmission report Always P...

Страница 106: ... Image Select this to print a relay station report with the 1st page image only when the relay transmission is not successful 30 Relay Station Report Selects how the relay station report is printed out OFF Does not print out the relay station report Always Prints out the relay station report at the completion of each transmission ON ERROR Prints out the relay station report only when a transmissio...

Страница 107: ...r submenu The Printer submenu page is displayed 3 In the Printer submenu page set the Printer settings as required To set the Printer Settings see the following P 106 Setting up the general setting P 107 Setting up the default Raw job setting P 108 Setting up the Raw job setting 4 Click Save The confirmation dialog box appears If you want to restore the current settings without saving the changes ...

Страница 108: ...lect whether printing a document intended for that one paper size can be printed on paper of a different size For example you can print a document set up for Letter size on A4 paper When disabled this equipment will prompt users for the correct paper size 2 Wide A4 Mode for PCL Select whether the width of the printable area of copy paper is widened or not when you are printing PCL print job on A4 ...

Страница 109: ...ault Orientation Select the default orientation that applies to a raw job 5 PCL Form Line Enter the number of lines printed per page 6 PCL Font Pitch Enter the font pitch when the selected font number represents a fixed pitch scalable font Pitch is measured by letters per inch so a 10 pitch is ten letters per inch 7 PCL Font Point Size Enter the font size when the selected font number represents a...

Страница 110: ...e raw job setting for each queue These queue names can be used when printing without a printer driver such as printing from UNIX workstation You can add edit or delete a LPR queue P 108 Adding or editing a LPR queue P 110 Deleting a LPR queue Adding or editing a LPR queue 1 To add a new LPR queue click Add in Raw Job Setting To edit an existing LPR queue select a radio button of a queue that you w...

Страница 111: ...e font pitch when the selected font number represents a fixed pitch scalable font Pitch is measured by letters per inch so a 10 pitch is ten letters per inch PCL Font Point Size Enter the font size when the selected font number represents a proportionally spaced scalable font The Font Size option allows you to determine the point size height of the default font PCL Font Number Enter the font numbe...

Страница 112: ...E SETUP MENU Printing Function 110 Setting up Printer Settings Deleting a LPR queue 1 Select a radio button of a queue that you want to delete and click Delete The confirmation dialog box appears 2 Click OK The selected queue is deleted ...

Страница 113: ...updated by pressing the FUNCTION CLEAR button on the Control Panel or after an Auto Clear time period Setting the print service settings 1 Access TopAccess in the administrator mode P 50 Accessing TopAccess 2 Click the Setup menu and Print Service submenu The Scan to Print Service submenu page is displayed 3 In the Print Service submenu page set the Print Service settings as required In the Print ...

Страница 114: ...nternet Explorer the settings that are displayed in each field may not be changed even if you change the settings and click Save However the settings have been changed in the equipment In that case click the Print Service submenu then the page displays the current settings in each field Setting up the Raw TCP print In Raw TCP Print you can enable or disable the Raw TCP print service 1 Enable Raw T...

Страница 115: ...In IPP Print you can set the IPP Print options to enable the IPP print service 1 Enable IPP Enable or disable IPP print service 2 Port80 Enable Enable or disable the Port80 for IPP printing Port631 is usually used for the IPP access so users must specify to the URL i e http IP address or DNS name 631 Print for the IPP port When this is enabled this equipment allows IPP access through the Port80 wh...

Страница 116: ...password will be displayed when a user creates the IPP print port Disable Select this to disable the authentication Basic Select this to enable the authentication To enable the authentication be sure to select Basic If Digest or Basic Digest is selected users no longer create the IPP print port because Digest or Basic Digest is not supported for Windows 8 User Name Enter the user name for authenti...

Страница 117: ...ion of this equipment The version information can be displayed from the Setup menu page 1 Access TopAccess in the administrator mode P 50 Accessing TopAccess 2 Click the Setup menu and Version submenu The Version submenu page is displayed 3 In the Version submenu page you can confirm the version informa tion of the system software ...

Страница 118: ......

Страница 119: ... maintenance of TopAccess performed by the TopAccess administrator About the Maintenance Functions 118 Switching Languages 119 Backing up Data 121 Restoring Data from Backup File 124 Importing Address Book Data 127 Exporting Address Book Data 130 Exporting Department Code Data 134 ...

Страница 120: ...dministrator can restore the address book from the backup files P 124 Restoring Data from Backup File Importing address book data This equipment allows you to import address book data in CSV format P 127 Importing Address Book Data Exporting address book data The address book data can be exported in a CSV format P 130 Exporting Address Book Data Exporting department code data The department code d...

Страница 121: ...Functions The TopAccess language data are also provided in the Client Utilities CD ROM included in the Net work Printer Kit which is described in this guide However they do not support the scanning function 1 Insert the Client Utilities CD ROM into a client PC When inserting the Client Utilities CD ROM the installer may automatically start Click Cancel to make the installer exit and continue the o...

Страница 122: ...ge file and click Open TopAccess language Client Utilities CD ROM TOPACCESS Language If the language selected in the drop down box and the one selected from the Client Utili ties CD ROM differ the error message dialog box shown below appears Click OK in this message dialog box and then select the correct language 6 Click Upload Uploading starts When it is completed the language is switched ...

Страница 123: ...her e STUDIO165 205 or e STUDIO167 207 237 compatible equipments 1 Access TopAccess in the administrator mode P 50 Accessing TopAccess 2 Click the Maintenance menu and Backup submenu The Backup submenu page is displayed 3 Click Create New File for the data that you want to backup Backup or restoration process in progress appears and the backup process begins ...

Страница 124: ...p file is created and its name and size will be displayed If the screen is not refreshed by clicking the REFRESH icon please wait a while and then try again Creating the backup file may take a few minutes depending on its size 5 Right click the File Name link and select Save Target As The Save As dialog box appears ...

Страница 125: ... it is named If you change the file name the equipment cannot restore the data from the backup files The file name of each backup data must be the following name Address Book BACKUP_ADDR date tbf 7 Click Save The backup file is saved in the selected location If you turn the power of the equipment OFF the export files in the equipment will be lost ...

Страница 126: ... the original environments Before restoring the data from backup files please confirm that there is no print job no scan job and no fax job The backup files cannot be restored if there are any jobs that have been pro cessed 1 Access TopAccess in the administrator mode P 50 Accessing TopAccess 2 Click the Maintenance menu and Restore submenu The Restore submenu page is displayed 3 Click Browse in t...

Страница 127: ... backup file and click Open If the backup file name is not the name as shown below the equipment cannot restore the data from the backup files Address Book BACKUP_ADDR date tbf 5 Click Upload The Restore screen displays the backup file information ...

Страница 128: ...tore Backup or restoration process in progress appears and the restoration process begins 7 Click REFRESH on the right side The address book data are restored in this equipment If the screen is not refreshed by clicking the REFRESH icon please wait a while and then try again Restoration may take a few minutes depending on the file size ...

Страница 129: ...gistered for one user is used for another only the data of the user first registered in this abbreviated number will be imported The same procedure is taken in one touch numbers OT_ID y For letters accepted for Search Letter see the Operator s Manual for Facsimile Func tion NAME Email Address Tel Number ABB_ID OT_ID Search Letter Use01 user01 toshibatec ifax com 000000000001 1 1 A Use02 user02 tos...

Страница 130: ... any operation modes e g copy mode is displayed or this equipment has entered into the energy saving mode from the status displaying the main screen of any operation modes y No reserved jobs or jobs in process exist 1 Access TopAccess in the administrator mode P 50 Accessing TopAccess 2 Click the Maintenance menu and Import submenu The Import submenu page is displayed 3 Click Browse in the Address...

Страница 131: ...ears and the import process begins 6 Click REFRESH on the right side The address book data are imported from the CSV file to this equipment If the screen is not refreshed by clicking the REFESH icon please wait a while and then try again Import may take a few minutes depending on the file size ...

Страница 132: ...ormats of the address book data and each item see the following page P 127 Importing Address Book Data 1 Access TopAccess in the administrator mode P 50 Accessing TopAccess 2 Click the Maintenance menu and the Export submenu The Export submenu page is displayed 3 Click Create New File in the Address Book area The information of the address book data CSV file name is displayed ...

Страница 133: ... As dialog box is displayed 5 Specify where the file is to be saved and select All Files in the Save as type drop down box 6 Click Save The address book data file in a CSV format is saved in the location you specified If you turn the power of the equipment OFF the export files in the equipment will be lost ...

Страница 134: ...ollowing conditions the department code data will not be imported y The department code function is enabled y The department code entry screen is displayed or this equipment has entered into the energy saving mode from the status displaying the department code entry screen y No reserved jobs or jobs in process exist 1 Access the TopAccess in the administrator mode P 50 Accessing TopAccess 2 Click ...

Страница 135: ...port Backup or restoration process in progress appears and the import process begins 6 Click the REFRESH on the right side The department code data are imported from the CSV file to this equipment If the screen is not refreshed by clicking the REFRESH wait for a while and then try again Import may take a few minutes depending on the file size ...

Страница 136: ...not be imported y The purpose of this procedure is backing up the department code data to prepare for failure Do not edit or delete the exported data because they will be needed at the time of importing them back 1 Access TopAccess in the administrator mode P 50 Accessing TopAccess 2 Click the Maintenance menu and the Export submenu The Export submenu page is displayed 3 Click Create New File in t...

Страница 137: ... As dialog box is displayed 5 Specify where the file is to be saved and select All Files in the Save as type drop down box 6 Click Save The department code data file in a CSV format is saved in the location you specified If you turn the power of the equipment OFF the export files in the equipment will be lost ...

Страница 138: ......

Страница 139: ...12 MANAGING DEPARTMENT CODES ON TopAccess FOR ADMINISTRATORS This chapter describes how to have department codes managed by an administrator Managing Department Codes For Administrators 138 ...

Страница 140: ...e only when a department code is set by using this equipment To register or delete the department codes use the control panel of this equipment For depart ment code settings in this equipment see Operator s Manual for Copying Functions 1 Click the Counters tab and the Department menu The Department menu page is displayed 2 Enter the master code in the Department Code field and click Enter The Depa...

Страница 141: ...to resolve the condi tions If the problem persists after you have followed all of the steps make sure to note what you were trying to do and any error messages appear etc and then contact your service representative TopAccess Error Messages 140 Device status indicator list 140 Error message list 141 ...

Страница 142: ...per Empty The Paper Empty icon indicates that one of the drawers is opened You must close the opened drawer to resume printing or copying This icon also indicates the empty status of the drawer This status does not immediately stop a print job or a copy job If the automatic paper selection APS function is enabled the print or copy job may continue by selecting paper of the same size in the other d...

Страница 143: ...ath Remove jammed paper Black Toner Empty Please Refill Replace the toner Refer to the Operator s Manual for Copying Functions for instruc tion Automatic Document Feeder Error Please Contact Service Technician Contact your service representative Alignment Error in Automatic Document Feeder Please Contact Service Technician Contact your service representative Motor Error in Automatic Document Feede...

Страница 144: ......

Страница 145: ...14 APPENDIX This chapter has been prepared to give additional information List Print Format 144 ...

Страница 146: ...X SPX ENABLE IPX SPX FRAME TYPE APPLE TALK ENABLE APPLE TALK DEVICE NAME DESIRED ZONE SESSION DNS SESSION ENABLE DNS PRIMARY DNS SERVER ADDRESS SECONDARY DNS SERVER ADDRESS DDNS SESSION ENABLE DDNS HOST NAME DOMAIN NAME NETWARE SESSION ENABLE BINDERY ENABLE NDS CONTEXT TREE SEARCH ROOT BONJOUR SESSION ENABLE BONJOUR LINK LOCAL HOST NAME 256MB NOT INSTALLED 10BASE FULL DYNAMIC XXX XXX XXX XXX XXX X...

Страница 147: ...CP IP Network Information enabled IP Address Subnet Mask Default Gateway Primary DNS Server DNS Name Host Name XX XXX XXX XX XXX XXX X X XX XXX XXX X XXX XX XXX XX XXXXXXXXXXXX IPP Network Information enabled I n t e r n e t P r i n t i n g P r o t o c o l X X X X X X X X X X A p p l e Ta l k N e t w o r k I n f o r m a t i o n disabled N o v e l l C o n n e c t i o n I n f o r m a t i o n C o u l...

Страница 148: ...14 APPENDIX 146 List Print Format PS Font List Example ...

Страница 149: ...List Print Format 147 PCL Font List Example ...

Страница 150: ......

Страница 151: ... 84 Copier Settings 97 98 Counter tab 51 D DDNS Session 92 Default Gateway 88 Default Raw Job Setting 107 Delayed Transmit 62 Department Code 79 Department Counter 79 Desired Zone 89 Destination Setting 69 71 Device Information 56 84 Device Name 89 Device Settings 83 Device status indicators 57 Device tab 51 Device Tab Page 56 Discard 102 DNS Session 91 Domain Name 93 Drawer 56 E ECM 102 Enable Al...

Страница 152: ...ort 103 N Name 56 84 NetWare Session 93 Network AppleTalk 89 Bonjour 90 DDNS Session 92 DNS Session 91 HTTP Network Service 94 IPX SPX 89 NetWare Session 93 SNMP Network Service 95 TCP IP 88 Network Configuration from Equipment AppleTalk Configuration 42 Ethernet Configuration 33 HTTP Configuration 44 IPX SPX Configuration 40 TCP IP Configuration 35 Network Printer Kit 57 Network Settings 86 NIC s...

Страница 153: ...02 S Scanner Upgrade Kit 57 Screen Digit entry screen 17 Error message screen 17 Menu selection screen 17 Mode main screens 16 Ready screen 16 Search root 93 Secondary DNS Server Address 91 Secondary Port Number 94 Security TX 102 Send after Scan 103 SEP 62 Separator Page 103 Service Name 90 Service Phone Number 84 Session Timer 85 Setup Copier 97 Fax 99 General 83 Network 86 Print Service 111 Pri...

Страница 154: ...152 INDEX ...

Страница 155: ...GA 1190 OME060181B0 ...

Страница 156: ...HIGASHIGOTANDA SHINAGAWA KU TOKYO 141 8664 JAPAN MULTIFUNCTIONAL DIGITAL SYSTEMS Setup Guide for Printing Functions GA 1190 2007 2008 TOSHIBA TEC CORPORATION All rights reserved R061120D0802 TTEC Ver02 2008 06 ...

Отзывы: