QUICK START
Camera
Camera indicator light
Camera
HD display
Enhance your ownership experience by taking a few minutes to register your To
shiba
device by touching the Register
( ) icon located on the Apps screen or go to
register.toshiba.com. Completing device registration allows
Toshiba to provide you
with device information updates, special offers and promotions
.
Quick To
ur
Front
Quick Tour
Back
Your device contains a rechar
geable battery that may need to be
charged prior to use.
Need Help?
©2012 Toshiba
America Information Systems, Inc.
• GMA501083010 • 03/12
Most problems ar
e easy to correct. Save time with one of these simple solutions.
Visit To
shiba's Support We
b site
tabletsupport.toshiba.com
Register Your
Toshiba Device
Your
device comes with:
• USB/AC adaptor
• USB Power cable
• Several documents, including a
standard limited warranty booklet
If any items are missing or damaged,
notify your dealer immediately.
Quick Start
Check the components
Consult the electronic User's Guide
To access the downloadable electronic User
’s
Guide for your device, touch the User's Guid
e
icon ( ) located on the Apps screen (internet
connection required). This will connect you to
the tablet support website. Select your model,
and then touch the “printer friendly versio
n”
link. The User
’s Guide will automatically
download into the Download folder
on your
device. Touch
Apps>File Manager>Download
Folder and then the User
’s Guide PDF (choose
your preferred reader from the options that appear).
For solutions to the most common problems,
refer to the “If Something Goes Wrong” section
of the User’s Guide.
Please read and adhere to all of the safety
information in the User's Guide and
Legal/Safety/Regulatory document, and make
sure you fully understand the instructions before
using the device.
Printed on recycled paper
excite is either a registered trademark or trademark of
Toshiba
America Information Systems and/or To
shiba Corporation.
Bluetooth word mark and logos are owned by the Bluetooth SIG, Inc. and any use of such marks by To
shiba is under license.
Google, the Google logo,
Android, Google Maps, Google eBooks, Gmail,
YouT
ube and Google Ta
lk are trademarks of
Google, Inc.
HDMI, the HDMI Logo and High-Definition Multimedia Interface are trademarks or registered trademarks of HDMI Licensing, LLC.
Secure Digital and SD are trademarks of SD Card Association.
Wi-Fi is a registered trademark of the Wi-Fi Alliance.
All other brand and product names are trademarks or registered trademarks of their respective companies
.
Your device contains a rechar
geable battery that may need to be
charged prior to use.
Right
Left
Bottom
Top
Micro SD™ Card slot
Micro USB port
Micro HDMI
®
Out port
Power button
Power indicator light
Speaker
Speaker
Headphone/Microphone
Line-In jack
Power/Docking connector
Volume control butto
n
Screen rotation lock/unlock switch
Setting up your device
Setting up your device (continued)
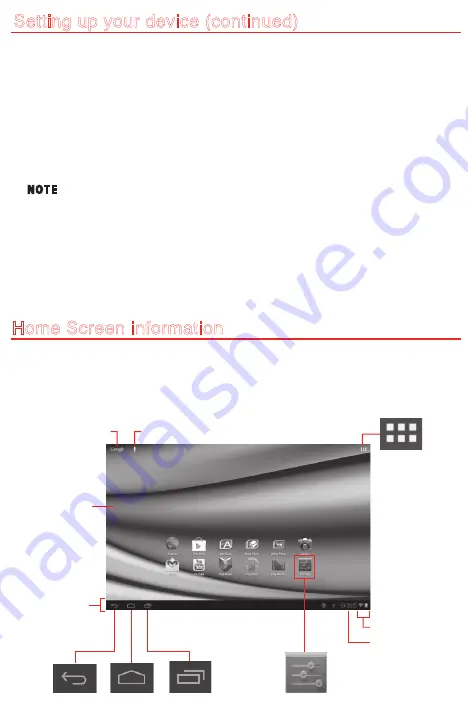
Home Screen information
Basics
Display screen
The HD display screen has the following capabilities: Auto Rotation and
Customization.
Auto Rotation
When you rotate the device from portrait to landscape
(or visa versa), the screen orientation automatically
changes according to the rotation angle.
To lock the screen so that it does not rotate automatically, orient the device
in the desired screen rotation (portrait or landscape) and set the lock/unlock
switch to the locked position.
Customization
Your home screens can be customized with Widgets, custom Wallpaper Apps
shortcuts, folders, and more.
Creating and naming folders
To create folders on the home screen:
1. Locate the desired app that you wish to include in a folder.
2. Locate a second app (on the home screen or in the app list).
3. Touch, hold, and drag the second app to the first app.
4. Release the second app and its icon will appear in the circle, behind the icon
of the first app. The folder is now created.
To name your new folder:
1. Touch the newly created folder.
2. Touch the generic title and type in the desired title.
For more information on how to customize your home screens, please refer to
your User’s Guide.
Wi-Fi
®
may be enabled by default and the device saves this information
so that the device can connect automatically the next time it is within
range of the connected network.
Wi-Fi
®
1. Touch the Apps ( ) icon > Settings ( ) icon > Wireless & networks >
Wi-Fi. (The device scans for and displays all available Wi-Fi
®
networks.)
2. Touch the name of the network you want to connect to, and then touch
Connect. (If the network is a secured/locked network, you will be asked to
enter the appropriate credentials before confirming.)
Setting up Wi-Fi® and
®
Backing up your data
Bluetooth
®
1. Touch the Apps ( ) icon > Settings ( ) icon > Wireless & networks >
Bluetooth (switch to ON to enable it) > Bluetooth settings > Search for
Devices. (The device scans/finds nearby devices [i.e. keyboard, mouse].)
2. Touch the name of the device to pair with, enter required PIN (if prompted)
and then touch OK.
Using the TOSHIBA File Manager, you can back up your data to a Micro SD™ Card.
1. Insert a Micro SD™ Card into the Micro SD™ Card slot.
2. Touch the Apps ( ) icon > File Manager ( ) (make sure "Internal Storage" is
selected at the top left of the screen).
3. Long-press a file or folder to enter selecting mode, then touch the files/folders
you wish to back up, or touch Select All from the “selected items count:”
drop-down menu located at the top left corner of the screen.
4. Touch the Copy button ( ) from the action bar located at the top right corner
of the screen, and then SD Card from the device icons on the left of the screen
to select the Micro SD™ card.
5. Select the folder you want to copy the files/folders to, and then touch the Paste
icon ( ) from the action bar located at the top right corner of the screen.
You can also back up your settings as well as your data using your Google™
Account. Your data is backed up automatically using this option. If you need to
replace your device, your data can be restored to your new one.
(Sample Image) TOSHIBA File Manager screen
Screen rotation
lock/unlock switch
Application shortcuts
Some basic icons/application shortcuts:
Back – Return to previous screen
Home – Starting point for all features
Recent apps – Displays recently used applications
Browser – Your web portal
Gmail™ – Webmail service
Camera – Capture photos/videos
Apps icon – View all your applications
Settings – Opens the Settings menu
File Manager – Back up your data and transfer files
To help keep your new device operating at its peak performance, you
may be notified when updated software is available for download
(internet connection required). Toshiba recommends installing these
updates as soon as they become available.
Five Home screens are available, each customizable to fit your personal needs.
Adding Apps shortcuts, Widgets, and Bookmarks, as well as changing the
Wallpaper creates a more personalized multi-media experience.
Toshiba recommends that you have access to a Wi-Fi
®
network and a
Google™ Account before setting up your device to take full advantage
of your device’s features.
A Google Account is required to access many of the powered by Android™
features, including Gmail™, backing up your data, etc.
7. Touch Sign in to sign in with an existing Google Account or create a new one
now.
The “Sign in” screen appears.
• Enter your existing Google Account information, and then touch Sign in.
• If you do not already have a Google Account, you can create a new one by
touching Get an account.
Touch Not now to skip the account setup for now. You can sign into a Google
Account later in Settings, under Accounts & sync.
The "Use Google location" screen appears displaying two options:
• Allow Google's location service to collect anonymous location data. Some
data may be stored on your device. Collection may occur even when no apps
are running.
• Use my location for Google search results and other Google services.
8. Touch Next to continue.
The "This tablet belongs to..." screen appears.
• Enter your first and last names, or
• Just touch Next to continue
The "Google Services" screen appears.
9. Touch Next to continue.
The "Setup complete" appears.
10. Touch Finish to complete the setup process.
If the screen times-out:
1. Press the Power button.
The lock screen appears, unless you have previously disabled it.
2. Touch and hold the lock icon and drag it to the edge of the large circle
surrounding it. The last screen viewed appears.
1. Connect to a power source using the provided USB/AC adaptor. The
Power light ( ) glows white.
2. To turn on your device, press and hold the Power button ( ) for
several seconds.
Your setup process begins.
3. Select the language you want, and then touch Start to continue. The
“Wi-Fi
®
setup” screen appears, displaying all available Wi-Fi
®
networks.
4. Touch the Wi-Fi
®
network you want to use and enter the key or password.
Click on Connect.
The "Connected to Wi-Fi network" screen appears.
5. Touch Next to continue.
The “Set date and time” screen appears.
6. There are two options available for setting date and time:
• Use network provided time (leave the setting option ON) then touch Next.
• The option, “Use network provided time” can be set to OFF. This allows
you to manually enter the date/time information.
A. Select the time zone.
B. Set the date and time by touching the date or time option and then the
up/down arrows, and then touch Next to continue.
The “Make it Google” screen appears.
This may take several minutes. If your screen times-out and goes
blank/dark, press the Power button to turn on the screen again.
Back
Home Recent Apps
Time
System bar
Home screen
Voice recognition
Apps icon
(Sample Image)
Home screen icons
Status icons
Application shortcuts
Google™ search
bar
Settings
Содержание Excite 10 LE
Страница 1: ...QUICK START QUICK START QUICK START ...


