background image

82

Cleaning the Equipment

It is recommended to clean the following parts periodically to scan paper without 

dirt or stains.

Notes

•  Take care not to cause damage where you 

are cleaning.

•  Take care not to leave any water inside the 

equipment.

•  Do not use organic solvents such as thinner 

and benzene. They may cause deformation 

or discoloration.

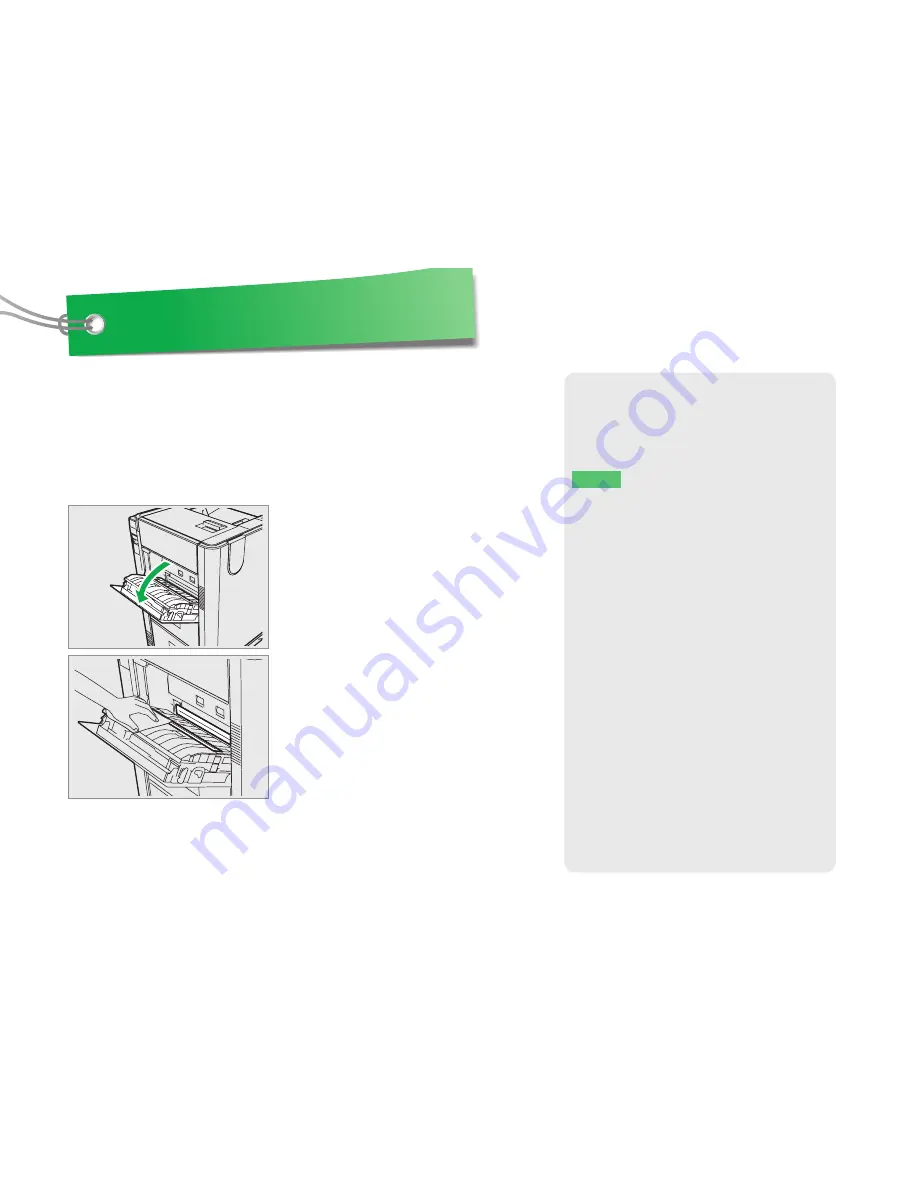
1. 

Open the upper left cover.

2. 

Clean the document scanning area (2 
places).

Wipe them with a dry soft cloth. Use a slightly 
moist soft cloth if the dry cloth does not clean 
well.
Do not use anything other than water such as 
organic solvents, alcohol and neutral detergent.

Document Scanning Area (Surface of the Long 

Narrow Glass)

Clean the document scanning area once a week approximately.

Содержание e-Studio RD30

Страница 1: ...this section when installing this equipment for the first time User s Guide PAPER REUSABLE DEVICE Thank you very much for purchasing TOSHIBA Paper Reusable Device This manual describes how to use Paper Reusable Device in Multifunctional Digital Systems to reuse paper Read this manual carefully before using this equipment Keep this manual safe for later reference ...

Страница 2: ...per by repeating this cycle If you continue reusing paper you can reduce paper consumption and carbon dioxide emission compared to printing with normal toners When the printed paper is no longer necessary erase it with e STUDIO RD30 RD301 for reuse Before erasing you can scan and save the data as a PDF file and the like Multifunctional Digital Systems e STUDIO306LP 307LP Keep reusing means Fewer s...

Страница 3: ...STUDIO RD30 and printed five times by e STUDIO306LP The amount of CO2 emitted per 1 gram of paper is 1 52 g 0 003 lb Japan Paper Association The life cycle assessment and recycling of e STUDIO306LP and e STUDIO RD30 are also taken into consideration 2 Calculated based on the value 1 52 g of CO2 per 1 gram of 1 sheet of paper in the 2011 edition of Life cycle CO2 emission of paper cardboard by the ...

Страница 4: ...ailed Operations 35 Changing Template Settings 36 Operating the Menu Screen 55 How to Log In 61 Troubleshooting 63 Error Codes 64 Paper Misfeed 67 Erase Sort Scan Function Trouble 75 When Something is Wrong with the Equipment 76 Maintenance 81 Cleaning the Equipment 82 Replacing the Ink Cartridge 84 Installing the Equipment 87 Installation Precautions 88 Installation Space 88 How to Install 89 Tur...

Страница 5: ...anual User s Guide this manual Describes safety precautions how to install how to operate and how to troubleshoot Be sure to read this manual before using the equipment PDF file User s Guide The User s Guide printed manual in PDF format TopAccess Guide Describes how to configure and manage this equip ment from TopAccess TopAccess is a web utility that allows the user to man age this equipment from...

Страница 6: ...pment Tip Describes handy information that is useful to know when operating the equipment Indicates the pages describing items related to what you are currently doing Screens and Operation Procedures In this manual the screens and the operation procedures in Windows are described for Windows 7 The details on the screens may differ depending on how the equipment is used such as the status of the in...

Страница 7: ...l interference when the equipment is operated in a commer cial environment This equipment generates uses and can radiate radio frequency energy and if not installed and used in accordance with the instruction manual may cause harmful interference to radio communications Operation of this equipment in a residential area is likely to cause harmful interference in which case the user will be required...

Страница 8: ...is product in restricted working environments may be an electromagnetic interference with other devices or machines in the nearby surrounding area This can result into malfunction including data loss data error pertaining to this product or the other devices machines involved in the electromagnetic interference Furthermore for general safety reasons the use of this product in environments with exp...

Страница 9: ...he take back and recycling of this product please contact your supplier where you purchased the product Following information is for EU member states only Disposal of batteries and or accumulators based on EU Directive on batteries and accumulators and waste batteries and accumulators By ensuring that batteries and or accumulators are disposed of correctly you will help prevent potential negative ...

Страница 10: ...hexavalent chromium poly brominated biphenyls or polybrominated diphenyl ethers in concentrations exceeding 0 1 by weight and 0 01 by weight for cadmium except for the exemption set in Schedule II of the Rule For Argentina only Following information is only for the province of Buenos Aires in Argentina La siguiente información es solo para Argentina El uso de este símbolo indica que este producto ...

Страница 11: ...ble Device 14 During maintenance or inspection 17 When handling supplies 18 Safety Information This chapter describes the necessary precautions for using this Paper Reusable Device For your added safety be sure to read this chapter before using this equipment ...

Страница 12: ...ere a 2 pin plug is used the Paper Reusable Device must be grounded for safety Never ground it to a gas pipe a water pipe or any other object not suitable for grounding Plug the power cord securely into the outlet If it is not plugged in properly it could heat up and cause a fire or give you an electric shock Do not damage break or attempt to repair the power cord The following things should not b...

Страница 13: ...oo high a fire could result Other points If there is insufficient space around the equipment the poor ventilation will result in malfunction also releasing paper misfeeds may become difficult To ensure adequate space follow the table below as a guide Adequate space Rear Left Right 20 cm 7 9 30 cm 11 8 80 cm 31 5 Be sure to fix the power cable securely so that no one trips over it Adverse environme...

Страница 14: ...and remove the plug from the outlet then contact your service representative If the Paper Reusable Device will not be used for more than one month remove the plug from the outlet for safety purposes during that time If an insulation failure occurs this could cause a fire or give you an electric shock Do not place heavy objects 4 kg 9 lb or more on the Paper Reusable Device If the objects fall off ...

Страница 15: ... Check that warning labels are displayed at the specified locations If any labels are missing or are illegible contact your service technician or representative for details Identification label Warning for high temperature area Erasure unit ...

Страница 16: ...urned ON next time Be sure to turn the power OFF when leaving the office or if there is a power outage However do not turn the power OFF if the weekly timer is in use Be careful because the paper exit area and paper just after exiting are hot Do not open close the covers or pull out the drawers during the operation Warning for grounding wire ...

Страница 17: ...the system when cleaning the floor This could cause a fire and give you an electric shock Always keep the plug and outlet clean Prevent them from accumulating dust and dirt This could cause a fire and give you an electric shock due to the heat released by electric leakage Other points Do not use such solvents as thinner or alcohol when cleaning the surface of the Paper Reusable Device This could w...

Страница 18: ...t or cold Emergency overview Contact with skin and eyes may result in irritation First Aid Measures Inhalation Remove to fresh air If symptoms persist get medical attention Skin contact Wash affected areas thoroughly with mild soap and water Get medical attention if irritation develops or persists Eye contact Do not rub eyes Immediately flush with large amounts of clean warm water low pressure for...

Страница 19: ... settings from being altered improperly or similar before you use this product change the administrator passwords set by factory default Data on remote servers and USB media must be managed by the user who carried out the operation Take security measures such as entry exit control and take out control for handling printed erased paper with important information Carry out Copy files To USB as appro...

Страница 20: ... size Sort Duplex or simplex print ing by alternating the front and back sides Reuse ratio up Point Fixing the paper size makes sorting unnecessary Staples Reuse ratio down Punch holes Reuse ratio down Print Back sheet of paper printed by other than e STUDIO306LP 307LP Reuse ratio down Use paper clips Reuse ratio up Do not fold bend the paper Reuse ratio up Write notes with FriXion pens Reuse rati...

Страница 21: ...ess Guide Chapter 5 Counter Tab Page Counter Tab Page Overview Fixing the paper size either to A4 LT or B5 improves the reuse ratio A5 ST is not recommended for everyday use because the drawer fills up at every job completion Upper drawer For Reuse Lower drawer Rejected Place paper with different size than the specified by the template Reuse ratio down Point For the data of the handouts ask the me...

Страница 22: ...memo ...

Страница 23: ...23 Before You Start This chapter describes the names of each part and papers that cannot be reused by this equipment Part Names and Functions 24 Non reusable Paper 28 ...

Страница 24: ...ply inlet Connect the power supply cable P 94 Connecting Cables in this manual Top cover Open this cover when removing misfed pa per and cleaning the paper feed roller P 69 Inside the Top Cover in this manual P 83 Paper Feed Roller in this manual USB port Use this port when saving scanned data in USB media P 30 Getting Started in this manual Paper feed tray Place paper you want to erase sort scan ...

Страница 25: ...ting Started in this manual Upper right cover Open when removing misfed paper P 74 Inside the Upper Right Cover in this manual Lower right cover Open when removing misfed paper P 71 Inside the Lower Right Cover in this manual Lower drawer Non reusable paper is ejected into this drawer Main power switch Use this switch to turn on this equipment P 96 Turning On in this manual Upper drawer Reusable p...

Страница 26: ...d return to the previous screen on the LCD OK button Press this button to confirm the selection and return to the previous screen on the LCD MENU OFF button Use this button to display the menu screen Holding this button down for 5 seconds while the equipment is operating shuts it down P 97 Turning Off Shutting Down in this manual MAIN POWER lamp The lamp lights in orange while the main power of th...

Страница 27: ...e screen menu screen and error messages Template display area Use this screen to select the operation to carry out You can create templates in TopAccess TopAccess Guide Chapter 4 Registration Tab Page Registration Tab Page Overview Paper misfeed location lamp This lamp lights in orange when a paper misfeed occurs and displays its position It also goes on when a cover or drawer is open or a paper d...

Страница 28: ...y e STUDIO306LP 307LP Uneven paper Folded paper Curled paper Creased paper Folded and opened paper Damaged paper Folded in half Folded in three Punched paper Torn paper Tips The number of times you can reuse the paper vary depending on the erasure settings Moreover the number of times you can reuse the paper may vary depending on the conditions and environment of use When erasing 1 sided prints Ap...

Страница 29: ...gs or tapes Paper with attachments Stapled paper Clipped paper Stuck paper even after the staples are removed Other paper Paper other than A4 A5 and B5 LT and ST for North America is not supported by this equipment Colored paper Paper written on with writing utensils other than FriXion pens ...

Страница 30: ... Place paper with the printed side up and align the edges Align the side guides to the paper width If the Login Screen is displayed on the control panel log in to the equipment P 61 How to Log In in this manual Tip You can create templates combination of desired settings in TopAccess Refer to the TopAccess Guide for details TopAccess Guide Chapter 4 Registration Tab Page Registration Tab Page Over...

Страница 31: ...r out and remove the paper This example shows removing the paper from the upper drawer 3 Push the drawer in Install this equipment as described in the following chapter if you have not done so P 87 Installing the Equipment in this manual Caution Take care not to catch your fingers in the drawer when closing it It may cause an injury Note When only scanning remove the paper from the drawer afterwar...

Страница 32: ...ed contents Notes Regarding the Erase Function When the paper surface is not erased even if you are using the recommended paper for e STUDIO306LP 307LP try again Colors in erased images may redevelop again if the paper is stored at a low temperature You can erase these redeveloped colors again using this equipment Certificate Importand document Do not use Do not use When not erased or colors redev...

Страница 33: ...stem than e STUDIO306LP 307LP This may cause a malfunction Sort may not work correctly depending on the conditions or environment of use Areas of paper repeatedly printed with images or large letters may become difficult to print or erase When erasing important documents be sure to verify in advance that the scanned data are saved When the internal temperature of the equipment becomes high its ope...

Страница 34: ...e partition When executing Scan_USB connect one USB media to the left or right side of this device When the ink cartridge is installed and the reuse counter function enabled reuse counter marks are printed on the upper left corner and lower right corner of the paper You can configure the reuse counter function in TopAccess Refer to the TopAccess Guide for details TopAccess Guide Chapter 7 Administ...

Страница 35: ...ase Settings 52 Changing Sorting Settings 53 Operating the Menu Screen 55 List of Menu Screen Items 57 How to Log In 61 With card authentication 61 With PIN code 62 Detailed Operations This chapter describes how to log in and change settings You can temporarily change template settings while in erasing ...

Страница 36: ... the power is turned off Erase Sort Scan_USB User_Template When the necessary settings are not registered in a template register the template in TopAccess Refer to the TopAccess Guide for details TopAccess Guide Chapter 4 Registration Tab Page Registration Tab Page Overview Tip A template is a combination of frequently used settings Configure using TopAccess in advance In TopAccess you can also ch...

Страница 37: ...The following 3 templates are registered as the default Erasure and sorting Scan and save in USB media Erasure only Erase Sort Scan_USB Erase When this equipment is managed with the user authentication function up to 10 private templates are available for each user Using Erase ejects paper written using writing utensils other than FriXion pens and torn paper to the upper drawer without sorting the...

Страница 38: ... change the scan results Configuration Procedure Erase Sort Scan_USB Erase 1 Use and to select a template and press Erase ON Paper Size A4 Erase Sort Scan OFF 2 Use and to select Scan and press ON Settings OFF Scan 3 Use and to select ON Settings and press ...

Страница 39: ...rmat P 42 in this manual Changing the Compression Ratio P 44 in this manual Scanning 2 Sides P 45 in this manual Omitting Blank Pages P 47 in this manual Changing the Exposure P 48 in this manual Specifying the Contrast P 49 in this manual Adjusting the Background P 50 in this manual Erasing Stain on the Paper Edges P 51 in this manual 150dpi 300dpi 200dpi Resolution 5 Use and to select the settin...

Страница 40: ...te Names are assigned to scanned data files according to the template settings in TopAccess Note that you cannot change them from the control panel Tip If you want to specify other than USB media as the destination it must be configured in TopAccess in advance Refer to the TopAccess Guide for details TopAccess Guide Chapter 4 Registration Tab Page Registration Tab Page Overview Tip See the followi...

Страница 41: ...ion and press to complete the set ting Item Setting Resolution 300dpi 200dpi 150dpi 100dpi Tip See the following page for how to display the item to specify P 38 Configuration Procedure in this manual Tips Selecting 300dpi limits the maximum number of sheets usable in a job to 60 When SLIM PDF Single or SLIM PDF Multi is selected for file format 300dpi and 200dpi are available for resolution ...

Страница 42: ... page for how to display the item to specify P 38 Configuration Procedure in this manual Item Setting Description Color Mode Full Color Select this mode to scan in full color Gray Scale Select this mode if you want to improve reproducibility of photos when the paper contains both text and photos B W Blue Select this mode to scan in monochrome Select this mode when scanning paper printed by e STUDI...

Страница 43: ... one TIFF file when scanning multiple pages PDF Multi Saves all pages in one PDF file when scanning multiple pages SLIM PDF Single Saves each page as a High Compression PDF file when scanning multiple pages Use this format when you want to prioritize the smaller file size than the image quality You can specify this only when you have selected Full Color or Gray Scale in Color Mode SLIM PDF Multi S...

Страница 44: ...ses low compression ratio and maintains the high image quality Medium Uses medium compression ratio and maintains the standard image quality High Uses high compression ratio Select this ratio when you want to minimize the size of the scanned data rather than giving precedence to the image quality Tip See the following page for how to display the item to specify P 38 Configuration Procedure in this...

Страница 45: ... 1 SIDE 1 or 2 Sided 2 Sided Book 2 Use and to select whether or not to scan both sides of the paper To scan 1 side select 1 SIDE and press to complete the setting To scan both sides select 2 Sided and press Scanning 2 Sides Tip See the following page for how to display the item to specify P 38 Configuration Procedure in this manual ...

Страница 46: ...e printed side up in the paper feed tray 2 Sided Book Scans both sides of the side bound paper directions of the top and bottom are the same on both sides 2 Sided Tablet Scans both sides of the top or bottom bound paper directions of the top and bottom are reverse on each side Tip When scanning 1 side of the paper the paper is fed in the direction shown in the figure A A Paper feed direction Scann...

Страница 47: ...Omit Blank Page 2 Use and to select whether or not to omit blank pages from the scan results and press Item Setting Description Omit Blank Page OFF Leaves blank pages in the scan results ON Omits blank pages from the scan results Tip See the following page for how to display the item to specify P 38 Configuration Procedure in this manual ...

Страница 48: ...Exposure and press 0 Exposure 2 2 Use and to specify the desired exposure and press to complete the setting Tip See the following page for how to display the item to specify P 38 Configuration Procedure in this manual Tip The larger the numeric value the darker is the scan result and vice versa 5 levels ...

Страница 49: ...Contrast and press Contrast 2 0 2 Use and to specify the desired contrast and press to complete the setting Tip See the following page for how to display the item to specify P 38 Configuration Procedure in this manual Tip The larger the numeric value the higher is the contrast and vice versa 5 levels ...

Страница 50: ... Use and to adjust the background of the scanned image and press to complete the setting Adjusting the Background Tip See the following page for how to display the item to specify P 38 Configuration Procedure in this manual Tip The smaller the numeric value the brighter is the background and vice versa 5 levels ...

Страница 51: ...e and to select Outside Erase and press OFF ON Outside Erase 2 Use and to select whether or not to erase staining on the paper edges from the scan results and press to complete the setting Tip See the following page for how to display the item to specify P 38 Configuration Procedure in this manual ...

Страница 52: ...e Sort Scan_USB Erase 1 Use and to select a template and press Erase Sort Paper Size A4 Scan OFF Erase ON 2 Use and to select Erase and press ON OFF Erase 3 Use and to select whether or not to erase and press to complete the setting ...

Страница 53: ...e 1 Use and to select a template and press Erase Sort Erase ON Scan OFF Sorting Auto 2 Use and to select Sorting and press Changing Sorting Settings Note The sorting settings may not be changed depending on the template settings ...

Страница 54: ...automatically assess whether the paper is reusable or not and eject reusable paper into the upper drawer Manual Settings Upper Drawer Select this to eject paper into the upper drawer without sort ing Lower Drawer Select this to eject paper into the lower drawer without sort ing Tip When selecting Manual Settings press and select Upper Drawer or Lower Drawer ...

Страница 55: ...ry out the fol lowing basic procedure before operating the menu screen Tips See the following section for information on items that you can specify in the menu screen P 57 List of Menu Screen Items in this man ual Press CANCEL to exit the setting without making any change You can also exit by pressing if buttons are enabled Note You need to enter the administrator PIN code to change an administrat...

Страница 56: ...Ether net 10BASE FULL Auto 10BASE HALF Ethernet 4 Use and to select the setting value you want to change and press to complete the setting The example shows the screen dis played when you have selected an op tion for Ethernet Tip When specifying such as IP address use and to enter numeric values Use and to change the input position Press when you have finished specifying the item ...

Страница 57: ...ka Specifies the display language at startup Status Display Displays the number of pages erased so far and the reuse ratio ADMIN Network Settings IPv4 Address Mode Dynamic Static Select Dynamic when you do not know the TCP IP settings for this equipment When Dynamic is selected the equipment will obtain the IP address subnet mask and gateway from the DHCP server if the network supports DHCP Select...

Страница 58: ...le Displays the IPv6 protocol settings IP Address Displays the IP address of the equipment Ethernet Auto 10BASE HALF 10BASE FULL 100BASE HALF 100BASE FULL 1000BASE FULL Select a combination of the communication speed and method Factory Default Yes No Restores all functions and settings to the factory default Note Wait until the equipment is turned off The equipment will turn itself off automatical...

Страница 59: ...useful when you want to specify the same settings in multiple Paper Reusable Device Selecting Create Clone File and pressing displays the screen to configure the PIN code The configured PIN code is necessary to Apply Clone Notes When cloning make sure the source and target are running the same software version You can check the software version and update from TopAccess TopAccess Guide Chapter 7 A...

Страница 60: ...ccumulate in the equipment one of the following error codes may occur making the equipment be come unavailable 2D11 2D60 For this reason use this function after connecting the USB media to the equipment to remove the scanned data as appropriate about once a month depending on the usage Note Transferring the scanned data to the USB media may take some time Tip If there is no scan data on this devic...

Страница 61: ...tility TopAccess Refer to the TopAccess Guide for details TopAccess Guide Chapter 7 Administration Tab Page Security Item List When a user registered in the equipment uses a non registered card a prompt to enter the PIN code displays Entering the PIN once registers the card information in the equipment enabling the user to log in only with the card from the next time on See the following section f...

Страница 62: ...ter the PIN code and press to display the home screen With PIN code Tips The PIN code is a number of up to 32 digits When you do not know the PIN code contact the administrator of the equipment When the Login Screen includes Guest as an option press to log in as a guest user ...

Страница 63: ...s 64 Paper Misfeed 67 Erase Sort Scan Function Trouble 75 When Something is Wrong with the Equipment 76 Troubleshooting Read this chapter when you have any problem while using this equipment such as a paper misfeed ...

Страница 64: ...e Corrective Action A100 A103 Check the paper and place the paper in the feed tray again A105 10004 20003 Place the paper in the paper feed tray A200 Close the covers of the equipment A201 E010 E417 Remove the paper inside the equipment and close the cover P 67 Paper Misfeed in this manual C010 CB15 CE10 CE20 F010 F902 6042 7101 7111 10001 10002 10005 10008 10100 20001 20002 20004 20005 30002 3002...

Страница 65: ...laced Contact your service representative 2D11 If there is a running job rerun the job in error after the running job completes If the error persists contact your service representative 2D30 2D31 Rerun the job in error after checking that the destination directory is write enabled and that the destination server or USB media has enough free space 2D32 Using File Explorer remove the file inside the...

Страница 66: ...ess is duplicated Check whether the stateless address is used by another piece of quipment 8014 The IPv6 stateful address is duplicated Check whether the stateful address is used by another piece of quipment 10003 10006 10009 10010 Press CANCEL and reattempt the job in error 10007 20006 30001 30021 30022 Turn off the equipment and then turn it on again to rerun the job in error 20007 The number of...

Страница 67: ...losing the open covers and drawers starts the warm up Follow the instruction on the screen PaperMisfeed Inside the top cover P 69 in this manual Inside the upper left cover P 69 in this manual Inside the middle left cover P 70 in this manual Inside the lower left cover P 70 in this manual Inside the lower drawer P 71 in this manual Inside the upper drawer P 71 in this manual Inside the upper right...

Страница 68: ...ding on the timing of the paper misfeed Carry out all the operations suggested in this document when the paper misfeed location lamp does not go off even after removing the misfed paper Try erasing again when paper in the upper drawer is not erased Note that this may create duplicated scan data if you are scanning Paper misfeeds occurring frequently The following may cause frequent paper misfeeds ...

Страница 69: ...69 1 Open the top cover 2 Remove the paper 3 Close the top cover Inside the Top Cover 1 Open the upper left cover 2 Remove the paper 3 Close the upper left cover Inside the Upper Left Cover ...

Страница 70: ...pen the middle left cover 2 Remove the paper 3 Close the middle left cover Inside the Middle Left Cover 1 Open the lower left cover 2 Remove the paper 3 Close the lower left cover Inside the Lower Left Cover ...

Страница 71: ...areful not to touch the erasure unit and surrounding metal parts Take care not to touch the erasure unit and surrounding metal parts when removing misfed paper inside the lower right cover It may cause a burn or an injury due to hitting somewhere else inside the equipment from the shock 1 Open the lower right cover Continued on the next page ...

Страница 72: ...ing the paper is difficult try by opening the upper right cover 2 Hold the green handle and lower it towards you 3 Push down the two green pressure release levers for the erasure unit till they stop 4 Remove the paper ...

Страница 73: ...73 5 Close the erasure unit 6 Push the two pieces of green felt to lock the erasure unit 7 Return the green handle to the original position 8 Close the lower right cover ...

Страница 74: ...74 Tip If removing the paper is difficult try by opening the lower right cover 1 Open the upper right cover 2 Remove the paper 3 Close the upper right cover Inside the Upper Right Cover ...

Страница 75: ...dition P 28 Non reusable Paper in this manual P 77 Paper in this manual Printed Contents are not Scanned Clearly Review the color mode setting To scan paper printed by e STUDIO306LP 307LP in monochrome use B W Blue mode P 51 Erasing Staining on the Paper Edges in this manual When the scanned data is stained or has streaks clean the paper feed roller and document scanning area P 82 Cleaning the Equ...

Страница 76: ...ny of the buttons on the control panel for 1 second to clear the Energy Save mode P 99 Energy Save Mode in this manual The control panel is dim The contrast of the LCD is ad justed lower Adjust the contrast of the LCD higher P 57 List of Menu Screen Items in this manual The button does not respond to my operation Only the MAIN POWER lamp is lit The power of the equipment is not turned on Press STA...

Страница 77: ... felt inside the lower right cover to lock the erasure unit Paper Problem Description Cause Corrective Action Paper misfeeds The paper you are using is not supported by this equipment Check whether the paper is supported by this equipment P 28 Non reusable Paper in this manual Hidden misfed paper has not been removed Check the control panel indication again to see where the misfeed occurred P 67 P...

Страница 78: ...e drawer Paper is rejected even when it is in good condition The paper coverage rate is high Paper with a coverage rate of around 30 or higher is rejected regardless of its condition Furthermore paper is also rejected if it contains pictures and graphs measuring 25mm 0 9 or longer When creating print data be sure it is within the aforemen tioned criteria Ink Cartridge Problem Description Cause Cor...

Страница 79: ...printed Checking erasure count mark printing 1 Place 1 sheet of white paper in the paper feed tray and carry out a mark print test P 59 Test Print in this manual 2 Look at both sides of the sheet to check whether there is 1 reuse counter mark printed 3 If the erasure count mark is not printed is light or is partially miss ing clean the ink cartridge as follows and test print again Continued on the...

Страница 80: ...sing The ink cartridge is dirty or dry Cleaning the ink cartridge 1 Turn off the equipment 2 Remove the ink cartridge 3 Wipe the nozzle plate of the ink cartridge with a non woven cloth Note Be careful not to damage the nozzle plate of the ink car tridge 4 Install the ink cartridge 5 Turn on the equipment ...

Страница 81: ...81 Cleaning the Equipment 82 Replacing the Ink Cartridge 84 Maintenance It is recommended to clean this equipment periodically to ensure efficient paper reuse operations ...

Страница 82: ...vents such as thinner and benzene They may cause deformation or discoloration 1 Open the upper left cover 2 Clean the document scanning area 2 places Wipe them with a dry soft cloth Use a slightly moist soft cloth if the dry cloth does not clean well Do not use anything other than water such as organic solvents alcohol and neutral detergent Document Scanning Area Surface of the Long Narrow Glass C...

Страница 83: ...nd benzene They may cause deformation or discoloration 1 Open the top cover 2 Clean the paper feed rollers two on the cover side one on the equipment side Clean them in one of the following two meth ods Wipe them using a dry soft cloth Wipe them using a slightly moist soft cloth Paper Feed Roller Clean the paper feed rollers once every four months approximately ...

Страница 84: ...g with the Equipment on page 76 in this manual If the problem persists replace the ink cartridge as follows ReplacingtheInkCartridge Note Dispose of used ink cartridges according to the regulations of your local government or your region Tip Carry out steps 1 2 5 6 and 7 when installing the ink cartridge for the first time The ink cartridge pad is located on the upper right of the ink cartridge ho...

Страница 85: ...ote Check that the ink cartridge is locked in the position shown in the figure 4 Remove the ink cartridge 5 Install a new ink cartridge 6 Attach the ink cartridge pad with the green face of the tab upwards ...

Страница 86: ...r the first time install the cartridge and then enable the reuse counter function in TopAccess TopAccess Guide Chapter 7 Administration Tab Page Setup Item List After installing a new ink cartridge carry out a print test and adjust the position of the reuse counter mark in TopAccess if necessary P 57 List of Menu Screen Items in this manual TopAccess Guide Chapter 7 Administration Tab Page Setup I...

Страница 87: ...8 Installation Space 88 How to Install 89 Turning On and Off 96 How to Configure Settings 100 Installing the Equipment This chapter describes how to install and configure this equipment Be sure to read this before the installation ...

Страница 88: ...recautions at the time of instal lation P 12 When installing or moving in this manual Caution This equipment weighs approximately 45 kg 99 2 lb Always use two people to install the equipment Installation Space Keep some clear space around the installation location Bad ventilation may cause malfunctions ...

Страница 89: ...is missing In the event that any accessory is missing or damaged please contact your service representative This equipment e STUDIO RD30 RD301 Power supply cable Used on P 94 in this manual User s Guide this manual User Document CD Caps Used on P 92 in this manual Reuse drawer label Used on P 93 in this manual ...

Страница 90: ... the two green levers to unlock the erasure unit 6 Lower the two green handles to open the erasure unit 1 Open the lower right cover 2 Remove the blue tape 2 places 3 Hold the green handle and lower it towards you Installing the Equipment Note If the equipment is fastened using blue tape remove it before installing ...

Страница 91: ... stops and then pull it towards you to remove 8 Close the erasure unit 9 Push the two pieces of green felt to lock the erasure unit 10 Return the green handle to the original position 11 Close the lower right cover 12 Open the middle left cover Continued on the next page ...

Страница 92: ...idge for the reuse counter function at the time of installation P 84 Replacing the Ink Cartridge in this manual 13 Pull the transport anchor with cord 2 places upwards to remove it 14 Close the middle left cover 15 Attach the caps 2 places 16 Attach the caps 2 places ...

Страница 93: ...tom of this equipment Lock the casters with the stoppers to fix the equipment se curely after moving or installing it Warning Be sure to lock the casters after moving and installing this equipment The equipment may move or fall and may cause injuries Tip Attach the reuse drawer label to the upper drawer as needed 93 ...

Страница 94: ...the ground wire Be sure to connect the ground wire Connect the ground wire Check that the ground terminal is securely grounded If not securely grounded a short circuit due to insulation failure may cause an electric shock For information on how to check contact your service representative ...

Страница 95: ...ied with this equipment Purchase the cable separately if required Warning Be sure to shut down this equipment and the computer when connecting an interface cable to the equipment Otherwise it may damage the equipment or cause an electric shock Note The shape of the power plug varies depending on the region ...

Страница 96: ...ot lit in orange Turn on the main power switch This equipment is ready after approximately 40 seconds Press START WAKE UP This equipment is ready after approximately 40 seconds When MAIN POWER lamp on the control panel is lit in orange MAIN POWER lamp orange MAIN POWER lamp orange ...

Страница 97: ...ile the equipment is operating except in the energy save mode also shuts down the equipment Notes Do not turn off the main power switch when a lamp other than the MAIN POWER lamp is lit or blinking on the control panel This may damage the equipment Do not turn off the equipment while the software is being updated or data are being imported Trying to shut down when there is a running job displays a...

Страница 98: ...the Equipment for a Long While Shut down the equipment using MENU OFF Check that the LCD is completely off and turn the main power switch off The MAIN POWER lamp orange goes off as you turn the main power switch off ...

Страница 99: ...canned images have been converted and saved 3 This equipment is not accessed via the network Status The MAIN POWER lamp is lit in orange and the ENERGY SAVER lamp blinks in blue Wake up 1 Press and hold any of the buttons on the control panel for 1 second 2 Place paper in the paper feed tray 1 1 minute as the factory default Tip You can change the duration before entering the energy save mode usin...

Страница 100: ...Use and to select ADMIN and press Tip Except for the settings described in this section use TopAccess to configure this equipment such as creating templates Refer to the TopAccess Guide for details TopAccess Guide Chapter 4 Registration Tab Page Registration Tab Page Overview TopAccess Guide Chapter 7 Administration Tab Page Setup Item List Tip If the administrator PIN code has not been changed en...

Страница 101: ...e MM 0 5 DD 1 0 YY 2 0 1 3 6 Use and to specify the date and press Set Date Set Time Date Time 7 Use and to se lect Set Time and press Set Time HH 0 8 MM 3 0 8 Use and to specify the time and press 9 Press CANCEL Ethernet ADMIN Factory Default Network Settings 10 Use and to select Network Settings and press ...

Страница 102: ...o select Address Mode and press Dynamic Static Address Mode 13 To acquire the IP ad dress dynamically select Dynamic using and and press to complete the setting Dynamic Static Address Mode 14 To specify the IP address manually select Static using and and press Tip To configure the IP address manually proceed to step 14 ...

Страница 103: ...ss and press Subnet Mask IPv4 IP Address Address Mode 17 Use and to select Subnet Mask and press Subnet Mask 2 5 5 2 5 5 2 5 5 0 0 0 18 Use and to specify the subnet mask and press Gateway Subnet Mask IPv4 IP Address 19 Use and to se lect Gateway and press 1 9 2 1 6 8 0 0 0 0 0 1 Gateway 20 Use and to specify the gateway and press to com plete the setting ...

Страница 104: ...memo ...

Страница 105: ...105 Specifications 106 Consumables 107 Datasheet This chapter describes specifications and supplemental information of this equipment ...

Страница 106: ...10 mm 0 4 5 Warming up time Approximately 40 seconds 6 Interface USB 2 0 Hi Speed Ethernet 1000Base T 100Base TX 10Base T Operating environ ment normal use Temperature 10 30 C 50 86 F Humid ity 20 85 No Condensation Power requirements and Power consump tion AC 220 240 V 10 8 A 50 60 Hz 2 0 kW or less AC 120 V 10 12 A 50 60 Hz 1 5 kW or less Dimensions W 470 mm 18 5 x D 470 mm 18 5 x H 825 mm 32 5 ...

Страница 107: ...em List You can use the reuse counter function under the following conditions With templates including the erase and sort functions With paper size A4 LT for North America only Consumables Notes The reuse counter mark cannot be erased Depending on the condition of the paper the reuse count may not be increased correctly Use the reuse counter mark as a measure of the number of times the paper has b...

Страница 108: ...e Product with hardware goods or software which TOSHIBA TEC CORPORATION has not directly or indirectly supplied Disclaimer Notice The following notice sets out the exclusions and limitations of liability of TOSHIBA TEC CORPORATION including its employees agents and sub contractors to any purchaser or user User of the e STUDIO RD30 RD301 including its accessories options and bundled software Produc...

Страница 109: ...oft Corporation in the US and other countries Apple AppleTalk Macintosh Mac Mac OS Safari and TrueType are trademarks of Apple Inc in the US and other countries Adobe Acrobat and Reader are either registered trademarks or trademarks of Adobe Systems Incorporated in the United States and or other countries Mozilla Firefox and the Firefox logo are trademarks or registered trademarks of Mozilla Found...

Страница 110: ...0 32 75 ERASE lamp 27 Eraser Setting 52 Error Codes 64 Exposure 48 F Factory Default 58 File Format 42 FriXion 21 107 H HOME button 26 Home icon 27 Home screen 27 I Ink cartridge 84 L LCD Liquid Crystal Display 27 Log In 61 Lower drawer 25 71 Lower left cover 24 70 Lower right cover 25 71 M MAIN POWER lamp 26 Main power switch 25 MENU OFF button 26 Menu screen 55 Middle left cover 24 70 N Network ...

Страница 111: ... 27 Scanning 2 Sides 45 Scan Settings 38 Settings 100 Shut Down 57 97 Side guide 25 Sort 30 75 Sorting Method 53 SORT lamp 27 Specifications 106 START WAKE UP button 26 Status Display 57 STOP LOGOUT button 26 T Template 30 36 Template display area 27 Top cover 24 69 Turn off 97 Turn on 96 U Upper drawer 25 71 Upper left cover 24 69 Upper right cover 25 74 USB port 24 25 ...

Страница 112: ...memo ...

Страница 113: ...memo ...

Страница 114: ...memo ...

Страница 115: ...Printed in Malaysia KH 1020 KH 1021 OME120263B0 ...

Страница 116: ...rm without prior writtenpermission of TTEC 2013 2014 TOSHIBA TEC CORPORATION All rights reserved PAPER REUSABLE DEVICE User s Guide 1 11 1 OSAKI SHINAGAWA KU TOKYO 141 8562 JAPAN 6LK35258000 R120820M6102 TTEC 2014 10 Ver02 F Patent http www toshibatec co jp en patent ...

Отзывы: