background image

25

Record Mode

Video recording

Video recording

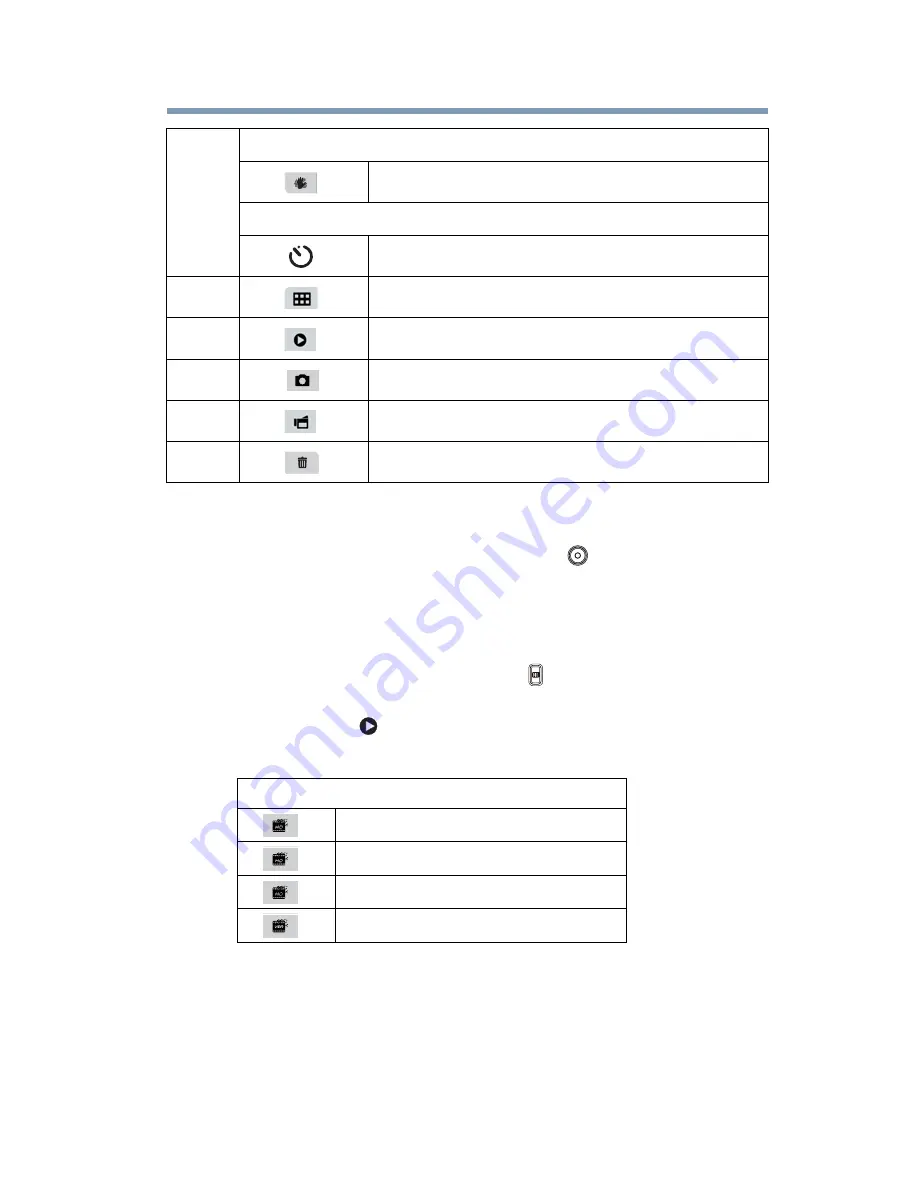
In Video Record mode, press the Record


(

button to start 

recording (The Video Record LED indicator light glows after 
pressing the Record button). When a video is being recorded, a time 
indicator will display on the LCD touch screen. To stop recording, 
press the Record button again. 

To pause recording, press the Pause


(

button. To continue 

recording, press it again.

Press the Play (

) button to view a recorded video. 

The four resolution settings available are: 

3

Video Record mode

Stabilization ON/OFF

Photo Record mode

Self-timer ON/OFF

4

Menu

5

Playback mode

6

Photo mode

7

Video  mode

8

Delete mode

Video Quality

Full HD:

 1920 x 1080p 30

HD60:

 1280 x 720p 60

HD30:

 1280 x 720p 30

VGA:

 640 x 480p 30

60

p

30

p

Содержание CAMILEO S30

Страница 1: ...GMAA00272011 11 10 English Español CAMILEO S30 User sGuide ...

Страница 2: ...ns However there is no guarantee that interference will not occur in a particular installation If this equipmentdoescause harmful interference to radioortelevision reception which can be determined by turning the equipment off and on the user is encouraged to try to correct the interference by one or more of the following measures Reorient or relocate the receiving antenna Increase the separation ...

Страница 3: ...g so may damage the camcorder 4 Use the camcorder with care Avoid pressing hard on the camcorder body 5 For your own safety avoid using the camcorder when there is a storm or lightning 6 Do not use batteries of different specifications Doing so may lead to the potential for serious damage 7 Remove the battery during long periods between usage as a deteriorated battery may affect the functionality ...

Страница 4: ...able or an optional Toshiba battery charger to charge the battery pack Never attempt to charge the battery pack with any other charger Safety icons This manual contains safety instructions that must be observed to avoid potential hazards that could result in personal injuries damage to your equipment or loss of data These safety cautions have been classified according to the seriousness of the ris...

Страница 5: ...f ArcSoft Inc Facebook is a registered trademark of Facebook Inc HDMI the HDMI Logo and High Definition Multimedia Interface are trademarks or registered trademarks of HDMI Licensing LLC Intel Intel Core Celeron Centrino and Pentium are trademarks or registered trademarks of Intel Corporation or its subsidiaries in the United States and other countries Microsoft Windows and Windows Vista are eithe...

Страница 6: ...w 12 Chapter 2 Getting Started 13 Loading the battery 13 Charging the battery 14 Inserting and removing an SD Card optional 19 Protecting data on an SD Card 20 Turning the camcorder on and getting started 20 Turning off the camcorder 20 Chapter 3 Record Mode 21 Button functions 21 LCD touch screen information 22 Notification icons 22 Touch function icons 24 ...

Страница 7: ...n functions 41 LCD touch screen information 42 Notification icons 42 Touch function icons 43 Playback mode operations 44 Video Playback 45 Photo Playback 45 Delete a file in Playback mode 46 Chapter 5 Camcorder Settings 47 Settings Menu 47 Sound 48 TV 48 Language 49 Time Setting 49 Format 50 Default Setting 50 Chapter 6 Viewing Photos and Videos on TV 52 Connecting to a high definition 16 9 wide T...

Страница 8: ... the Internet 56 CAMILEO UPLOADER 56 ArcSoft MediaImpression 60 Chapter 9 Specifications 63 Operating Environment Conditions 64 Chapter 10 Troubleshooting 65 Chapter 11 Other Information 67 Toshiba Support 67 Before you call 67 Contacting Toshiba 68 Toshiba s technical support Web site 68 Toshiba voice contact 68 Warranty 69 Online Warranty Information 69 Warranty Service 69 ...

Страница 9: ...to 16 mega pixels Color LCD touch screen for easy viewing of photos and videos Video recording at an HD resolution of 1920 x1080 HDTV connectivity via an HDMI cable Easy playback of recorded high definition videos on wide screen HDTV Built in CAMILEO UPLOADER allowing you to upload videos captured by the camcorder to the Internet more effortlessly ISO and white balance can be set to automatic or m...

Страница 10: ...ow are included Sample Illustration Components Preinstalled in the camcorder Be sure to remove the protective film on the lens before using System Requirements Microsoft Windows XP Windows Vista Windows 7 Intel Pentium IV 2 4 GHz or above 512 MB RAM CD ROM Drive 1 GB free HDD space Available USB 2 0 port 16 bit color display NOTE Camcorder USB cable AV cable Quick Start Guide CD ROM Software User ...

Страница 11: ...cording Front Side views Sample Illustration Front view NOTE Switch between Macro SD Card cover Macro switch Lens NOTE Remove the Microphone LED light mode and Normal protective film from the lens before use mode Switch between Video mode and Photo Power Speaker Battery Mode button mode Internet Upload button In Playback mode press to select the file you wish to upload to a Web site When the camco...

Страница 12: ...ew Video mode indicator light Tele button Wide button TV port Record button In Video Record mode press to Press to pause recording Pause button Mini USB 2 0 port Hand strap hook Photo mode indicator light HDMI port Zoom out and Volume decrease record a video press again to stop In Photo Record mode press to take photos Press it again to continue Zoom in and Volume increase recording LED light butt...

Страница 13: ...lm on the battery before use To properly connect the battery 1 Flip open the LCD touch screen and slide the battery cover off 2 Remove the battery 3 Pull off the protective film Sample Illustration Removing the protective film 4 Reinsert the battery making sure it is lined up with the correct polarity marks Protective film Li ion battery ...

Страница 14: ...plied AC adaptor or the USB cable to charge your camcorder before use Turn off the camcorder A blinking light will indicate active charging and a solid light indicates that charging is complete In AC charging mode the light will turn off automatically after 3 5 minutes Sample Illustration Charging the battery Polarity marks Li ion battery Battery cover ...

Страница 15: ...ther electrolytic substances could cause fire possibly resulting in death or serious injury Never short circuit the battery pack by either accidentally or intentionally bringing the battery terminals in contact with another conductive object This could cause serious injury or a fire and could also damage the battery pack and product Always wrap the battery pack in plastic or place it in a plastic ...

Страница 16: ...se a fire or explosion possibly resulting in serious injury Never expose a battery pack to abnormal shock vibration or pressure Never use a battery pack which has been exposed to abnormal shock even if the appearance is normal The battery pack s internal protective device could fail causing it to overheat or ignite resulting in caustic liquid leakage or explosion or fire possibly resulting in deat...

Страница 17: ... possibly resulting in serious injury Battery pack warning indicators Always immediately turn the power off and disconnect the power cable cord plug from the plug socket and stop using the battery pack if you observe any of the following conditions Offensive or unusual odor Excessive heat Discoloration Deformation cracks or leaks Smoke Other unusual event during use such as abnormal sound In such ...

Страница 18: ...alls out while you are carrying the product you could be injured or the battery pack could be damaged Do not use an impaired or exhausted battery pack Never continue to use a battery pack after its recharging capability has become impaired or after the warning message indicating that the battery pack power is exhausted has been displayed Continued use of an exhausted or impaired battery pack could...

Страница 19: ... remove the battery pack without first turning off the power and disconnecting the AC adaptor Inserting and removing an SD Card optional An SD Card must be purchased separately Your camcorder comes with internal memory that allows you to store photos and videos You can expand the memory capacity by using an optional SD SDHC SDXC memory card 1 Open the SD Card cover 2 Insert the SD Card into the sl...

Страница 20: ... to turn on the camcorder automatically Or press the Power button for approximately one second to turn it on To record videos Press the Mode button or touch the onscreen icon to switch to Video Record mode Press the Record button to begin recording The Video Record mode LED Indicator glows To take a photo Press the Mode button or touch the onscreen icon to switch to Photo Record mode Press the Rec...

Страница 21: ...rd videos Press the button again to stop recording 2 In Photo Record mode press to take a still photo Tele T button Zoom in Wide W button Zoom out Pause button 1 Press to pause recording 2 Press again to continue recording LED light button LED light ON LED light OFF Digital light ON Power button Press for one second to turn ON OFF the camcorder ...

Страница 22: ...image below may appear on the LCD touch screen Sample Image LCD touch screen notification icons Notification icons Macro switch Switch between Macro mode and Normal mode 1 Battery Full power Battery Medium power Battery Low power Battery No power DC power mode 2 Macro Position Focusing 3 2 1 6 5 8 4 7 ...

Страница 23: ...er of photos taken 4 Motion Detection Video Record mode only 5 Scene Skin Night Backlight 6 Manual white balance Daylight Fluorescent Tungsten 7 Zoom meter 1x 16x 16x Digital zoom 8 Slow Motion Video Record mode only Note Slow motion videos will be recorded in QVGA resolution Time Lapse Video Record mode only Pre Record mode Video Record mode only 00 03 12 00 03 12 250 321 ...

Страница 24: ...h screen touch function icons Touch function icons 1 Digital light ON Light ON Light OFF 2 Video Resolution Full HD 1080p 30 HD60 720p 60 HD30 720p 30 VGA QVGA while the Slow Motion function is active the video resolution is 320 x 240 QVGA Photo resolution High 16MP Standard 8MP Low 3MP 3 2 1 8 7 6 5 4 60p 30p ...

Страница 25: ...screen To stop recording press the Record button again To pause recording press the Pause button To continue recording press it again Press the Play button to view a recorded video The four resolution settings available are 3 Video Record mode Stabilization ON OFF Photo Record mode Self timer ON OFF 4 Menu 5 Playback mode 6 Photo mode 7 Video mode 8 Delete mode Video Quality Full HD 1920 x 1080p 3...

Страница 26: ...objects To take close up photos 1 Slide the Macro switch to Macro 2 Press the Record button to start recording a video or take a still photo In Macro mode the macro icon appears on the LCD touch screen Remember to turn the macro switch back to Normal when you are not taking close up photos Using digital zoom The digital zoom magnifies images when recording videos or taking photos 1 To zoom in out ...

Страница 27: ...cene Filter White Balance Sound TV Language Time Setting Format Default Setting Delete Video Delete Photo Delete Video Photo Delete All Operation Screen 1 Touch the onscreen icon The Menu screen appears The available options are Video Setting Photo Setting Effects Setup and Delete 2 Touch the desired onscreen icon twice The Options Menu appears 3 Touch to select the specific option you want to cha...

Страница 28: ...ting menu The Video Setting Menu appears 3 The Video Setting menu contains eight options Light Resolution Stabilization Motion Detect Slow Motion Pre Record Time Lapse and Continuous Play ON The light is turned ON and provides illumination OFF The light is turned OFF Digital Light Extend the dynamic range of high contrast and the backlight so objects appear brighter and clearer Operation Screen 1 ...

Страница 29: ...Record videos at 1280 x 720p 60 resolution HD 30 Record videos at 1280 x 720p 30 resolution VGA Record videos at 640 x 480p 30 resolution Operation Screen 1 In the Video Setting menu touch the Resolution icon twice 2 Touch to select the desired option 3 Touch again to validate the new setting 4 Touch the Exit icon twice to exit Operation Screen 1 In the Video Setting menu touch the Stabilization i...

Страница 30: ...ime Operation Screen 1 In the Video Setting menu touch the Motion Detect icon twice 2 Touch to select the desired option 3 Touch again to validate the new setting 4 Touch the Exit icon twice to exit The camcorder will begin recording automatically if movement is detected Stop recording if it does not detect movement Operation Screen 1 In the Video Setting menu touch the Slow Motion icon twice 2 To...

Страница 31: ...ted Time Lapse This setting allows the camcorder to record still images at specific time intervals that you can set and then play back as one video file Operation Screen 1 In the Video Setting menu touch the Pre Record icon twice 2 Touch to select the desired option 3 Touch again to validate the new setting 4 Touch the Exit icon twice to exit OFF Disables Time Lapse 1 second Record one frame per s...

Страница 32: ...ch the Exit icon twice to exit Operation Screen 1 In the Video Setting menu touch the Continuous Play icon twice 2 Touch to select the desired option 3 Touch again to validate the new setting 4 Touch the Exit icon twice to exit Operation Screen 1 Touch the onscreen icon The Menu screen appears 2 Touch the Photo Setting icon twice to enter the Photo Setting menu The Photo Setting Menu appears 3 The...

Страница 33: ...light is turned OFF Digital Light Extend the dynamic range of high contrast and the backlight so objects appear brighter and clearer Operation Screen 1 In the Photo Setting menu touch the Light icon twice 2 Touch to select the desired option 3 Touch again to validate the new setting 4 Touch the Exit icon twice to exit High 16M Take photos at 4608 x 3456 16 MP quality Standard 8M Take photos at 326...

Страница 34: ...speed increases just before the photo is taken Operation Screen 1 In the Photo Setting menu touch the Resolution icon twice 2 Touch to select the desired option 3 Touch again to validate the new setting 4 Touch the Exit icon twice to exit Operation Screen 1 In the Photo Setting menu touch the Self Timer icon twice 2 Touch to select the desired option 3 Touch again to validate the new setting 4 Tou...

Страница 35: ...ith a higher ISO setting Slideshow Photos can be viewed one after another in a slideshow Auto Sets the ISO setting automatically according to conditions 800 ISO 800 1600 ISO 1600 Operation Screen 1 In the Photo Setting menu touch the ISO icon twice 2 Touch to select the desired option 3 Touch again to validate the new setting 4 Touch the Exit icon twice to exit 2 seconds Display one photo every tw...

Страница 36: ...date the new setting 4 Touch the Exit icon twice to exit Operation Screen 1 Touch the onscreen icon The Menu screen appears 2 Touch the Effects icon twice to enter the setting menu 3 The Effects menu contains three options Scene Filter and White Balance Auto Automatically adjusts to current conditions Skin Adjusts skin tones to appear more natural Night Use in low light conditions or at night Back...

Страница 37: ... twice 2 Touch to select the desired option 3 Touch again to validate the new setting 4 Touch the Exit icon twice to exit Auto No filter effects Black White The image is converted to black and white Classic The image is converted to sepia Negative The image is converted to the negative of the original Operation Screen 1 In the Effects Setting menu touch the Filter icon twice 2 Touch to select the ...

Страница 38: ... images automatically Four White balance settings are available Auto Automatically adjusts white balance Daylight Use in outdoor conditions Fluorescent Use in Fluorescent lighting Tungsten Use in tungsten lighting Operation Screen 1 In the Effects Setting menu touch the White Balance icon twice 2 Touch to select the desired option 3 Touch again to validate the new setting 4 Touch the Exit icon twi...

Страница 39: ...s four options Delete Video Delete Photo Select Delete and Delete All Operation Screen 1 In the Delete menu touch the Video icon twice 2 Touch to select the desired option 3 Touch again to validate the new setting 4 Touch the Exit icon twice to exit Operation Screen 1 In the Delete menu touch the Photo icon twice 2 Touch to select the desired option 3 Touch again to validate the new setting 4 Touc...

Страница 40: ...d option 3 Touch again to validate the new setting 4 Touch the Exit icon twice to exit Yes Delete all videos and photos in the built in memory when no SD Card is installed or delete all videos and photos on the installed SD Card No Do not delete all videos and photos in the built in memory when no SD Card is installed or do not delete all videos and photos on the installed SD Card Operation Screen...

Страница 41: ...ctions in Playback mode Record button 1 Press to enter Record mode Tele T button Zoom in Wide W button Zoom out Pause button 1 Press to pause recording 2 Press is again to continue recording Internet upload button In Playback mode press to activate the Internet upload function ...

Страница 42: ...een notification icons Notification icons 1 Battery Full power Battery Medium power Battery Low power Battery No power DC power mode 2 The current video or photo file is selected to upload to the Internet 3 Playback time counter Current number of photos taken The remaining amount of photos that can be taken at the current resolution settings 4 Volume control 3 2 1 5 4 00 03 12 321 250 ...

Страница 43: ...unction icons 5 Video Playback mode Photo Playback mode 1 Video Playback mode Continuous play ON OFF Photo Playback mode Slideshow ON OFF 2 Select Play thumbnail screen ON 3 Menu ON 4 Return to Record mode 5 Return to the previous file Video fast rewind 6 Play a video or photo file Pause 7 Advance to the next file Video fast forward 3 2 1 8 7 6 5 4 ...

Страница 44: ...ch to Playback mode 2 Touch the onscreen icon to view the previous video photo or touch the onscreen icon to view the next video photo 3 Touch the onscreen icon The Menu screen appears 4 Touch the onscreen icon to open the thumbnail screen for videos and photos The Select Play screen appears 5 In the Select Play screen select the file s you want to play and then touch to confirm Check marks will a...

Страница 45: ... Touch the icon to play all video files continuously Touch the icon to stop the video 4 Use the Tele Wide buttons to adjust the volume 5 Press the Internet upload button to select the current video to upload to the Internet Operation Screen 1 In the Photo Playback mode touch the icon to view the previous photo or touch the icon to view the next photo 2 In the Slideshow On mode the icon is highligh...

Страница 46: ...ard has been installed only the videos and photos stored on the card are deleted Videos or photos cannot be deleted if the card is write protected Operation Screen 1 In the Playback mode touch the icon 2 Touch the icon to delete the current photo 3 Touch the Exit icon twice to exit NOTE ...

Страница 47: ...ation Screen 1 Touch the onscreen icon The Menu screen appears 2 Touch the Setup icon twice to enter the setting menu 3 The Setup Menu contains six options Sound operation sound TV Language Time Setting Format and Default Setting scroll down to view ...

Страница 48: ... menu touch the Sound icon twice The Menu screen appears 2 Touch to select the desired option 3 Touch again to validate the setting 4 Touch the Exit icon twice to exit NTSC 60Hz USA Canada Japan South Korea and Taiwan etc PAL 50Hz UK Europe China Australia Singapore and Hong Kong etc Operation Screen 1 In the Setup menu touch the TV icon twice The Menu screen appears 2 Touch to select the desired ...

Страница 49: ... Language icon twice The Menu screen appears 2 Touch to select the desired option 3 Touch again to validate the setting 4 Touch the Exit icon twice to exit Operation Screen 1 In the Setup menu touch the Time Setting icon twice The Menu screen appears 2 Touch to Year Month Day Hour or Minute to set 3 Touch to validate the setting 4 Touch the Exit icon twice to exit ...

Страница 50: ... and photos in the built in memory when no SD Card is installed or delete all videos and photos on the installed SD Card No Do not delete all videos and photos in the built in memory when no SD Card is installed or do not delete all videos and photos on the installed SD Card Operation Screen 1 In the Setup menu touch the Format icon twice The Menu screen appears 2 Touch to select the desired optio...

Страница 51: ...ing Yes performs the operation and No cancels the operation 3 Touch the Exit icon twice to exit Setting Default Factory Setting Resolution Video Full HD Photo Standard 8M Stabilization OFF Motion Detection OFF Slow Motion OFF Time Lapse OFF Self Timer OFF ISO Auto Scene Auto Filter Auto White Balance Auto Light OFF Sound ON TV Depends on shipping area Language Depends on shipping area Volume Level...

Страница 52: ...6 9 wide TV To view images or videos from your camcorder on a TV 1 Connect the HDMI cable to your camcorder s HDMI Out port 2 Connect the other end of the cable to a television 3 Set the video input source of your TV to HDMI Sample Image Connecting a high definition TV 16 9 ...

Страница 53: ...o a non high definition 4 3 TV 1 Connect one end of the AV cable to your camcorder s AV out port 2 Connect the other end of the cable to a television The steps for viewing stored photos and videos on a TV are exactly the same as for viewing them on the LCD touch screen Sample Image Connecting a standard TV The LCD touch screen does not display when the camcorder is connected to a TV Some functions...

Страница 54: ...he Internet easily Adobe Reader is a popular program that is needed to view the User s Manual Many users will find they already have this software installed on their computer To install the bundled software 1 Insert the CD ROM into your computer s optical disc drive The autorun screen appears 2 Click Install Application Software Follow the on screen instructions to complete the installation Detail...

Страница 55: ...end them via email to friends or post them on the Internet To do this 1 Connect the computer and camcorder with the supplied mini USB 2 0 cable The LED lights up 2 The videos and photos can be found on your computer at My Computer Removable Disk DCIM 100MEDIA 3 In this folder you can view delete move or copy any video photo you want 4 Use the bundled ArcSoft application software to edit the videos...

Страница 56: ...elps you share them with your family and friends on these Web sites The bundled software ArcSoft MediaImpression can also be used to upload your video clips to Web sites You must have internet access to upload videos to a Web site CAMILEO UPLOADER To upload files to the Internet 1 Select the video clip files in Video Playback mode by pressing the Internet upload button NOTE ...

Страница 57: ...le Sample Illustration Connecting the camcorder to a computer 3 Press the Internet upload button on the camcorder to launch the CAMILEO UPLOADER application automatically Before the computer launches the CAMILEO UPLOADER you must install ArcSoft MediaImpression included on the CD first Sample Image CAMILEO UPLOADER main screen ...

Страница 58: ...u may be asked to fill in your account information before uploading or you can fill in the information before uploading by clicking on the icon Click CANCEL to stop uploading Sample Image CAMILEO UPLOADER screen To upload video files selected manually to a Web site 1 Follow steps 2 and 3 in CAMILEO UPLOADER on page 56 2 On the thumbnail screen click the up down icon to change pages Click on the vi...

Страница 59: ...creen To playback the video file 1 Double click the video clip on the thumbnail screen 2 Click the Play Pause icon to play pause Click the Return icon to return to the thumbnail preview screen Sample Image CAMILEO UPLOADER screen To setup your account information for a Web site 1 Click on the icon to enter the setup screen ...

Страница 60: ...nformation If you do not have an account please sign up on the Web site first ArcSoft MediaImpression To upload video files to the Internet 1 Install ArcSoft MediaImpression 2 Click Start All Programs and then ArcSoft MediaImpression The ArcSoft MediaImpression main screen appears on your desktop 3 Click Videos Sample Image ArcSoft MediaImpression main screen NOTE ...

Страница 61: ...Select the folder that contains the video files you want to upload Select the files in the display area Click Upload to the Internet on the bottom menu Sample Image Selecting files 5 Fill in your site account information in the blanks and then click Login Sample Image Entering account information ...

Страница 62: ...62 Uploading Video Files to the Internet ArcSoft MediaImpression 6 Fill in the information on the video clips and then click Upload Sample Image Uploading to the Internet ...

Страница 63: ...to Zoom 1x 16x 16x Digital zoom Shutter Electronic LCD touch screen 3 in 7 6cm LCD touch screen Storage media Built in 128MB memory partial memory is used for firmware code SD SDHC SDXC card slot support up to 64GB Image resolution High 4608 x 3456 16M pixels Standard 3264 x 2448 8M pixels Low 2048 x 1536 3M pixels Video resolution Full HD 1920 x 1080 30fps HD60 1280 x 720 60fps HD30 1280 x 720 30...

Страница 64: ...Manual Daylight Fluorescent Tungsten ISO Auto 800 1600 Self timer 10 second delay Light Light ON Light OFF Digital Light ON File format Photo JPG Video MP4 Image play Single image slideshow PC interface Mini USB 2 0 port TV out NTSC PAL selectable HDMI Battery Lithium ion rechargeable battery Dimensions 2 36 in W x 4 33 in H x 0 75 in D 60mm W x 110mm H x 19mm D Weight 4 16 oz without battery 118g...

Страница 65: ...nstead of a computer Refer to Format on page 50 3 Why do some of my indoor photos look blurry and dark The camcorder extends photo exposure time under low light indoor conditions Keep the camcorder and the target subject steady for several seconds when taking photos The shutter sounds when a photo is taken 4 How do I charge the battery You must use the supplied AC adaptor or the USB cable The camc...

Страница 66: ...emory of the camcorder Removable Disk indicates the external memory SD SDHC SDXC card installed in the camcorder The disk DVAP indicates the built in CAMILEO UPLOADER application is saved to the disk Do not format the disk or delete the application inside The CAMILEO Uploader application may not function ...

Страница 67: ...stigate other sources of assistance first Try the following before contacting Toshiba Review the documentation supplied with your product If a problem occurs when you are running software applications consult the software documentation for troubleshooting suggestions Contact the software company s technical support department for assistance Consult the reseller or dealer from whom you purchased yo...

Страница 68: ...the United States at 888 592 0944 Outside the United States at 949 583 3305 Toshiba Phone Service Center for Latin America Specialized technical service in Spanish Hours Phone charges apply Monday through Friday from 8 00 a m to 9 00 p m EST Argentina 0 800 666 3701 Chile 800 64 6526 Costa Rica 0 800 011 1123 El Salvador 800 6601 Honduras 949 587 6836 Panama 00 8000 44 7813 Peru 0 800 5 3817 Urugu...

Страница 69: ...toshiba com accessories1yr Warranty Service Customers located in the fifty 50 United States and District of Columbia may obtain warranty service by visiting the Toshiba Acclaim Web site at www acclaim toshiba com or by contacting the telephone support center at 1 888 592 0944 Customers located outside the fifty 50 United States and District of Columbia may obtain warranty service by contacting the...

Страница 70: ......

Страница 71: ...CAMILEO S30 Manualdelusuario ...

Страница 72: ... provocar interferencias perjudiciales a las comunicaciones por radio Sin embargo no se garantiza que no habrá interferencias en una instalación en particular Si este equipo provoca interferencias perjudiciales en la recepción de radio o televisión lo que se puede determinar apagando y encendiendo el equipo recomendamos al usuario que intente corregir la interferencia adoptando una o varias de las...

Страница 73: ... Contacto Instrucciones de seguridad 1 No deje caer la videocámara ni la perfore o desarme de lo contrario se anula la garantía 2 Evite el contacto con el agua y séquese las manos antes de usar la videocámara 3 No exponga la videocámara a temperatur as elevadas ni la deje en contacto directo con la luz del sol ya que la videocámara podría averiarse 4 Use la videocámara con cuidado No presione el c...

Страница 74: ...recto 12 Elimine las baterías usadas de acuerdo con las instrucciones Información sobre la batería Utilice solamente las baterías recomendadas por TOSHIBA como repuestos La batería es de iones de litio y puede explotar si no se reemplaza utiliza manipula o elimina en forma correcta Deseche la batería según lo requieran la legislación y los reglamentos locales Cargue la batería a temperatura ambien...

Страница 75: ...ia de una situación potencialmente peligrosa que de no evitarse podría ocasionar muerte o lesiones graves Este ícono indica la presencia de una situación potencialmente peligrosa que de no evitarse podría ocasionar lesiones menores o moderadas Este ícono indica la presencia de una situación potencialmente peligrosa que de no evitarse podría ocasionar daños a la propiedad Este ícono brinda informac...

Страница 76: ...rcas registradas de HDMI Licensing LLC Intel Intel Core Celeron Centrino y Pentium son marcas comerciales o marcas registradas de Intel Corporation o de sus subsidiarias en Estados Unidos y otros países Microsoft Windows y Windows Vista son marcas registradas o marcas comerciales de Microsoft Corporation en Estados Unidos y u otros países Picasa es una marca comercial de Google Inc Secure Digital ...

Страница 77: ...sistema 11 Lados frontal lateral 12 Lado Posterior 13 Lado inferior 13 Capítulo 2 Para comenzar 14 Inserción de la batería 14 Carga de la batería 15 Inserción y extracción de una tarjeta SD opcional 20 Protección de datos en una tarjeta SD 21 Encender la videocámara y empezar a usarla 21 Cómo apagar la videocámara 21 ...

Страница 78: ...9 Opciones de configuración de fotografías 34 Efectos para las fotografías 37 Eliminar archivos 40 Capítulo 4 Modo Reproducir 42 Funciones de los botones 42 Información de la pantalla táctil LCD 43 Íconos de notificación 43 Íconos de funciones táctiles 44 Operaciones del modo Reproducir 45 Reproducción de video 46 Reproducción de fotografía 46 Eliminar un archivo en el modo Reproducir 47 Capítulo ...

Страница 79: ...omputadora 56 Capítulo 8 Para transferir archivos de video a Internet 57 CAMILEO UPLOADER 57 ArcSoft MediaImpression 61 Capítulo 9 Especificaciones 64 Condiciones ambientales de funcionamiento 65 Capítulo 10 Solución de problemas 66 Capítulo 11 Información adicional 68 Asistencia técnica de Toshiba 68 Antes de contactar a Toshiba 68 Contacto con Toshiba 69 Sitio web de asistencia técnica de Toshib...

Страница 80: ...egapixeles Pantalla LCD táctil a color para visualizar fotografías y videos con mayor facilidad Grabación de video con resolución de alta definición HD de 1920 x1080 Conectividad HDTV a través de un cable HDMI Fácil reproducción de videos grabados en alta definición en un televisor de pantalla ancha de alta definición Aplicación integrada CAMILEO UPLOADER que permite transferir a Internet los vide...

Страница 81: ...incluidos los artículos enumerados a continuación Ilustración de muestra Componentes Preinstalada en la videocámara Asegúrese de retirar la película protectora del lente antes de usar la videocámara Requisitos del sistema Microsoft Windows XP Windows Vista Windows 7 Intel Pentium IV 2 4 GHz o superior 512 MB de RAM Unidad de CD ROM 1 GB de espacio libre en el disco duro Un puerto USB 2 0 disponibl...

Страница 82: ...ación de muestra Vista frontal NOTA Para alternar entre el Cubierta de la tarjeta SD Interruptor Macro Lente NOTA Retire la Micrófono Luz LED Botón de Parlante Cubierta de Botón Modo modo Macro y el película protectora del lente antes de Botón cargar a Internet encendido la batería modo Normal usarlo Alternar entre el modo Video y el modo Fotografía En el modo Reproducir presione este botón para s...

Страница 83: ...Grabar Botón Pausar Mini puerto USB 2 0 Gancho para la correa de mano Luz indicadora del modo Puerto HDMI Botón de la luz LED Fotografía En el modo Grabar video presione este botón para grabar un video y presiónelo de nuevo para detener la grabación En el modo Grabar fotografía presione este botón para Presione este botón para pausar la grabación Presiónelo de nuevo para seguir grabando tomar foto...

Страница 84: ...e usarla Para conectar correctamente la batería 1 Abra la pantalla táctil LCD y deslice la cubierta de la batería 2 Saque la batería 3 Hale la película protectora Ilustración de muestra Cómo retirar la película protectora 4 Inserte de nuevo la batería asegurándose de que esté alineada con las marcas de polaridad correctas Película protectora Batería de iones de litio ...

Страница 85: ...usando el adaptador de CA o el cable USB que se suministran Apague la videocámara Una luz intermitente indica que se está cargando la batería y una luz sólida indica que se completó la carga Cuando se utiliza el modo de carga con CA la luz se apaga automáticamente después de 3 5 minutos Ilustración de muestra Cómo cargar la batería Marcas de polaridad Cubierta de la batería Batería de iones de lit...

Страница 86: ... otro objeto conductor causando un cortocircuito Esto podría ocasionar lesiones graves o provocar un incendio así como dañar la batería y el producto Cuando transporte la batería envuélvala siempre en un material plástico o colóquela en una bolsa plástica para evitar exponer sus terminales a otro objeto conductor lo cual podría ocasionar lesiones graves Al desechar la batería siempre cubra las ter...

Страница 87: ...impacto aunque la apariencia de ésta sea normal El dispositivo de protección interno de la batería puede fallar ocasionando que ésta se sobrecaliente o encienda provocando una fuga de líquido cáustico una explosión o un incendio que podría causar la muerte o lesiones graves Nunca someta una batería al calor y nunca la guarde o use cerca de una fuente de calor Si la batería se caliente o se quema s...

Страница 88: ...lo que podría ocasionar lesiones graves Indicadores de advertencia de la batería Si observa cualquiera de las siguientes condiciones apague inmediatamente la alimentación desconecte la clavija del cable de alimentación del tomacorriente y deje de usar la batería Mal olor u olor inusual Calor excesivo Decoloración Deformación grietas o fugas Humo Otras situaciones poco usuales durante el uso tal co...

Страница 89: ... seguro Si la batería llegara a caerse mientras traslada el producto usted podría sufrir lesiones o la batería podría dañarse No use una batería dañada o agotada Nunca continúe usando una batería después de que se haya afectado su capacidad de recargarse o después de que aparezca un mensaje de advertencia que indique que se le ha agotado la energía Si continúa usando una batería agotada o dañada p...

Страница 90: ... instale o extraiga la batería sin antes apagar la alimentación y desconectar el adaptador de CA Inserción y extracción de una tarjeta SD opcional La tarjeta SD se debe comprar por separado Su videocámara viene con una memoria interna que le permite almacenar fotografías y videos Usted puede aumentar la capacidad de la memoria utilizando una tarjeta de memoria SD SDHC SDXC opcional 1 Abra la cubie...

Страница 91: ... los siguientes métodos Abrir la pantalla táctil LCD para encender la videocámara automáticamente Presionar el botón de encendido durante aproximadamente un segundo Para grabar videos Presione el botón Modo o toque el ícono en la pantalla para cambiar al modo Grabar video Presione el botón Grabar para iniciar la grabación La luz indicadora del modo Grabar video se ilumina Para tomar una fotografía...

Страница 92: ...video Presione el botón de nuevo para detener la grabación 2 En el modo Grabar fotografía presione este botón para tomar una fotografía Botón Tele T Efectuar acercamientos Botón Gran Angular W Efectuar alejamientos Botón Pausar 1 Presione este botón para pausar la grabación 2 Presiónelo de nuevo para seguir grabando Botón de la luz LED Luz LED encendida Luz LED apagada Luz Digital encendida ...

Страница 93: ...s de notificación de la pantalla táctil LCD Íconos de notificación Botón de encendido Presione durante un segundo para encender apagar la videocámara Interruptor Macro Para alternar entre el modo Macro y el modo Normal 1 Batería Alimentación plena Batería Alimentación media Batería Alimentación baja Batería Sin alimentación Modo de alimentación con corriente continua 2 Enfoque de posición Macro 3 ...

Страница 94: ...el momento 4 Detección de movimiento sólo en el modo Grabar video 5 Escena Piel Noche Luz de fondo 6 Balance de blancos manual Luz de día Fluorescente Tungsteno 7 Contador del zoom 1x 16x 16x zoom digital 8 Cámara lenta sólo en el modo Grabar video Nota Los videos en cámara lenta se graban en resolución QVGA Tiempo de espera sólo en el modo Grabar video Modo Pregrabación sólo en el modo Grabar vid...

Страница 95: ...A continuación se muestran los íconos de funciones táctiles que aparecen en la pantalla Imagen de muestra Íconos de funciones táctiles en la pantalla táctil LCD Íconos de funciones táctiles 1 Luz digital encendida Luz encendida Luz apagada 3 2 1 8 7 6 5 4 ...

Страница 96: ...la táctil LCD Para detener la grabación vuelva a presionar el botón Grabar 2 Resolución de videos HD completa 1080p 30 HD60 720p 60 HD30 720p 30 VGA QVGA mientras esté activa la función de Cámara lenta la resolución del video es 320 x 240 QVGA Resolución de fotografías Alta 16MP Estándar 8MP Baja 3MP 3 Modo Grabar video Estabilización ACTIVADA DESACTIVADA Modo Grabar fotografía Autotemporizador AC...

Страница 97: ...ones de resolución disponibles son Grabar fotografías videos en primer plano Deslice el interruptor Macro para enfocar objetos cercanos o lejanos Para tomar fotografías en primer plano 1 Deslice el interruptor Macro para seleccionar Macro 2 Presione el botón Grabar para empezar a grabar un video o tomar un fotografía En el modo Macro el ícono de macro aparece en la pantalla táctil LCD Recuerde vol...

Страница 98: ... de videos Configuración de fotografías Efectos Configuración Eliminar Luz Resolución Estabilización Detección de movimiento Cámara lenta Pregrabación Tiempo de espera Reproducción continua Luz Resolución Autotemporizador ISO Presentación de diapositivas Escena Filtro Balance de blancos Sonido TV Idioma Ajuste de la hora Formato Configuración predeterminada Eliminar video Eliminar fotografía Elimi...

Страница 99: ... validar la nueva configuración 5 Para salir toque el ícono Salir dos veces Operación Pantalla 1 Toque el ícono en la pantalla Aparece la pantalla Menú 2 Toque el ícono Configuración de video dos veces para ingresar en el menú Configuración de video Aparece el menú Configuración de video 3 El menú Configuración de video tiene ocho opciones Luz Resolución Estabilización Detección de movimiento Cáma...

Страница 100: ...ra salir toque el ícono Salir dos veces HD completa Grabar videos a una resolución de 1920 x 1080p 30 HD60 Grabar videos a una resolución de 1280 x 720p 60 HD 30 Grabar videos a una resolución de 1280 x 720p 30 VGA Grabar videos a una resolución de 640 x 480p 30 Operación Pantalla 1 En el menú de Configuración de video toque el ícono Resolución dos veces 2 Toque para seleccionar la opción deseada ...

Страница 101: ...Pantalla 1 En el menú de Configuración de video toque el ícono Estabilización dos veces 2 Toque para seleccionar la opción deseada 3 Toque de nuevo para validar la configuración nueva 4 Para salir toque el ícono Salir dos veces Operación Pantalla 1 En el menú de Configuración de video toque el ícono Detección de movimiento dos veces 2 Toque para seleccionar la opción deseada 3 Toque de nuevo para ...

Страница 102: ... tocarlo de nuevo para activarla La función Tiempo de espera no se puede usar mientras que la función Pregrabar esté activada Operación Pantalla 1 En el menú de Configuración de video toque el ícono Cámara lenta dos veces 2 Toque para seleccionar la opción deseada 3 Toque de nuevo para validar la configuración nueva 4 Para salir toque el ícono Salir dos veces Operación Pantalla 1 En el menú de Con...

Страница 103: ...ma por segundo 3 segundos Grabar un fotograma cada 3 segundos 5 segundos Grabar un fotograma cada 5 segundos Operación Pantalla 1 En el menú de Configuración de video toque el ícono Tiempo de espera dos veces 2 Toque para seleccionar la opción deseada 3 Toque de nuevo para validar la configuración nueva 4 Para salir toque el ícono Salir dos veces Operación Pantalla 1 En el menú de Configuración de...

Страница 104: ... Configuración de fotografía 3 El menú configuración de fotografía tiene cinco opciones Luz Resolución Autotemporizador ISO y Presentación de diapositivas ENCENDIDA La luz está encendida y suministra iluminación APAGADA La luz está apagada Luz digital Extiende la gama dinámica para la luz de fondo y el alto contraste para que los objetos se vean más iluminados y más claros Operación Pantalla 1 En ...

Страница 105: ...alidad 4608 x 3456 16 MP Estándar 8M Para tomar fotografías en calidad 3264 x 2448 8 MP Baja 3M Para tomar fotografías en calidad 2048 x 1536 3 MP Operación Pantalla 1 En el menú de Configuración de fotografía toque el ícono Resolución dos veces 2 Toque para seleccionar la opción deseada 3 Toque de nuevo para validar la configuración nueva 4 Para salir toque el ícono Salir dos veces Operación Pant...

Страница 106: ... diapositivas Las fotografías se pueden ver consecutivamente en una Presentación de diapositivas Auto Establece la configuración ISO automáticamente de acuerdo con las condiciones 800 ISO 800 1600 ISO 1600 Operación Pantalla 1 En el menú de Configuración de fotografía toque el ícono ISO dos veces 2 Toque para seleccionar la opción deseada 3 Toque de nuevo para validar la configuración nueva 4 Para...

Страница 107: ...ar la configuración nueva 4 Para salir toque el ícono Salir dos veces Operación Pantalla 1 Toque el ícono en la pantalla Aparece la pantalla Menú 2 Toque el ícono Efectos dos veces para ingresar en el menú de configuración 3 El menú Efectos tiene tres opciones Escena Filtro Balance de blancos Auto Ajusta las condiciones corrientes automáticamente Piel Hace que los tonos de la piel aparezcan más na...

Страница 108: ... veces 2 Toque para seleccionar la opción deseada 3 Toque de nuevo para validar la configuración nueva 4 Para salir toque el ícono Salir dos veces Auto Sin efectos de filtro Blanco y negro La imagen se convierte a blanco y negro Clásica Le da una apariencia sepia a la imagen Negativo La imagen se convierte en una versión negativa del original Operación Pantalla 1 En el menú de Configuración de efe...

Страница 109: ...onibles cuatro configuraciones de Balance de blancos Auto Ajusta automáticamente el balance de blancos Luz de día Utilizar en exteriores Fluorescente Utilizar con iluminación fluorescente Tungsteno Utilizar con iluminación con tungsteno Operación Pantalla 1 En el menú de Configuración de efectos toque el ícono Balance de blancos dos veces 2 Toque para seleccionar la opción deseada 3 Toque de nuevo...

Страница 110: ...minar video Eliminar fotografía Seleccionar y Eliminar Eliminar todo Operación Pantalla 1 En el menú Eliminar toque el ícono Video dos veces 2 Toque para seleccionar la opción deseada 3 Toque de nuevo para validar la configuración nueva 4 Para salir toque el ícono Salir dos veces Operación Pantalla 1 En el menú Eliminar toque el ícono Fotografía dos veces 2 Toque para seleccionar la opción deseada...

Страница 111: ...idar la configuración nueva 4 Para salir toque el ícono Salir dos veces Sí Eliminar todos los videos y fotografías almacenados en la memora integrada cuando no hay instalada una tarjeta SD o eliminar todos los videos y fotografías almacenados en la tarjeta SD instalada No No eliminar todos los videos y fotografías almacenados en la memora integrada cuando no hay instalada una tarjeta SD o no elimi...

Страница 112: ...resione para ingresar al modo Grabar Botón Tele T Efectuar acercamientos Botón Gran Angular W Efectuar alejamientos Botón Pausar 1 Presione este botón para pausar la grabación 2 Presiónelo de nuevo para seguir grabando Botón Cargar a internet En el modo Reproducir presione este botón para activar la función Cargar contenido a Internet ...

Страница 113: ...alla táctil LCD Íconos de notificación 1 Batería Alimentación plena Batería Alimentación media Batería Alimentación baja Batería Sin alimentación Modo de alimentación con corriente continua 2 El archivo de video o fotografía corriente está seleccionado para cargarlo a Internet 3 Contador de tiempo de reproducción Número de fotografías tomadas hasta el momento La cantidad de fotografías que todavía...

Страница 114: ...les en la pantalla táctil LCD Íconos de funciones táctiles 4 Control de volumen 5 Modo Reproducir video Modo Reproducir fotografía 1 Modo Reproducir video Reproducción continua ACTIVADA DESACTIVADA Modo Reproducir fotografía Presentación de diapositivas ACTIVADA DESACTIVADA 2 Pantalla en miniatura Seleccionar y Reproducir ACTIVADA 3 Menú ACTIVADO 4 Regresar el modo Grabar 3 2 1 8 7 6 5 4 ...

Страница 115: ...presione el botón Reproducir o toque el ícono en la pantalla para cambiar al modo Reproducir 2 Toque el ícono en la pantalla para ver el video fotografía previo o toque el ícono en la pantalla para ver el siguiente video fotografía 3 Toque el ícono en la pantalla Aparece la pantalla Menú 4 Toque el ícono en la pantalla para abrir la pantalla en miniatura para videos y fotografías Aparece la pantal...

Страница 116: ...os archivos de video en forma continua Toque el ícono para detener el video 4 Utilice los botones Tele Gran angular W para ajustar el volumen 5 Presione el botón Cargar a Internet para seleccionar el video corriente para subirlo a Internet Operación Pantalla 1 En el modo Reproducir fotografía toque el ícono para ver la fotografía previa o el ícono para ver la fotografía siguiente 2 En el modo Pres...

Страница 117: ...arjeta SD sólo se eliminan los videos y fotografías almacenados en ella No se pueden eliminar videos o fotografías si la tarjeta está protegida contra escritura Operación Pantalla 1 En el modo Reproducir toque el ícono 2 Toque el ícono para eliminar la fotografía corriente 3 Para salir toque el ícono Salir dos veces NOTA ...

Страница 118: ...no en la pantalla Aparece la pantalla Menú 2 Toque el ícono Configuración dos veces para entrar en el menú Configuración 3 El menú Configuración tiene seis opciones Sonido sonido de funcionamiento TV Idioma Ajuste de la hora Formato y Configuración predeterminada desplazarse hacia abajo para verla ...

Страница 119: ...Configuración toque el ícono de Sonido dos veces Aparece la pantalla Menú 2 Toque para seleccionar la opción deseada 3 Toque de nuevo para validar la configuración 4 Para salir toque el ícono Salir dos veces NTSC 60Hz USA Canadá Japón Corea del Sur Taiwán etc PAL 50Hz Reino Unido Europa China Australia Singapur Hong Kong etc Operación Pantalla 1 En el menú Configuración toque el ícono TV dos veces...

Страница 120: ...oma dos veces Aparece la pantalla Menú 2 Toque para seleccionar la opción deseada 3 Toque de nuevo para validar la configuración 4 Para salir toque el ícono Salir dos veces Operación Pantalla 1 En el menú Configuración toque el ícono Ajuste de la hora dos veces Aparece la pantalla Menú 2 Para fijarlos toque el Año Mes Día Hora o Minuto 3 Toque para validar la configuración 4 Para salir toque el íc...

Страница 121: ...nados en la memora integrada cuando no hay instalada una tarjeta SD o eliminar todos los videos y fotografías almacenados en la tarjeta SD instalada No No eliminar todos los videos y fotografías almacenados en la memora integrada cuando no hay instalada una tarjeta SD o no eliminar todos los videos y fotografías almacenados en la tarjeta SD instalada Operación Pantalla 1 En el menú Configuración t...

Страница 122: ...ara cancelarla 3 Para salir toque el ícono Salir dos veces Configuración Configuración predeterminada en fábrica Resolución Video HD completa Fotografía Estándar 8M Estabilización DESACTIVADA Detección de movimiento DESACTIVADA Cámara lenta DESACTIVADA Tiempo de espera DESACTIVADO Autotemporizador DESACTIVADO ISO Auto Escena Auto Filtro Auto Balance de blancos Auto Luz APAGADA Sonido ACTIVADO TV D...

Страница 123: ...ver imágenes o videos de la videocámara a través de un televisor 1 Conecte el cable HDMI al puerto de salida HDMI de la videocámara 2 Conecte el otro extremo del cable a un televisor 3 Fije la fuente de entrada de video del televisor en HDMI Ilustración de muestra Conexión de un televisor de alta definición 16 9 ...

Страница 124: ...finición de 4 3 1 Conecte un extremo del cable AV al puerto de salida AV de la videocámara 2 Conecte el otro extremo del cable a un televisor Los pasos para ver fotografías y videos almacenados en la videocámara a través de un TV son los mismos que para verlos en la pantalla táctil LCD Ilustración de muestra Conexión de un televisor estándar En la pantalla táctil LCD no aparece nada cuando la vide...

Страница 125: ...obe Reader es un programa popular que se necesita para ver el Manual del usuario Muchos usuarios ya tienen este software instalado en sus computadoras Para instalar el paquete de software incluido 1 Inserte el CD ROM en la unidad de discos ópticos de la computadora Aparece la pantalla de ejecución automática 2 Haga clic en Instalar software Para terminar el proceso de instalación siga las instrucc...

Страница 126: ... correo electrónico a sus amigos o subirlos a Internet Para hacerlo 1 Conecte la computadora y la videocámara con el mini cable USB 2 0 que se suministra El LED se ilumina 2 Los videos y fotografías se pueden encontrar en la computadora bajo Equipo Disco extraíble DCIM 100MEDIA 3 En esta carpeta puede ver eliminar mover o copiar los videos y fotografías que desee 4 Utilice la aplicación de softwar...

Страница 127: ... compartirlos con sus familiares y amigos a través de estos sitios Además el software ArcSoft MediaImpression incluido también se puede utilizar para transferir videoclips a sitios web Para transferir videos a un sitio web tiene que tener acceso a Internet CAMILEO UPLOADER Para transferir archivos a Internet 1 En el modo Reproducir video seleccione los videoclips presionando el botón Cargar a Inte...

Страница 128: ...conectar la videocámara a una computadora 3 En la videocámara presione el botón Cargar a Internet para iniciar automáticamente la aplicación CAMILEO UPLOADER Antes de que la computadora inicie la aplicación CAMILEO UPLOADER usted debe instalar primero la aplicación ArcSoft MediaImpression incluida en el CD Imagen de muestra Pantalla principal de la aplicación CAMILEO UPLOADER ...

Страница 129: ...ida ingresar la información sobre su cuenta o usted puede completar la información antes de subir los videos haciendo clic en el ícono Haga clic en CANCELAR para detener la carga Imagen de muestra Pantalla de CAMILEO UPLOADER Para cargar a un sitio en la Web archivos de video seleccionados manualmente 1 Siga los pasos 2 y 3 en CAMILEO UPLOADER en la página 57 2 En la pantalla en miniatura haga cli...

Страница 130: ...o 1 Haga doble clic en el clip de video en la pantalla en miniatura 2 Haga clic en el ícono Reproducir Pausar para reproducir o pausar el video Haga clic en el ícono Regresar para regresar a la pantalla de vista previa en miniatura Imagen de muestra Pantalla de CAMILEO UPLOADER Para establecer la información de su cuenta en un sitio web 1 Haga clic en el ícono para ingresar a la pantalla de config...

Страница 131: ...n de la cuenta Si no tiene una cuenta inscríbase primero en el sitio web ArcSoft MediaImpression Para cargar archivos de video a Internet 1 Instale ArcSoft MediaImpression 2 Haga clic en Inicio Todos los programas y luego en ArcSoftMediaImpression Aparece la pantalla principal de ArcSoft MediaImpression en el escritorio 3 Haga clic en Videos Imagen de muestra Pantalla principal de ArcSoft MediaImp...

Страница 132: ...e video que desea transferir Seleccione los archivos en el área de visualización En el menú inferior haga clic en Upload to the Internet Cargar a Internet Imagen de muestra Cómo seleccionar los archivos 5 Escriba la información de su cuenta en los espacios en blanco y luego haga clic en Login Iniciar sesión Imagen de muestra Cómo ingresar le información de la cuenta ...

Страница 133: ...Para transferir archivos de video a Internet ArcSoft MediaImpression 6 Llene la información sobre los videoclips y luego haga clic en Upload Cargar Imagen de muestra Cómo transferir los archivos a Internet ...

Страница 134: ...digital Obturador Electrónico Pantalla táctil LCD Pantalla LCD táctil de 7 6 cm 3 pulgadas Medios de almacenamiento Memoria integrada de 128 MB memoria parcial utilizada para el código del firmware Compatible con ranuras de tarjetas SD SDHC SDXC hasta 64GB Resolución de imagen Alta 4608 x 3456 16M pixeles Estándar 3264 x 2448 8M pixeles Baja 2048 x 1536 3M pixeles Resolución de video HD completa 1...

Страница 135: ...e Tungsteno ISO Auto 800 1600 Autotemporizador Demora de 10 segundos Luz Luz encendida Luz apagada Luz digital encendida Formato de archivo Fotografía JPG Video MP4 Reproducción de imágenes Imagen individual Presentación de diapositivas Interfaz de la computadora Mini puerto USB 2 0 Salida de TV NTSC PAL seleccionable HDMI Batería Batería recargable de iones de litio Dimensiones Anc x Alt x Prof 6...

Страница 136: ... de la tarjeta SD es muy baja o que la tarjeta contiene archivos corrompidos Para resolver este problema formatee la tarjeta SD utilizando la videocámara en vez de la computadora Consulte Formatear en la página 51 3 Por qué algunas de las fotografías de interiores aparecen oscuras y borrosas La videocámara extiende el tiempo de exposición de las fotografías en interiores o en condiciones de baja i...

Страница 137: ... apaga automáticamente después de 3 5 minutos en el modo de carga con CA 5 Después de conectar el cable USB a la computadora El disco DV indica la memoria interna de la videocámara Disco removible indica la memoria externa tarjeta SD SDHC SDXC instalada en la videocámara El disco DVAP indica que la aplicación integrada CAMILEO UPLOADER está guardada en el disco No formatee el disco ni elimine la a...

Страница 138: ...ro a otras fuentes de asistencia técnica Intente lo siguiente antes de comunicarse con Toshiba Consulte la documentación suministrada con el producto Si el problema se produce mientras está ejecutando una aplicación de software consulte las sugerencias sobre posibles soluciones de problemas en la documentación del software Póngase en contacto con el personal de asistencia técnica del fabricante de...

Страница 139: ...l Centro de asistencia al cliente de Toshiba Al 888 592 0944 dentro de Estados Unidos Al 949 583 3305 desde fuera de Estados Unidos Centro de Asistencia Telefónica de Toshiba para América Latina servicio en español Horas Hay cargos por la llamada De lunes a viernes de 8 00 a m a 9 00 p m hora estándar del este Argentina 0 800 666 3701 Chile 800 64 6526 Costa Rica 0 800 011 1123 El Salvador 800 660...

Страница 140: ...toshiba com accessories1yr Servicio de garantía Los clientes en los cincuenta 50 estados de Estados Unidos y en el Distrito de Columbia pueden obtener el servicio en garantía visitando el sitio Toshiba Acclaim en www acclaim toshiba com o llamando al centro de asistencia telefónica 1 888 592 0944 Los clientes por fuera de los cincuenta 50 estados de Estados Unidos y el Distrito de Columbia pueden ...

Отзывы: