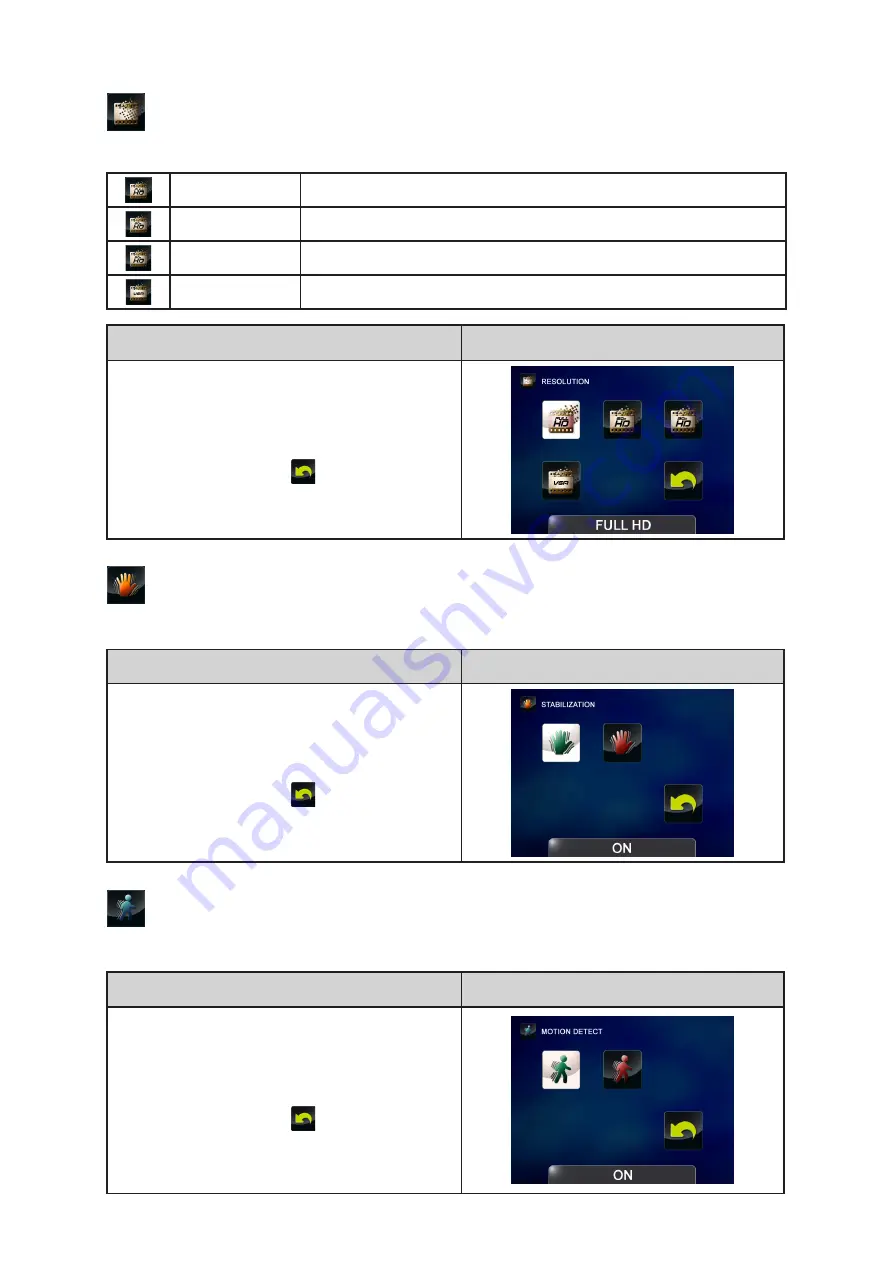
background image

19

EN

 Resolution

Four resolution settings are available.

Full HD

Record videos at 1920x1080p 30 resolution.

HD 60

Record videos at 1280x720p 60 resolution.

HD 30

Record videos at 1280x720p 30 resolution.

VGA

Record videos at 640x480p 30 resolution.

Operation

Display Screen

In the Video Setting menu, touch the 

1. 

[Resolution] icon twice on the screen.
Touch to select the desired option.

2. 

Touch again to validate the setting.

3. 

Or touch 

4. 

the Exit icon (


 ) to exit.


Stabilization

Record with an effect of reducing camcorder shake to result in more stable videos.

Operation

Display Screen

In the Video Setting menu, touch the 

1. 

[Stabilization] icon twice on the screen.
Touch to select the desired option.

2. 

Touch again to validate the setting.

3. 

Or touch 

4. 

the Exit icon (


 ) to exit.

 Motion Detection

Record videos automatically when the camcorder detects a movement.

Operation

Display Screen

In the Video Setting menu, touch the [Motion 

1. 

Detect] icon twice on the screen.
Touch to select the desired option.

2. 

Touch again to validate the setting.

3. 

Or touch 

4. 

the Exit icon (


 ) to exit.

Camcorder will start to record video 

5. 

automatically if it detects a movement. Stop 

recording if it does not detect a movement.

Содержание CAMILEO P20

Страница 1: ...User s Manual CAMILEO p20 ...

Страница 2: ...Introduction Welcome and thank you for choosing a TOSHIBA product For your convenience your TOSHIBA product is furnished with two guides a a Quick Start Guide and b this comprehensive PDF User s Manual ...

Страница 3: ...ted 10 Loading the Battery 10 Inserting and Removing an SD Card Optional 10 Turning the Camcorder On and Getting Started 11 Turning the Camcorder Off 11 Section 3 Record Mode 12 Button Function 12 LCD Monitor Information 13 Video Recording 15 Photo Recording 16 Taking Close up Photos Videos 16 Using Digital Zoom 16 Options for Menu 17 Operations 17 Video Setting 18 Photo Setting 22 Effects 25 Dele...

Страница 4: ...n Playback Mode 33 Section 5 Setting Your Camcorder 34 Setup Menu 34 Section 6 Viewing Photos and Videos on TV 37 Connecting to a High Definition 16 9 Wide TV 37 Connecting to a non high definition 4 3 TV 37 Section 7 Viewing Video Photo on PC 38 Installing Bundled Software 38 Transferring Photos or Videos to a Computer 38 Section 8 Uploading Files to Internet 39 ...

Страница 5: ...tion 9 Specifications 42 Section 10 Troubleshooting 43 Section 11 Other Information 44 TOSHIBA Support 44 Operating Environment Conditions 44 Regulatory Information 44 Additional Information 46 About the battery pack 46 ...

Страница 6: ...ation you can upload the videos or photos captured by the camcorder to Internet more effortlessly ISO sensitivity and color balance can either be adjusted automatically or changed manually A 16x digital zoom helps you to control over the videos and photos you take The varied effect options such as Time Lapse and Slow Motion make recording more fun The built in memory allows you to take photos and ...

Страница 7: ...e as a deteriorated battery may affect the 7 functionality of the camcorder Remove the battery if it shows signs of leaking or distortion 8 Use only the accessories supplied by the manufacturer 9 Keep the camcorder out of the reach of infants 10 Risk of explosion if battery is replaced by an incorrect type 11 Dispose of used batteries according to the instructions 12 System Requirements Microsoft ...

Страница 8: ...8 EN Front View Rear View Photo button Video Button Tele Button HDMI Port TV Port Mini USB 2 0 Port Wide Button Pause Button SD card Cover Lens Light Macro Switch LCD Touch Panel Microphone ...

Страница 9: ...9 EN Side View Bottom View Tripod Socket Strap Hook Power Button Battery Cover Speaker Playback Button Internet Button ...

Страница 10: ...videos You can expand the memory capacity by using an optional SD memory card Insert the memory card into the slot Please refer to the figure 1 on the right side To remove an installed SD card press the card inwards to 2 release it When the card pops out gently remove it from its slot 3 Recommended memory capacity 1GB or above 4 Note When a memory card is fitted videos photos are saved on the card...

Страница 11: ...o stop recording press it again To pause recording Press Pause Button to pause recording To continue the recording press it again To take a photo Press Photo button to take photos To view stored videos and photos Press Playback Button or touch on screen icon to switch to the Playback mode Turning the Camcorder Off To turn off the camcorder You can either press Power Button for one second or you ca...

Страница 12: ... ress to take photos Tele Button Zoom In 1 Wide Button Zoom out 1 Pause Button Press to pause the recording 1 To continue the recording press it again 2 Power Button Press down for one second to turn on or turn off the camcorder 1 Playback Button Switch to the Playback Mode 1 Macro Switch Switch between Macro Mode and Normal Mode 1 ...

Страница 13: ...le function icon 1 Battery full power Battery medium power Battery low power Battery empty power DC power mode 2 Macro Position Focusing 3 00 03 12 Recording time 00 03 12 Pause recording 250 The amount of photos that can still be taken at current resolution 321 Number of current photo 4 Motion Detection Video Record Mode Only 5 Scene Skin Night Backlight ...

Страница 14: ...e Only Pre Record Mode Video Record Mode Only 9 Digital Light On Light On Light Off 10 Video Resolution Full HD 1080p 30 60p HD60 720p 60 30p HD30 720p 30 VGA QVGA When Slow Motion function is activated the video resolution is 320x240 QVGA Photo Resolution High 16M Standard 5M Low 3M 11 Video Record Mode Stabilization On Off Photo Record Mode Self timer On Off ...

Страница 15: ...multaneously Motion Detect Time Lapse and Slow Motion functions can not be used simultaneously Video Recording P ress Video Button to start recording When a video is being recorded a time indicator will display on the LCD monitor To stop recording press Video Button again To pause recording Press Pause Button to pause recording To continue the recording press it again Press Playback Button to view...

Страница 16: ...e focus range for different distances of objects To take close up photos Slide the macro switch to Macro 1 Press 2 Video Button to start recording or press Photo button to take photo In Macro Mode the macro icon will appear on the LCD monitor Note Remember to turn the macro switch back to Normal when you are not taking close up photos Using Digital Zoom The digital zoom magnifies images when recor...

Страница 17: ...o Delete Video Photo Delete All Please refer to Section 5 for the detailed information about Setup Operations Operation Screen T 1 ouch on the screen The main menu will show on the screen The options are Video Setting Photo Setting Effects 2 Setup and Delete Touch the desired icon twice on the screen The option menu will pop up on the screen 3 Touch to select the specific option you want to adjust...

Страница 18: ...just the camcorder settings Light You can select the mode to brighten the area or to extend the brightness of the objects On The light will be turned on and provides light when recording Off The light is turned off Digital Light Extend the dynamic range for backlight and high contrast sense so that the objects will be brighter and clearer Operation Display Screen In the Video Setting menu touch th...

Страница 19: ...of reducing camcorder shake to result in more stable videos Operation Display Screen In the Video Setting menu touch the 1 Stabilization icon twice on the screen Touch to select the desired option 2 Touch again to validate the setting 3 Or touch 4 the Exit icon to exit Motion Detection Record videos automatically when the camcorder detects a movement Operation Display Screen In the Video Setting m...

Страница 20: ...touch 3 the Exit icon to exit Pre Record The Pre record function ensures that you will not miss any critical recording opportunities The videos are recorded 1 second more before the Video Button is pressed Operation Display Screen In the Video Setting menu touch the Pre 1 Record icon twice on the screen Touch to select the desired option 2 Touch again to validate the setting 3 Or touch the Exit ic...

Страница 21: ...touch the Time 1 Lapse icon twice on the screen Touch to select the desired option 2 Touch again to validate the setting 3 Or touch 4 the Exit icon to exit Note Motion Detect Time Lapse and Slow Motion functions can not be used simultaneously Continuous Play Playback the files continuously Operation Display Screen In the Video Setting menu touch the 1 Continuous Play icon twice on the screen Touch...

Страница 22: ...ngs Light You can select the mode to brighten the area or to extend the brightness of the objects On The light will be turned on and provides light when recording Off The light is turned off Digital Light Extend the dynamic range for backlight and high contrast sense so that the objects will be brighter and clearer Operation Display Screen In the 1 Photo Setting menu touch the Light icon twice on ...

Страница 23: ...n Touch to select the desired option 2 Touch again to validate the setting 3 Or touch 4 the Exit icon to exit Self Timer The self timer allows you to take photos with a ten second time delay The self timer light on the front of the camcorder will also blink The speed of blinking will increase just before the photo is taken Operation Display Screen In the Photo Setting menu touch the Self 1 Timer i...

Страница 24: ... the Photo Setting menu touch the ISO icon 1 twice on the screen Touch to select the desired option 2 Touch again to validate the setting 3 Or touch 4 the Exit icon to exit Note The image may become noisy when the ISO number is large Slideshow Display photos one after another in turn 2 Seconds Display one photo every 2 seconds 5 Seconds Display one photo every 5 seconds 10 Seconds Display one phot...

Страница 25: ...n Auto Automatic adjustment Skin Shoot with an effect that makes skin tones more natural Night Use Night Mode for night scenes or low light conditions Backlight You can take shots when the bright light is behind the subject Operation Display Screen In the Effects menu touch the Scene icon 1 twice on the screen Touch to select the desired option 2 Touch again to validate the setting 3 Or touch 4 th...

Страница 26: ... the desired option 2 Touch again to validate the setting 3 Or touch 4 the Exit icon to exit White Balance The camcorder adjusts the color balance of images automatically Three manual white balance settings are available Auto The camcorder automatically adjusts white balance Daylight Under outdoor condition Fluorescent Under fluorescent light condition Tungsten Under tungsten light condition Opera...

Страница 27: ...creen In the Delete menu touch the Delete Video 1 icon twice on the screen In the video thumbnail screen touch to select 2 the desired video s The check mark s will be shown on the selected file s Touch 3 to delete the selected video s Or touch 4 the Exit icon to exit Delete Photo Operation Display Screen In the Delete menu touch the Delete Photo 1 icon twice on the screen In the photo thumbnail s...

Страница 28: ...e camcorder Delete all of the videos and photos on the SD card When there is an SD card in the camcorder No Do not delete all of the videos and photos in the built in memory When there is no SD card in the camcorder Delete all of the videos and photos on the SD card When there is an SD card in the camcorder Operation Display Screen In the Delete menu touch the Delete All icon 1 twice on the screen...

Страница 29: ...ress to go the Video Record Mode 1 Photo button Press to go the Photo Record Mode 1 Tele Button Volume increase 1 Wide Button Volume decrease 1 Pause Button In Video Playback Mode press to pause the recorded videos 1 Internet Button In Playback Mode press to select the current video or photo to upload 1 to the Internet ...

Страница 30: ... Battery low power Battery empty power DC power mode 2 The current file is selected to upload to the Internet 3 00 03 12 Playback time counter 321 Number of current photo 250 Total number of photos 4 Volume 5 Video playback mode Photo playback mode 6 Video Playback Mode Indicate the function of continuous play on or off Photo Playback Mode Indicate the function of slideshow on or off ...

Страница 31: ...Mode 10 Go to the previous file Videos fast rewind 11 Play files Pause 12 Go to the next file Videos fast forward 13 Delete the current file 13 Stop video playing Stop photo slideshow Note Tap on the screen to close the touchable function bars Tap again to show the bars ...

Страница 32: ...Mode Touch 2 to go to the previous video photo Touch to go to the next video photo Touch 3 to open the menu Please refer to section3 Touch 4 to open the thumbnail screen of videos and photos In 5 the thumbnail screen of videos and photos select the file s you want to play and then touch to confirm The check mark s will be shown on the selected file s Or touch 6 to exit Touch 7 to play the selected...

Страница 33: ...to select the current video 6 to upload to Internet Photo Playback Operation Display Screen In the Photo Playback Mode touch 1 to go to the previous file touch to go to the next file In the Slideshow On Mode 2 is highlighted touch to play or pause the slideshow Touch to stop slideshow Press Internet Button to select the current 3 photo to upload to Internet Delete File in Playback Mode Operation D...

Страница 34: ...tion Display Screen In the Setup menu touch the Sound icon 1 twice on the screen Touch to select the desired option 2 Touch again to validate the setting 3 Or touch 4 the Exit icon to exit TV Ensure that the appropriate TV standard of your area is selected either NTSC or PAL Wrong TV system setting may cause image flickers NTSC 60Hz USA Canada Japan South Korea and Taiwan etc PAL 50Hz UK Europe Ch...

Страница 35: ...tting Or touch 5 the Exit icon to exit Format Use this option to erase all data in tthe built in memory or the SD card Yes Format the built in memory When there is no SD card in the camcorder SD card When there is an SD card in the camcorder No Do not format the built in memory When there is no SD card in the camcorder SD card When there is an SD card in the camcorder Operation Display Screen In t...

Страница 36: ... screen Touch the Yes icon to execute the operation 2 and the No icon to cancel the operation The following table indicates the camcorder s default settings Setting Default Factory Setting Resolution Full HD for Video Standard 5M for Photo Stabilization Off Motion Detection Off Slow Motion Off Time Lapse Off Self Timer Off ISO Auto Scene Auto Filter Auto White Balance Auto Light Off Sound On TV De...

Страница 37: ...e same as for viewing 4 them on the LCD monitor 16 9 Note The camcorder can not run menu setting thumbnail screen and certain on screen setting when it is connected to an HDTV Connecting to a non high definition 4 3 TV Connect one end of the AV cable to your camcorder s AV out port 1 Connect the other end of the cable to a television 2 Use the buttons to view the stored photos and videos on the TV...

Страница 38: ...tructions to complete the installation Note The detailed Instructions for the bundled software can be found within the program once the installation is completed Click on Extras on the title bar and select Help to open the instruction manual Install the bundled software application ArcSoft MediaImpression for viewing the videos correctly on a PC Transferring Photos or Videos to a Computer You can ...

Страница 39: ...pload your files to the web sites CAMILEO UPLOADER To upload files marked with to Internet Select the files in the Playback Mode by pressing Internet Button 1 Connect the camera to your computer by using the supplied USB cable 2 Press Internet Button 3 on the camera to launch the CAMILEO UPLOADER application automatically To view the recorded clips on CAMILEO UPLOADER it is necessary to install Ar...

Страница 40: ... account information before uploading or you can fill in the information firstly by click on Click on CANCEL to stop uploading 4 To upload files selected manually to Internet Follow the step 2 and 3 on the previous page 1 On the thumbnail screen click on the up down icon to change the pages Click on the files you 2 want to upload Choose the website you want to upload 3 Click on UPLOAD to start upl...

Страница 41: ...use icon 2 to play pause Click on the Return icon to return to the thumbnail preview screen To setup your account information for the website Click on 1 to go to the setup screen Fill in your account information in the blanks Then click on Save 2 If you do not have a account please sign up on the website first ...

Страница 42: ...XC card slot support up to 64GB Image resolution 16 Mega Pixels 4608 x 3456 Interpolated 5 Mega Pixels 2592x1944 3 Mega Pixels 2048x1536 Video resolution Full HD 1920X1080 30fps HD60 1280X720 60fps HD30 1280X720 30fps VGA 640X480 30fps White balance Auto Manual Daylight Fluorescent Tungsten ISO Auto 800 1600 Self timer 10 seconds delay Light Light ON Digital Light ON Light OFF File format Photo JP...

Страница 43: ...everal seconds when taking photos The shutter will sound when photos are being taken How do I charge battery 444 You must use the supplied AC charger or the USB cable The camcorder must be turned OFF blinking light confirms charging and the light becomes constant after the charging is completed In AC charging Mode the light will turn itself off automatically after 3 5 minutes The full charge time ...

Страница 44: ...ing website http epps toshiba teg com Working Environment The Electromagnetic Compliance EMC of this product has been verified typically for this product category for a so called Residential Commercial Light Industry Environment Any other working environment has not been verified by Toshiba and the use of this product in these working environments is maybe restricted or cannot be recommended Possi...

Страница 45: ... REACH requirements and is committed to provide our customers with information about the chemical substances in our products according to REACH regulation Please consult the following website www toshiba europe com computers info reach for information about the presence in our articles of substances included on the candidate list according to article 59 1 of Regulation EC No 1907 2006 REACH in a c...

Страница 46: ...e or the shop where you purchased the product Additional Information 2010 TOSHIBA Europe GmbH All rights reserved TOSHIBA reserves the right to make technical changes TOSHIBA assumes no liability for damages incurred directly or indirectly from errors omissions or discrepancies between this product and the documentation About the battery pack Use only batteries recommended by TOSHIBA as replacemen...

Страница 47: ...P20_UM_V02_0111 www toshiba multimedia com For more information please visit ...

Отзывы: