Toshiba Camileo BW10 Скачать руководство пользователя страница 65

■ 

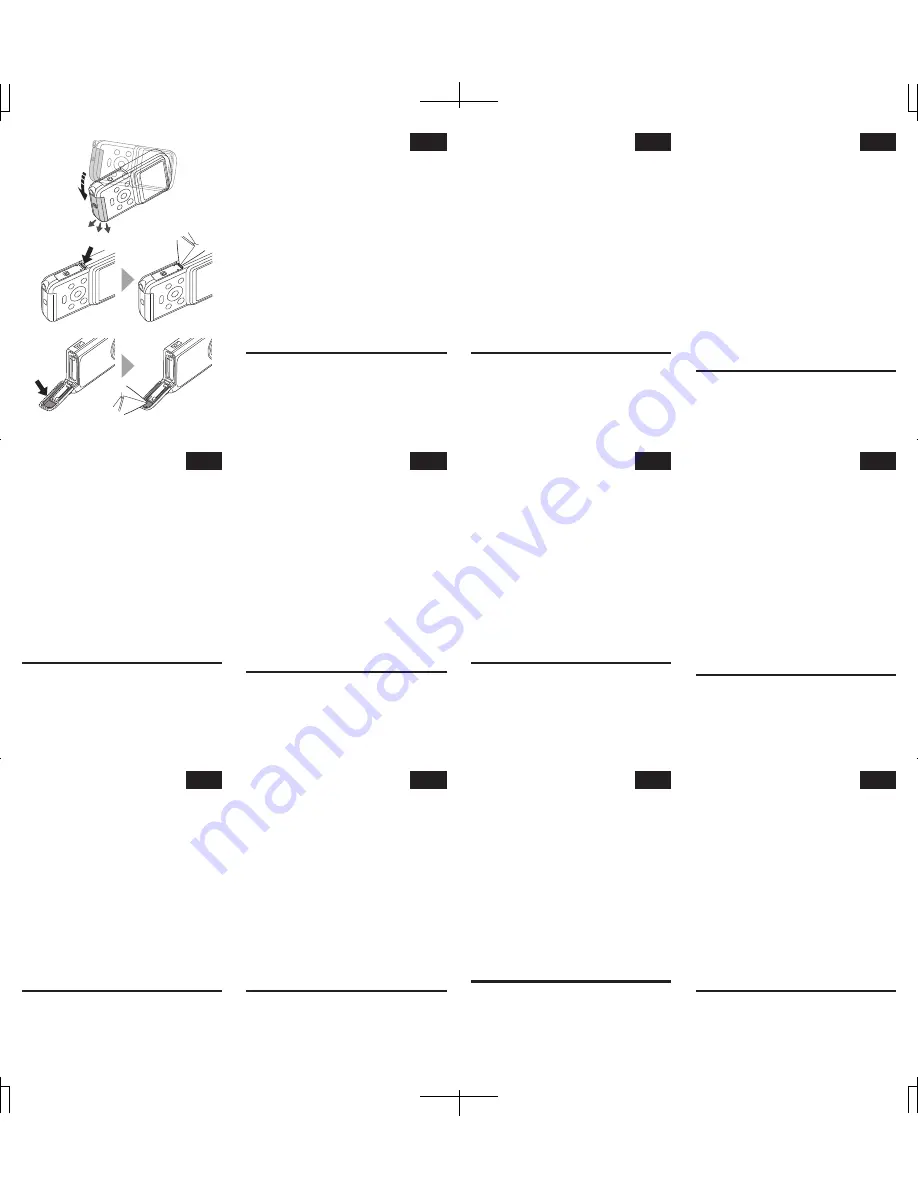
How to remove all moisture from 
the camcorder surfaces

• 

If moisture adhering to the crevices in the slot 
cover and terminal cover is not sufficiently 
wiped off, moisture may get inside the 
camcorder when the cover is opened. Please 
heed the following points to completely 
remove all moisture from the camcorder. 

1


Gently shake the camcorder to shake off any 
water drops. 

(Fig. 1)

2


Wipe off any moisture from the area around 
the terminal cover.

•  Take care that water does not get inside the 

camcorder when opening the cover.  

(Fig. 2)

•  If there is any moisture adhering inside the slot 

cover, wipe it off completely from every crevice.

*  This moisture is not due to exposure to water. 

 (Fig. 

3)

■ 

Quick Start Guide content change

• 

On page 17, the numerical value has been 
changed as follows:

-  Output 65 μW (internal 34 mW)

ޓ

-  Output 110 μW (internal 34 mW)
 

EN

1AG6P1P6071--

0610

Fig. 1

Fig. 2

Fig. 3

CZ

DE

FI

ES

DK

FR

HU

HR

GR

IT

■ 

Jak odstranit veškerou vlhkost z 
povrchů videokamery

• 

Pokud není dostatečně odstraněna vlhkost, 
která ulpívá ve štěrbinách krytu zásuvky a 
krytu konektoru, může vniknout do videoka-
mery, když je kryt otevřený. Věnujte pozornost 
následujícím bodům a odstraňte veškerou 
vlhkost z videokamery. 

1


Jemně videokamerou zatřeste, abyste setřásli 
veškeré kapky vody. 

(Obr. 1)

2


Odstraňte veškerou vlhkost z oblasti kolem 
krytu konektoru.

•  Dávejte pozor, aby voda při otevření krytu nevnikla 

do videokamery.

 (Obr. 2)

•  Pokud uvnitř krytu zásuvky ulpívá nějaká vlhkost, 

zcela ji odstraňte ze všech štěrbin.

*  Tato vlhkost nepochází z vystavení videokamery 

vodě. 

(Obr. 3)

■ 

Změna obsahu Stručné základní 
příručky

• 

Na straně 17 se numerické hodnoty mění 
následovně:

-  výstup 65 μW (interní 34 mW)

ޓ

-  výstup 110 μW (interní 34 mW)

■ 

Jegliche Feuchtigkeit von der Oberflä-
che des Camcorders entfernen

• 

Wenn an den Spalten der Steckplatzabdeckung und 
an der Buchsenabdeckung anhaftende Feuchtigkeit 
nicht sorgfältig abgewischt wird, kann beim Öffnen der 
Abdeckung Feuchtigkeit ins Innere des Camcorders 
eindringen. Bitte beachten Sie die folgenden Punkte, 
um sicherzustellen, dass jegliche Feuchtigkeit von der 
Oberfläche des Camcorders entfernt wird. 

1


Schütteln Sie den Camcorder leicht, um alle 
Wassertropfen abzuschütteln. 

(Abb. 1)

2


Wischen Sie jegliche Feuchtigkeit im Bereich 
um die Buchsenabdeckung ab.

•  Achten Sie darauf, dass beim Öffnen der 

Abdeckung keine Feuchtigkeit ins Innere des 
Camcorders gelangt. 

(Abb. 2)

•  Wenn Feuchtigkeitsreste an der Innenseite der 

Kartensteckplatzabdeckung anhaften, wischen Sie 
diese sorgfältig aus jeder Spalte der Abdeckung ab.

*  Diese Feuchtigkeit rührt nicht daher, dass das Gerät 

mit Wasser in Berührung gekommen ist. 

(Abb. 3)

■ 

Änderung des Inhalts der Kurzanleitung

• 

Auf Seite 17 wurde der numerische Wert wie 
folgt geändert:

-  Leistungsabgabe 65 μW (intern 34 mW)

ޓ

-  Leistungsabgabe 110 μW (intern 34 mW)

■ 

Kaiken kosteuden poistaminen 
videokameran pinnoilta

• 

Jos videokameran aukkojen tai liitäntöjen 
kansien syvennyksiin joutunutta kosteutta ei 
pyyhitä pois riittävän huolellisesti, kosteus voi 
päästä videokameran sisään, kun kansi 
avataan. Poista kaikki kosteus videokameras-
ta noudattamalla seuraavia ohjeita.

1


Poista vesipisarat ravistamalla videokameraa 
varovasti 

(kuva 1)

.

2


Pyyhi kosteus liitäntöjen kannen ympäriltä.

•  Varmista, että videokameran sisään ei pääse 

vettä, kun avaat kannen

 (kuva 2)

.

•  Jos aukon kannen sisäpuolella on kosteutta, pyyhi 

se pois huolellisesti jokaisesta syvennyksestä.

*  Tämä kosteus ei johdu vedelle altistumisesta


(kuva 3)

.

■ 

Pikaoppaan sisällön muutos

• 

Numeroarvoa on muutettu seuraavasti sivulla 
17:

-  Teho 65 μW (sisäinen 34 mW)

ޓ

-  Teho 110 μW (sisδinen 34 mW)
 

■ 

Comment ôter toute l’humidité 
présente sur les surfaces du 
caméscope

• 

Si l’humidité présente dans les ouvertures du 
cache de la fente et du cache du connecteur 
n’est pas essuyée de manière correcte, elle peut 
pénétrer dans le caméscope lors de l’ouverture 
du cache. Veuillez procéder comme suit pour 
ôter toute l’humidité présente sur le caméscope. 

1


Secouez légèrement le caméscope pour faire 
tomber les gouttes d’eau 

(ill. 1)

.

2


Essuyez l’humidité présente autour du cache 
du connecteur.

•  Veillez à ce que l’eau ne pénètre pas dans le 

caméscope lors de l’ouverture du cache 

(ill. 2)

.

•  En présence d’humidité à l’intérieur du cache de la 

fente, essuyez bien toutes les ouvertures.

*  Cette humidité n’est pas liée à l’exposition à l’eau 

(ill. 3)

.

■ 

Modification dans le Guide de 
démarrage rapide

• 

À la page 17, la valeur numérique a été 
modifiée comme suit :

-  Puissance de 65 μW (puissance interne de 34 mW)

ޓ

-  Puissance de 110 μW (puissance interne de 34 mW)

■ 

Minden nedvessé eltávolítása a 
kamera felületéről

• 

Ha a nyílás fedelének hasadékaiban 
megmaradt a nedvesség és a csatlakozó 
fedele sincs megfelelően letörölve, a 
kamerába a fedél kinyitásakor víz kerülhet. 
Kérjük, járjon el az alábbi módon a nedvesség 
maradéktalan eltávolításához. 

1


Finoman rázza le a kameráról a vízcseppeket. 

(1. ábra)

2


Törölje szárazra a csatlakozófedél környékét.

•  Ügyeljen arra, hogy ne kerülhessen víz a 

kamerába a fedél kinyitásakor. 

(2. ábra)

•  Ha a nyílás fedelén belül némi víz található, törölje 

ki azt minden résből.

*  Ez a nedvesség nem azért került be, mert víz érte 

a készüléket. 

(3. ábra)

■ 

Gyorsindítási útmutató tartalomvál-
tozás

• 

A 17. oldalon a számérték a következőképp 
módosult:

-  Teljesítmény: 65 μW (belső: 34 mW)

ޓ

-  Teljesítmény: 110 μW (belső: 34 mW)

■ 

Come rimuovere l'umidità dalle 
superfici della videocamera

• 

Se l'umidità presente negli interstizi del coperchio della 
fessura e del coperchio del terminale non viene 
rimossa in modo appropriato, essa potrebbe penetrare 
all'interno della videocamera quando si apre il 
coperchio. Attenersi alle istruzioni seguenti per 
rimuovere completamente l'umidità dalla videocamera. 

1


Scuotere delicatamente la videocamera per 
eliminare eventuali gocce d'acqua. 

(Fig. 1)

2


Asciugare le aree umide intorno al coperchio 
del terminale.

•  Prestare attenzione affinché non penetri acqua all'interno 

della videocamera quando si apre il coperchio. 

(Fig. 2)

•  Se la parte interna del coperchio della fessura è 

umida, asciugarla completamente rimuovendo 
l'umidità da ogni interstizio.

*  Questa umidità non è dovuta all'esposizione 

all'acqua. 

(Fig. 3)

■ 

Modifiche apportate al contenuto 
della Guida rapida

• 

A pagina 17, il valore numerico è stato 
modificato nel modo seguente:

-  Intensità 65 μW (interna 34 mW)

ޓ

-  Intensitΰ 110 μW (interna 34 mW)

■ 

Sådan fjernes al fugt fra camcorde-
rens overflader

• 

Hvis fugt i revnerne i slot- og terminallåget 
ikke aftørres grundigt, kan der trænge fugt ind 
i camcorderen, når låget åbnes. Vær 
opmærksom på følgende for at fjerne al fugt 
fra camcorderen. 

1


Ryst forsigtigt camcorderen for at ryste 
eventuelle vanddråber af. 

(Fig. 1)

2


Tør eventuel fugt af området omkring 
terminallåget.

•  Pas på, at der ikke trænger vand ind i camcorde-

ren, når låget åbnes. 

(Fig. 2)

•  Hvis der er fugt inden i slotlåget, skal det tørres 

helt væk fra alle revner.

*  Denne fugt skyldes ikke, at camcorderen har 

været i nærheden af vand. 

(Fig. 3)

■ 

Ændring i hurtigvejledningens 
indhold

• 

På side 17 er den numeriske værdi blevet 
ændret, som følger:

-  Udgangseffekt 65 μW (intern 34 mW)

ޓ

-  Udgangseffekt 110 μW (intern 34 mW)

■ 

Cómo eliminar toda la humedad de 
las superficies de la videocámara

• 

Si no se limpia suficientemente la humedad 
adherida a las grietas en la tapa de la ranura y 
la tapa del terminal, la humedad puede penetrar 
en la videocámara al abrir la tapa. Tenga en 
cuenta los puntos siguientes para eliminar por 
completo toda la humedad de la videocámara. 

1


Sacuda suavemente la videocámara para 
eliminar las gotas de agua. 

(Fig. 1)

2


Limpie la humedad de la zona situada 
alrededor de la tapa del terminal.

•  Tenga cuidado para que el agua no penetre en el 

interior de la videocámara al abrir la tapa. 

(Fig. 2)

•  Si hay humedad adherida en el interior de la tapa de la 

ranura, límpiela por completo en cada una de las grietas.

*  Esta humedad no procede de una exposición al 

agua. 

(Fig. 3)

■ 

Modificación del contenido de la 
Guía de inicio rápido

• 

En la página 17, se ha modificado el valor 
numérico del siguiente modo:

-  Salida de 65 μW (interna 34 mW)

ޓ

-  Salida de 110 μW (interna 34 mW)

■ 

Τρόπος απομάκρυνσης της υγρασίας 
από τις επιφάνειες της βιντεοκάμερας

• 

Εάν η υγρασία από τις εσοχές του καλύμμα-
τος υποδοχής και τερματικού δεν απομακρυν-
θεί εντελώς, ενδέχεται η υγρασία να μεταφερ-
θεί στο εσωτερικό της βιντεοκάμερας όταν το 
κάλυμμα είναι ανοικτό. Ακολουθήστε πιστά τα 
παρακάτω βήματα για την πλήρη απομάκρυν-
ση της υγρασία από την βιντεοκάμερα. 

1


Τινάξτε απαλά τη βιντεοκάμερα για την 
απομάκρυνση τυχόν σταγόνων νερού. 

(Εικ. 1)

2


Σκουπίστε την υγρασία που τυχόν υπάρχει στην 
περιοχή γύρω από το κάλυμμα του τερματικού.

•  Προσέξτε ώστε να μην μπει νερό στο εσωτερικό 

της βιντεοκάμερας κατά το άνοιγμα του καλύμμα-
τος. 

(Εικ. 2)

•  Εάν υπάρχει τυχόν υγρασία εντός του καλύμματος της 

υποδοχής, σκουπίστε το εντελώς από κάθε εσοχή.

*  Η υγρασία δεν οφείλεται στην έκθεση σε νερό. 

(Εικ. 3)

■ 

Αλλαγή περιεχομένου στον Οδηγό 
γρήγορης εκκίνησης

• 

Στη σελίδα 17, η αριθμητική τιμή έχει αλλάξει 
ως εξής:

-  Ισχύς 65 μW (εσωτερική 34 mW)

ޓ

-  Ισχύς 110 μW (εσωτερική 34 mW)
 

■ 

Kako odstraniti svu vlagu s 
površina video kamere

• 

Ako vlaga koja se zadržava u šupljinama 
poklopca utora i poklopca priključka nije u 
potpunosti odstranjena, ona može ući u 
kameru prilikom otvaranja poklopca. Molimo 
slijedite daljnje korake da biste u potpunosti 
odstranili vlagu iz video kamere. 

1


Lagano protresite kameru da biste otresli 
kapljice vode. 

(Sl. 1)

2


Obrišite svu vlagu iz područja oko poklopca 
priključka.

•  Pazite da prilikom otvaranja poklopca u kameru ne 

uđe voda. 

(Sl. 2)

•  Ako se unutar poklopca utora zadržala vlaga, 

dobro osušite sve šupljine.

*  Ova vlaga nije nastala uslijed izloženosti vodi.

 (Sl. 

3)

■ 

Izmjena sadržaja Vodiča za brzi 
početak

• 

Na str. 17 izmijenjena je brojčana vrijednost:

-  Izlazna jačina 65 μW (unutarnja 34 mW)

ޓ

-  Izlazna jačina 110 μW (unutarnja 34 mW)
 

Содержание Camileo BW10

Страница 1: ...User s Manual Camileo BW10 EN CZ DE DK ES FI FR GR HR HU IT NL NO PL PT RS RU SE SK SL TR AR ...

Страница 2: ...d b this comprehensive PDF User s Manual Please read these instructions carefully before using the camcorder Keep this Manual in a safe place for later reference Symbols used in this manual HINT Points giving some extended instructions or special points to pay attention to CAUTION Points that require special attention page xx Refer to the page indicated for detailed information ...

Страница 3: ... cover is open water will get inside the camcorder and damage it When closing the slot cover and terminal cover make sure that no foreign object such as sand hair dust etc is caught in the rubber seal There are places in the camcorder where water might accumulate but this will not affect its waterproof properties Slot cover Terminal cover ...

Страница 4: ... THE BATTERY PACK AND CARD When using for the first time The battery pack is already installed in the camcorder Remove the battery pack from the camcorder remove the insulating seal and reinstall the battery pack in the camcorder ...

Страница 5: ...included accessory Please purchase a commercially sold card i The camcorder has an internal memory which means that you can record and save the recorded data even if no card is installed 3 Open 2 Pull out 1 While pressing 6 Close 4 Insert 5 Insert Remove the battery pack Remove the card 2 Pull out 1 Press 2 Pull out 1 Push in ...

Страница 6: ...g the battery pack 1 Press the power button to turn off the camcorder h It is not possible to charge the battery pack while the camcorder is on 2 Use the dedicated USB interface cable supplied to connect the camcorder to a computer 3 Turn on the computer h Charging begins h During charging the multi indicator is lit orange h When charging is completed the indicator turns off h The charging time is...

Страница 7: ...is not possible to charge the battery pack while the camcorder is on i Do not turn off the computer while the battery pack is charging It is not possible to charge the battery pack while the computer is off i With certain computers it may be possible to charge the battery pack even when the computer is turned off ...

Страница 8: ... it For how to set the date and time see page 16 2 Record To record a video clip h Press the button to begin recording a video clip h Press the button again to end the recording To take a photo h Press the button h A still image is captured REC 00 00 09 5 2M POWER button button Video recording button Available recording time remaining Recording time button Photo shooting button MENU button ...

Страница 9: ... frame to the image you wish to play back h The image information for the framed image is shown in the bottom part of the monitor 3 Press the OK button h The file you selected is played back To return to the recording mode h Press the play button 2010 12 24 14 25 100 0011 Remaining battery power indication Orange frame button Play button Arrow keys OK button MENU button ...

Страница 10: ...nd press the MENU button 2 Select DELETE SINGLE and press the OK button h If you press G or H the screen to delete a different file will appear 3 When you are finished deleting files press the MENU button When you are finished using the camcorder Press the POWER button for at least 1 second to turn the camcorder off ...

Страница 11: ...lied dedicated USB interface cable to connect your camcorder to the computer h Connect the cable between the camcorder s USB terminal and the computer s USB connector 2 Turn on the camcorder page 13 h The USB Connection Screen appears on the camcorder s monitor Supplied dedicated USB interface cable To USB terminal To USB connector USB CONNECTION COMPUTER PRINTER CANCEL OK CANCEL OK ...

Страница 12: ...d press the OK button h The screen to select the computer connection mode appears 4 Select CARD READER and press the OK button 5 Copy data from your camcorder to a computer OK USB CONNECTION CARD READER YouTube MTP PC CAMERA CANCEL OK CANCEL ...

Страница 13: ...s connected to the computer s USB connector 2 Left click on the camcorder drive E h The camcorder can now be disconnected h The drive name E may be different on your computer HINT About the application software Concerning the application software the following software is bundled in the supplied DVD ROM i CAMILEO Uploader With application installed when your camcorder is connected to your computer...

Страница 14: ... the temperature alert icon 12 TURNING THE CAMCORDER ON AND OFF 13 Turning on the camcorder 13 Turning off the camcorder 13 Turning on the camcorder when the power save sleep mode is active 14 DATE AND TIME SETTING 16 ACCESSING THE MENU SCREEN 18 SHOOTING VIDEO CLIP RECORDING 20 SHOOTING SINGLE SHOTS 22 SHOOT A STILL IMAGE WHILE RECORDING A VIDEO CLIP 25 MACRO PHOTOGRAPHY ZOOM 27 PLAYING BACK VIDE...

Страница 15: ...ing to the HDMI terminal 33 PLAYING BACK ON A TV 34 APPENDICES FREQUENTLY ASKED QUESTIONS 35 OVERVIEW OF THE MENU SCREEN 40 SPECIFICATIONS 42 Camcorder 42 Concerning the multi indicator 43 Others 44 TOSHIBA SUPPORT 45 REGULATORY INFORMATION 46 ADDITIONAL INFORMATION 49 ...

Страница 16: ...anual CHECKING THE INCLUDED ACCESSORIES i Software DVD User s Manual DVD ROM 1 i Li ion battery pack 1 i Dedicated USB interface cable page v x 9 1 i Handstrap 1 i Soft case 1 i Quick Start Guide i Warranty Leaflet ...

Страница 17: ... when there is a storm or lighting 5 Do not use batteries of different specifications Doing so may lead to the potential for serious damage 6 Remove the battery during long periods between usages as a deteriorated battery may affect the functionality of the camcorder 7 Remove the battery if it shows signs of leaking or distortion 8 Use only the accessories supplied by the manufacturer 9 Keep the c...

Страница 18: ...type of card that can be inserted into and used with this camcorder is i SD Memory Card i SDHC Memory Card i SDXC Memory Card What card means in this manual i In this manual SD Memory Cards SDHC Memory Cards and SDXC Memory Cards that can be used in this camcorder are referred to as card ...

Страница 19: ...User s Manual 6 EN SETUP SETUP SETUP PARTS NAMES Front Lens Terminal cover Microphone Speaker LED light Slot cover ...

Страница 20: ...EN 7 User s Manual Rear Multi indicator Monitor OK button Arrow keys button Photo shooting button button Video recording button POWER button button Play button MENU button ...

Страница 21: ...n included accessory Please purchase a commercially sold card i The camcorder has an internal memory which means that you can record and save the recorded data even if no card is installed 3 Open 2 Pull out 1 While pressing 6 Close 4 Insert 5 Insert Remove the battery pack Remove the card 2 Pull out 1 Press 2 Pull out 1 Push in ...

Страница 22: ...g the battery pack 1 Press the power button to turn off the camcorder h It is not possible to charge the battery pack while the camcorder is on 2 Use the dedicated USB interface cable supplied to connect the camcorder to a computer 3 Turn on the computer h Charging begins h During charging the multi indicator is lit orange h When charging is completed the indicator turns off h The charging time is...

Страница 23: ...at a card 1 Insert the card in the camcorder and press the POWER button pages 8 and 13 2 Press the MENU button 3 Select FORMAT and press the OK button i The Format Screen appears Follow the instructions on the screen to format the card Shooting without a card installed i When a card is installed images are recorded to and played back from the card When no card is installed images are recorded to a...

Страница 24: ...s well as the shooting settings The backup battery will be fully charged when the battery pack is kept in the camcorder continuously for about 2 days In the fully charged state the backup battery will maintain the camcorder settings for about 7 days When not using the camcorder for a long time remove the battery pack i A small amount of power is still used even if the camcorder is turned off and i...

Страница 25: ...attery rises a icon lights on the monitor It is still possible to record and play back even when the icon is lit however it is advised that you discontinue use as soon as possible and turn the camcorder off h If the temperature rises further the icon will start to flash and the camcorder will turn off automatically The camcorder cannot be turned on until the temperature has dropped or as long as t...

Страница 26: ...r save mode h When the I arrow key is used to turn on the camera the screen to set the operation sounds appears Turning off the camcorder 1 Press the POWER button for at least 1 second h The camcorder turns off HINT To adjust the operation sounds i If you turn on the camcorder by pressing the POWER button while holding down the J arrow key the screen to change the operation sounds will appear POWE...

Страница 27: ...5 minutes of no use during playback factory preset setting i When the power save mode is active you can restore the power by any of the following methods h Press the POWER button i After the power save mode has been active for about 10 minutes the camcorder will switch to the standby mode In this case you can restore the power by pressing the POWER button i When the camcorder is connected to a com...

Страница 28: ...mcorder is turned on the Set date and time reminder briefly appears after which the K icon is shown on the Recording Screen To have the date and time recorded with the images please complete this setting before capturing images i Due to the characteristics of the camcorder the outer surface may become warm during use but this does not indicate a malfunction i If the camcorder starts to feel uncomf...

Страница 29: ...rrow keys to select CLOCK SET and press the OK button h The Clock Set Screen appears 4 Set the date and time h To select the desired setting Press the G and H arrow keys h To change the assigned value Press the I and J arrow keys 5 Press the OK button h Assign the desired value to each setting 6 Press the MENU button h The date and time settings are completed and you are returned to the Setting Me...

Страница 30: ...t is recommended to check that the date and time settings are still correct after replacing the battery pack and before shooting or recording of any type follow step 1 To correct the date and time settings 1 Turn on the camcorder 2 Press the MENU button 3 Select CLOCK SET and press the OK button h The screen to set the date and time appears h The current date and time settings are shown 4 Select t...

Страница 31: ...ING THE MENU SCREEN 1 Turn on the camcorder page 13 2 Press the MENU button h The Menu Screen appears h To cancel the Menu Screen press the MENU button MENU LED LIGHT FACE CHASER PHOTO VIEW LANGUAGE CLOCK SET TV OUTPUT OK MENU button ...

Страница 32: ... OK button h The Setting Screen for the selected item appears h To return to the Menu Screen press the MENU button OK MENU LED LIGHT FACE CHASER PHOTO VIEW LANGUAGE CLOCK SET TV OUTPUT OK FACE CHASER ON OFF Select an item to change Applicable mode Setting Screen Press OK button Press I J ...

Страница 33: ...the button pressed while recording h When the remaining recording time available for the currently recording clip becomes little a countdown of the remaining recording time appears on the display 3 End the recording h Press the button again to stop recording REC 00 00 09 5 2M POWER button button Video recording button Available recording time remaining Recording time ...

Страница 34: ...press the MENU button 2 Use the G and H keys to select a setting and press the OK button h The video settings are changed and you are returned to the recording screen To record using the action mode video self timer 1 Press and hold the button until the Action Mode Screen appears h About 10 seconds after the Action Mode Screen appears recording begins h After recording begins it ends in about 60 s...

Страница 35: ...hot 1 Turn on the camcorder page 13 2 Press the button h The shutter releases and the image is captured h You can view the captured image on the monitor by keeping the button depressed when you capture the image 00 00 19 00 00 19 00 00 19 13 button Photo shooting button POWER button ...

Страница 36: ...w key h The screen to change the photo settings appears h To return to the recording screen without changing the settings press the MENU button 2 Use the G and H keys to select a setting and press the OK button h The photo settings are changed and you are returned to the recording screen PHOTO 2592x1944 ...

Страница 37: ...ity that the image may be blurred due to camcorder shake becomes high the camcorder shake icon may appear on the monitor In this case use a tripod to stabilize the camcorder when shooting Does it seem to take a long time to save images i When shooting in dimly lit conditions it may take some time to save the data to the card Camcorder shake icon ...

Страница 38: ...clip recording HINT i When the remaining video recording time becomes approximately 50 seconds it will no longer be possible to capture a still image while recording a video clip The exact remaining recording time at which this occurs will differ depending on the subject and on the recording size as well as on the video clip recording mode If you intend to capture a still image while recording a v...

Страница 39: ...cording size of still images i The size of a still image captured during video clip recording depends on the video clip recording size Video clip recording size setting Still image recording size Y 1920 1080 pixel 1280 720 pixel 640 480 pixel ...

Страница 40: ...mcorder lens at the subject 2 Press I or J I Zoom in on the subject J Zoom out h When the zoom switch is pushed the zoom bar appears on the monitor 3 Take the picture For video clip recording see page 20 For shooting single shots see page 22 Press I J Monitor ...

Страница 41: ...e framed image is shown in the bottom part of the monitor 3 Press the OK button h The file you selected is played back To return to the recording mode h Press the play button HINT Slideshow playback i In step 3 if you press the OK button for about 1 second or more a slideshow playback will start i The slideshow playback will stop when any button is pressed 2010 12 24 14 25 100 0011 MENU button Rem...

Страница 42: ...2 move the orange frame to the file you wish to delete and press the MENU button 2 Select DELETE SINGLE and press the OK button h If you press G or H the screen to delete a different file will appear 3 When you are finished deleting files press the MENU button ...

Страница 43: ...ausing playback press G Slow playback Forward playback After pausing playback press and hold H Reverse playback After pausing playback press and hold G To accelerate playback Forward playback During forward playback press H h The playback speed changes each time H is pressed as follows Normal playback 2 5 10 15 Press G to resume normal playback speed Reverse playback During forward playback press ...

Страница 44: ...king it appear jerky The video will always be displayed properly on the camcorder monitor or a television i Depending on the card recording may end even before the possible recording time indicated Display the video clip playback point i During video clip playback press the MENU button for at least 1 second to display a bar showing the current playback point in the video clip i Press the MENU butt...

Страница 45: ...g them If undue force is used to connect a cable it may permanently damage the connector pins in the terminal socket i Do not use excessive force when connecting and disconnecting cables About image output The image output destination differs depending on the camcorder status m Images are output n Images are not output When an HDMI cable is used to connect the camcorder to a TV 1080p video mode im...

Страница 46: ...ser s Manual Connecting to the HDMI terminal Use a separately sold or commercially available mini HDMI cable to connect to a TV Set the input to HDMI To HDMI terminal To HDMI terminal on the TV Mini HDMI cable ...

Страница 47: ...ck procedure as when playing back with the camcorder is used to play back audio recordings as well CAUTION Insert and pull out the cable carefully i When connecting the cables make sure that the cable plugs are correctly oriented and that they match the shapes of the terminal sockets on the devices Push the plugs in straight when connecting them If undue force is used to connect a cable it may per...

Страница 48: ...ture is very low Keep the battery pack in an environment of 10 to 40 C 50 to 104 F The battery pack life has expired If a battery becomes depleted quickly even after it was sufficiently charged it should be assumed that the battery has reached the end of its service life Please replace it with a new battery Why doesn t recharging end The battery pack life has expired Replace with a new battery pac...

Страница 49: ...inting a close up of part of a photo trimming For printing standard photo photo service sizes For photos displayed on a web page or sent as e mail attachments Monitor When used in cold weather why does the image seem to leave traces as it moves Condition due to the monitor characteristics Not a malfunction Spots that appear in the monitor only appear in the monitor and will not be recorded with th...

Страница 50: ... were recorded on a card using this camcorder Why is the playback image distorted If the subject moves or the camcorder is moved during recording a distorted image may sometimes occur Not a malfunction This is a characteristic of the CMOS sensor Why isn t the magnified image clear Due to the characteristics of the camcorder magnified images appear less clear Not a malfunction Can I play back image...

Страница 51: ...pear There is no more available memory on the card or in the camcorder s internal memory Delete unnecessary files or use a card that has more memory available Why does the Card is protected message appear The lock switch on the card is in the locked protect position Move the lock switch to the unlocked position Why can t the camcorder be operated A temporary internal circuitry problem may be the c...

Страница 52: ...t with a dealer near you for advice Why does the System error message appear A problem has occurred within the camcorder or card Check the following items 1 Remove the card and then install it again 2 Remove the battery pack and then install it again 3 Install a different card If System error still appears after performing the above steps then take the camcorder to the dealer for service Question ...

Страница 53: ...User s Manual 40 EN APPENDICES OVERVIEW OF THE MENU SCREEN OK MENU LED LIGHT FACE CHASER PHOTO VIEW LANGUAGE CLOCK SET TV OUTPUT OK FORMAT 5 4 3 2 1 6 7 8 ...

Страница 54: ...corder s clock 5 LANGUAGE setting h Select the language in which the monitor messages are displayed 6 TV output setting 7 FORMAT 8 Remaining battery power indication The LED light operates regardless of the shooting conditions The LED light is disabled regardless of the shooting conditions Enable face chaser Disable face chaser ...

Страница 55: ...e Resolution HD 1920 1080p 30fps HD 1280 720p 30fps VGA 640 480p 30fps White Balance Auto Exposure Auto Light On Off File Format Picture JPEG Movie Mpeg 4 AVC H 264 Image play Single Image Slideshow PC interface USB 2 0 Port TV out mini HDMI Battery Lithium ion Rechargeable Battery Dimension 55 0 H 22 8 W 107 0 D mm Weight 98 5g Without battery Li ion battery pack Type name PX1686 Water resistant ...

Страница 56: ... different camcorder operations Multi indicator status Camcorder status Lit Connected to a computer or printer Charging Flashing Slow Battery charge error or rise in internal temperature Slow Fast During sleep mode Fast Connected to a computer or printer Connected to a TV During self timer photography Very fast Accessing card ...

Страница 57: ...Windows Software Red Eye by FotoNationTM 2003 2005 is a trademark of FotoNation Inc Red Eye software 2003 2005 FotoNation In Camcorder Red Eye covered by U S Patent No 6 407 777 Other patents Pending SDXC logo is a trademark of SD 3C LLC All other company and product names are registered trademarks or trademarks of their respective owners CAUTION i It is forbidden to copy this manual whole or in p...

Страница 58: ...ed help For the latest driver updates User s Manuals FAQs please have a look at the TOSHIBA options services support page computers toshiba eu options support Please see computers toshiba eu options warranty for the TOSHIBA hotline numbers ...

Страница 59: ...onments can be Disturbances of other products or of this product in the nearby surrounding area with temporarily malfunction or data loss corruption as result Example of non verified working environments and related advices Industrial environment e g where 3 phase 380V mains is being used mainly Danger of disturbances of this product due to possible strong electromagnetic fields especially near to...

Страница 60: ... consult the following website http www toshiba europe com computers info reach for information about the presence in our articles of substances included on the candidate list according to article 59 1 of Regulation EC No 1907 2006 REACH in a concentration above 0 1 weight by weight WEEE Following information is only valid for EU member States Disposal of products The crossed out wheeled dust bin ...

Страница 61: ...ins more than the specified values of lead Pb mercury Hg and or cadmium Cd defined in the Battery Directive 2006 66 EC then the chemical symbols for lead Pb mercury Hg and or cadmium Cd will appear below the crossed out wheeled dust bin symbol By participating in separate collection of batteries you will help to assure the proper disposal of products and batteries and thus help to prevent potentia...

Страница 62: ... TOSHIBA Europe GmbH All rights reserved TOSHIBA reserves the right to make technical changes TOSHIBA assumes no liability for damages incurred directly or indirectly from errors omissions or discrepancies between this product and the documentation ...

Страница 63: ...BW10_UM__AB_V01_0510 For more information please visit www toshiba multimedia com ...

Страница 64: ...formation available before you call Product serial number and part number Place of purchase Applicable error messages or fault symptoms Operating system if applicable Installed third party hardware and software if applicable 2010 Toshiba Australia Pty Limited Camileo is a trademark of Toshiba Corporation Product specifications configurations prices system component options availability are all sub...

Страница 65: ...maradéktalan eltávolításához 1 Finoman rázza le a kameráról a vízcseppeket 1 ábra 2 Törölje szárazra a csatlakozófedél környékét Ügyeljen arra hogy ne kerülhessen víz a kamerába a fedél kinyitásakor 2 ábra Ha a nyílás fedelén belül némi víz található törölje ki azt minden résből Ez a nedvesség nem azért került be mert víz érte a készüléket 3 ábra Gyorsindítási útmutató tartalomvál tozás A 17 oldal...

Страница 66: ...yfa 17 deki sayısal değerler şu şekilde değiştirilmiştir Çıkış 65 μW dahili 34 mW ޓ Çıkış 110 μW dahili 34 mW Como remover toda a humidade das superfícies da câmara Se a humidade que aparecer nas reentrâncias da tampa de encaixe e da tampa do terminal não for bem limpa pode entrar na câmara de vídeo quando a tampa for aberta Tenha atenção aos pontos que se seguem para remover completa mente a humi...

Отзывы: