EN-
50
32
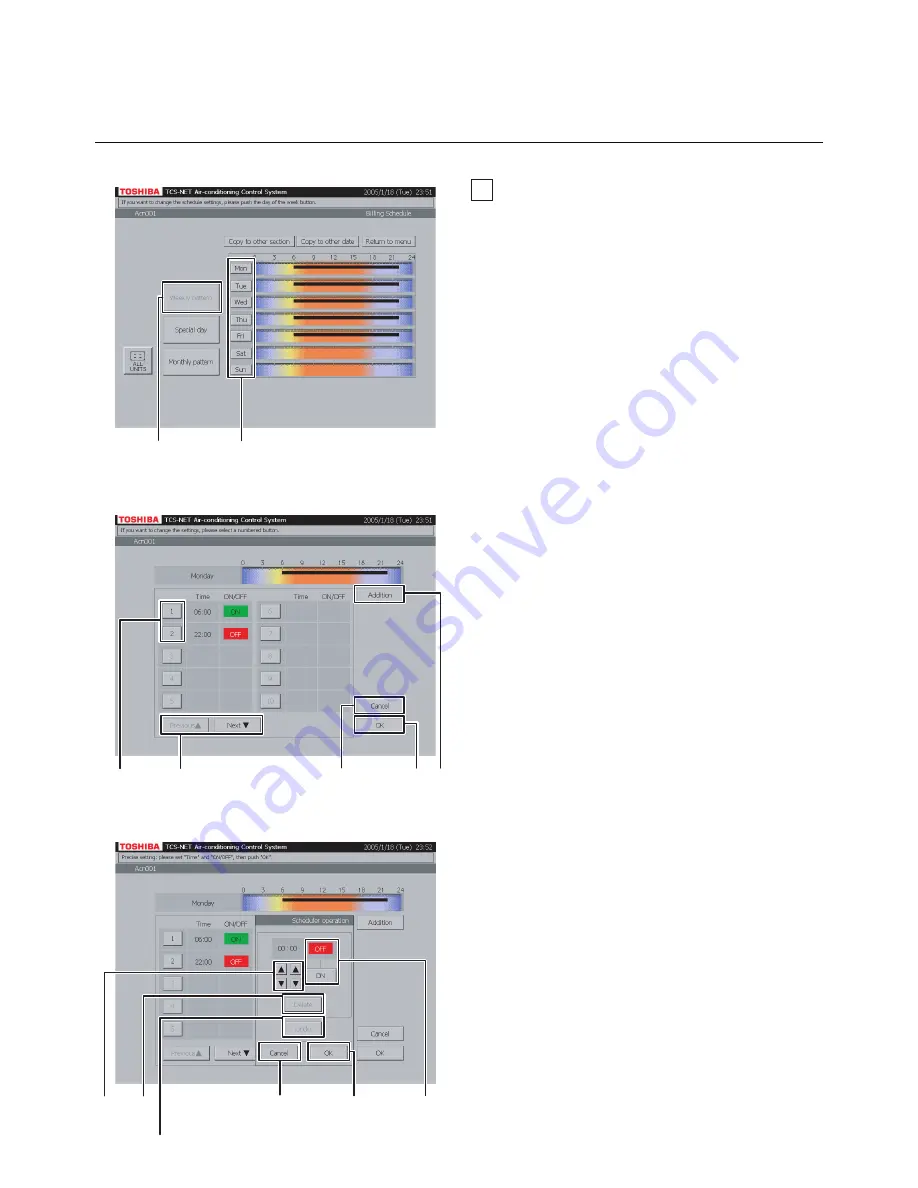
Setting weekly pattern
A
Push [Weekly pattern].
B
Push the button of a day of the week you want
to set.
The Weekly Pattern Setting screen (Fig. 32-2)
appears.
<Addition>
C
Push [Addition].
The Billing Schedule Detail Setting screen
(Fig. 32-3) appears.
D
Set time for operation ON or OFF with the
▲
and
▼
buttons.
E
Push [ON] to run or [OFF] to stop.
To undo the setting to the previous state, push
[Undo].
F
Confirm the setting, and then push [OK] on the
Detail Setting screen.
If you do not add the weekly pattern, push
[Cancel] on the Detail Setting screen.
<Change>
G
Push a number (1 to 20) whose weekly pattern
you want to change.
The schedule list ranges on two pages.
H
Switch the list using the [Previous
▲
] and
[Next
▼
] buttons.
The Detail Setting screen (Fig. 32-3) appears.
I
To change ON or OFF time, use the
▲
and
▼
buttons.
J
Push [ON] or [OFF] to change ON/OFF mode.
To undo the changed setting to the previous
state, push [Undo].
K
Confirm the setting, and then push [OK] on the
Detail Setting screen.
If you do not change the weekly pattern, push
[Cancel] on the Detail Setting screen.
Fig. 32-1 Weekly Pattern Check Screen
Fig. 32-2 Weekly Pattern Setting Screen
Fig. 32-3 Billing Schedule Detail Setting Screen
B
A
H M
C
GL
When not setting (
P
)
P
N
FKO
E J
DI
When not
setting (
F
,
K
,
O
)
To undo (
E
,
J
)
HOW TO OPERATE
(continued)
Checking/Setting Billing Schedule
(continued)
Содержание BMS-TP0641ACE
Страница 4: ...4 MEMO ...
Страница 76: ...SN EH99928201 EN 336 Tadewara Fuji shi Shizuoka 416 8521 Japan ...


