


Smart
Mode
95
Use
G
to select
Input
and
then press
@
(Select).
a
The e-mail address input screen
appears.
・
If you do not want to enter an e-mail
address, press
@
(OK) and proceed to Step 8.
・
You can also use
G
to select
See Sent Hist
or
See recv hist
and enter an e-mail
address from there.
6
■
Symb
Left
Left
64
Name
Tel
Mail
Press
J
(Add).
a
The entry is saved in the phone book.
8
Enter an e-mail address and
then press
@
(OK).
a
The New screen appears.
・
You can use
G
to select an item and
then press
@
(Edit) to edit something
you have already entered, or to configure call ring tone and
mail ring tone settings.
7
New
Edit
Add
Kelly Mille
KellyMiller
0900001XXXX
kelly@□□□□□
Ringtone
・
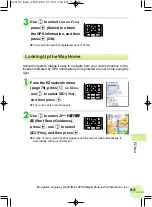
When you have already stored data in the phone book, pressing
K
while the
standby screen is displayed displays a phone book list. To store new phone book
data, press
J
(New) and perform Steps 3 through 8 of the above procedure.
・
To edit phone book contents, press
K
while the standby screen is displayed. Use
E
to select the phone book entry you want to edit, press
@
(Select), and then
press
K
(Edit).
・
For other details, see page 42.
Note
Note
A5516T_Basic_P090~99 05.9.21 5:35 PM ページ 95