background image

15

Using the TV’s features

Picture adjustment

• Most of the picture controls and functions are 

available. However, features not available will 
be greyed out.

Selecting the Picture Size

1

 Press 

 until the picture size list appears 

on the screen, then press 

V

 or 

U

 to select 

the appropriate picture size (or press 


repeatedly to select the desired picture size 
directly).

2

 Press 

Q

.

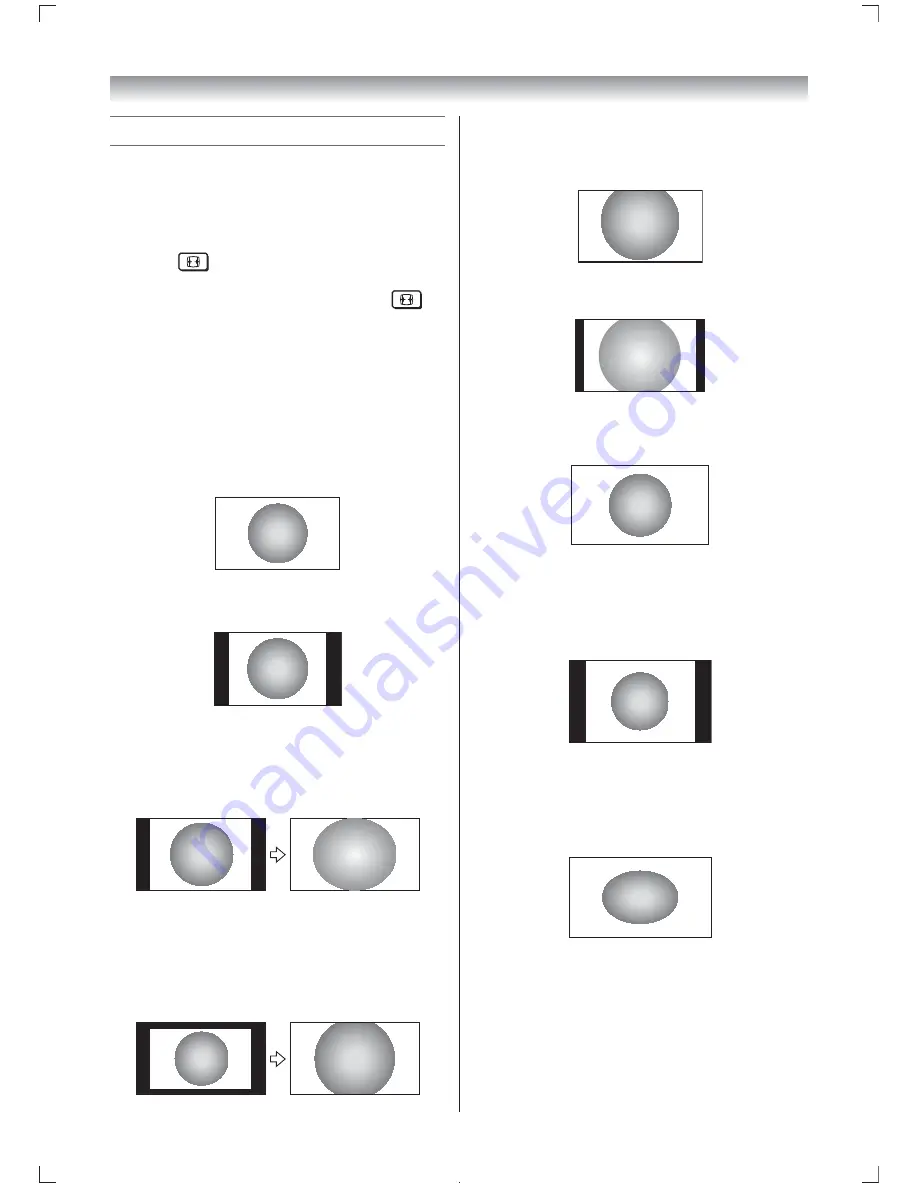
Wide

Use this setting when watching a wide-screen 
DVD, widescreen video tape or a 16:9 broadcast 
(when available). Due to the range of wide-
screen formats (16:9, 14:9, 20:9 etc.), you may 
see bars on the top and bottom of the screen.

4:3

Use this setting to view a true 4:3 broadcast.

Super Live

This setting will enlarge a 4:3 image to fi t the 
screen by stretching the image horizontally 
and vertically, holding better proportions at the 
centre of the image. Some distortion may occur.

Cinema

When watching “all sides panel format” fi lms/
video tapes, this setting will eliminate or reduce 
the black bars on all the sides of the screen 
by zooming in and selecting the image without 
distortion.

Subtitle

When subtitles are included on a letterbox 
format broadcast, this setting will raise the 
picture so that the most of text is displayed.

Subtitle

14:9

Use this setting when watching a 14:9 broadcast.

Native

This setting will display the image correctly 
without distortion or picture clipping.

PC Normal

Use this setting for PC connected via HDMI 
or RGB/PC terminal when receiving PC signal 
format. This setting will display the image 
correctly without distortion or picture clipping.

PC Wide

Use this setting for PC connected via HDMI 
or RGB/PC terminal when receiving PC signal 
format. This setting will display the image 
without picture clipping.

4046TL20ETV̲En.indd   15

2011/11/16   8:15:19

Содержание 40TL20 Series

Страница 1: ...ial number on the back of the TV Record these numbers in the spaces provided below Refer to them whenever you call upon your TOSHIBA dealer regarding this product Model number Serial number 40TL20 Series 46TL20 Series 2011 TOSHIBA CORPORATION All Rights Reserved VX1A00229400 TD J ...

Страница 2: ...njury To prevent injury use the exclusive optional stand or wall hanging bracket to install this TV on the floor or wall securely in accordance with a qualified technician Sturdy tie as short as possible Stand clips Fixing strap Screw supplied Fixing strap Clip supplied Contents Introduction Getting started Connecting an aerial 7 Exploring your new TV 7 TV panel controls 7 Learning about the remot...

Страница 3: ...utlet equipped with 110 240V AC 50 60Hz Never use the TV outside the specified voltage range It may cause a fire or an electric shock Check Ex 110 240V AC 50 60Hz About the fuse only for E models In a three pin earthing type the fuse fitted in this plug is approved by ASTA or BSI to BS1362 It should only be replaced by a correctly rated and approved type and the fuse cover must be refitted 5 Never...

Страница 4: ...ctric light or power circuits If the aerial falls down or drops it may cause an injury or an electric shock Introduction Getting started Use 1 Never place hot objects or open flame sources such as lighted candles or nightlights on or close to the TV High temperatures can melt plastic and lead to fires 2 The apparatus shall not be exposed to dripping or splashing and that no objects filled with liqui...

Страница 5: ... power cord is damaged 7 If there is thunder or lightning never touch the aerial cable or other connected cables You may suffer an electric shock Service 1 Never repair modify or disassemble the TV by yourself It may cause a fire or an electric shock Consult a service technician for inspection and repairs 2 When a malfunction occurs or if smoke or an unusual odor comes from the TV turn off the TV ...

Страница 6: ...ile compounds such as insecticide on the cabinet and LCD screen This may cause a discolouration or damage the cabinet and LCD screen 3 About afterimage If a still picture is displayed an afterimage may remain on the screen however it will disappear This is not a sign of malfunction 4 Some pixels of the screen do not light up The LCD display panel is manufactured using an extremely high level of pr...

Страница 7: ...nt Cautions Dispose of batteries in a designated disposal area Batteries must not be exposed to excessive heat such as sunshine fire or the like Introduction Getting started Attention should be drawn to the environmental aspects of battery disposal Never mix battery types or combine used batteries with new ones Notes If the remote control does not operate correctly or if the operating range becomes...

Страница 8: ...d uncompressed digital video from an HDMI device page 32 7 o 2 Video 2 input terminals Standard composite video and standard analogue stereo audio inputs page 31 Power cord Cable holder Cable holder You can use the cable holder to hold the aerial cable video and audio cables etc Never grasp the holder when moving the TV 13 14 15 8 10 11 12 9 6 TV back view 8 O DIGITAL AUDIO OPTICAL output terminal...

Страница 9: ...put source selection TV VIDEO or COMPONENT HDMI PC 5 Subtitle on off 6 Picture Mode 7 Number buttons 0 9 8 To return to the previous programme 9 To display the Channel List 10 To display on screen information Initial Index function for Teletext 11 Sound Mute This button turns the sound off on 12 Volume These buttons adjust the volume level 13 Programme position U u 14 To select 3D 2D 15 Teletext o...

Страница 10: ...9 1 Press The Menu Language screen will appear This screen will appear the first time that the TV is switched on Menu Language 2 Press V U Y or Z to select the Menu Language English Chinese CS Malay Thai Vietnamese Russian Arabic Persian or French 3 Press Q to display the Location menu page 14 Press Y or Z to select Store or Home For normal home use select Home Location Home To use the TV for disp...

Страница 11: ...0 0 0 0 0 0 0 Picture Mode Standard Reset Backlight Contrast Brightness Tint Colour Sharpness Picture Mode Reset Backlight Contrast Brightness Tint Colour Sharpness MTS Dual Dual 1 Off Balance Advanced Sound Settings Stable Sound Auto MTS Auto Off Stable Sound On Dynamic Range Control Dynamic Range Control Advanced Sound Settings Balance Dual Dual 1 USB Media Player On Timer Sleep Timer 00 00 USB ...

Страница 12: ...osition you want to view 2 Select the second position with the Number buttons 0 9 3 Press The previous channel will be displayed 2 EFGH 3 IJKL Dual Each time you press the TV will switch back and forth between the two positions Displaying the on screen information 1 Press to display the following on screen information 4 ABCD The information will disappear in 5 seconds Position or external input mo...

Страница 13: ...on is wrong In such a case select another colour and or sound system page 49 D Position skip selection Press V or U to turn the position skip option on 8 or off The position will then be skipped when you select channels with PU or Pu The 8 mark will appear when you use the Number button on the remote control E Signal Class selection page 47 Press V or U to select C or S C 1 ch 12 ch 21 ch 70 ch S ...

Страница 14: ... ABCD EFGH IJKL MNOP Pos Manual Tuning Label 3 Use V or U to move through the list to your preferred position As you do so the other channels will move to make room 4 Press Y to store your move Repeat as necessary and then press EXIT Setting the Location You can select either Home or Store mode Home is recommended for normal home use Select Store when using a TV for displaying in a shop etc 1 From...

Страница 15: ... and vertically holding better proportions at the centre of the image Some distortion may occur Cinema When watching all sides panel format films video tapes this setting will eliminate or reduce the black bars on all the sides of the screen by zooming in and selecting the image without distortion Subtitle When subtitles are included on a letterbox format broadcast this setting will raise the pict...

Страница 16: ...y Settings 2 Press Q then press V or U to select the item you want to adjust 0 0 Picture Position Horizontal Position Reset Vertical Position 3 Press Y or Z to adjust the settings as desired Horizontal Position 0 Notes When the picture size is in Wide or 4 3 mode only the Horizontal position can be adjusted When the picture size is in Native PC Wide PC Normal and Dot by Dot mode none of this funct...

Страница 17: ...ing the red green or blue tint 1 From the Picture Settings menu press V or U to select Colour Temperature then press Q 2 Press Y or Z to select Cool Natural or Warm to suit your preference Colour Temperature Colour Temperature Cool Red Level Green Level Blue Level Reset 0 0 0 3 Press V or U to select Red Level Green Level or Blue Level then press Y or Z to adjust the setting as required Resetting ...

Страница 18: ...le The Dual menu setting status remains even if the TV is turned off 4 Press Q then press V or U to select an item you want to adjust Base Colour Adjustment Hue Saturation Brightness Red 0 0 0 0 0 0 0 0 0 0 0 0 0 0 0 0 0 0 Green Blue Yellow Magenta Cyan Reset 5 Press Z then press Y or Z to select Hue Saturation or Brightness 6 Press V or U to adjust the settings as required Hue Saturation Brightne...

Страница 19: ... audio 1 From the SOUND menu press V or U to select Dynamic Range Control 2 Press Y or Z to select On or Off Setting the Digital Audio Output 1 From the PREFERENCES menu press V or U to select AV Connection and press Q Selecting the stereo programmes 1 When a stereo programme is received d Stereo appears 10 ABCD Stereo 2 Press g to select the stereo monaural mode d Stereo and e Mono appear cyclica...

Страница 20: ...ime from now until the TV turns on using the Number buttons maximum of 12 hours 4 When all the details have been entered select Done and press Q to start the timer To cancel the On Timer 1 In the On Timer menu select Enable On Timer 2 Press Y or Z to select Off and then select Done and press Q Setting the Sleep Timer The Sleep Timer is especially useful if you want the TV to turn itself off after ...

Страница 21: ...into a full screen picture 1 From the Display Settings menu press V or U to select 4 3 Stretch 2 Press Y or Z to select On or Off Note This feature is not available when Auto Format is set to Off Panel Lock Panel Lock disables the buttons on the TV All buttons on the remote control can still be used 1 From the PREFERENCES menu press V or U to select Panel Lock 2 Press Y or Z to select On or Off No...

Страница 22: ...ed 3D glasses When watching 3D images do not wear 3D glasses at an angle and do not lie down If you watch while lying down or with the glasses tilted the 3D effect is lost and it may cause eye strain It is recommended that the viewer s eyes and 3D glasses are level with the screen Use the Manual Tuning operation if desired channels cannot be preset with the Auto If you have prescription eye glasse...

Страница 23: ...tions Incoming video signals can either be in 2D or 3D format A 2D signal can be viewed in either 2D or 3D and 3D can be viewed in either 2D or 3D If the TV can detect the fact that a signal is 3D it can change to 3D mode automatically see 3D Auto Start page 25 Otherwise you can change the viewing mode using the 3D button Finally the format of the 3D signal can be either Side by Side SBS or Top an...

Страница 24: ... to 3D If you can see the left and right images on the screen in Native mode select SBS If you can see top and bottom images on the screen in Native mode select TAB Using the TV s features To switch to 3D mode Set 3D Auto Start to 3D Press while viewing 2D mode or Native mode Trigger of Switching Display Mode Input Signal Press 3D button Type Additional Information Format Source Signal Select 3D S...

Страница 25: ...hile viewing 2D to 3D mode From the Quick Menu in 2D mode From the Quick Menu in 2D mode 1 From the PREFERENCES menu press V or U to select 3D Setup and press Q 2 Press V or U to select 2D Format Select Press Q 3 Press Y or Z to select Native Notes When 3D format signal with 3D Auto Detect Information is received it is not possible to switch to Native When Frame Packing is input 3D Settings will b...

Страница 26: ...is helps to avoid having to enter the 3D Lock PIN and view the 3D start message every time when switching to 3D Using the TV s features 1 From the 3D Safety Settings menu press Q and Enter your 4 digit 3D PIN code 2 Press V or U to select 3D Timer Lock and press Y or Z to select On or Off Note The PIN input window appears when continue is selected in the reminder dialogue for Enable 3D Timer even ...

Страница 27: ...Language Auto Tuning Manual Tuning Colour System Quick Setup Software Licences Location Antenna System Information English Auto Home SETUP 2 Press V or U to select Colour System and then press Y or Z to select Auto PAL SECAM NTSC 4 43 or NTSC 3 58 3 Press Q to store your settings Notes Confirm that Colour System is set to Auto If not select Auto with Y or Z This feature is available in Standard vid...

Страница 28: ... mode this displays the main subjects available and their relevant page numbers In List mode you will see the page numbers currently stored on the each colour button Sub pages Once in this chosen page if there are sub pages they will automatically load into memory without changing the one you are reading If there are many sub pages it will take a long time for them all to load and this will depend...

Страница 29: ... The one displayed is dependant on the broadcaster In List mode Press to return to the 100 page or initial page To reveal concealed text Some pages cover topics such as quizzes and jokes To discover the solutions press To hold a wanted page This function is included as it is part of the broadcast teletext system but you will not need it as this TV allows you to control the display of sub pages To ...

Страница 30: ...R L and R Red Audio White Green Blue Red Connecting an audio system You can enjoy high quality dynamic sound by connecting the TV to an audio system Notes DO NOT connect the DIGITAL AUDIO output terminal to the AC 3 RF input of a Dolby Digital Receiver with a built in Dolby Digital decoder Connect the DIGITAL AUDIO output terminal to the OPTICAL input of a receiver or processor Refer to the owner ...

Страница 31: ...uipment via the terminals located on the left side of the TV o 2 Please always refer to the owner s manual of the equipment to be connected for full details Connection example Left side of the TV Video Games Camcorder To select the side inputs press o until the video input mode list appears on the screen then press V or U to select VIDEO2 page 27 then press Q Before connecting any external equipme...

Страница 32: ...6 60 72 75 Hz XGA VESA 1024 5 768 60 70 75 Hz W XGA VESA 1280 5 768 60 75 Hz W XGA VESA 1360 5 768 60 Hz S XGA VESA 1280 5 1024 60 75 Hz However these signal formats are converted to match the number of pixels of the LCD panel Therefore the TV may not display small text properly If you connect this unit to your PC the compressed image is displayed in S XGA mode therefore the picture quality may de...

Страница 33: ...80 1024 60 75 Hz 1920 1080p 60Hz Horizontal Frequency 67 5 kHz H Pixel Clock Frequency 148 5 MHz Notes Some PC models cannot be connected to this TV If connecting a certain PC model that signal is particular the PC signal may not be detected correctly There is no need to use an adapter for computers with DOS V compatible mini D sub 15 pin terminal A bar may appear in the upper lower right or left ...

Страница 34: ...re Adjusting the Sampling Clock If the Sampling Clock does not match with the dot clock frequency of the PC blurred picture detail will occur or screen width will change or drift patterns in vertical lines may be apparent This function enables you to adjust it and optimize the picture 1 From the PC Settings menu press V or U to select Sampling Clock 2 Press Y or Z to optimize the picture Resetting...

Страница 35: ...vice The IP address you use should be a private address MAC Address You can view the fixed MAC address for the TV if one is installed 1 From the PREFERENCES menu select Network Setup and press Q 2 Press V or U to select MAC Address and press Q To connect the TV to a home network TV back view Cable or Phone jack Modem if available Router with Hub Server PC 1 2 2 2 3 1 Coaxial or telephone cable dep...

Страница 36: ...B When Auto Start is enabled you will be asked if you want to start the Media Player whenever a USB device is inserted If Auto Start is disabled or if you want to connect to a DMS on the network you must manually start the Media Player from the menu To change the Auto Start setting 1 From the APPLICATIONS menu press V or U to select USB Media Player and press Q 2 Press V or U to select Setup 3 Pre...

Страница 37: ...xxxxxxx jpg xxxxxxxxx jpg xxxxxxxxx jpg 5 20 xxxxxxxxx jpg xxxxxxxxx jpg xxxxxxxxx jpg xxxxxxxxx jpg xxxxxxxxx jpg xxxxxxxxx jpg xxxxxxxxx jpg xxxxxxxxx jpg The initial highlighted position will be on the top left thumbnail in the Multi View 1 Press V U Y or Z to move the highlight in one window If all of the photos will not fit in one screen when pressing Y at the top left thumbnail the screen wi...

Страница 38: ...crolling Note Using the zoom function while in the Slide Show mode will stop the slideshow and zoom in out the photo To select a photo from Play List While in the Single View mode or Slide Show mode you can select a different photo from the Play List 1 Press QUICK to open the Quick Menu from Single View mode or Slide Show mode 2 Press V or U to select Play List and press Q 3 Press Y or Z to select...

Страница 39: ... only You can resume playback from where it was last stopped Press v while playing the movie to memorize the stopped position On the Multi View screen if you select a movie whose stopped position has been memorized the message Resume Play will appear Select Yes to resume playback from the last stopped position Note If you play different content or exit Media Player the memorized stopped position w...

Страница 40: ...he Number button is used for direct jump If the 3 button is pressed playback will jump to the beginning of 3rd chapter Even if the playback content has authored chapters the Number button is used to jump directly to Auto Generated Chapter If the content has Authored Chapters Z z are using for Authored Chapters Notes Depending on the content data will not be operated The playback speed CC cc may no...

Страница 41: ...tom of the screen 2 Press again to remove the information Note The information may not be correctly displayed depending on the contents or DMS Closing the Music Player 1 Press EXIT File Compatibility See page 45 Using the MHL Function You can use the following functions by connecting the HDMI 4 port on the TV and the USB port on a mobile phone etc with the MHL cable MHL Mobile High definition Link...

Страница 42: ...ability with MHL devices of other manufacturers is not guaranteed Toshiba does not provide any guarantee therefore against operational failure such as that described below when an MHL source is connected to the TV No picture or sound Some of the functions do not work by remote operation from the TV If the MHL does not work properly also contact the manufacturer of the source device for advice on i...

Страница 43: ...096 Maximum number of files 1000 folder Some files may not be played depending on file size BMP bmp BMP yes no Movie AVI avi Video MPEG 2 MPEG 4 part2 H 264 MPEG 4 AVC DivX Xvid Sorenson H 263 FLV1 yes no USB Maximum number of files 1000 per folder Maximum viewable resolution Motion JPEG 640 480 Other 1920 1080 Some files may not be played Audio MPEG 1 2 Layer2 MPEG 1 2 Layer3 Dolby Digital AC 3 L...

Страница 44: ...2 Layer3 Dolby Digital AC 3 L PCM MOV mov Video H 264 MPEG 4 AVC MPEG 4 part2 yes no Audio MPEG 1 2 Layer3 MPEG 2 4 LC AAC MPEG 4 HE AAC MP4 mp4 m4v Video H 264 MPEG 4 AVC MPEG 4 part12 14 yes yes Audio MPEG 1 2 Layer3 MPEG 2 4 LC AAC MPEG 4 HE AAC ASF asf wmv Video VC 1 WMV9 yes no Audio WMA7 8 9 Std WMA9 Pro DivX divx div Video DivX 3 4 5 6 yes no Audio MPEG 1 2 Layer2 MPEG 1 2 Layer3 Dolby Digi...

Страница 45: ...3 MPEG 2 4 LC AAC Flash Video FLV1 flv swf Video Sorenson H 263 FLV1 H 264 MPEG 4 AVC yes no Audio MPEG 1 2 Layer3 MPEG 2 4 LC AAC L PCM ADPCM 3GPP 3gp Video MPEG 4 part2 H 264 MPEG 4 AVC yes no Audio MPEG 2 4 LC AAC AMR Motion JPEG avi mp4 mkv Video JPEG yes no Audio L PCM ADPCM Music MP3 mp3 MPEG 1 2 Layer 3 yes yes USB Maximum number of files 1000 per folder MP4 m4a MPEG 2 4 LC AAC yes yes WMA ...

Страница 46: ... 75 000 kHz 148 500 MHz Frame Packing 37 500 kHz 74 250 MHz Side by Side Half Top and Bottom 1920 1080i 16 9 59 940 60 000 Hz 33 716 33 750 kHz 74 176 74 250 MHz Side by Side Half Top and Bottom 50 000 Hz 28 125 kHz 74 250 MHz Side by Side Half Top and Bottom 1920 1080p 16 9 24 000 Hz 54 000 kHz 148 500 MHz Frame Packing 27 000 kHz 74 250 MHz Side by Side Half Top and Bottom 30 000 Hz 67 433 67 50...

Страница 47: ...53 727 25 C54 735 25 C55 743 25 C56 751 25 C57 759 25 C58 767 25 C59 775 25 C60 783 25 C61 791 25 C62 799 25 C63 807 25 C64 815 25 C65 823 25 C66 831 25 C67 839 25 C68 847 25 C69 855 25 C70 863 25 S mode OSD RF Frequency MHz S1 105 25 S2 112 25 S3 119 25 S4 126 25 S5 133 25 S6 140 25 S7 147 25 S8 154 25 OSD RF Frequency MHz S9 161 25 S10 168 25 S11 231 25 S13 238 25 S14 245 25 S15 252 25 S16 259 2...

Страница 48: ...ed using an extremely high level of precision technology however sometimes some pixels of the screen may be missing picture elements or have luminous spots This is not a sign of a malfunction The picture brightness varies when you display switch the TV on If you switch the TV on at 0 C and under wait until the warms up Multiple images The station may have broadcast difficulties Try another channel...

Страница 49: ... video tapes through PAL TV equipment Specifications LED LCD TV Model 40TL20 Series 46TL20 Series Power source 110V 240V AC 50 60Hz Power consumption 40 112 W 0 3 W standby 46 134 W 0 3 W standby Dimensions 40 923 mm W 628 mm H 240 mm D 46 1 056 mm W 703 mm H 287 mm D Mass Weight 40 14 5 kg 46 16 5 kg TV system Aerial input Channel coverage PAL B G CCIR VHF 2 12 UHF 21 69 CATV X Z 2 S1 S41 PAL I UK...

Страница 50: ...atories Dolby and the double D symbol are trademarks of Dolby Laboratories DivX DivX Certified DivX Plus HD and associated logos are trademarks of Rovi Corporation or its subsidiaries and it is used under license Covered by one or more of the following U S patents 7 295 673 7 460 668 7 515 710 7 519 274 MHL the MHL logo and Mobile High Definition Link are trademarks or registered trademarks of MHL...

Страница 51: ...GAGED IN A PERSONAL AND NON COMMERCIAL ACTIVITY AND OR WAS OBTAINED FROM A VIDEO PROVIDER LICENSED BY MPEG LA TO PROVIDE MPEG 4 VIDEO NO LICENSE IS GRANTED OR SHALL BE IMPLIED FOR ANY OTHER USE ADDITIONAL INFORMATION INCLUDING THAT RELATING TO PROMOTIONAL INTERNAL AND COMMERCIAL USES AND LICENSING MAY BE OBTAINED FROM MPEG LA L L C SEE HTTP WWW MPEGLA COM DLNA DLNA Certification Logo and DLNA CERT...

Страница 52: ......

Отзывы: