background image

56

(E) 32HL83

Using the T

V’s

F

eatur

es

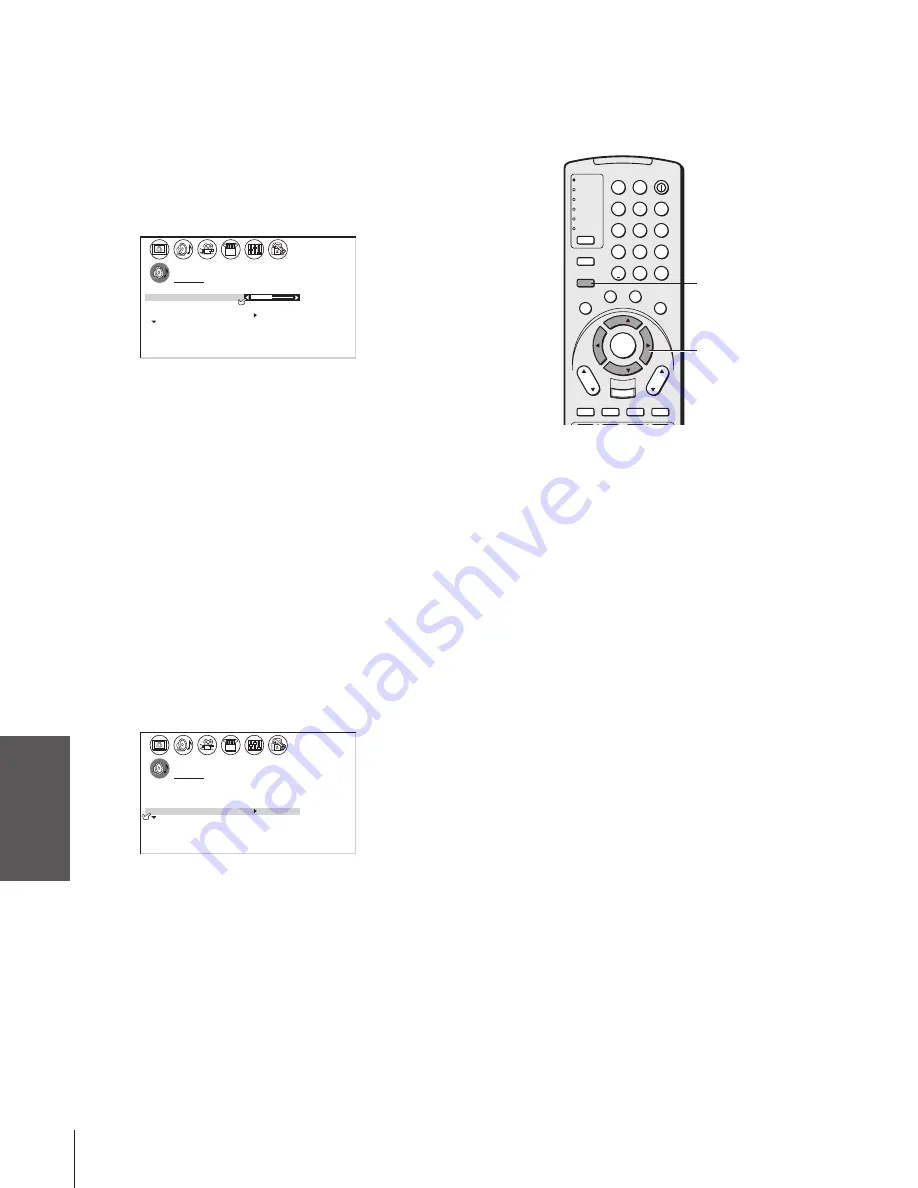
Adjusting the sound quality

You can change the quality of your TV’s sound by adjusting the bass,
treble, and balance.
To adjust the sound quality:

1. Press MENU, and then press 

x

 or 

 until the AUDIO menu

appears.

2. Press 

y

 or 

z

 to highlight the item you want to adjust (BASS,

TREBLE, or BALANCE).

AUD O

I

MTS
BASS

STEREO

5 0

5 0

0

TREBLE

BALANCE

RESET

3. Press 

x

 or 

 to adjust the level.

x

 makes the sound quality weaker or decreases the balance in the

right channel, depending on the item selected.

 makes the sound quality stronger or decreases the balance in

the left channel, depending on the item selected.

Resetting your audio adjustments

The RESET function returns your audio adjustments to the following
factory settings:

Bass ..................  center (50)
Treble ...............  center (50)
Balance ............  center (0)

To reset your audio adjustments:

1. Press MENU, and then press 

x

 or 

 until the AUDIO menu

appears.

2. Press 

y

 or 

z

 to highlight RESET.

3. Press 

x

 or 

. The menu displays “DONE.”

AUD O

I

MTS
BASS

STEREO

5 0

5 0

0

TREBLE

BALANCE

RESET

DONE

yzx


MENU

TV

CABLE/SAT

VCR

DVD

AUDIO1

AUDIO2

1

2

3

4

5

6

7

8

9

100/

0

ENT

POWER

+10

ACTION

MODE

PIC SIZE

MENU

LIGHT

SLEEP

ENTER

FAV

CH

VOL

EXIT

CH RTN

DVD RTN

DVD CLEAR

SLOW/DIR

SKIP/SEARCH

INPUT

RECALL

MUTE

LIN

K

THE

ATE

R

FAVORITE

INFO

GU

IDE

SE

TU

P

TITLE

SUB TITLE

AU

DIO

FAV

Содержание 32HL83

Страница 1: ... TV Record these numbers in the spaces below Refer to these numbers whenever you communicate with your Toshiba dealer about this TV Model number 32HL83 Serial number Introduction Connecting your TV Using the Remote Control Setting up your TV Using the TV s Features Appendix Index E ENGLISH F FRANÇAIS S ESPAÑOL E S F ...

Страница 2: ...h or pull a TV over Share our safety message about this hidden hazard of the home with your family and friends Thank you 2500 Wilson Blvd Arlington VA 22201 U S A Tel 703 907 7600 Fax 703 907 7690 www CE org CEA is the Sponsor Producer and Manager of the International CES Safety Precautions WARNING TO REDUCE THE RISK OF FIRE OR ELECTRIC SHOCK DO NOT EXPOSE THIS APPLIANCE TO RAIN OR MOISTURE Dear C...

Страница 3: ...e inserted completely to prevent blade exposure Important Safety Instructions 1 Read these instructions 2 Keep these instructions 3 Heed all warnings 4 Follow all instructions 5 Do not use this apparatus near water 6 Clean only with dry cloth 7 Do not block any ventilation openings Install in accordance with the manufacturer s instructions 8 Do not install near any heat sources such as radiators h...

Страница 4: ...nt lamp is LCD panel contains a small amount of mercury When the TV reaches the end of its useful life ask a qualified service technician to properly dispose of the TV or follow local ordinances or regulations for disposal 25 Always make sure the antenna system is properly grounded to provide adequate protection against voltage surges and built up static charges see Section 810 of the National Ele...

Страница 5: ...ing the cinema mode 37 Using the POP double window feature 38 Switching the main and POP pictures 39 Freezing the POP picture 39 Adjusting the size of the double window 39 Double Window with keeping aspect ratio 40 Using the programmed channel search function 40 Using the favorite channel search function 41 About the auto favorite feature 41 Using the LOCKS menu 42 Entering the PIN code 42 If you ...

Страница 6: ...rols on the TV if they have the same name as those referred to on the remote control Please read all the safety and operating instructions carefully and keep this manual for future reference Supplied accessories Check that you have the accessories and items shown Note Regarding Quick Connect Guide The Quick Connect Guide automatically appears on screen the first time the TV is turned on This featu...

Страница 7: ...W DIR PAUSE STEP AM FM SKIP SEARCH PLAY REW FF STOP POP DIRECT CH FREEZE SPLIT CH SCAN SOURCE SWAP POP CH REC INPUT RECALL MUTE LINK THEATER FAVORITE INFO GUIDE S ETUP TITLE SUB TITLE AUDI O FAV TV front DVI HDCP AUDIO IN Volume x Menu x Channel zy Menu zy MENU ANT 1 IN Remote sensor Remote control Exploring your new TV You can operate your TV using the buttons on the front panel or the remote con...

Страница 8: ...rough the TV see page 16 NOTE REGARDING PICTURE QUALITY When connecting video equipment to your Toshiba TV For GOOD picture quality Use a standard stereo A V yellow video cable For BETTER picture quality If your equipment has an S video connector use an S video cable instead of a standard yellow video cable You still must connect the standard red and white audio cables for full system connection b...

Страница 9: ...w premium channels select ANT 2 tune the TV to channel 3 or 4 whichever channel is vacant in your area and use the converter box to change channels You will need three coaxial cables ANT 1 ANT 2 OUT VIDEO VAR AUDIO ANT 75 R R R L L O AUDIO L MONO OUT TheaterLinkOUT DVI HDCO IN IN OUT Cable converter box Note When you use a converter box with your TV the remote control will not operate some feature...

Страница 10: ...TREAM HD 1 COLOR STREAM HD 2 R L PB PR Y ANT 1 ANT 2 OUT VIDEO VAR AUDIO ANT 75 AUDIO AUDIO R R R L L PB PR Y AUDIO AUDIO L MONO IN IN IN OUT DVI HDCP AUDIO IN OUT OUT Cable signal splitter IN IN OUT Cable converter box Note If you have a mono VCR connect L Mono to VCR Audio OUT using only one audio cable If you have a VCR with S video use an S video cable instead of a standard video cable When yo...

Страница 11: ...M HD 1 COLOR STREAM HD 2 R L PB PR Y ANT 1 ANT 2 OUT VIDEO VAR AUDIO ANT 75 AUDIO AUDIO R R R L L PB PR Y AUDIO AUDIO L MONO IN IN IN OUT DVI HDCP AUDIO IN Note For the highest possible picture quality from a DVD player satellite receiver without component video or DVI HDCP use an S video cable between the TV and DVD player satellite receiver If your DVD player satellite receiver is compatible wit...

Страница 12: ...AM HD 2 R L PB PR Y ANT 1 ANT 2 OUT VIDEO VAR AUDIO ANT 75 AUDIO AUDIO R R R L L PB PR Y AUDIO AUDIO L MONO IN IN IN OUT DVI HDCP AUDIO IN Stereo VCR From Antenna TV DVD player with component video Note For the highest possible picture quality use component video cables or a DVI D digital single link cable between the TV and DVD player You can connect component video cables from the DVD player to ...

Страница 13: ... Y ANT 1 ANT 2 OUT VIDEO VAR AUDIO ANT 75 AUDIO AUDIO R R R L L PB PR Y AUDIO AUDIO L MONO IN IN IN OUT DVI HDCP AUDIO IN DTV receiver with component video Note For the highest possible picture quality use component video cables or a DVI D digital single link cable between the TV and DTV receiver You can connect component video cables from the DTV receiver to either set of ColorStream terminals on...

Страница 14: ...use S video cables instead of standard video cables Do not connect both a standard video cable and an S video cable to VIDEO 1 or VIDEO 2 at the same time or the picture performance will be unacceptable Do not connect the same VCR to the output and input terminals on the TV at the same time To dub or edit VCR 2 must select Line IN and the TV must select VIDEO 1 The Video OUT terminals does not out...

Страница 15: ...OUT L MONO S VIDEO VIDEO 1 VIDEO 2 VIDEO R R L COLOR STREAM HD 1 COLOR STREAM HD 2 R L PB PR Y ANT 1 VIDEO VAR AUDIO AUDIO AUDIO R R R L L PB PR Y AUDIO AUDIO L MONO IN IN IN OUT TheaterLinkOUT DVI HDCP AUDIO IN DVI HDCO IN TV DVI HDCP device for example set top box or DVD player DVI HDCP Digital Visual Interface High bandwidth Digital Content Protection EIA CEA 861 compliance covers the transmiss...

Страница 16: ...her end of the TheaterLink cable into the TV s TheaterLink OUT terminal You will need one TheaterLink cable included one piece of double sided mounting tape included L MONO S VIDEO VIDEO 1 VIDEO 2 VIDEO R R L COLOR STREAM HD 1 COLOR STREAM HD 2 R L PB PR Y ANT 1 VIDEO VAR AUDIO AUDIO AUDIO R R R L L PB PR Y AUDIO AUDIO L MONO IN IN IN OUT TheaterLinkOUT DVI HDCP AUDIO IN DVI HDCO IN POMER TheaterL...

Страница 17: ...plifier set the volume of both to a moderate level and turn off the TV s built in speakers see Turning off the built in speakers on page 57 You will need one pair of standard audio cables LINE IN L R L MONO S VIDEO VIDEO 1 VIDEO 2 VIDEO R R L COLOR STREAM HD 1 COLOR STREAM HD 2 R L PB PR Y VIDEO VAR AUDIO AUDIO AUDIO R R R L L PB PR Y AUDIO AUDIO L MONO IN IN IN OUT TheaterLinkOUT DVI HDCP AUDIO I...

Страница 18: ... control 2 Install two AA size alkaline batteries Match the and signs on the batteries to the signs on the battery compartment 3 Slide the battery cover back on to the remote control until the lock snaps Note Your TV s remote control may not operate certain features on your VCR cable TV converter or other electronic device Refer to the owner s manuals for your other devices to determine their avai...

Страница 19: ...it 9 Digit 9 Aux Digit 9 Digit 9 ACTION Action Menu Menu 100 100 100 10 0 Digit 0 Digit 0 Digit 0 Digit 0 Digit 0 Digit 0 Digit 0 Digit 0 ENT H Enter CH Enter GUIDE SETUP Guide DVD setup INFO TITLE INFO TITLE Top menu FAVORITE Favorites Favorites Subtitle SUBTITLE THEATERLINK TheaterLink Audio AUDIO MENU Menu Action Menu ACTION Menu yz FAV yz Menu select Menu select Menu select FAV yz x Menu selec...

Страница 20: ... TV TV TV SWAP POP Swap TV TV TV TV TV TV TV CH SCAN POP Ch scan TV TV TV TV TV TV TV SOURCE POP Source TV TV TV TV TV TV TV Notes will send nothing TV will jump to TV VCR will jump to last active VCR or DVD Active VCR DVD is defined as the mode that remains for a minimum of 5 seconds or if a key is pressed in that mode The VOLUME and MUTE will jump to TV by default When the volume is unlocked all...

Страница 21: ... CH y and PLAY Invalid keys will be ignored while in program mode To cycle through each available device code and sample its functions 1 Press MODE to select the mode you want to set up 2 While holding down the RECALL button press 8 5 0 0 The remote control will enter program mode 3 Point the remote control at the target device and press POWER or other function buttons that are available to be sam...

Страница 22: ... SAT CBL SAT CBL SAT AUD1 AUD2 VCR VCR VCR VCR VCR AUD1 AUD2 DVD DVD DVD DVD DVD AUD1 AUD2 AUD1 AUD1 AUD1 AUD1 AUD1 AUD1 AUD1 AUD2 AUD2 AUD2 AUD2 AUD2 AUD2 AUD2 To reset the volume controls to the original device code 1 While holding down the RECALL button press 8 0 0 0 2 Press VOL z The Mode indicator will blink four times unlocked Operational feature reset 8900 This feature clears all setup feat...

Страница 23: ... 0123 0124 0131 0146 0101 0102 0170 0172 0174 0176 0183 REALISTIC 0124 0105 0136 0109 0140 0127 SAMSUNG 0137 0102 0104 0133 SAMTRON 0163 SANSUI 0139 0126 0120 0152 SANYO 0105 0109 0113 SCOTT 0101 0102 0104 0109 0138 0140 0147 0148 0126 0120 SEARS 0105 0106 0107 0108 0100 SHARP 0135 0136 0167 0162 SHINTOM 0117 SIGNATURE 2000 0127 0135 SINGER 0117 SONY 0128 0129 0130 0153 0154 0155 SV2000 0127 SYLVA...

Страница 24: ... DENON 7131 FISHER 7103 JENSEN 7114 JVC 7129 7130 7132 7133 KENWOOD 7100 7107 MARANTZ 7102 NAKAMICHI 7105 ONKYO 7108 7109 7113 PANASONIC 7116 7118 PHILIPS 7122 7121 PIONEER 7104 7106 RCA 7126 7127 7128 7134 7135 SANSUI 7105 7110 7112 SHARP 7131 SONY 7119 7120 TEAC 7110 7111 7115 TECHNICS 7116 7118 7117 YAMAHA 7101 7102 Laser Disc setup codes Brand Code DENON 5114 HITACHI 5100 KENWOOD 5102 5103 MAG...

Страница 25: ...nds page 21 PIC SIZE cycles through the five pictures sizes Natural Theater Wide 1 2 3 and Full page 34 FAVORITE allows access to the favorite channel search function page 41 MENU allows access to on screen programming menus page 26 ENTER sets programming menu information page 26 yz x select or adjust programming menus page 26 FAV yzcycles through favorite channels page 32 CH yz cycles through pro...

Страница 26: ...C I NEMA MODE TruBass OFF OFF SELECT LANGUAGE ANT ADD ADD ERASE TV CH PROGRAM CABLE CABLE 1 ANT1 2 ENGL SH I QU I CK GRAY LEVEL BACK L I GH I NG CONNECT UP SET SELECT CUSTOM T I MER ON CC OFF FAVOR I CH 0 0 h 0 0 m SLEEP 0 h 0 0 m 1 TE FAVOR BACKGROUND I CH2 TE V I DEO CH L A B E L LABEL I NG END EXIT SELECT END LOCKS V CH I P V CH FRONT PANEL LOCK GAME T I MER NEW P I N I LOCK LOCK CODE DEO ENABL...

Страница 27: ...en press x or until the SET UP menu appears 2 Press y or z to highlight QUICK CONNECT GUIDE SET UP LANGUAGE ANT ADD ADD ERASE TV CH PROGRAM CABLE CABLE 1 ANT1 ANT2 2 ENGL SH I QU I CK CONNECT GU I DE GRAY LEVEL 1 15 BACK L I GHT I NG 3 Press x or to enter the Quick Connect Guide mode Advance through the setup according to the guide displayed on screen Press x or to make a selection Press MENU to c...

Страница 28: ...put sources ANT 1 or ANT 2 To select the antenna input using the INPUT or TV VIDEO button Press INPUT on the remote control or TV VIDEO on the TV see illustrations below The current signal source displays in purple SOURCE SELECTION 0 ANT 1 1 VIDEO 1 2 VIDEO 2 3 VIDEO 3 4 5 C o l o r S t r e a m H D 1 C o l o r S t r e a m H D 2 6 DV I 7 ANT 2 0 7 TO SELECT SOURCE SELECTION 0 ANT 1 1 VIDEO 1 2 VIDE...

Страница 29: ...the channels are programmed automatically you can manually add or erase individual channels see page 30 To program channels automatically 1 Press MENU and then press x or until the SET UP menu appears 2 Press y or z until TV CABLE is highlighted 3 Press x or to highlight either TV or CABLE depending on which you use If you use an antenna highlight TV if you use cable highlight CABLE SET UP LANGUAG...

Страница 30: ...annel Press Channel y or z on the TV or remote control To change to a specific channel programmed or unprogrammed Press the Channel Number buttons 0 9 and 100 For channels 100 and higher press the 100 button and then the next two numbers For example to select channel 125 press 100 2 5 Changing channels using SpeedSurf To change to a specific programmed channel using SpeedSurf Press and hold Channe...

Страница 31: ...switching back and forth between the last two channels that were selected Programming your favorite channels You can preset up to 7 of your favorite channels each for the FAVORITE CH1 and FAVORITE CH2 modes using the Favorite Channel Programming feature Because this feature scans through only your favorite channels it allows you to skip other channels you do not normally watch To program your favo...

Страница 32: ...VOR I CH1 TE V BACKGROUND I DEO CH L A B E L LABEL I NG 4 Press yzx to highlight the channel you want to clear and then press ENTER CUSTOM CH I NPUT TV CABLE CLEAR ALL 2 15 0 6 18 8 20 T I MER ON 00h00m SLEEP 0h00m CC FAVOR I CH OFF 2 TE FAVOR I CH1 TE V BACKGROUND I DEO CH L A B E L LABEL I NG 5 Repeat step 4 for other channels To clear all favorite channels at once Press y or z to highlight CLEA...

Страница 33: ...L LABEL I NG 4 Press the Channel Number buttons to select a channel you want to label 1 2 3 4 5 6 7 8 9 10 11 12 13 14 15 16 17 18 CUSTOM CH LABEL CLEAR I NPUT 6 T I MER ON 00h00m SLEEP 0h00m CC FAVOR I CH OFF 2 TE FAVOR I CH1 TE V BACKGROUND I DEO CH L A B E L LABEL I NG 5 Press z to highlight LABEL 6 Repeatedly press x or to select a character for the first space and then press ENTER CUSTOM CH L...

Страница 34: ... sizes will vary depending on he format of the program you are viewing Select the picture size that displays the current program the way that looks best to you Selecting the picture size 1 Press PIC SIZE on the remote control 2 Press the corresponding number button to select the desired picture size as described below and on the next page P I CTURE S I ZE 0 1 2 3 4 NATURAL THEATER W I DE 1 THEATER...

Страница 35: ...ortion but the left and right edges are stretched wider to fill the screen A small part of the picture at the top and bottom is hidden however this mode cannot be scrolled Theater Wide 2 picture size The entire picture is uniformly enlarged it is stretched the same amount both wider and taller retains its original proportion Part of the picture at the top and bottom is hidden To view the hidden ar...

Страница 36: ...eater Wide picture Theater Wide 2 and 3 only 1 Press PIC SIZE to select either Theater Wide 2 or 3 mode 2 Press MENU and then press x or until the THEATER menu appears 3 Press y or z to highlight PICTURE SCROLL THEATER OFF OFF OFF OFF WOW SRS 3D Do by V r t u a l l i FOCUS T r uB a s s OFF P I C T U R E S I Z E AUTO ASPECT P I C T U R E S C R O L L CINEMA MODE FILM 4 Press x or to display the Scro...

Страница 37: ...3 2 pulldown processed from a DVD player connected to the ColorStream component video or DVI HDCP inputs on the TV smoother and more natural motion can be obtained by setting the CINEMA MODE to FILM auto To set the CINEMA MODE to FILM auto 1 Press MENU and then press x or until the THEATER menu appears 2 Press y or z to highlight CINEMA MODE 3 Press x or to select FILM auto THEATER P I CTURE S I Z...

Страница 38: ...the POP window in the following two ways To change to a specific channels press POP DIRECT CH While POP is on the screen press the Channel Number buttons 0 9 and 100 To change the next programmed channels press POP CH yz If the V CHIP feature is active and you try to watch a TV program that exceeds your set rating limits the program will be blocked see Using the V CHIP menu on page 43 POP BLOCKED ...

Страница 39: ...To erase the still POP window Press EXIT Adjusting the size of the double window When the input signals of the main and POP pictures are 480i you can adjust the size of each window Continuously pressing x or changes the size in 9 steps ENTER FAV CH TV VCR VOL EXIT DISC CH RTN DVD RTN DVD CLEAR SLOW DIR PAUSE STEP AM FM SKIP SEARCH PLAY REW FF STOP POP DIRECT CH FREEZE SPLIT CH SCAN SOURCE SWAP POP...

Страница 40: ...gins a seven picture scan of your programmed channels in the POP window CABLE 10 3 4 5 6 7 8 9 10 2 Press yzx to select one of the seven pictures becomes a moving picture The main picture is an always moving picture 3 Press ENTER to display the channel you selected in step 2 as a normal picture 3 4 5 6 7 8 9 ENTER FAV CH TV VCR VOL EXIT DISC CH RTN DVD RTN DVD CLEAR SLOW DIR PAUSE STEP AM FM SKIP ...

Страница 41: ...el you selected in step 2 as a normal picture 6 3 4 5 6 7 8 9 Every time you press FAVORITE the POP window scans your favorite channels in the following order FAVORITE CH1 FAVORITE CH2 Off About the auto favorite feature If your TV is in the program lock mode after 4 seconds the TV starts the auto favorite channel search function See page 45 for details 3 4 5 6 7 8 9 CABLE TH I S PROGRAM HAS BEEN ...

Страница 42: ...ns 0 9 to enter the 4 digit PIN code used for blocking channels and then press ENTER 1 1 2 3 4 5 6 7 8 9 10 11 12 13 14 15 16 17 18 1 2 3 4 5 6 7 8 9 10 11 12 13 14 15 16 17 18 2 3 4 5 6 7 8 9 10 11 12 13 14 15 16 17 18 19 20 21 22 23 24 25 26 27 28 29 30 31 32 33 34 35 1 2 3 4 5 6 7 8 9 10 11 12 13 14 15 16 17 18 19 20 21 22 23 24 25 26 27 28 29 30 31 32 33 34 35 LOCKS BLOCK NG RESET I P I N CODE...

Страница 43: ...able for children under 14 years of age D Intensely suggestive dialog L Strong coarse language S Intense sexual situations V Intense violence PG Parental Guidance Suggested This program contains material that parents may find unsuitable for younger children D Some suggestive dialog L Infrequent coarse language S Some sexual situations V Moderate violence G General Audience Most parents would find ...

Страница 44: ...LOCK I LOCK DEO ENABLE TV RAT MPAA I NG RAT I NG BLOCK I NG BLOCK I NG OPT I ON ON OFF NEW FRONT PANEL LOCK P I N CODE OFF GAME T I MER OFF LOCKS MPAA TV NONE RATING UNRATED BLOCK I NG OPT I ON OFF ON OFF V CH I P MENU TV NONE RATING Press x or to select ON lock or OFF unlock for programs rated NONE in the TV PARENTAL GUIDELINES LOCKS MPAA TV NONE RATING UNRATED BLOCK I NG NG OPT I ON OPT EMERGENC...

Страница 45: ...umber buttons unless you clear the setting You can lock a maximum of nine channels To lock channels 1 From the LOCKS menu select CH LOCK 2 Press x or to display the CH LOCK menu CH INPUT will be highlighted 3 Press the Channel Number buttons to enter the channel you want to lock 4 Press ENTER 1 2 3 4 5 6 7 8 9 10 11 12 13 14 15 16 17 18 19 20 21 22 23 24 25 26 27 28 29 30 31 32 33 34 35 LOCKS V CH...

Страница 46: ... 0 0 0 0 TV CABLE 0 0 ENABLE TV RAT MPAA I NG RATI NG BLOCK I NG BLOCK I NG OPTI I ON ON CH NPUT CLEAR ALL NEW PI N CODE FRONT PANEL LOCK GAME T I MER Locking video inputs You can use the VIDEO LOCK feature to lock out the video input sources VIDEO 1 VIDEO 2 VIDEO 3 ColorStream HD1 ColorStream HD2 DVI and channels 3 and 4 You will not be able to select the locked input sources with the TV VIDEO IN...

Страница 47: ...17 18 2 3 4 5 6 7 8 9 10 11 12 13 14 15 16 17 18 19 20 21 22 23 24 25 26 27 28 29 30 31 32 33 34 35 1 2 3 4 5 6 7 8 9 10 11 12 13 14 15 16 17 18 19 20 21 22 23 24 25 26 27 28 29 30 31 32 33 34 35 LOCKS V CH I P V I LOCK DEO ENABLE TV RAT MPAA I NG RAT I NG BLOCK I NG BLOCK I NG OPT I ON ON OFF CH LOCK NEW FRONT RANEL LOCK GAME TIMER OFF P I N CODE If a button on the front panel is pressed the mess...

Страница 48: ...mory with the SAVE NEW PREFERENCE feature see page 49 You can keep these settings or choose factory set options as described under Selecting the picture mode above Mode Picture Quality Sports Bright and dynamic picture factory setting Standard Standard picture setting factory setting Movie Movie like picture setting factory setting Preference Your personal preferences Selection x Pressing contrast...

Страница 49: ... and then press x or until the PICTURE menu appears 2 Press y or z to highlight CableClear DNR 3 Press x or to highlight AUTO To turn off CableClear DNR Highlight OFF in step 3 above Selecting the color temperature You can change the quality of the picture by selecting from three preset color temperatures cool medium and warm To select the color temperature 1 Press MENU and then press x or until t...

Страница 50: ...below You can select ANT 1 VIDEO 1 VIDEO 2 VIDEO 3 ColorStream HD1 ColorStream HD2 DVI or ANT 2 depending on which input terminals are used to connect your devices see Connecting your TV on pages 8 17 SOURCE SELECTION 0 ANT 1 1 VIDEO 1 2 VIDEO 2 3 VIDEO 3 4 5 C o l o r S t r e a m H D 1 C o l o r S t r e a m H D 2 6 DV I 7 ANT 2 0 7 TO SELECT SOURCE SELECTION 0 ANT 1 1 VIDEO 1 2 VIDEO 2 3 VIDEO 3 ...

Страница 51: ... can change the background of the menu display by selecting from two preset types shaded and solid black To select the background 1 Press MENU and then press x or until the CUSTOM menu appears 2 Press y or z to highlight BACKGROUND 3 Press x or to select either a SHADED or SOLID background 1 1 2 3 4 5 6 7 8 9 10 11 12 13 14 15 16 17 18 1 2 3 4 5 6 7 8 9 10 11 12 13 14 15 16 17 18 2 3 4 5 6 7 8 9 1...

Страница 52: ...r C4 C1 displays translation of the primary language in your area Note If the program or video you selected is not closed captioned no captions will display on screen Giant pandas eat leaves To view text highlight T1 T2 T3 or T4 Note If text is not available in your area a black rectangle may appear on screen If this happens turn off the Closed Caption feature WORLD WEATHER Temps Current F C Weath...

Страница 53: ...Every time you press the button the time display will increase by 10 minutes up to 3 hours 0h00m 0h10m 0h20m 2h50m 3h00m 0h00m To cancel the sleep timer Press SLEEP until it is set to 0h00m The timer can also be set using the on screen menu 1 Press MENU and then press x or until the CUSTOM menu appears 2 Press y or z to highlight SLEEP 3 After the number position starts to blink press the Number b...

Страница 54: ...ONO 5 0 5 0 0 TREBLE BALANCE RESET You can leave your TV in STEREO mode because it will automatically output the type of sound being broadcast stereo or monaural The word STEREO or SAP displays in yellow in the menu when the TV receives the signal If the stereo sound is noisy select MONO to reduce the noise To listen to SAP if available 1 Press MENU and then press x or until the AUDIO menu appears...

Страница 55: ...urround sound feature The WOW surround sound features SRS 3D FOCUS and TruBass expand the audio listening field wider and deeper to create exceptional sound quality from the TV s speakers The WOW features use stereo signals from a TV broadcast or video input SRS 3D Surround sound effect FOCUS Vocal emphasis effect TruBass Bass expansion level HIGHT LOW or OFF To adjust the WOW feature 1 Select STE...

Страница 56: ...er or decreases the balance in the left channel depending on the item selected Resetting your audio adjustments The RESET function returns your audio adjustments to the following factory settings Bass center 50 Treble center 50 Balance center 0 To reset your audio adjustments 1 Press MENU and then press x or until the AUDIO menu appears 2 Press y or z to highlight RESET 3 Press x or The menu displ...

Страница 57: ...ight OFF in step 3 above Turning off the built in speakers Use this feature to turn the TV speakers off when you connect an audio system see Connecting an audio system on page 18 To turn off the built in speakers 1 Press MENU and then press x or until AUDIO menu appears 2 Press y or z to highlight SPEAKERS 3 Press x or to highlight OFF AUD O I SBS SBS LEVEL ON ON OFF MA I N 8 0 O N OFF SPEAKERS AU...

Страница 58: ...Sound feature limits he highest volume level to prevent extreme changes in volume when the signal source is changed for example to prevent the sudden increase in volume that often happens when a TV program switches to a commercial To turn on the StableSound feature 1 Press MENU and then press x or until the AUDIO menu appears 2 Press y or z to highlight STABLE SOUND 3 Press x or to select ON AUD O...

Страница 59: ...k lighting feature To adjust the back lighting 1 Press MENU and then press x or until the SET UP menu appears 2 Press y or z to highlight BACK LIGHTING SET UP LANGUAGE ANT ADD ADD ERASE TV CH PROGRAM CABLE CABLE 1 ANT1 ANT2 2 ENGL SH I QU I CK CONNECT GU I DE GRAY LEVEL 1 15 BACK L I GHT I NG 3 Press x or to adjust the screen brightness yzx MENU TV CABLE SAT VCR DVD AUDIO1 AUDIO2 1 2 3 4 5 6 7 8 9...

Страница 60: ... Channel number or video mode selected Remaining time of ON SLEEP time if set Channel label if set Stereo or SAP audio status V CHIP rating status Picture size 1 2 3 4 5 6 7 8 9 10 11 12 13 14 15 16 17 18 33 34 35 33 34 35 ANT ABCD FULL STEREO SAP TV ON T I MER 12h34m SLEEP T I MER 1h23m L V PG CABLE 1 6 Viewing the demonstration mode The demonstration mode will demonstrate several of your TV s fe...

Страница 61: ... E EDID 1 3 compliant DVI D uncompressed high speed digital single link connection Suggested input scan rates 1080i 720p 480p 480i Headphones jack 3 5 mm stereo Appendix Specifications Design and specifications are subject to change without notice Never service or remodel the TV set by yourself It may expose you to a fire hazard or dangerous voltage TheaterLink OUTPUT 3 V p p 10k ohm Dimensions Wi...

Страница 62: ... corresponds with the signal source type cable company or outside antenna Black box appears on the screen The closed caption feature may be set to one of the Text modes T1 T2 T3 or T4 Turn closed captioning OFF Unable to select a certain channel The channel may be locked out with the CH LOCK feature or erased with the ADD ERASE feature Multiple images The station may have broadcast difficulties Tr...

Страница 63: ...ties to original consumers in the United States THESE LIMITED WARRANTIES EXTEND TO THE ORIGINAL CONSUMER PURCHASER OR ANY PERSON RECEIVING THIS LCD TV AS A GIFT FROM THE ORIGINAL CONSUMER PURCHASERAND TO NO OTHER PURCHASER OR TRANSFEREE PRODUCTS PURCHASED IN THE U S A AND USED IN CANADA ARE NOT COVERED BY THESE WARRANTIES PRODUCTS PURCHASED IN CANADA AND USED IN THE U S A ARE NOT COVERED BY THESE ...

Страница 64: ...ts caused by misuse accident Acts of God such as lightning or fluctuations in electric power improper installation improper maintenance or use in violation of instructions furnished by TCL or to units that have been modified or had the serial number removed altered defaced or rendered illegible How to Obtain Warranty Services If after following all of the operating instructions in this manual and ...

Страница 65: ...els 33 Labeling video inputs 51 Language selection 28 Last mode memory 60 Locking channels 45 Locking video inputs 46 LOCK menu 42 Menu system 26 MTS feature 54 MUTE button 54 O P Q ON timer 53 Picture adjustments COLOR TEMPERATURE 49 Picture mode 48 Picture quality 50 Picture out picture POP POP CH yz buttons 38 SOURCE button 38 FREEZE button 39 SWAP button 39 Picture scroll 36 Picture size selec...

Страница 66: ... TEL 808 591 9281 Printed in Japan HEAD OFFICE 82 TOTOWA ROAD WAYNE NEW JERSEY 07470 NATIONAL SERVICE DIVISION 1420B TOSHIBA DRIVE LEBANON TN 37087 ColorStream and StableSound are registered trademarks of Toshiba America Consumer Products Inc SurfLock is trademark of Toshiba America Consumer Products Inc Dolby and the double D symbol are registered trademarks of Dolby Laboratories Manufactured und...

Отзывы: