Toshiba 26HL37 Скачать руководство пользователя страница 5

5

HL37 (E/F) Web 213:276

Choosing a location for your LCD TV

To Display your LCD TV on the included Pedestal 
Stand: 

Observe the following safety precautions:

1) Read and Follow the pedestal assembly instructions included 

with the pedestal.

CAUTION:

 Before beginning pedestal assembly, carefully lay 

the front of the LCD Panel face down on a flat, cushioned 
surface such as a quilt or blanket. Leave the bottom of the unit 
protruding over the edge of the surface and assemble pedestal 
as indicated below.

Note: 

Extreme care should always be used when attaching 

the pedestal stand to avoid damage to the LCD panel.

2) Place the TV on a sturdy, level surface that can support the 

weight of the TV.

3) Be sure to secure the TV to a wall, pillar, surface, or other 

immovable structure. To secure the TV in this manner, use the 
included strap located at the rear of the pedestal stand. (

-

 item 

20, page 3).

To Display your LCD TV using a Wall Bracket: 

If you decide to wall mount your LCD TV, always use a UL-
listed wall bracket appropriate for the size and weight of the 
LCD TV (

-

 page 2) :

1)

CAUTION:

 Two people are required for installation. 

2) Unplug and remove any cables and/or other component 

connectors from the rear of the TV.

3) Follow the instructions provided with your wall bracket. 

Before proceeding, make sure the appropriate bracket(s) are 
attached to the wall and the back of the TV as described in the 
instructions provided with the wall bracket.

4) After attaching the appropriate bracket(s) to the wall and the 

back of the TV, remove the pedestal stand from the TV as 
described below.

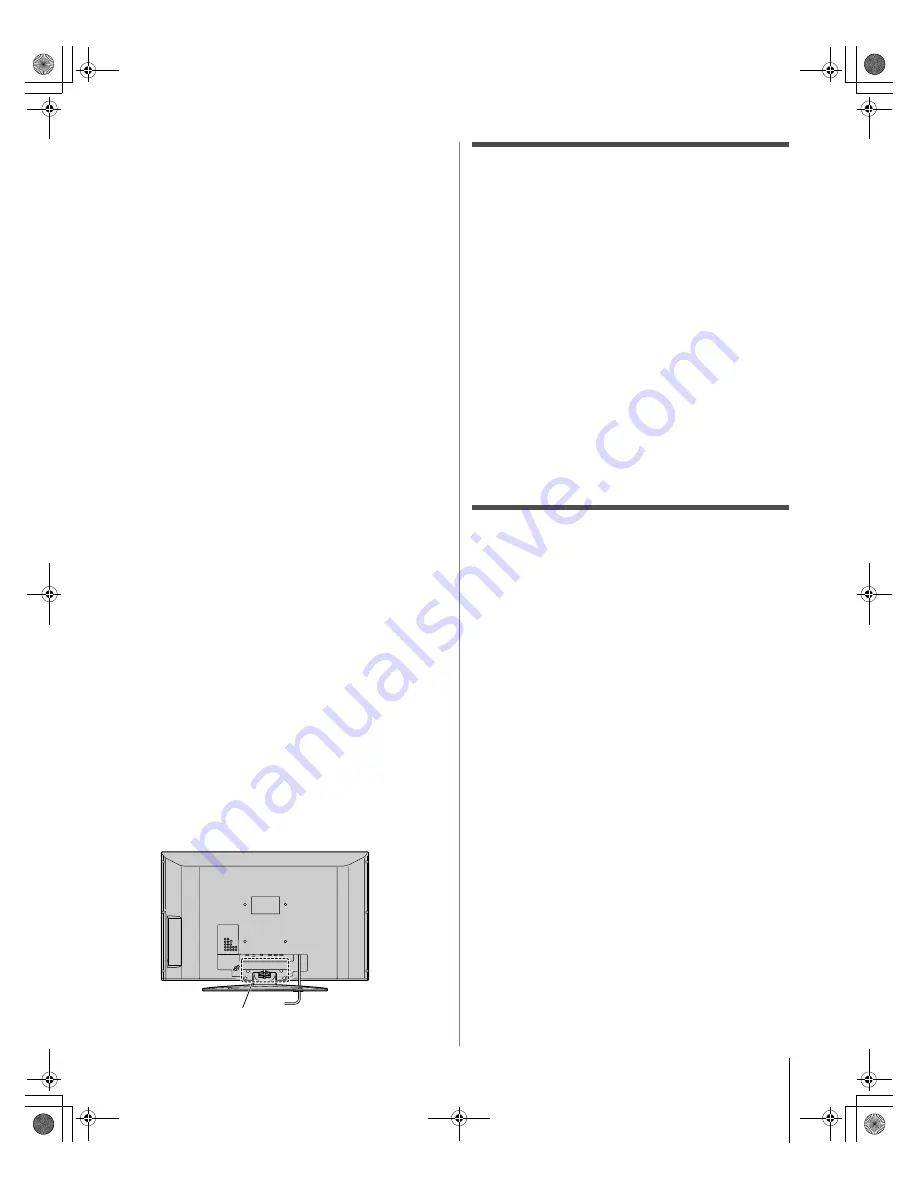
Removing the Pedestal Stand

1) Carefully lay the front of the unit face down on a flat, 

cushioned surface such as a quilt or blanket. Leave the stand 
protruding over the edge of the surface.

Note: 

Extreme care should always be used when removing 

the pedestal stand to avoid damage to the LCD panel.

2) Remove the jack pack cover on the back of the TV to expose 

the pedestal stand screws. The jack pack cover can be removed 
without tools.

3) Remove the five screws shown in the diagram below. This will 

allow removal of the pedestal stand.

4) Once you have removed all five screws holding the pedestal 

stand in place, remove the pedestal stand from the TV by 
sliding the pedestal stand away from the TV.

Important notes about your LCD 
TV

The following symptoms are technical limitations of LCD 
Display technology and are not an indication of malfunction; 
therefore, Toshiba is not responsible for perceived issues 
resulting from these symptoms.

1) An afterimage (ghost) may appear on the screen if a fixed, non-

moving image is displayed for a long period of time. The 
afterimage is not permanent and will disappear in a short period 
of time.

2) The LCD panel contained in this TV is manufactured using an 

extremely high level of precision technology; however, there 
may be an occasional pixel (dot of light) that does not operate 
properly (does not light, remains constantly lit, etc.). This is a 
structural property of LCD technology, is not a sign of 
malfunction, and is not covered under your warranty. Such 
pixels are not visible when the picture is viewed from a normal 
viewing distance.

Note: 

Interactive video games that involve shooting a “gun” 

type of joystick at an on-screen target may not work with this 
TV.

Trademark Information

• WOW, SRS and 

l

 symbol are trademarks of SRS Labs, Inc.

WOW technology is incorporated under license from SRS Labs, Inc.

• HDMI, the HDMI logo and High-Definition Multimedia Interface are 

trademarks or registered trademarks of HDMI Licensing LLC.

Five screws

267470726HL37_EN.book  Page 5  Friday, July 6, 2007  7:44 PM

Содержание 26HL37

Страница 1: ...TV Record these numbers in the spaces below Refer to these numbers whenever you communicate with your Toshiba dealer about this TV Model number Serial number For an overview of steps for setting up your new TV see page 7 A high definition tuner and programming are required to view High Definition TV broadcasts Please contact your cable or satellite provider 26HL37 ...

Страница 2: ...into the TV a Carefully read and understand the other enclosed instructions for proper use of this product a Do not allow children to climb on or play with furniture and TVs a Avoid placing any item on top of your TV such as a VCR remote control or toy that a curious child may reach for a Remember that children can become excited while watching a program and can potentially push or pull a TV over ...

Страница 3: ...e TV contains glass and a toxic liquid If the liquid comes in contact with your mouth or eyes or your skin is cut by broken glass rinse the affected area thoroughly with water and consult your doctor ALWAYS contact a service technician to inspect the TV any time it has been damaged or dropped 15 CAUTION To reduce the risk of electric shock do not use the polarized plug with an extension cord recep...

Страница 4: ...f your TV from lightning and power surges always unplug the power cord and disconnect the antenna from the TV if you leave the TV unattended or unused for long periods of time 34 During normal use the TV may make occasional snapping or popping sounds This is normal especially when the unit is being turned on or off If these sounds become frequent or continuous unplug the power cord and contact a T...

Страница 5: ...nket Leave the stand protruding over the edge of the surface Note Extreme care should always be used when removing the pedestal stand to avoid damage to the LCD panel 2 Remove the jack pack cover on the back of the TV to expose the pedestal stand screws The jack pack cover can be removed without tools 3 Remove the five screws shown in the diagram below This will allow removal of the pedestal stand...

Страница 6: ...g the video input source to view 30 Labeling the video input sources 30 Tuning channels 31 Tuning your favorite channels 31 Tuning to the next programmed channel 31 Tuning to a specific channel programmed or unprogrammed 31 Tuning to a specific programmed channel or video mode using the Program list 31 Switching between two channels using Channel Return 31 Selecting the picture size 31 Adjusting t...

Страница 7: ... for the TV Place the TV on the floor or a sturdy level stable surface that can support the weight of the unit Secure the TV to a wall pillar or other immovable structure page 3 Place the TV in a location where light does not reflect on the screen Place the TV far enough from walls and other objects to allow proper ventilation Inadequate ventilation may cause overheating which will damage the TV T...

Страница 8: ...te audio cables are required for a complete connection 4 POWER Press to turn the TV on and off 5 ARROWS BbC c When a menu is on screen these buttons function as up down left right menu navigation buttons 6 CHANNEL Bb When no menu is on screen these buttons change the channel programmed channels only page 26 7 VOLUME C c When no menu is on screen these buttons adjust the volume level 8 MENU Press t...

Страница 9: ...gured in the Set Up menu page 42 4 VIDEO 1 IN Standard composite video and standard analog audio inputs for connecting devices with composite video output Note VIDEO 1 input terminals are shared with ColorStream HD 1 input terminals When component video cables are connected to the ColorStream HD 1 terminals and ColorStream HD 1 is the current input mode the VIDEO 1 input terminals will not carry a...

Страница 10: ...ent video output ColorStream is Toshiba s brand of component video These cables are typically color coded red green and blue Separate audio cables are required for a complete connection Note Component video cables provide better picture performance than a standard composite video or S video cable HDMI cable HDMI High Definition Multimedia Interface cable is for use with devices with an HDMI output...

Страница 11: ...e performance will be unacceptable If you have a mono VCR connect L MONO on the TV to your VCR s audio out terminal using the white audio cable only To view the antenna or Cable signal Select the ANT video input source on the TV To view the VCR Turn ON the VCR Select the Video1 video input source on the TV To select the video input source press INPUT on the remote control page 30 To program the TV...

Страница 12: ...e a Cable box you may not be able to use the remote control to program or access certain features on the TV To view basic and premium Cable channels Turn OFF the VCR Select the ANT video input source on the TV Tune the TV to channel 3 or 4 whichever channel the Cable box output is set to Use the Cable box controls to change channels To view the VCR Turn ON the VCR Select the Video2 video input sou...

Страница 13: ... on the TV HD 1 or HD 2 The ColorStream HD 1 and HD 2 terminals can be used with Progressive 480p 720p 1080p and Interlaced 480i 1080i scan systems If your DVD player or satellite receiver does not have component video connect a standard A V cable to VIDEO 1 If your DVD player has HDMI video see page 15 To view antenna or Cable channels Select the ANT video input source on the TV To view the DVD p...

Страница 14: ...ram the TV remote control to operate other devices see Chapter 3 Connecting an audio system This connection allows you to use external speakers with an external analog audio amplifier to adjust the sound level You will need standard audio cables To control the audio 1 Turn on the TV and the stereo amplifier 2 Minimize the sound volume from the TV s built in speakers and control the volume level us...

Страница 15: ...evice you will need one HDMI to DVI adapter cable HDMI type A connector per DVI device For proper operation the length of an HDMI to DVI adapter cable should not exceed 9 8 ft 3m The recommended length is 6 6 ft 2m one pair of standard analog audio cables per DVI device An HDMI to DVI adapter cable transfers video only Separate analog audio cables are required see illustration See Setting the HDMI...

Страница 16: ...to your PC the compressed image is displayed in SXGA mode therefore the picture quality may deteriorate and characters may not be read A bar may appear in the upper lower right or left side of the screen or parts of the picture may be obscured depending on some signals This is not the malfunction To connect a PC to the HDMI terminal on the TV When connecting a PC to the HDMI terminal on the TV use...

Страница 17: ...on Never throw batteries into a fire Note Be sure to use AAA size batteries Dispose of batteries in a designated disposal area Batteries should always be disposed of with the environment in mind Always dispose of batteries in accordance with applicable laws and regulations If the remote control does not operate correctly or if the operating range becomes reduced replace batteries with new ones Whe...

Страница 18: ...mbers 0 9 100 directly tune channels 6 INPUT selects the video input source page 30 7 CH Bb cycles through programmed channels when no menu is on screen page 26 8 VOL adjusts the volume level 9 PIC MODE selects the picture mode page 35 10 RECALL displays TV setting information on screen page 44 11 CH RTN returns to the last viewed channel or source page 31 12 MUTE reduces or turns off the sound pa...

Страница 19: ...s programmed into memory only 5 INFO Displays TV status information on screen 6 BbC c Press to navigate DVD menus may not work on some DVD players 7 ENTER Required by some satellite receivers and DVD players 8 DVD CLEAR Press to reset the title and chapter number 9 PLAY Begins playback of a tape or DVD 10 PAUSE Press during play or record mode to pause the picture press again to restart 11 STOP St...

Страница 20: ...revious channel INFO Info MENU Menu DVD Menu Menu DVD Menu Bb FAVBb Menu select FAV up down Menu up down Menu up down C Menu select Menu left Menu left c Menu select Menu right Menu right ENTER Enter Select Enter Enter EXIT DVD CLEAR Exit Exit DVD Clear VOL Volume up down s TV s TV s TV s TV CHBb Channel up down Channel up down Channel up down Channel up down PIC SIZE Picture size s TV s TV s TV s...

Страница 21: ...mote control at it and press p Also see notes below If the correct code was entered the device will turn off If the device does not respond repeat steps 1 4 using another code If the device does not respond to another code you will need to use the device s original remote control 5 Remember to set the MODE SELECT Switch back to TV to control the TV 6 For future reference write down the code s you ...

Страница 22: ...058 Pansat 036 052 Primestar 015 042 Proscan 008 009 013 Radio Shack 022 023 030 RCA 008 009 013 016 Realistic 030 Samsung 059 Sony 014 055 Star Choice 057 Star Trak 025 026 037 054 STS 024 Toshiba 000 001 002 003 004 005 006 007 020 031 056 Uniden 021 028 030 032 035 039 043 045 047 058 Zenith 027 TV VCR Combo Action 078 GE 059 062 Goldstar 065 Panasonic 065 Precision 078 Quasar 065 Realistic 079...

Страница 23: ... 046 057 061 072 079 Pentax 012 024 025 035 042 053 063 Pentex Research 014 Philco 026 027 063 Philips 026 031 044 057 Pioneer 006 024 043 055 Portland 012 013 015 Proscan 001 002 048 Proton 061 Quasar 045 Radio Shack 010 031 065 Radio Shack Realistic 007 009 010 016 018 020 021 022 031 049 Radix 010 RCA 001 002 003 009 024 025 029 035 040 042 045 048 055 056 063 071 083 Realistic 007 009 010 011 ...

Страница 24: ... Français Español TV CABLE S Select the input source TV Cable CH Program S Start channel programming automatically Add Erase S Add Erase a channel Channel Labeling S Channel Labeling edit window Video Label S Video input labeling edit window AV Connection S PC HDMI Audio Settings edit window Picture Position S Picture Position Settings edit window PC Settings S PC Settings edit window Sleep Timer ...

Страница 25: ...nu is open use the up down left right arrow buttons BbC c on the remote control or TV control panel to move in the corresponding direction in the menu Press T to save your menu settings or to select a highlighted item A highlighted menu item appears in a different color in the menu All menus close automatically if you do not make a selection within 60 seconds To close a menu instantly press O 2674...

Страница 26: ...he TV s memory If the input signal type is set to TV the automatic channel programming process does NOT erase channels that were previously programmed into the TV s memory but adds newly found channels to the existing set of programmed channels To remove a channel from the memory you must manually delete it To tune the TV to a channel not programmed in the channel memory you must use the Channel N...

Страница 27: ...s 1 4 for other channels you want to add or erase Programming your favorite channels You can preset up to 12 of your favorite channels using the Favorite Channel Programming feature Because this feature scans through only your favorite channels it allows you to skip other channels you do not normally watch To add and delete channels in the Favorite Channel lists 1 Press Y and open the Function men...

Страница 28: ...or b or the Channel Numbers to select a channel you want to label 4 Press c to select a character for the first space and then repeatedly press B or b to select a character 5 Repeat step 4 to enter the rest of the characters If you would like a blank space in the label name you must choose an empty space from the list of characters otherwise a dash will appear in that space 6 Repeat steps 3 5 to l...

Страница 29: ...he HDMI1 Audio setting is set to Digital and will be grayed out When the sound is not audible Some of legacy HDMI sources may not work properly with latest HDMI TV products due to new standard adoption Please try to set Off the Lip Sync Latency feature Your legacy HDMI source should operate properly with this TV 1 Press Y and open the Set Up menu 2 Highlight AV Connection and press T 3 Press B or ...

Страница 30: ...V from the following preset list of labels Uses the default label name VCR Video cassette recorder DVD DVD video DTV Digital TV set top box SAT Satellite box CBL Cable box To label the video input sources 1 Press to select the video source you want to label 2 Press Y and open the Set Up menu 3 Press B or b to highlight Video Label 4 Press T to display the Video Label menu 5 Press c to highlight th...

Страница 31: ...ed Note If you press R from a non antenna input the TV will return to the last viewed channel or video input mode Selecting the picture size You can view 480i 480p 720p 1080i and 1080p format programs in a variety of picture sizes Natural TheaterWide 1 TheaterWide 2 TheaterWide 3 Full 4 3 HD and Native Note The picture size illustrations are examples only The format of the image in any of the pict...

Страница 32: ...n 4 3 HD picture size for 720p 1080i and 1080p program sources only Sidebars fill the empty vertical spaces Picture is not distorted from original size Note If you select one of the TheaterWide picture sizes the top and bottom edges of the picture including subtitles or captions may be hidden To view the hidden edges try viewing the program in Full or Natural picture size The picture size illustra...

Страница 33: ...0p signal from the HDMI1 or HDMI2 input Note The auto aspect ratio feature is not applicable to antenna or cable input sources To turn on the auto aspect ratio feature 1 Press Y and open the Function menu 2 Press B or b to highlight Auto Aspect 3 Press C or c to select On To turn off the auto aspect ratio feature Select Off in step 3 above Selection Pressing C Pressing c Horizontal Position Moves ...

Страница 34: ...r b to highlight Side Panel 3 Press C or c to select the desired gray level 1 2 or 3 as follows 1 Black 2 Dark gray 3 Light gray Selecting the cinema mode 480i signals only When you view a DVD 480i signal 3 2 pulldown processed from a DVD player connected to the VIDEO 1 VIDEO 2 ColorStream HD 1 HD 2 component video HDMI1 or HDMI2 inputs on the TV smoother motion can be obtained by setting the Cine...

Страница 35: ...e menu 2 Highlight Picture Settings and press T 3 Press B or b to select the picture quality you want to adjust Back Light Contrast Brightness Color Tint or Sharpness and then press C or c to adjust the setting as described in the table above The picture qualities you adjusted are automatically saved in the Preference mode Selecting the picture mode above left Note The cold cathode fluorescent lam...

Страница 36: ...R digital noise reduction The CableClear digital noise reduction feature allows you to reduce visible interference in your TV picture This may be useful when receiving a broadcast with a weak signal especially a Cable channel or playing a noisy video cassette or disc To turn on the CableClear DNR settings 1 Press Y and open the Picture menu 2 Highlight Picture Settings and press T 3 Press B or b t...

Страница 37: ...stock data when provided by individual stations To view captions or text 1 Press Y and open the Function menu 2 Press B or b to highlight CC 3 Press C or c to select the desired closed caption mode To view captions Highlight C1 C2 C3 or C4 C1 displays translation of the primary language in your area Note If the program or video you selected is not closed captioned no captions will display on scree...

Страница 38: ... also can transmit a second audio program SAP containing a second language music or other audio information when provided by individual analog stations The MTS feature is not available when the TV is in VIDEO mode When the TV receives a stereo or SAP broadcast the word STEREO or SAP appears on screen when E is pressed To listen to stereo sound 1 Press Y and open the Audio menu 2 Press B or b to hi...

Страница 39: ...s from stereo sound sources Your TV s audio will sound fuller richer and wider To adjust the WOW settings 1 Put the TV in Stereo mode Selecting stereo SAP broadcasts on page 38 2 Press Y and open the Audio menu 3 Highlight WOW and press T 4 Press b or B to highlight the WOW feature you want to adjust and then press C or c to adjust the item SRS 3D To turn the surround sound effect On or Off Note I...

Страница 40: ...d press T The Locks menu appears 3 Press B or b to highlight Channel Lock or Video Lock and then press T to display the PIN code entering mode Blocking Reset status Set a new 4 digit code by pressing the Number buttons 0 9 When the PIN code is already stored Press the Number buttons 0 9 to enter your 4 digit PIN code If the wrong PIN code is entered the message Incorrect appears Enter your code ag...

Страница 41: ...Clear All and then press T Using the Video lock feature You can use the Video Lock feature to lock the video inputs Video 1 Video 2 ColorStream HD 1 ColorStream HD 2 HDMI1 HDMI2 and PC and channels 3 and 4 You will not be able to view the input sources or channels until you unlock the inputs To lock unlock the video inputs 1 Press Y and open the Function menu 2 Highlight Locks and press T 3 Press ...

Страница 42: ...range is within 15 from center Reset To reset the PC setting select Reset and press T The range of adjustment may vary slightly Setting the PC Audio This function allows you to output the sound from your PC if connected or mute the sound from your PC and output the sound from your HDMI DVI connection page 15 To set the PC Audio 1 Press Y and open the Set Up menu 2 Highlight AV Connection and press...

Страница 43: ... Note When a power failure occurs the sleep timer setting may be cleared To display the amount of time remaining on the sleep timer press E Setting the On timer To set the On timer to turn on the TV automatically 1 Press Y and open the Timer menu 2 Press B or b to highlight On Timer 3 Press the Number buttons 0 9 or B or b to enter the length of time until the TV turns on automatically You can set...

Страница 44: ... will automatically turn itself off after approximately 15 minutes if it is tuned to a vacant channel or a station that completes its broadcast for the day This feature does not work in VIDEO mode Understanding the last mode memory feature If the power is cut off while you are viewing the TV the Last Mode Memory feature automatically turns on the TV when the power is resupplied Note You should unp...

Страница 45: ...nnected to VIDEO 1 VIDEO 2 ColorStream HDMI1 HDMI2 PC or from channels 3 or 4 make sure the Video Lock is set to Off page 41 Poor color or no color The station may have broadcast difficulties Try another channel Adjust the Tint and or Color page 35 Poor composite or S video picture If the poor picture occurs when the TV is connected to an external A V device e g DVD player video game system set to...

Страница 46: ...nnel to the channel memory page 27 The channel may be blocked by the Channel Lock feature Unblock the channel page 41 Closed caption problems If the program or video you selected is not closed captioned no captions will display on screen page 37 If text is not available a black rectangle may appear on screen If this happens turn off the closed caption feature page 37 A closed caption signal may no...

Страница 47: ...75 ohm PR 0 7 V p p 75 ohm PB 0 7 V p p 75 ohm Suggested formats 1080i 720p 480p 480i AUDIO 150 mV rms 22 k ohm or greater HDMI INPUT HDMI compliant type A connector HDCP compliant E EDID compliant Suggested formats 1080p 24 60Hz 1080i 60Hz 720p 60Hz 480p 60Hz 480i 60Hz HDMI Audio 2 channel PCM 32 44 1 48 kHz sampling frequency 16 20 24 bits per sample FIXED AUDIO OUTPUT 150 mV rms 30 modulation e...

Страница 48: ... the type of repair required the service will either be performed on site or the Television will be taken to an ASP for repair and returned at no cost to you ON SITE SERVICE ONLY APPLIES WITHIN 100 KILOMETERS OF AN ASP IF YOU ARE NOT WITHIN 100 KILOMETERS OF AN ASP YOU MUST DELIVER THE ENTIRE TELEVISION TO AN ASP YOU MUST PAY FOR ALL TRANSPORTATION AND INSURANCE CHARGES FOR THE TELEVISION TO AND F...

Страница 49: ...l be referred to and resolved by final and binding arbitration to the exclusion of the courts To the extent not precluded by law you agree to waive any right that you may have to commence or participate in any representative or class proceeding against the Related Parties relating to any Dispute If and where applicable and to the extent not precluded by law you further agree to opt out of any such...

Страница 50: ... 7 L Labeling video input 30 Language selection 26 Last mode memory feature 44 Lip Sync Latency 29 Locks menu New PIN code 41 Video inputs locking 41 M MPEG noise reduction 36 MTS feature 38 MUTE button 38 P PC connection 16 PC setting 42 Picture adjustment 35 Picture mode 35 Picture quality 35 Picture size selection 31 POWER button 8 R RECALL button 44 Remote control Battery installation 17 Devic...

Страница 51: ...HL37 E F Web 213 276 51 Notes 267470726HL37_EN book Page 51 Friday July 6 2007 7 44 PM ...

Страница 52: ...REET MARKHAM ONTARIO L3R 8H2 CANADA TEL 905 470 5400 SERVICE CENTERS TORONTO 191 McNABB STREET MARKHAM ONTARIO L3R 8H2 CANADA TEL 905 470 5400 MONTREAL 18050 TRANS CANADA KIRKLAND QUEBEC H9J 4A1 CANADA TEL 514 390 7766 VANCOUVER 13551 COMMERCE PARKWAY SUITE 110 RICHMOND B C V6V 2L1 CANADA TEL 604 303 2500 HL37 E F Web 213 276 267470726HL37_EN book Page 52 Friday July 6 2007 7 44 PM ...

Отзывы: