background image

53

DVD Playback

Using the

TV/D

VD’

s Features

Setting up

your TV/DVD

Connecting

your TV/DVD

Introduction

Appendix

1

-/72 --:--

/0-9/Enter/Play Mode

2

3

4

5

Japan

CD-R

Bay Bridge
CLOSE MY EYES
DIVE TO BLUE

Honey

8

9

10

11

12

flower
Lies and Truth-
winter fall
Rain

Strawberry

6

BLUE EYES

13

Welcome party

7

Blurry Eyes

14

Thailand

Pops

1

-/72 --:--

/0-9/Enter/Play Mode

2

3

4

5

Japan

CD-R

Bay Bridge
CLOSE MY EYES
DIVE TO BLUE

Honey

8

9

10

11

12

flower
Lies and Truth-
winter fall
Rain

Strawberry

6

BLUE EYES

13

Welcome party

7

Blurry Eyes

14

Thailand

Pops

15

-/72

16

Mother

CD-R

Hold Your Last

Pops

--:--

/0-9/Enter/Play Mode

/0-9/Enter/Play Mode

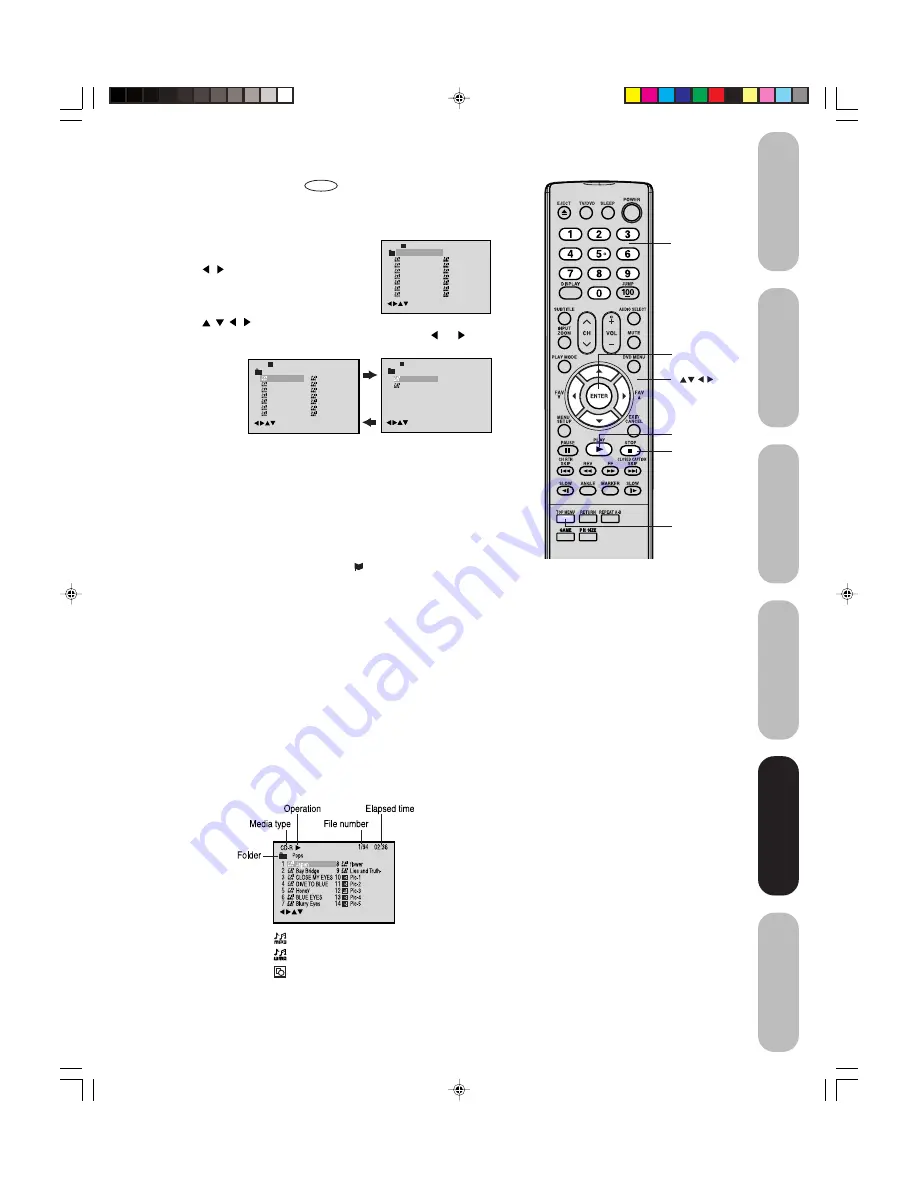
: Indicates MP3 file

: Indicates WMA file

: Indicates JPEG file

/0–9/Enter/Play Mode/DVD Menu

Top Menu

Play

Stop

Enter

Number
buttons

DVD Playback

MP3/WMA CD playback


CD

1. Load a disc on which MP3 or WMA files have been recorded in the

disc slot.

2. A file menu screen will appear on the

screen.
Press 

/

 or ENTER to select folder.

3. Press 

/

/

/

 or Number buttons (0–9) to select the desired file.

• In case the folder includes more than 15 files, press 

 or 

 to

display next file list.

• When PLAY has been pressed after displaying the file menu,

playback begins automatically starting from the first file.  In this
case, if the first file is an MP3/WMA file, only MP3/WMA files are
played back in order. If the first file is a JPEG file, the first JPEG
file is played back.

4. Press ENTER.

The selected file starts playing back.

5. Press STOP to end playback.

• The unit records the stopped point. “

” appears on the screen.

Press PLAY to resume playback (from the scene point).

• If you press STOP again or unload the disc, the unit will clear the

stopped point.

About file menu

Notes:

• During MP3/WMA/JPEG playback, you

cannot use JUMP, A-B Repeat functions.

• You can use Repeat (Track or All), Random

functions and Program playback for MP3/
WMA/JPEG CD playback (see pages 47
and 48).

• In the case of a CD containing a mixture of

MP3, WMA and JPEG files, the files are
played back by selecting them from the file
menu.

Notes:

• The picture menu is displayed when the

FUJICOLOR CD or the Kodak Picture CD
are played. To display the file
menu, press TOP MENU.

• In the case of a CD containing a mixture of

MP3, WMA and JPEG files, the files are
played back by selecting them from the file
menu.

• MP3 or WMA file on the Kodak Picture CD

is not recognized on this unit.

 5U90221A(E)P42-53

5/31/05, 19:02

53

Содержание 20HLV15

Страница 1: ...20HLV15 ENER Y STAR PARTNER DVD Playback Using the TV DVD s Features Setting up your TV DVD Connecting your TV DVD Introduction Appendix 5U90221A E Cover 5 31 05 18 58 1 ...

Страница 2: ... to alert the user to the presence of uninsulated dangerous voltage within the product s enclosure that may be of sufficient magnitude to constitute a risk of electric shock to persons The exclamation point within an equilateral triangle is intended to alert the user to the presence of important operating and maintenance servicing instructions in the literature accompanying the appliance CAUTION T...

Страница 3: ...R OTHER OUTLET UNLESS THE BLADES CAN BE FULLY INSERTED TO PREVENT BLADE EXPOSURE Federal Communications Commission FCC This equipment complies with Part 15 of the FCC rules FCC Declaration of Conformity Compliance Statement Part 15 The Toshiba 20HLV15 LCD TV DVD Combination complies with Part 15 of the FCC rules Operation is subject to the following two conditions 1 this device may not cause harmf...

Страница 4: ...the plug fully into the outlet try reversing the plug If the plug should still fail to fit contact your electrician to replace your obsolete outlet 12 POWER CORD PROTECTION Power supply cords should be routed so that they are not likely to be walked on or pinched by items placed upon or against them paying particular attention to cords at plugs convenience receptacles and the point where they exit...

Страница 5: ... is closing Failure to do so may cause serious personal injury 23 CONNECTING When you connect the product to other equipment turn off the power and unplug all of the equipment from the wall outlet Failure to do so may cause a product damage Read the owner s manual of the other equipment carefully and follow the instructions when making any connections 24 HEADPHONES When you use headphones keep the...

Страница 6: ...n locating the unit When you place this unit near a TV radio or VCR the playback picture may become poor and the sound may be distorted In this case place the unit away from the TV radio or VCR To avoid damage to this product never place or store the TV DVD in direct sunlight hot humid areas or areas subject to excessive dust or vibration Always place the TV DVD on the floor or a sturdy level stab...

Страница 7: ...ack 5 DVD video disc Video CD Audio CD Structure of disc contents Normally DVD video discs are divided into titles and the titles are sub divided into chapters Video CDs and Audio CDs are divided into tracks DVD video disc Video CD Audio CD Each title chapter or track is assigned a number which is called title number chapter number or track number respectively Some discs may not have these numbers...

Страница 8: ...e discs Playable discs This unit can play the following discs DIGITAL VIDEO Disc Mark Contents Disc Size Maximum playback time Audio Video moving pictures DVD video discs Video CDs Audio CDs Audio Video moving pictures Audio 12 cm 8 cm with Disc adapter 12 cm 12 cm 8 cm CD single with Disc adapter Approx 4 hours single sided disc Approx 8 hours double sided disc Approx 80 minutes single sided disc...

Страница 9: ...s 30 Selecting the video input source 31 Labeling the video input sources 31 Setting the clock 31 Setting the ON timer 32 Viewing the wide screen picture formats 480i and 480p signals only 33 Selecting the cinema mode 34 Using the ASPECT feature 34 Setting the sleep timer 35 Using the closed caption feature 35 Adjusting the picture 36 Selecting the picture mode 36 Adjusting the picture quality 36 ...

Страница 10: ... Disc slot Top Front Remote sensor POWER indicator Back Left side Side panel The STARTING SETUP feature appears the first time you turn on the TV DVD See page 23 for details Top panel Back panel PC IN COAXIAL DIGITAL AUDIO OUT HDMI IN VIDEO 1 IN DC IN RF IN You can adjust the angle of the TV screen 5 forward or 10 backward from vertical Hold the base of the TV DVD while adjusting the angle The vol...

Страница 11: ... the standard cable that comes in from your antenna or cable converter box Coaxial cables use F connectors Standard A V audio video cables are usually color coded accord ing to use yellow for video and red and white for audio The red audio cable is for the stereo right channel and the white audio cable is for the stereo left or mono channel If you look at the rear panel of the TV DVD you will see ...

Страница 12: ...television to the output of the Converter Descrambler box usually channel 3 or 4 and use the Converter Descrambler box to select channels Option 3 For Subscribers to Unscrambled Basic Cable with Scrambled Premium Channels If you subscribe to a cable service in which basic cable channels are unscrambled and premium channels require the use of a Converter Descrambler box you may wish to use a two se...

Страница 13: ...use a standard video cable instead of the S video cable but the picture quality will decrease If you use an S video cable between the TV DVD and DVD player satellite receiver make the audio connections but remove the standard video cable Do not connect both an S video and a standard video cable to VIDEO1 at the same time or the picture performance will be unacceptable Satellite Receiver From satel...

Страница 14: ... compatible DVD player such as a Toshiba DVD player with ColorStream can greatly enhance picture quality and performance DVD player with Component video TV DVD back panel Stereo VCR From antenna Note The ColorStream HD jacks can be used with Progressive 480p 720p and Interlaced 480i 1080i scan systems A 1080i signal will provide the best picture performance The unauthorized recording use distribu ...

Страница 15: ... cables one set of standard audio cables one set of component video cables Note For HDMI connection see page 17 The ColorStream HD jacks and HDMI jacks can be used with Progressive 480p 720p and Interlaced 480i 1080i scan systems If your DTV receiver does not have compo nent video use the S video and standard audio connections instead Do not connect both an S video and a standard video cable to VI...

Страница 16: ... For better picture quality if your camcorder has S video you can use an S video cable plus the standard audio cables instead of a standard video cable Do not connect both a standard video cable and an S video cable at the same time or the picture performance will be unacceptable You will need one set of standard AV cables TV DVD Side panel S VHS Camcorder TV DVD back panel Connecting your TV DVD ...

Страница 17: ...properly with the TV DVD To connect a DVI device you will need one HDMI to DVI adapter cable HDMI type A connector For proper operation the length of an HDMI to DVI adapter cable should not exceed 9 8 ft 3m The recommended length is 6 6 ft 2m one pair of standard analog audio cables An HDMI to DVI adapter cable transfers only video Separate analog audio cables are required see illustration below Y...

Страница 18: ...Pro Logic and the double D symbol are trademarks of Dolby Laboratories TV DVD back panel You will need one coaxial cable Notes Connect the COAXIAL DIGITAL AUDIO OUT jack of the TV DVD to the COAXIAL input of a Receiver or Processor Refer to the owner s manual of the connected equipment as well The output sound of the TV DVD has a wide dynamic range Be sure to adjust the receiver s volume to a mode...

Страница 19: ...er before you connect or disconnect the TV DVD s power cord If you leave the amplifier power on the speakers may be damaged Connecting your TV DVD Connecting an amplifier equipped with a digital audio input 2 channel digital stereo You can enjoy the dynamic sound of 2 channel digital stereo by connecting an amplifier equipped with a digital audio input and speaker system right and left front speak...

Страница 20: ...e page 41 Notes Make sure to insert the plug of each cord securely During use the AC adapter becomes warm This is not a malfunction WARNING Do not connect this unit to the power using any device other than the supplied AC adapter or power cord This could cause fire electric shock or damage Do not use with a voltage other than the power voltage displayed This could cause fire electric shock or dama...

Страница 21: ...controls for your other devices in which case it is suggested that you use the original remote control for the applicable device Caution Never throw batteries into a fire Notes Be sure to use AAA size batteries Dispose of batteries in a designated disposal area Batteries should always be disposed of with the environment in mind Always dispose of batteries in accordance with applicable laws and reg...

Страница 22: ... MENU allows access to DVD Top menu page 49 PLAY MODE sets repeat playback page 47 RETURN removes DVD setup menu page 55 MARKER index of DVD page 46 REPEAT A B repeats playback between A and B page 47 ANGLE changes playback angle page 49 JUMP locates the desired point to play back page 45 CH RTN returns to the last viewed channel page 25 ZOOM allows you to zoom in page 45 SKIP 4 4 4 4 4 skips DVD ...

Страница 23: ...d the remote control you need to set some preferences on the TV DVD using the menu system You can access the menu system with the buttons on the remote control When you make a menu selection your changes occur immedi ately You do not have to press MENU or EXIT to see your changes After one minute the menu screen will automatically close if you do not make a selection Your changes will still be sav...

Страница 24: ... add or erase specific channels manually To add or erase channels manually 1 Select the channel you want to add or erase If adding channels you must select the channel to add using the Channel Number buttons 2 Press MENU then press or to display the SETUP menu 3 Press or to highlight ADD ERASE 4 Press or to select ADD or ERASE whichever function you want to perform 5 Repeat steps 1 4 for other cha...

Страница 25: ...play the OPTION menu 3 Press or to highlight FAVORITE CH 4 Press to display the FAVORITE CH menu SET CLEAR will be highlighted 5 Press or to highlight SET and press ENTER 6 Press EXIT to return to normal viewing 7 Repeat steps 1 6 for up to 12 channel To select your favorite channels Press the FAV buttons on the remote control to select your favorite channels The FAV buttons will not work until yo...

Страница 26: ...word again to confirm it and then press ENTER The LOCKS menu appears If the wrong password is entered ERROR blinks about 4 seconds 5 You may now set up the LOCKS menu See Using the V Chip parental control feature page 27 Locking channels page 28 Locking the video inputs page 28 Setting the GameTimerTM page 29 or Using the panel lock feature page 29 To change your password 1 Press MENU then press o...

Страница 27: ...al audience TV PG Parental guidance TV 14 14 years old and above TV MA 17 years old and above When you select TV Y7 TV PG TV 14 or TV MA press DISPLAY to explain the rating Press or to select the desired rating you want Press or to select the setting ON or OFF then press ENTER 6 Press or to highlight MOVIE RATING Then press or to display the desired rating OFF MOVIE RATING is not set no movies wil...

Страница 28: ...tune locked channels unless you clear the setting You can choose to lock up to nine TV channels and nine cable channels 1 Use the Channel Number buttons 0 9 and 100 to display the television channel you wish to lock 2 Press MENU then press or to display the LOCKS menu 3 Press or to display the password entering mode 4 Use the Channel Number buttons 0 9 to enter your password then press ENTER The L...

Страница 29: ...s MENU then press or to display the LOCKS menu 2 Press or to display the password entering mode 3 Use the Channel Number buttons 0 9 to enter your password then press ENTER The LOCKS menu appears 4 Press or to highlight VIDEO LOCK and press or to highlight OFF 5 Press EXIT to return to normal viewing Setting the GameTimerTM With the GameTimerTM feature you can automatically activate the VIDEO LOCK...

Страница 30: ...bove the channel number display each time you turn on the TV DVD select a channel or press the DISPLAY button You can choose any four characters to identify a channel To create channel labels 1 Select a channel you want to label 2 Press MENU then press or until the OPTION menu appears 3 Press or to highlight CH LABEL 4 Press to display the CH LABEL menu SET CLEAR will be high lighted 5 Press or to...

Страница 31: ...hrough the video input sources in the order illustrated below Labeling the video input sources The video label feature allows you to label each input source for your TV DVD from the following preset list of labels Uses the default label name VCR Video cassette recorder DVD DVD video DTV Digital TV set top box SAT Satellite box CBL Cable box To label the video input sources 1 Press MENU then press ...

Страница 32: ...et the on timer Example Turning on the TV DVD to channel 012 at 6 30 AM DAILY 1 Set the clock if you have not already done so see page 31 2 Press MENU then press or to display the OPTION menu 3 Press or to highlight ON TIMER 4 Press or to highlight SET then press ENTER The ON TIMER menu appears Press to set the time 5 Press or to set the desired hour then press 6 Set the desired minutes and channe...

Страница 33: ... displays will vary depending on the format of the program you are currently watching SETUP CLOSED CAPTION PICTURE SIZE CINEMA MODE ASPECT BACK LIGHTING SELECT ADJUST OFF FILM ON 16 TheaterWide picture size example Notes The PICTURE SIZE feature is not available for some program formats such as 1080i or 720p Such formats will display in Full picture size Using these functions to change the picture...

Страница 34: ...e CINEMA MODE to FILM To set the CINEMA MODE to FILM 1 Press MENU then press or until the SETUP menu appears 2 Press or to highlight CINEMA MODE then press or to select FILM To set the CINEMA MODE to VIDEO Press or to select VIDEO in step 2 above SETUP CLOSED CAPTION PICTURE SIZE CINEMA MODE ASPECT BACK LIGHTING SELECT ADJUST OFF FILM VIDEO ON 16 Using the ASPECT feature When the ASPECT feature is...

Страница 35: ...ated to the program such as weather or stock data if available in your viewing area To view captions or text 1 Tune the TV DVD to the desired program 2 Press MENU then press or to display the SETUP menu 3 Press or to highlight CLOSED CAPTION 4 Press or to select the desired Closed Caption mode as follows To view captions select C1 or C2 C1 displays translation of the primary language in your area ...

Страница 36: ... Movie and Memory as described in the following table To select the picture mode 1 Press MENU then press or to display the PICTURE menu 2 Press or to highlight MODE 3 Press or to highlight the mode you prefer 4 Press EXIT to return to normal viewing Mode Picture Quality SPORTS Bright and dynamic picture factory set STANDARD Standard picture quality factory set MOVIE Movie like picture setting fact...

Страница 37: ...r 25 To reset your picture adjustments 1 Press MENU then press or to display the PICTURE menu 2 Press or to highlight RESET and then press Mode Picture Quality COOL Blueish MEDIUM Neutral WARM Reddish PICTURE CableClear COLOR TEMPERATURE RESET SELECT ADJUST COOL MEDIUM WARM OFF COOL PICTURE CableClear COLOR TEMPERATURE RESET SELECT ADJUST OFF COOL Menu Exit Using the CableClear feature CableClear ...

Страница 38: ...her audio information Note The MTS feature is not available in VIDEO mode When the TV DVD receives a stereo or SAP broadcast the word STEREO or SAP displays on screen every time you turn the TV DVD on change the channel or press DISPLAY To listen to stereo sound 1 Press MENU then press or to display the AUDIO menu 2 Press or to highlight MTS 3 Press or to highlight STR stereo Notes In general you ...

Страница 39: ...F HDMI DVI Menu Using the WOW surround sound feature WOW is a special combination of SRS Labs audio technologies that creates a thrilling surround sound experience with deep rich bass from stereo sound sources Your TV DVD s audio will sound fuller richer and wider WOW consists of three features SRS 3D FOCUS and TruBass To adjust the WOW feature 1 Select STEREO mode see selecting stereo SAP broadca...

Страница 40: ...e STEREO SAP TV PG L V ON TIMER 12 00AM SLEEP TIMER 2h00m ANT FULL ABCD CLOCK 12 00AM CABLE 002 OFF FILM ON 16 SETUP CLOSED CAPTION PICTURE SIZE CINEMA MODE ASPECT BACK LIGHTING SELECT ADJUST Note The cold cathode fluorescent lamp used for the back light on this TV DVD has a limited life When areas on the screen darken flicker or no longer light up the lamp may be at the end of its life Contact yo...

Страница 41: ... highlight RESET and then press PICTURE menu BRIGHTNESS To adjust the brightness of PC Monitor screen CONTRAST To adjust the contrast of PC Monitor screen HOR POSITION To adjust the horizontal position of the image on the PC Monitor screen Each video standard will require a different value for this setting VER POSITION To adjust the vertical position of the image on the PC Monitor screen Each vide...

Страница 42: ...te When you playback the 8cm disc you need an adapter not supplied 4 On the TV screen No Disc changes to Reading and then playback commences A menu screen will appear on the TV screen if the disc has a menu feature Press or to select title then press ENTER Title is selected and play commences 5 Press VOL or to adjust the volume 6 Press STOP to end playback Resume feature Depending on the disc you ...

Страница 43: ...in see pages 8 and 57 Some discs may take a minute or so to start playback If you insert a single sided disc the wrong way Reading will appear on the display for about 1 minute and then Incor rect Disc will continue to be displayed Some discs may not resume playing the same scene after stopping Resuming cannot function when you play a PBC featured Video CD while the PBC is on To turn off the PBC s...

Страница 44: ...track SKIP To locate succeeding chapters or tracks SKIP 4 Playback starts from the beginning of the current chapter or track When you press twice in quick successions playback starts from the beginning of the preceding chapter or track Note A Prohibition symbol may appear at the upper left of the screen This symbol means either the feature you tried is not available on the disc or the TV DVD canno...

Страница 45: ...o play back To check the title chapter and time press DISPLAY 1 Press JUMP during playback or stop mode 2 Press or to select the Time Title or Chapter 3 Press Number buttons 0 9 to change the number If you input a wrong number press CANCEL Refer to the package supplied with the disc to check the numbers 4 Press ENTER Playback starts When you change the title playback starts from Chapter 1 of the s...

Страница 46: ...ng playback or stop mode 2 Press or to select the Marker 1 3 3 Press ENTER Playback starts from the marked scene To cancel the Marker Follow the above steps 1 2 then press CANCEL Marker 2 Marker 1 Marker 3 Enter Cancel Marker Marker 2 Marker 1 Marker 3 Enter Cancel Marker 27 00 54 Notes Some discs may not work with the marking operation The marking is canceled when you eject the disc or turn the p...

Страница 47: ...f in step 2 A B Repeat playback DVD VCD CD A B repeat playback allows you to repeat material between two selected points 1 Press REPEAT A B during playback The start point is selected 2 Press REPEAT A B again The end point is selected Playback starts at the point that you selected Playback stops at the end point returns to Point A automatically then starts again To resume normal playback Press REP...

Страница 48: ...t to playback in the order In case of JPEG file press SKIP to continue the program playback To resume normal playback select Play Mode Off in step 2 To change the program 1 In the program mode press to select the track number 2 Press Number buttons 0 9 to select the track number to be replaced To clear the program one by one In the program mode press to select the track number Then press CANCEL To...

Страница 49: ... title will start DVD menu Some DVDs allow you to select the disc contents using the menu When you playback these DVDs you can select the subtitle language and sound track language etc using the menu 1 Press DVD MENU during playback The DVD menu appears on the screen Press DVD MENU again to resume playback at the scene when you pressed DVD MENU 2 Press to select the desired item 3 Press ENTER The ...

Страница 50: ...atedly during playback until your desired language appears 2 To turn off the subtitle press subtitle until Off appears The on screen display will disappear after a few seconds Notes If the desired language is not heard after pressing the button several times the language is not recorded on the disc Changing soundtrack language is cancelled when you eject the disc The initial default language or av...

Страница 51: ... The primary vocal is output when it is recorded on the disc Off The primary vocal is not output The on screen display will disappear after a few seconds Disc status DVD VCD CD With each press of DISPLAY the status of the disc will appear on the screen and change as follows DVD To make status display disappear press DISPLAY again Video CD To make status display disappear press DISPLAY again Audio ...

Страница 52: ...the recorded order 1 Use MP3 WMA JPEG software that records data alphabetically or numerically 2 Name each file including two digit or three digit number ex 01 02 or 001 002 3 Refrain from making too many sub folders Notice Some MP3 WMA JPEG CDs cannot be played back depending on the recording conditions The CD R RW that has no music data or non MP3 WMA JPEG files cannot be played back Standard sa...

Страница 53: ...e list When PLAY has been pressed after displaying the file menu playback begins automatically starting from the first file In this case if the first file is an MP3 WMA file only MP3 WMA files are played back in order If the first file is a JPEG file the first JPEG file is played back 4 Press ENTER The selected file starts playing back 5 Press STOP to end playback The unit records the stopped poin...

Страница 54: ...In this case if the first file is a JPEG file the first JPEG file is played back If the first file is an MP3 WMA file only MP3 WMA files are played back in order 4 Press ENTER The selected picture appears on the screen Rotating an image You can rotate an image by 90 degrees by pressing ANGLE during playback of the image or appears briefly on the screen 5 Press STOP to end playback The file menu ap...

Страница 55: ... the desired option 4 Change the selection using or ENTER see Setting details on page 56 and 57 Repeat step 3 and 4 to change other settings Press to select another operation go back to step 2 5 To make SETUP screen disappear press SETUP or RETURN Details To select the language of Menu Subtitle and Audio if their languages are recorded on the disc in more than one language To select a picture size...

Страница 56: ...s to choose from 4 3 Letter box When playing back a wide screen DVD disc it displays the wide picture with black bands at the top and bottom of screen 4 3 Pan scan It displays the wide picture on the whole screen with left and right edges automatically cut off 16 9 Wide A wide screen picture is displayed full size Note If the DVD disc is not formatted in the pan scan style it displays 4 3 style Di...

Страница 57: ...lower 2 Press or to select Password Press Number buttons 0 9 to input a 4 digit password Be sure to remember this number If you input a wrong number press CANCEL 3 Press ENTER to store the password Note Now the rating is locked and the setting cannot be changed unless you enter the correct password Notes Depending on the discs the unit cannot limit playback Some discs may not be encoded with speci...

Страница 58: ... parental control level screen will then appear 3 If you wish to cancel the set rating level temporarily select Parental Control Level with or then press ENTER If the 4 digit password at step 2 on page 57 has been set the password entering screen will appear as shown in step 4 Alternatively if the password has not been set playback will commence If you don t know or have forgotten the password sel...

Страница 59: ...pali 2415 Telugu 3015 Bhutani 1436 Hindi 1819 Norwegian 2425 Thai 3018 Bihari 1218 Hungarian 1831 Oriya 2528 Tibetan 1225 Breton 1228 Icelandic 1929 Panjabi 2611 Tigrinya 3019 Bulgarian 1217 Indonesian 1924 Pashto Pushto 2629 Tonga 3025 Burmese 2335 Interlingua 1911 Persian 1611 Turkish 3028 Byelorussian 1215 Irish 1711 Polish 2622 Turkmen 3021 Cambodian 2123 Italian 1930 Portuguese 2630 Twi 3033 ...

Страница 60: ...ponding audio jacks or the HDMI input if available on your TV for connection to such external A V device If the TV is connected to an A V receiver that has a programmable audio delay feature use this feature to help synchronize the sound to the picture If connected to a video game system and your TV has the Game Mode feature see owner s manual for more information enable this feature If you notice...

Страница 61: ...ch slow motion Some discs may not perform certain functions play repeat play or program play etc cannot be performed No on screen display Select Display On No surround sound The setup does not match your stereo system The unit or remote operation key is not Turn off the unit and unplug the AC power cord for several minutes functioning then replug it Playback does not start when the title is Check ...

Страница 62: ...ial DVD mode only 0 5V p p 75 ohm pin jack L R x 1 HEADPHONE Ø3 5mm stereo mini jack x 1 HDMI INPUT HDMI compliant type A connector HDCP compliant E EDID compliant Suggested scan rates 1080i 480p 480i 720p HDMI Audio 2 channel PCM 32 44 1 48 kHz sampling frequency 16 20 24 bits per sample PC Monitor Input Mini Dsub 15pin x 1 Dimensions Width 21 13 16 inches 554 mm Height 17 5 8 inches 448 mm Depth...

Страница 63: ... Depot Repair Warranty personal computer level IEEE 1394 devices and any other connected signal source device are your responsibility 5 Warranties extend only to defects in materials or workmanship as limited above and do not extend to any LCD TV DVD Combination or parts that have been lost or discarded by you or to damage to the LCD TV DVD Combination or parts caused by fires misuse accident Acts...

Страница 64: ... TheaterWide and StableSound are registered trademarks of Toshiba America Consumer Products L L C LCDVD and GameTimer are trademarks of Toshiba America Consumer Products L L C Printed in Thailand J5U90201A SH 05 06 N 5U90201A E P60 Back 6 1 05 14 55 64 ...

Отзывы: