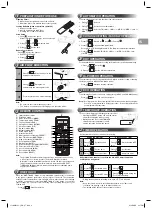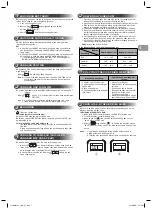
Setting Daily Timer
1
Press
: Set the ON timer.
3
Press
.
2
Press
: Set the OFF timer.
4
Press
: button during the
( or ) mark fl ashing.
• During the daily timer is activating, both arrows ( , ) are indicated.
Note:
• Keep the remote control in accessible transmission to the indoor unit;
otherwise, the time lag of up to 15 minutes will occur.
• The setting will be saved for the next same operation.
Press the “ONE-TOUCH” button for fully automated operation that is customized
to the typical consumer preferences in your region of the world. The customized
settings control temperature air fl ow strength, air fl ow direction and other settings
to provide you alternate contact with “ONE-TOUCH” of the button. If you prefer
other settings you can select from the many other operating functions of your
Toshiba unit.
Press
ONE-TOUCH
: Start the operation.
ONE-TOUCH
5
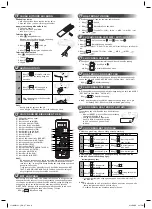
Preparing Filters
1. Open the air inlet grille and remove the air fi lters.
2. Attach the fi lters. (see detail in the accessory sheet).
Loading Batteries (when use wireless operation.)
1. Remove the slide cover.
2. Insert 2 new batteries (AAA type)
following the (+) and (–) positions.
Clock Setup
1. Push
by tip of the pencil.
If timer indication is fl ashing, go to the next step 2.
2. Press
or
: adjust the time.
3. Press
: Set the time.
Remote Control Reset
Push
by tip of the pencil or
1. Remove the batteries.
2. Press
.
3. Insert the batteries.
PREPARATION BEFORE USE
2
1
Press
FIX
: Move the louver in the
desired vertical direction.
2
Press
SWING
: Swing the air
automatically and press again to stop.
3
For horizontal direction, adjust manually.
Note:
• Do not move the louver manually by others.
• The louver may automation positioning by some operation mode.
AIR FLOW DIRECTION
3
Note:
• The provided Remote Controller is a wireless type, which also can be used as
a wire. Please see “How to Connect The Remote Controller for Wired
Operation”, located in installation instruction, in case of wired control is required.
• In wire operation, remote controller will return to initial condition (PRESET,
TIMER and CLOCK will return to initial condition) when user shutdown power
supply of Air conditioner.
1
Infrared signal emitter
2
Start/Stop button
3
Mode select button (MODE)
4
Temperature button (TEMP)
5
Fan speed button (FAN)
6
Swing louver button (SWING)
7
Set louver button (FIX)
8
On timer button (ON)
9
Off timer button (OFF)
!
Setup button (SET)
"
Clear button (CLR)
#
Memory and Preset button (PRESET)
$
One-Touch button (ONE-TOUCH)
%
High power button (Hi-POWER)
&
Economy button (ECO)
(
Quiet button (QUIET)
)
Comfort sleep button (COMFORT SLEEP)
~
Filter reset button (FILTER)
+
Set clock button (CLOCK)
,
Check button (CHECK)
-
Reset button (RESET)
REMOTE CONTROL
4
SWING
FAN
FIX
QUIET
ONE-TOUCH
COMFORT
SLEEP
Hi POWER
4
5
!
-
"
%
(
8
1
2
$
)
,
&
#
3
+
7
6
~
9
1. Press
MODE
: Select Cool
, Heat
, or Fan only
.
2. Press
: Set the desired temperature.
Cooling: Min. 17°C, Heating: Max. 30°C, Fan Only: No temperature indication
3. Press
FAN
: Select AUTO, LOW , LOW+
, MED
, MED+
,
or HIGH
.
COOLING / HEATING / FAN ONLY OPERATION
7
For dehumidifi cation, a moderate cooling performance is controlled automatically.
1.
Press
MODE
: Select Dry
.
2.
Press
: Set the desired temperature.
DRY OPERATION
8
To automatically control room temperature and airfl ow for faster cooling or heating
operation (except in DRY and FAN ONLY mode)
Press
Hi POWER
: Start and stop the operation.
Hi-POWER OPERATION
9
To automatically control room to save energy (except in DRY and FAN ONLY mode)
Press
:
Start and stop the operation.
Note:
Cooling operation; the set temperature will increase automatically 1 degree/
hour for 2 hours (maximum 2 degrees increase). For heating operation the
set temperature will decrease.
ECO OPERATION
10
In case of the misplaced or discharged remote control
• Pressing the RESET button, the unit can start or
stop without using the remote control.
• Operation mode is set on AUTOMATIC
operation, preset temperature is 24°C
and fan operation is automatic speed.
TEMPORARY OPERATION
11
To automatically select cooling, heating or fan only operation
1. Press
MODE
: Select A.
2. Press
: Set the desired temperature.
3. Press
FAN
: Select AUTO, LOW , LOW+
, MED
, MED+
, or
HIGH
.
AUTOMATIC OPERATION
6
Set the timer when the air conditioner is operating.
Setting the ON Timer
Setting the OFF Timer
1
Press
: Set the desired
ON timer.
Press
: Set the desired OFF
timer.
2
Press
: Set the timer.
Press
: Set the timer.
3
Press
: Cancel the timer.
Press
: Cancel the timer.
Daily timer allows the user to set both the ON & OFF timers and will be
activated on a daily basis.
TIMER OPERATION
12
EN
ES
FR
IT
DE
PT
PL
NL
GR
CR
HU
TR
NL
GR
SV
FI
NO
DK
RO
BG
EE
LV
SK
SI
1110655141-1_EN_VT.indb 3
1110655141-1_EN_VT.indb 3
1/13/58 BE 2:17 PM
1/13/58 BE 2:17 PM

