background image

14

Setting Up 

Y

our TV

Setting Up Your TV

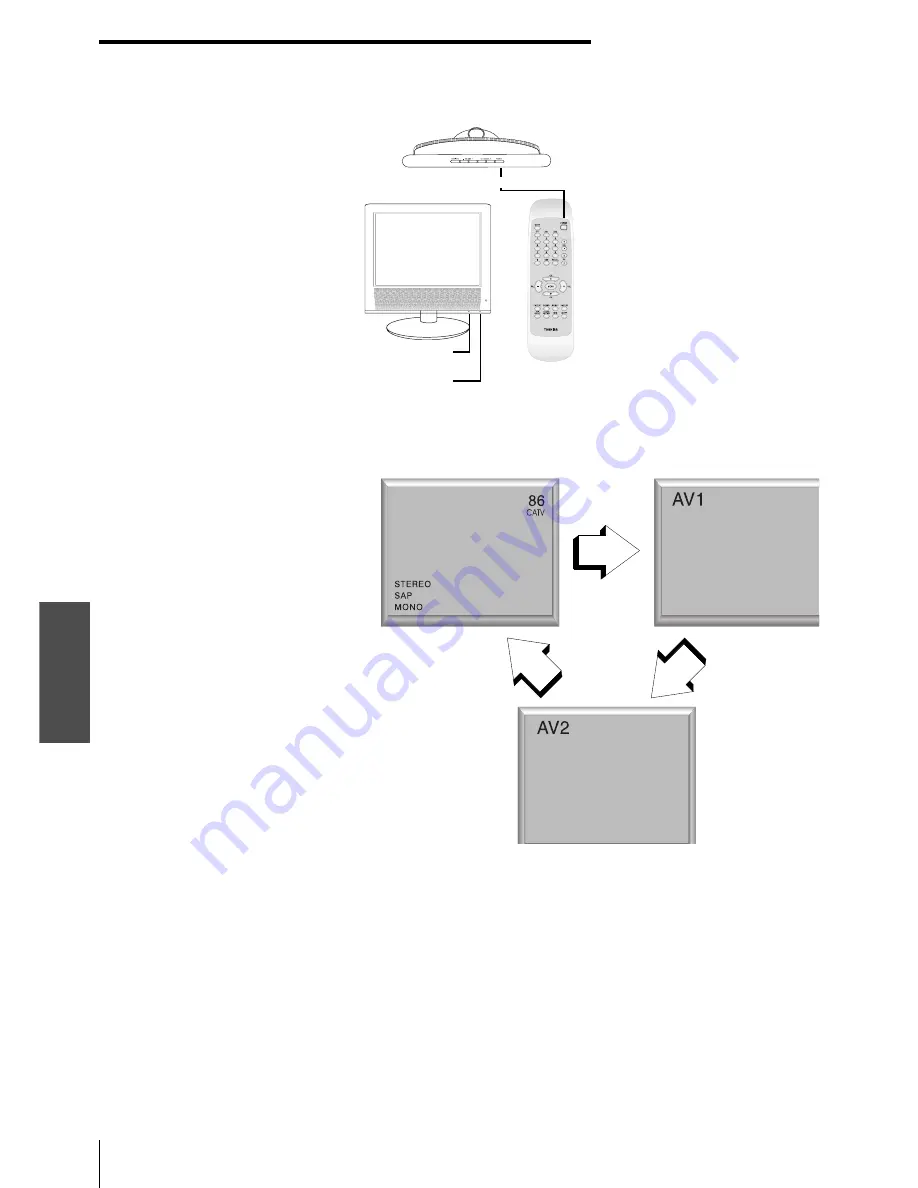
Turning the TV On and Off

You can use the Remote Control or 
TV Control Panel to turn the TV On 
and Off:

• Press the POWER button on the 

TV Control Panel. The red 
(standby) or blue (power on) 
LED lights up.

• When the TV is in standby 

mode, press the POWER button 
on the Remote Control once. 
The blue LED indicator lights 
up. The TV display is now ON. 
Press the power button again. 
The red LED indicator lights up. 
The TV is now in standby mode.

Changing between TV / AV Settings

Press the TV/VIDEO button on the Top Con-
trol Panel; the selected mode appears in the 
upper left or right side of the display. Alterna-
tively use the Remote Control to directly 
select TV, AV1, or AV2 mode. 

Switching Channels

Notes


• Always include the digit “0” in


front of Single digit channel


selections.


• For channels 100 and above,


  press the 100 button, and then


 the next two channel numbers


(for example, to select channel 


100, press 100,0,0; to select


channel 125, press 100,2,5).

Use the number buttons on the Remote Control to select the channel you desire.
When selecting Single or Double digit channels be sure to complete the selection 
within 4 seconds.
(e.g., Channel “8” is selected by pressing “08”)

Action 1:

 Press “0”

Action 2: 

Press “8”

Red LED Indicator 

(Standby)

Blue LED Indicator 
(Power On)

POWER button

Antenna selection

Press CH

S

 channel selection moves from

2

X

3

X

...

X

68

X

69

X

2

X

3

Press CH

T

 channel selection moves from

69

X

68

X

...

X

3

X

2

X

69

X

68

Cable selection

Press CH

S

 channel selection moves from

1

X

2

X

...

X

124

X

125

X

1

X

2

Press CH

T

 channel selection moves from

125

X

124

X

...

X

2

X

1

X

125

X

124

Содержание 14DL74

Страница 1: ...GLISH F FRANÇAIS S ESPAÑOL Introduction Connecting Your TV Using the Remote Control Setting Up your TV Using the TV s Features 14DL74 20DL74 2004 TOSHIBA CORPORATION All Rights Reserved OWNER S MANUAL TOSHIBA LCD COLOR TV ...

Страница 2: ...audio speakers chests or carts As a result TVs may fall over causing unnecessary injury Toshiba Cares The consumer electronics industry is committed to making home entertainment enjoyable and safe The Consumer Electronics Association formed the Home Entertainment Support Safety Committee comprised of TV and consumer electronics furniture manufacturers to advocate children s safety and educate cons...

Страница 3: ...he apparatus has been damaged in any way such as power supply cord or plug is damaged liquid has been spilled or objects have fallen into the apparatus the apparatus has been exposed to rain or moisture does not operate normally or has been dropped Wide plug 15 Do not expose the apparatus to dripping or splashing liquids Do not place objects filled with liquids such as vases on the apparatus Insta...

Страница 4: ...he residential unit where the LCD TV is used Antenna lead in wire Antenna discharge unit NEC Section 810 20 Grounding conductors NEC Section 810 21 Power service grounding electrode system NEC Art 250 Part H Ground clamp Electric service equipment Ground clamps 32 For added protection of your TV from lightning and power surges always unplug the power cord and disconnect the antenna from the TV if ...

Страница 5: ...on 9 Power Connection 10 Video Audio Connections 11 Using the Remote Control 13 Operating the Remote Control 13 Remote Control Battery Installation 13 Setting Up Your TV 14 Turning the TV On and Off 14 Changing between TV AV Settings 14 Switching Channels 14 Using the TV s Features 15 Menu Display 15 Picture Settings 16 Audio Settings 17 TV Settings 18 Other Function Settings 21 Appendix 23 Troubl...

Страница 6: ...uction Accessories CAUTION Please make sure to only use the AC adapter provided with this prod uct to power the TV AC Adapter TAA Y58 Power Cord Owner s Manual Batteries x 2 Type AAA for Remote Control Remote Control CT 864 ...

Страница 7: ...ber Press T to go back one chan nel number RECALL Press to go back to the last channel viewed MENU allows access to the menu display PICTURE Press to toggle between picture modes USER DYNAMIC MILD and THEATER SOUND Press to toggle between sound modes USER THEATER NEWS and HALL BRIGHT Press to toggle the brightness level between NORMAL BRIGHT and DARK DISPLAY Press to toggle the display information...

Страница 8: ...ximately 5 degrees forward 10 degrees back ward and 15 degrees left right To adjust the angle press down on the base and tilt the top of the LCD panel in the direction desired 1 Press the rear cover at the arrows A and pull the rear cover in the direction of the arrows B as shown in the illus tration to remove the cover 2 Plug the TV antenna coaxial cable into the antenna input 3 Insert the cover ...

Страница 9: ...e of the following methods Notes Follow these tips when setting up your antenna Keep your TV antenna cabling to the minimum required length to avoid unnecessary interference Avoid installing your TV antenna near steel framed housings or other metallic objects Install your TV antenna at a high location avoiding main roads neon lights and electrical power stations Avoid sharing your TV antenna i e u...

Страница 10: ...LCD TV Refer to the following illustration 4 Take out the power cord and connect the flat end to the AC adapter 5 Plug the other end of the power cord into the wall outlet 6 Replace the rear cover as described in step 3 of Connecting the Antenna to Your TV on page 8 CAUTION Keep children away from electri cal outlets at all times to prevent accidents from happening Power cord supplied AC adapter s...

Страница 11: ...AV1 and AV2 terminals for connecting other equipment to your TV are on the left and right side of the back panel Notes TV audio broadcast through external speakers will result in improved sound quality If your sound system does not have Auxiliary input connectors you may select CD or Video auxiliary inputs Connection cables are not supplied Composite Video For Normal Picture Quality You will need ...

Страница 12: ...d 480i scan systems For the Best Picture Quality You will need one set of component video cables one pair of standard audio cables Amplifier To Boost Sound Quality You will need one pair of standard audio cables AUDIO OUT DVD player with component video L R L R S VIDEO OUT COMPONENT VIDEO VIDEO OUT Y PB PR Amplifier LINE IN L R ...

Страница 13: ...tion as indicated 30o 30o CAUTION Dispose of batteries in a disposal area Do not throw batteries into a fire Do not mix battery types or combine used batteries with new ones Remove dead batteries immediately to prevent battery acid from leaking into the battery compartment Notes If you do not intend to use the Remote Control for a long time remove the batteries If the Remote Control does not opera...

Страница 14: ...y select TV AV1 or AV2 mode Switching Channels Notes Always include the digit 0 in front of Single digit channel selections For channels 100 and above press the 100 button and then the next two channel numbers for example to select channel 100 press 100 0 0 to select channel 125 press 100 2 5 Use the number buttons on the Remote Control to select the channel you desire When selecting Single or Dou...

Страница 15: ...settings Picture Settings Audio Settings TV Settings Other Function Settings The selected option is stored in memory to be recalled To locate the above settings do the following 1 Press MENU and press VOL or to select the desired item 2 Press CH S or T to scroll up or down to select an option in the setting 3 Press VOL or to adjust the setting 4 Press MENU to exit 0 0 0 CATV OFF OFF 50 100 50 3 0 ...

Страница 16: ...ttings except BACKLIGHT are specific to AV1 AV2 and TV modes For example BRIGHT NESS may be set to 80 in AV1 but 60 in AV2 Mode To adjust the BRIGHTNESS CONTRAST COLOR SHARPNESS TINT and BACKLIGHT settings individually do the following 1 Press MENU and press VOL or to select 2 Press CH S or T to scroll either up or down to find the function you need to adjust 3 Press VOL or to adjust the selected ...

Страница 17: ...ns to choose from Alternatively do the following 1 Press MENU and press VOL or to select 2 Press CH S or T to select AUDIO EFFECT 3 Press VOL or to set to your desired mode 4 Press MENU to exit To adjust the setting of TREBLE or BASS 1 Press MENU and Press VOL or to select 2 Press CH S or T to select TREBLE or BASS 3 Press VOL or to adjust the desired level 4 Press MENU to exit 0 0 0 ADJUST THEATE...

Страница 18: ...xt section 1 Press MENU and press VOL or to select 2 Press CH S or T to select CHANNEL AUTO SCAN 3 Press VOL or to start this function 4 Press MENU to exit When the AUTO SCAN window disappears the AUTO SCAN is completed Press CH S or T to view the programmed channels Notes This delete add channel action may also be carried out via the menu button 1 Press MENU and press VOL or to select 2 Press CH ...

Страница 19: ...lect the MODE 5 Press VOL or to change the MODE setting 6 Press MENU to exit V CHIP Block US Only This function allows TV programs to be restricted and TV usage to be controlled based on FCC data and helps prevent children from watching violent or sexual scenes that may be unsuitable Restriction of TV programs is based on two ratings systems that contain informa tion about the program the MPAA rat...

Страница 20: ...HIP BLOCK 2 Press and hold VOLUME on the upper Control Panel then press and hold CHANNEL on the TV set simultaneously 3 The message NEW SECRET NUMBER is dis played Input desired 4 digit number using number buttons TV Parental Guidelines The following table outlines the TV Parental Guidelines Y The content rating can be set but this rating is not normally broadcast by TV stations X The content rati...

Страница 21: ...uto Power Off TV AV Mode The power of the TV is turned off when there is no signal for 15 minutes Blue Screen Setting Note When received signals are weak due to low signal strength or inter ference from other signals the BLUE SCREEN function is acti vated To watch the TV under such conditions set BLUE SCREEN to off Automatically turns the screen blue if a broadcast signal is not received 1 Press M...

Страница 22: ...reen will show your present status as being STEREO ON AIR or SAP ON AIR function Highlighted TV settings indicates the TV s present status Weak reception may result in poor effects Press MTS to change settings from STEREO to MONO which will give you better sound reception If a program is being broadcast under a secondary language selection then stereo sound will not be heard Secondary language and...

Страница 23: ...e experiencing in the following lists and then apply the suggestions to resolve the problem Picture with no sound Check if you have accidentally pressed the MUTE button Check if the same problem exists on other channels If the other channels can be viewed correctly then there is probably a fault in the TV program you are viewing Verify all connections are firmly attached If the problem persists co...

Страница 24: ...electrical device Make sure that the batteries in the Remote Control are not depleted Make sure batteries are placed correctly in the Remote Control Unplug the TV for a few minutes and then turn it on again Poor sound or no sound Check volume and mute settings Check for possible sources of interference Blurred picture or no picture Check antenna or TV cable Check for possible sources of outside in...

Страница 25: ...dots x 480 V dots 20DL74 VGA 800 H dots x 600 V dots Audio Power 2 5W 2 5W Speaker Type 3 4 x 3 4 cm Video Audio Terminals S VIDEO INPUT Y 1 V p p 75 ohm negative sync C 0 286 V p p burst signal 75 ohm VIDEO AUDIO INPUT 1 2 VIDEO 1 V p p 75 ohm negative sync AUDIO 150 mV rms 30 modulation equivalent 47k ohm ColorStream component video INPUT Y 1V p p 75 ohm PR 0 7V p p 75 ohm PB 0 7V p p 75 ohm AUD...

Страница 26: ...in materials or workman ship as limited above and do not extend to any LCD TV or parts that have been lost or discarded by you or to damage to the LCD TV or parts caused by fires misuse accident Acts of God such as lightning or fluctuations in electric power improper installation improper maintenance use in violation of instructions furnished by TACP or misuse or malfunction through simultaneous u...

Страница 27: ...et installation setup adjustment of customer controls and installation or repair of antenna systems are not covered by these warranties Reception problems caused by inadequate antenna systems are your responsibility 5 Warranties extend only to defects in materials or workman ship as limited above and do not extend to any LCD TV or parts that have been lost or discarded by you or to damage to LCD T...

Страница 28: ......

Отзывы: