


32
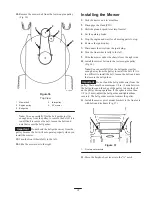
13. Slide the end of the long rod through the hole in the
mower mount (Fig. 38).
2
1
3
4
2
m–1805
m-1805
Figure 38
1.
Rod
2.
Hairpin cotter and washer
3.
Leveling bracket
4.
Mower mount
14. Install the washer and hairpin cotter to secure the rod in
place. Repeat this step on the opposite side of the
mower.
15. Mount the slotted mower leveling bracket onto the pin
on the height-of-cut arm (Fig. 38).
16. Install the washer and hairpin cotter to secure the
mower. Repeat this step on the opposite side of the
mower.
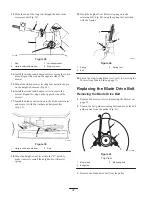
17. Install the blade control rod onto the blade control arm
and secure it with the washer and hairpin cotter
(Fig. 39).
m-1897
1
2
Figure 39
1.
Hairpin cotter and washer
2.
Rod
18. Move the height-of-cut lever into the “D” notch to
make it easier to install the height-of-cut lift assist
spring.
19. Hook the height-of-cut lift assist spring onto the
retaining bolt (Fig. 40) using the spring tool provided
with the tractor.
m-1851
1
2
3
Figure 40
1.
Spring
2.
Bolt
3.
Spring tool
20. Check the side-to-side blade level; refer to Leveling the
Mower from Side to Side on page 33.
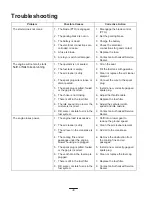
Replacing the Blade Drive Belt
Removing the Blade Drive Belt
1. Remove the mower; refer to Removing the Mower on
page 29.
2. Loosen the belt guide mounting bolts and move the belt
guides away from the pulley (Fig. 41).
m-1899
2
2
1
3
3
Figure 41
Top View
1.
Mower belt
2.
Belt guide
3.
Mounting bolt
3. Remove the blade drive belt from the pulley.


