background image

34

Troubleshooting

PROBLEM

POSSIBLE CAUSES

CORRECTIVE ACTION

Starter does not engage.

1.

Blade control (PTO) is
ENGAGED.

1.

Move blade control (PTO) to
DISENGAGED.

2.

Parking brake is not on.

2.

Set parking brake.

3.

Battery is dead.

3.

Charge the battery.

4.

Electrical connections are
corroded or loose.

4.

Check electrical connections
for good contact.

5.

Fuse is blown.

5.

Replace fuse.

6.

Relay or switch is defective.

6.

Contact Authorized Service
Dealer.

Engine will not start, starts hard, or
f il t k

i

1.

Operator is not seated.

1.

Sit on the seat.

g

,

,

fails to keep running.

2.

Fuel tank is empty.

2.

Fill fuel tank with gasoline.

3.

Air cleaner is dirty.

3.

Clean or replace air cleaner
element.

4.

Spark plug wire is loose or
disconnected.

4.

Install wire on spark plug.

5.

Spark plug is pitted, fouled, or
gap is incorrect.

5.

Install new, correctly gapped
spark plug.

6.

Choke is not closing.

6.

Check for choke operation.

7.

Dirt in fuel filter.

7.

Replace fuel filter.

8.

Idle speed is too low or
mixture is incorrect.

8.

Contact Authorized Service
Dealer.

9.

Dirt, water, or stale fuel is in
fuel system.

9.

Contact Authorized Service
Dealer.

Engine loses power.

1.

Engine load is excessive.

1.

Reduce ground speed.

g

p

2.

Air cleaner is dirty.

2.

Clean air cleaner element.

3.

Oil level in crankcase is low.

3.

Add oil to crankcase.

4.

Cooling fins and air passages
under engine blower housing
are plugged.

4.

Remove obstruction from
cooling fins and air passages.

5.

Spark plug is pitted, fouled, or
gap is incorrect.

5.

Install new, correctly gapped
spark plug.

6.

Vent hole in fuel cap is
plugged.

6.

Clean or replace the fuel cap.

7.

Dirt in fuel filter.

7.

Replace fuel filter.

8.

Dirt, water, or stale fuel is in
fuel system.

8.

Contact Authorized Service
Dealer.

Содержание Wheel Horse 17-44 HXL

Страница 1: ...Operator s Manual Domestic English EN Form No 3323 315 Wheel Horse 17 44 HXL Lawn Tractor 71197 200000001 Up...

Страница 2: ...e the product about safe operation The Toro warning system in this manual identifies potential hazards and has special safety messages that help you and others avoid personal injury even death DANGER...

Страница 3: ...by Hand 16 Driving Forward or Backward 16 Stopping the Machine 17 Tips for Mowing Grass 17 Maintenance 19 Service Interval Chart 19 Greasing and Lubrication 20 Tire Pressure 20 Brake 20 Wiring Diagram...

Страница 4: ...e Be sure the area is clear of other people before mowing Stop the machine if anyone enters the area Never carry passengers Do not mow in reverse unless absolutely necessary Always look down and behin...

Страница 5: ...ion could cause sliding Do not try to stabilize the machine by putting your foot on the ground Do not use a grass catcher on steep slopes Children Tragic accidents can occur if the operator is not ale...

Страница 6: ...intenance or adjustments Slow down before turning Sharp turns on any terrain may cause loss of control Never leave a running machine unattended Always turn off blades set parking brake stop engine and...

Страница 7: ...Safety 5 Slope Chart Read all safety instructions on pages 2 4...

Страница 8: ...6...

Страница 9: ...y area of potential danger Replace any decal that is damaged or lost ON DASH LEFT SIDE Part No 92 2461 ON STEERING TOWER Part No 92 2462 ON FRAME LEFT REAR Part No 93 6678 ON DASH RIGHT SIDE Part No 9...

Страница 10: ...and stay away from an open flame or where gasoline fumes may be ignited by a spark Store gasoline in an approved container and keep it out of the reach of children Never buy more than a 30 day supply...

Страница 11: ...when mixed with fresh gasoline To minimize the chance of varnish deposits in the fuel system use fuel stabilizer at all times Filling the Fuel Tank 1 Shut the engine off and set the parking brake 2 Cl...

Страница 12: ...tor 7 Height of cut lever deck lift 8 Parking brake lever 9 Throttle lever 10 Hood opening 11 Operating in Reverse light 12 Key Choice switch Parking Brake Always set the parking brake when you stop t...

Страница 13: ...tional on some models A dash mounted ON OFF switch Fig 1 controls the headlights The lights only shine while the engine is running and the switch is ON Using the Blade Control PTO The blade control PT...

Страница 14: ...the parking brake or fully depress the brake pedal 3 Move the blade control PTO to DISENGAGED Fig 6 4 Move the throttle lever to CHOKE Fig 7 Note An engine that has been running and is warm may not re...

Страница 15: ...pped by turning the ignition key to OFF The Safety Interlock System Understanding the Safety Interlock System The safety interlock system is designed to prevent the engine from starting unless You are...

Страница 16: ...d light on the front console Fig 10 will turn on as a reminder that the no operating in reverse interlock has been deactivated Once the interlock is deactivated it stays in this mode with your mower b...

Страница 17: ...the engine should not crank 3 Set the parking brake and move the blade control PTO to DISENGAGED Now start the engine While the engine is running release the parking brake and rise slightly from the...

Страница 18: ...Driving Forward or Backward The throttle control regulates the engine speed as measured in rpm revolutions per minute Place the throttle control in the FAST position for best performance To go forward...

Страница 19: ...rass which allows air to be drawn into the mower Using the Mower for the First Time Cut grass slightly longer than normal to ensure the cutting height of the mower does not scalp any uneven ground How...

Страница 20: ...utting height higher than usual and cut the grass at this setting Then cut the grass again using the lower normal setting When Stopping If the machine s forward motion must be stopped while mowing a c...

Страница 21: ...check for wear cracks X Gasoline drain X Engine clean outside X X Mower Housing clean X X X Chipped Surfaces paint X Battery check electrolyte X X X X X Battery charge disconnect cables X Fuel Filter...

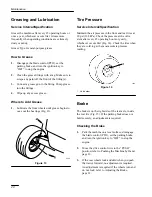
Страница 22: ...ervice Interval Specification Maintain the air pressure in the front and rear tires at 20 psi 138 kPa Check the pressure at the valve stem after every 25 operating hours or yearly whichever occurs fir...

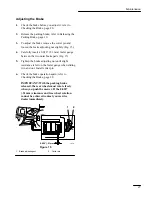
Страница 23: ...e between the two outer brake pads Fig 15 5 Tighten the brake adjusting nut until slight resistance is felt on the feeler gauge when sliding it in and out Install cotter pin 6 Check the brake operatio...

Страница 24: ...Maintenance 22 Wiring Diagram...

Страница 25: ...lder 1 4 turn counterclockwise and remove it from the reflector Fig 17 4 Push and rotate the bulb counterclockwise until it stops approx 1 4 turn and remove bulb from the bulb holder Fig 18 1 2 3 4 4...

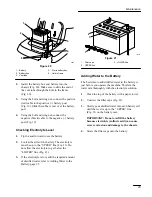
Страница 26: ...ery 3 Disconnect the negative black ground cable from the battery post Fig 19 4 Slide the rubber cover up the positive red cable Disconnect the positive red cable from the battery post Fig 19 5 Remove...

Страница 27: ...e up to the UPPER line Fig 21 Do not allow the electrolyte to get below the LOWER line Fig 21 3 If the electrolyte is low add the required amount of distilled water refer to Adding Water to the Batter...

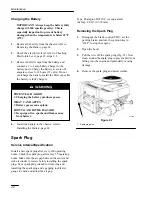
Страница 28: ...ep cigarettes sparks and flames away from battery 4 Install the battery in the chassis refer to Installing the Battery page 24 Spark Plug Service Interval Specification Install a new spark plug after...

Страница 29: ...gasoline is extremely flammable and highly explosive WHAT CAN HAPPEN A fire or explosion from gasoline can burn you others and cause property damage HOW TO AVOID THE HAZARD Drain gasoline from the fue...

Страница 30: ...from the fuel lines 5 Install a new filter and move the hose clamps close to the filter 6 Close the hood Air Cleaner Service Interval Specification Foam Element Clean and re oil after every 25 operat...

Страница 31: ...B Dry the element by squeezing it in a clean cloth C Put one or two ounces of oil on the element Fig 28 Squeeze the element to distribute the oil IMPORTANT Replace the foam element if it is torn or w...

Страница 32: ...e Interval Specification Change oil After the first 5 operating hours After every 25 operating hours Note Change oil more frequently when operating conditions are extremely dusty or sandy Oil Type Det...

Страница 33: ...rk the machine so that the right front side is slightly lower than the left side to assure the oil drains completely Then disengage the blade control PTO set the parking brake and turn the ignition ke...

Страница 34: ...urn the ignition key to OFF to stop the engine Remove the ignition key 2 Remove grass clippings dirt and grime from the external parts of the entire machine especially the engine Clean dirt and chaff...

Страница 35: ...an alcohol based stabilizer ethanol or methanol Note A fuel stabilizer conditioner is most effective when mixed with fresh gasoline and used at all times B Run engine to distribute conditioned fuel th...

Страница 36: ...ark plug is pitted fouled or gap is incorrect 5 Install new correctly gapped spark plug 6 Choke is not closing 6 Check for choke operation 7 Dirt in fuel filter 7 Replace fuel filter 8 Idle speed is t...

Страница 37: ...ankcase 3 Cooling fins and air passages under engine blower housing are plugged 3 Remove obstruction from cooling fins and air passages Machine does not drive 1 Drive control is in PUSH position 1 Mov...

Страница 38: ......

Страница 39: ......

Страница 40: ...1 3 4 9 1442 3 943 11 4 7 77 39 2 9 77 39 47 422 7 1 8 438 2 7 3 74 98 0 4 2 89 2 39 3 4 7 74 9 4114 3 9 2 3 9 3 3 574 7 8 8 7 3 9 45 7 947 8 2 3 1 74 9 3 2 39 3 3 9 7 5 7 472 1 7 47 4 8 9 4 7 5 38 0...

Отзывы: