background image

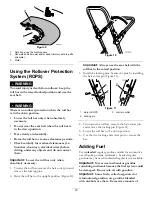
G008952

Figure 25

Driving Backward

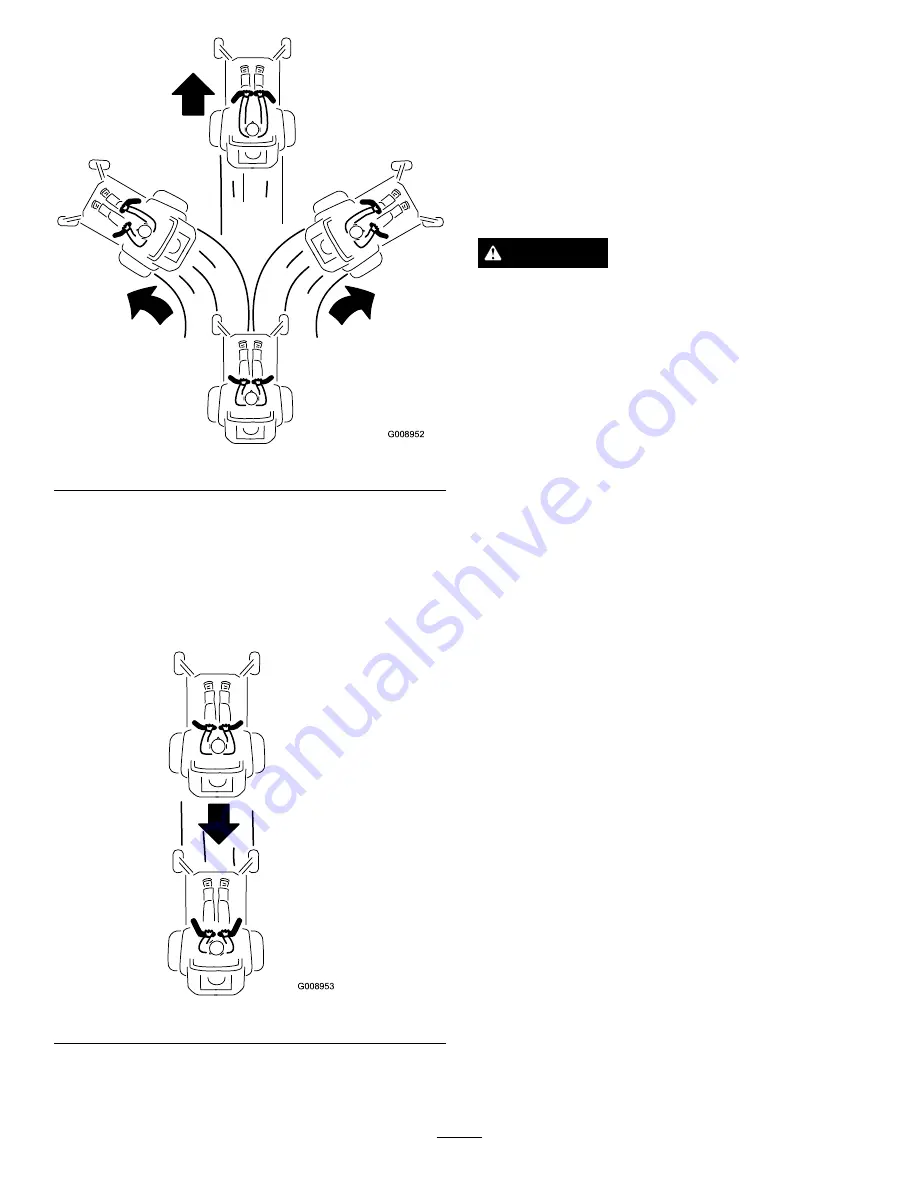
1. Move the levers to the center, unlocked position.

2. To go backward, look behind you and down as

you slowly pull the motion control levers rearward
(Figure 26).

G008953

Figure 26

Stopping the Machine

To stop the machine, move the traction control levers
to neutral and move to locked position, disengage the
blade control switch (PTO), and turn the ignition key
to off.

Set the parking brake when you leave the machine; refer
to Setting the Parking Brake. Remember to remove the
key from the ignition switch.

CAUTION

Children or bystanders may be injured if they
move or attempt to operate the tractor while it is
unattended.

Always remove the ignition key and set the parking
brake when leaving the machine unattended, even
if just for a few minutes.

Adjusting the Height of Cut

The machine is equipped with a foot pedal deck lift
system. The operator can use the foot pedal to lift
the deck briefly to avoid obstacles or lock the deck in
the highest height-of-cut or transport position. The
operator can use the height of cut lever with the foot
pedal to lock the deck in a specific cutting height.

Using the Foot Pedal Deck Lift System

Press the pedal down to raise the deck; continue to
press the pedal until the deck is locked in the transport
position Figure 27. Push on the deck lift pedal with
your foot and raise the height-of-cut lever slightly to
disengage the transport lock.

25

Содержание TITAN ZX5020

Страница 1: ...TITAN ZX5020 Zero Turn Radius Riding Mower Model No 74840 Serial No 311000001 and Up G015749 To register your product or download an Operator s Manual or Parts Catalog at no charge go to www Toro com Original Instructions EN ...

Страница 2: ...the engine manufacturer in accordance with SAE J1940 As configured to meet safety emission and operating requirements the actual engine horsepower on this class of lawn mower will be significantly lower Introduction Read this information carefully to learn how to operate and maintain your product properly and to avoid injury and product damage You are responsible for operating the product properly...

Страница 3: ...harge 28 Operating Tips 28 Maintenance 30 Recommended Maintenance Schedule s 30 Premaintenance Procedures 32 Raising the Seat 32 Removing the Floor Pan 32 Lubrication 32 Greasing the Bearings 32 Engine Maintenance 33 Servicing the Air Cleaner 33 Servicing the Engine Oil 34 Servicing the Spark Plug 36 Cleaning the Blower Housing 37 Fuel System Maintenance 37 Replacing the Fuel Filter 37 Servicing t...

Страница 4: ...y Always look down and behind before and while backing up Be aware of the mower discharge direction and do not point it at anyone Avoid discharging material against a wall or obstruction Material may ricochet back toward the operator Stop the blade s when crossing gravel surfaces Do not operate the machine without deflector discharge cover or entire grass collection system in place and working Be ...

Страница 5: ...rop offs or water Lower the rollbar only when absolutely necessary Do not wear the seat belt with the roll bar folded down Check carefully for overhead clearances i e branches doorways electrical wires before driving under any objects and do not contact them Children Tragic accidents can occur if the operator is not alert to the presence of children Children are often attracted to the machine and ...

Страница 6: ... and inspect the equipment if you strike an object Repair if necessary before restarting Never make any adjustments or repairs with the engine running Grass catcher components are subject to wear damage and deterioration which could expose moving parts or allow objects to be thrown Frequently check components and replace with manufacturers recommended parts when necessary Mower blades are sharp an...

Страница 7: ... degrees Use the slope chart to determine the degree of slope of hills before operating Do not operate this machine on a slope greater than 15 degrees Fold along the appropriate line to match the recommended slope 2 Align this edge with a vertical surface a tree building fence pole etc 3 Example of how to compare slope with folded edge 7 ...

Страница 8: ...w 115 9625 1 Parking brake disengaged 2 Parking brake engaged 117 5344 1 Lock 2 Read the Operator s Manual 117 1158 1 Bypass lever position for operating the machine 2 Bypass lever position for pushing the machine 115 9632 1 Power take off PTO Blade control switch on some models 5 Fast 2 Blade control switch On 6 Continuous variable setting 3 Blade control switch Off 7 Slow 4 Choke 114 1606 1 Enta...

Страница 9: ...g parts 2 Thrown objects hazard mower keep the discharge deflector or collection system in place 112 9840 1 Read the Operator s Manual 3 Remove the ignition key and read the instructions before servicing or performing maintenance 2 Height of cut 99 3943 For Models with 50 Inch Decks 1 Engine 107 3069 1 Warning there is no rollover protection when the roll bar is down 2 To avoid injury or death fro...

Страница 10: ...battery 1 Explosion hazard 6 Keep bystanders a safe distance from the battery 2 No fire open flame or smoking 7 Wear eye protection explosive gases can cause blindness and other injuries 3 Caustic liquid chemical burn hazard 8 Battery acid can cause blindness or severe burns 4 Wear eye protection 9 Flush eyes immediately with water and get medical help fast 5 Read the Operator s Manual 10 Contains...

Страница 11: ...f bystanders reversing do not carry passengers look behind and down when reversing 3 Cutting dismemberment hazard mower blade entanglement hazard belt stay away from moving parts keep all guards and shields in place 7 Thrown object hazard keep bystanders a safe distance from the machine pick up debris before operating keep deflector in place 4 Warning do not use split ramps use a full ramps when t...

Страница 12: ...e 4 Check the hydraulic oil every 25 hours 2 Check the engine oil every 8 hours 5 Check the caster wheel tire pressure every 25 hours 3 Check the drive wheel tire pressure every 25 hours 6 Lubricate the caster wheel every 25 hours 119 8985 1 Fuel 2 Full 3 Half 4 Empty 12 ...

Страница 13: ...ry cable 2 Completing the Setup Parts needed for this procedure 1 Ignition Key 1 Hose coupling 1 Operator s Manual 1 Engine Operator s Manual 1 Operator Training Material Procedure Checking the Tire Pressure Check the front and rear tires for proper inflation Refer to Checking the Tire Pressure in the Operator s Manual for the recommended inflation pressure Checking the Side Discharge Chute Remove...

Страница 14: ...e side to side level and the front to rear blade slope See the Operator s Manual for the proper procedure Review the Remaining Parts Keep all the following items with the machine Ignition Key Hose coupling Operator s Manual Engine Operator s Manual View the Operator training material 14 ...

Страница 15: ...evers 7 Front caster wheel 10 Deflector 2 Operator seat 5 Parking brake 8 Anti scalp roller 3 Roll over protection system ROPS 6 Footrest 9 Foot pedal deck lift and height of cut G014716 1 2 3 4 Figure 6 1 Mower Deck 2 Drive wheel 3 Engine 4 Roll over protection system ROPS folded down 15 ...

Страница 16: ...hours the blades have operated It operates when the blade control switch PTO is engaged Use these times for scheduling regular maintenance Figure 7 Fuel Gauge The fuel window located below the operator position can be used to verify the level of gasoline in the tank Figure 8 G010077 1 Figure 8 1 Fuel gauge window Motion Control Levers The motion control levers are speed sensitive controls of indep...

Страница 17: ...in the safety section Knowing this information could help you your family pets or bystanders avoid injury DANGER Mowing on wet grass or steep slopes can cause sliding and loss of control Wheels dropping over edges can cause rollovers which may result in serious injury death or drowning A loss of traction is a loss of steering control To avoid loss of control and possibility of rollover Do not mow ...

Страница 18: ...bar remove the hair cotter pin and remove the locking pins 2 Raise the roll bar to the upright position Figure 10 G015034 Figure 10 Important Always use the seat belt with the roll bar in the raised position 3 Install the locking pins Secure the pins by installing the hair cotter pin Figure 11 G015035 1 2 3 2 Figure 11 1 Hole in ROPS 3 Hair pin cotter 2 Locking pin 4 Two lower the roll bar remove ...

Страница 19: ...y Always place gasoline containers on the ground away from your vehicle before filling Do not fill gasoline containers inside a vehicle or on a truck or trailer bed because interior carpets or plastic truck bed liners may insulate the container and slow the loss of any static charge When practical remove gas powered equipment from the truck or trailer and refuel the equipment with its wheels on th...

Страница 20: ... result in fuel leakage or damage to the engine or emission system 1 Clean around the fuel tank cap and remove the cap Note You can use the fuel window below the operating position verify the presence of gasoline before filling the tank Figure 12 2 Slowly add regular unleaded gasoline until the fuel reaches the base of the filler neck Figure 13 G010475 1 2 4 3 Figure 13 3 Install the fuel tank cap...

Страница 21: ... the choke to disengage the choke after the engine has started Figure 17 G008959 1 2 Figure 17 1 On 2 Off Operating the Ignition Switch 1 Turn the ignition key to the Start position Figure 18 When the engines starts release the key Important Do not engage starter for more than 5 seconds at a time If the engine fails to start allow a 15 second cool down period between attempts Failure to follow the...

Страница 22: ... engines starts release the key Important Do not engage starter for more than 5 seconds at a time If the engine fails to start allow a 15 second cool down period between attempts Failure to follow these instructions can burn out the starter motor Note Additional starting cycles may be required when starting the engine for the first time after the fuel system has been without fuel completely STA RT...

Страница 23: ...system is designed to prevent the engine from starting unless The parking brake is engaged The blades are disengaged The motion control levers are in the neutral lock position The safety interlock system also is designed to stop the engine when the control levers are out of the neutral lock position with the parking brake on or if you rise from the seat when the blades are engaged Testing the Safe...

Страница 24: ...red in rpm revolutions per minute Place the throttle control in the fast position for best performance Always operate in the full throttle position when mowing CAUTION Machine can spin very rapidly Operator may lose control of machine and cause personal injury or damage to machine Use caution when making turns Slow the machine down before making sharp turns Using the Motion Control Levers Figure 2...

Страница 25: ...to operate the tractor while it is unattended Always remove the ignition key and set the parking brake when leaving the machine unattended even if just for a few minutes Adjusting the Height of Cut The machine is equipped with a foot pedal deck lift system The operator can use the foot pedal to lift the deck briefly to avoid obstacles or lock the deck in the highest height of cut or transport posi...

Страница 26: ...owest height of cut use only for deck removal 2 Cut height pin 5 Lock position transport position 3 Height of cut positions Using the Lock Positions The deck can be locked in the highest height of cut or transport position or the lowest height of cut position To lock the deck in the transport position 1 Push on the deck lift pedal with your foot and raise the mower deck to the transport position a...

Страница 27: ...ired position Figure 30 G010232 1 Figure 30 1 Adjustment lever Adjusting the Motion Control Levers Adjusting the Height The motion control levers can be adjusted higher or lower for maximum operator comfort 1 Remove the 2 bolts and 2 washers holding the control lever to the control arm shaft Figure 31 2 Move the control lever to the next set of holes Secure the lever with the 2 bolts and 2 washers...

Страница 28: ...m the mower because the grass deflector routes material down toward the turf If the grass deflector is ever damaged replace it immediately Never put your hands or feet under the mower Never try to clear the discharge area or mower blades unless you move the blade control switch PTO to the off position rotate the ignition key to off and remove the key Make sure the grass deflector is in the down po...

Страница 29: ...ing height higher than usual and cut the grass at this setting Then cut the grass again using the lower normal setting When Stopping If the machine s forward motion must be stopped while mowing a clump of grass clippings may drop onto your lawn To avoid this move onto a previously cut area with the blades engaged Keep the Underside of the Mower Clean Clean clippings and dirt from the underside of ...

Страница 30: ...e often under dusty dirty conditions Change the engine oil more often under dusty dirty conditions Clean the blower housing More often under dirty conditions Replace the fuel filters more often under dusty dirty conditions Inspect the emissions filter Every 200 hours Change the engine oil filter Check spark plug s condition and gap Every 400 hours Change the hydraulic system filter and oil Every 5...

Страница 31: ...nual before performing any maintenance 4 Check the hydraulic oil every 25 hours 2 Check the engine oil every 8 hours 5 Check the caster wheel tire pressure every 25 hours 3 Check the drive wheel tire pressure every 25 hours 6 Lubricate the caster wheel every 25 hours 31 ...

Страница 32: ...ral Purpose Lithium Base Grease 1 Park the machine on a level surface and disengage the blade control switch 2 Move the motion control levers outward to the neutral lock position stop the engine remove the key and wait for all moving parts to stop before leaving the operating position 3 Clean the grease fittings Figure 35 and Figure 33 with a rag Make sure to scrape any paint off of the front of t...

Страница 33: ... Note Service the air cleaner more often under extremely dusty dirty conditions G010338 1 2 3 4 5 6 Figure 36 1 Air cleaner cover 4 Air cleaner base 2 Air cleaner latch 5 Foam element 3 Air cleaner 6 Paper element Servicing Foam Element Check the foam element every 25 hours of operation more often under extremely dusty or dirty conditions Clean or replace the element as necessary Replace the air c...

Страница 34: ...petroleum based oil before switching to synthetic oil Checking the Engine Oil Level Service Interval Before each use or daily Note Check the oil when the engine is cold WARNING Contact with hot surfaces may cause personal injury Keep hands feet face clothing and other body parts away the muffler and other hot surfaces Important Do not overfill the crankcase with oil because damage to the engine ma...

Страница 35: ... Oil Service Interval After the first 8 hours Every 100 hours more often under dusty dirty conditions Note Dispose of the used oil at a recycling center 1 Start the engine and let it run five minutes This warms the oil so it drains better 2 Park the machine so that the drain side is slightly lower than the opposite side to assure the oil drains completely 3 Disengage the blade control switch PTO m...

Страница 36: ...ging the Oil Servicing the Spark Plug Service Interval Every 200 hours Check spark plug s condition and gap Every 500 hours Replace the spark plug s The spark plug is RFI compliant Equivalent alternate brand plugs can also be used Spark plug replacement is recommended at 500 hours Type Champion XC12YC or equivalent Air Gap 0 030 inch 0 76 mm Removing the Spark Plug 1 Disengage the blade control sw...

Страница 37: ...e to overheating Fuel System Maintenance Replacing the Fuel Filter Service Interval Every 100 hours Yearly whichever comes first more often under dusty dirty conditions 1 Disengage the blade control switch PTO move the motion control levers to the neutral lock position and set the parking brake 2 Stop the engine remove the key and wait for all moving parts to stop before leaving the operating posi...

Страница 38: ...val Monthly WARNING CALIFORNIA Proposition 65 Warning Battery posts terminals and related accessories contain lead and lead compounds chemicals known to the State of California to cause cancer and reproductive harm Wash hands after handling DANGER Battery electrolyte contains sulfuric acid which is a deadly poison and causes severe burns Do not drink electrolyte and avoid contact with skin eyes or...

Страница 39: ...ositive red battery cable Figure 45 7 Remove the battery Installing the Battery 1 Position battery in the tray with the terminal posts opposite from the fuel tank Figure 45 2 First install the positive red battery cable to positive battery terminal 3 Then install the negative battery cable to the negative battery terminal 4 Secure the cables with 2 bolts 2 washers and 2 locknuts Figure 45 5 Slide ...

Страница 40: ... a fuse blows check the component circuit for a malfunction or short Fuses Main 30 amp blade type Engine 20 amp blade type 1 The fuses are located on right hand console next to the seat Figure 47 2 To replace the fuses pull out on the fuse to remove it 3 Install a new fuse of the same amperage removed Figure 47 30 25 1 2 3 G015037 4 Figure 47 1 30 amp 3 Open accessory slot 2 25 amp 4 Fuse block 40...

Страница 41: ...il Type 20w 50 engine oil Important Use oil specified or equivalent Other fluids could cause system damage Checking the Hydraulic Oil Level Service Interval Every 25 hours Check expansion reservoir and if necessary add 20W 50 engine oil to the FULL COLD line G010253 1 2 3 Figure 49 1 Expansion reservoir 3 Engine 2 Full Cold line Changing the Hydraulic System Filter and Oil The filter and oil are c...

Страница 42: ... 3 4 1 2 3 4 5 6 Figure 51 1 Apply a thin coat of oil on the surface of the rubber seal of each filter 2 Turn the filter clockwise until rubber seal contacts the filter adapter then tighten the filter an additional 3 4 to 1 full turn Repeat for the other filter 3 Install the filter guards over each filter as previously removed Use the three screws to secure the filter guards 4 Verify the vent plug...

Страница 43: ...ast time Add the specified oil as until it reaches the FULL COLD line on the expansion reservoir if necessary Mower Deck Maintenance Servicing the Cutting Blades Maintain sharp blades throughout the cutting season because sharp blades cut cleanly without tearing or shredding the grass blades Tearing and shredding turns grass brown at the edges which slows growth and increases the chance of disease...

Страница 44: ...g edge and the level surface the machine is on G009679 1 2 3 Figure 54 1 Deck 3 Blade 2 Spindle housing 3 Measure from the tip of the blade to the flat surface here G009680 1 2 3 Figure 55 1 Blade in position for measuring 2 Level surface 3 Measured distance between blade and surface A 4 Rotate the same blade 180 degrees so that the opposing cutting edge is now in the same position G009681 1 2 3 F...

Страница 45: ... To ensure optimum performance and continued safety conformance of the machine use genuine Toro replacement blades Replacement blades made by other manufacturers may result in non conformance with safety standards Hold the blade end using a rag or thickly padded glove Remove the blade bolt curved washer and blade from the spindle shaft Figure 58 1 2 3 4 G010341 Figure 58 1 Sail Area of Blade 3 Cur...

Страница 46: ... control levers outward to the neutral lock position stop the engine remove the key set the parking brake and wait for all moving parts to stop before leaving the operating position 3 Carefully rotate the blades side to side 4 Measure between the outside cutting edges and the flat surface Figure 61 If both measurements are not within 3 16 inch 5 mm an adjustment is required continue to the Levelin...

Страница 47: ...four leveling adjust locking nuts Figure 64 G010312 1 2 3 4 1 6 5 3 Figure 64 1 Deck lift arm 4 Slot in deck hanger 2 Deck hanger 5 Slot in rear deck hanger bracket 3 Leveling adjust locking nut 6 Rear deck hanger bracket 5 Recheck that blocks fit just snugly under the deck skirt Make sure all attachment bolts are tight 6 Verify the deck is level by checking the side to side level and front to rea...

Страница 48: ...idler spring over the deck hook and placing tension on the idler pulley and mower belt route the belt onto the idler pulley Figure 65 9 Ensure that the belt is properly seated in all pulleys 10 Install the belt covers over the outside spindles Removing the Mower 1 Park the machine on a level surface and disengage the blade control switch 2 Move the motion control levers outward to the neutral posi...

Страница 49: ...y Inspect the grass deflector for damage WARNING An uncovered discharge opening could allow the lawn mower to throw objects in the operator s or bystander s direction and result in serious injury Also contact with the blade could occur Never operate the machine without grass deflector discharge cover or grass collection system in place Inspect the grass deflector for damage before each use Replace...

Страница 50: ... height of cut 5 Sit on the seat and start the engine Engage the blade control switch and let the mower run for one to three minutes 6 Disengage the blade control switch stop the engine and remove the ignition key Wait for all moving parts to stop 7 Turn the water off and remove the coupling from the washout fitting Note If the mower is not clean after one washing soak it and let it stand for 30 m...

Страница 51: ...n wash the mower with a garden hose Note Run the machine with the blade control switch PTO engaged and the engine at high idle for 2 to 5 minutes after washing 11 Check the condition of the blades refer to Servicing the Cutting Blades in the Maintenance Section 12 Prepare the machine for storage when non use occurs over 30 days Prepare the machine for storage as follows A Add a petroleum based sta...

Страница 52: ...Replace seat if needed 9 Electrical connections are corroded loose or faulty 9 Check the electrical connections for good contact Clean connector terminals thoroughly with electrical contact cleaner apply dielectric grease and reconnect 10 Relay or switch is defective 10 Contact an Authorized Service Dealer 11 Faulty spark plug 11 Clean adjust or replace spark plug Engine will not start starts hard...

Страница 53: ...rvice Dealer 6 Blade spindle is bent 6 Contact an Authorized Service Dealer Abnormal vibration 7 Motor mount is loose or worn 7 Contact an Authorized Service Dealer 1 Blade s not sharp 1 Sharpen the blade s 2 Cutting blade s is are bent 2 Install new cutting blade s 3 Mower deck is not level 3 Level mower deck from side to side and front to rear 4 Underside of mower is dirty 4 Clean the underside ...

Страница 54: ...Schematics G010474 Wire Diagram Rev A 54 ...

Страница 55: ...Notes 55 ...

Страница 56: ...nder warranty 3 If for any reason you are dissatisfied with the Service Dealer s analysis or with the assistance provided contact us at Customer Care Department RLC Division Toro Warranty Company 8111 Lyndale Avenue South Bloomington MN 55420 1196 Toll free at 866 216 6029 U S customers Toll free at 866 216 6030 Canadian customers Items and Conditions Not Covered There is no other express warranty...

Отзывы: