


12
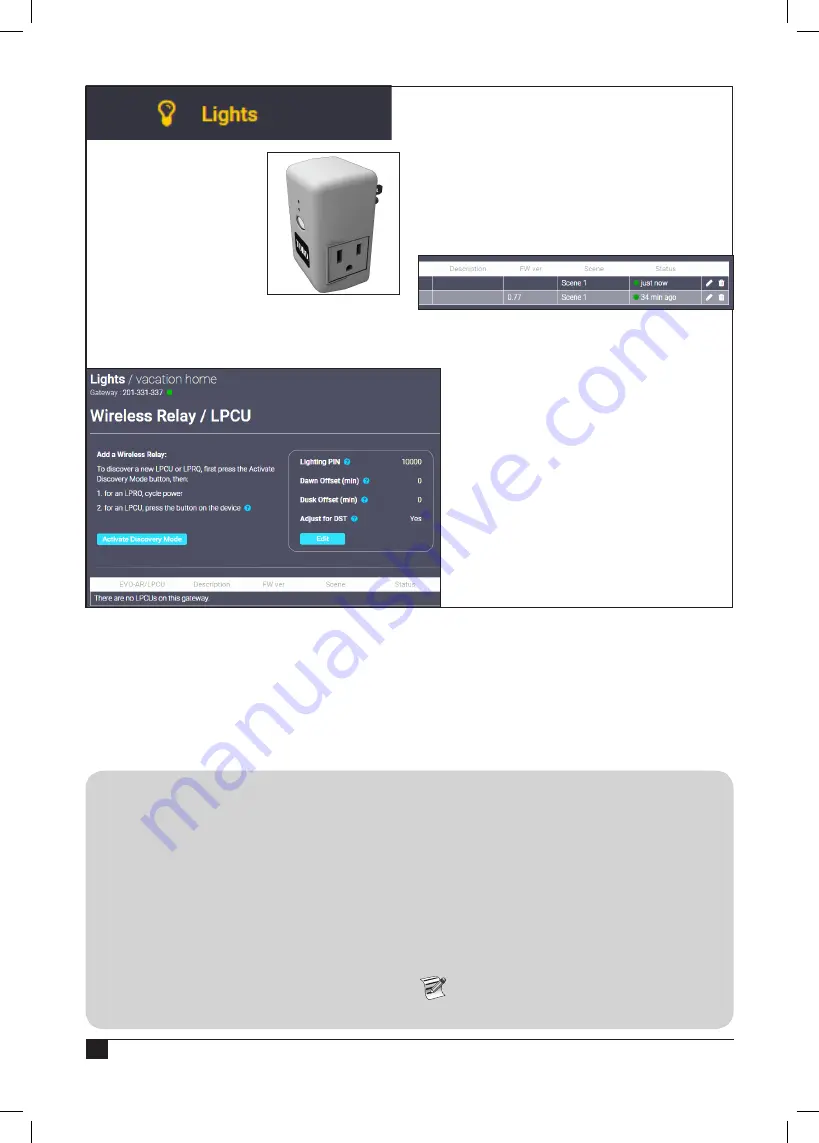
To control lights with the
SMRT
SCAPE
.com website,
you must first add LPCUs
to the SMRT
SCAPE
website,
similar to how you added the
irrigation controller.
Add an LPCU
1. Plug a LPCU into an
outlet.
2. On the SMRT
SCAPE
.com
website / app, click the
Lights
tab and click
Activate Discovery Mode
button.
3.
Discovery Mode is activated with a countdown
timer. Now, press the button on the LPCU.
4. LPCU should be quickly detected. Assign the
LPCU to a Scene and edit the Description field
as desired.
5. Click the
Add LPCU
button. You will receive a
confirmation message that the LPCU was added
to the scene.
Edit an LPCU
Click the pencil icon by the LCPU to edit.
Change the Scene and Description fields as
desired. Click
Submit
when done.
Delete an LPCU
1. Click the
trash can icon
by the LCPU to
delete.
2. Click
Yes
at the confirmation prompt.
LPCU / EVO-AR
Controller PIN Setup
The SMRT Logic PIN must match the PIN entered in
the EVOLUTION controller or Climate Logic device for
the system to operate.
Use the included
SMRT Logic Information Card
to
record the necessary info from the SMRT Logic device
and the irrigation controller for easy entry into the
SMRT
SCAPE
.com website.
To setup a new PIN or view an existing one, follow
these steps at the irrigation controller:
For an EVOLUTION controller:
Go to ADVANCED
►
ADD/REMOVE
DEVICE
►
REMOTE.
For a Climate Logic controller:
Go to MENU
►
REMOTE.
For a Climate Logic Mini Receiver (CL-MR):
1. Put the Mini Receiver into Learn Mode by
holding down its button for more than 8
seconds.
2. Enter the PIN under the corresponding
SMRT
SCAPE
controller page.
3. Manually turn a station ON or OFF.
4. The Mini Receiver will learn the new PIN
and exit Learn Mode.
The PIN can be set in the CL-MR using a
remote transmitter (CL-R1). See the CL-MR
manual for instructions.
Содержание A-SMRT-T
Страница 15: ...15 Notes...


