1
All Rights Reserved
Printed in the USA
2001 by The Toro Company
8111 Lyndale Avenue South
Bloomington, MN 55420-1196
Update Kit
Workman
2100 Utility Vehicle
Part No. 99-7019
Form No. 3327-416
Installation Instructions
Position the machine on a level surface, stop the engine,
and remove the key.
If you leave the key in the ignition switch,
someone could accidently start the engine and
seriously injure you or other bystanders.
Remove the key from the ignition switch before
you do any maintenance.
Caution
Replacing the Hood and
Updating the Steering Column
1. Remove the old hood.
2. Remove headlights and the rubber seals around each
light; refer to the Service Manual for instructions.
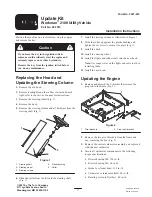
3. Remove the steering wheel (Fig. 1).
4. Remove the dash.
5. Remove the steering column and all hardware from the
steering shaft (Fig. 1).
1
2
3
4
5
Figure 1
1.
Steering shaft
2.
Steering wheel
3.
Steering column
4.
Plastic bushing
5.
Collar
6. Slide the collar from the kit onto the steering shaft
(Fig. 1).
7. Install the steering column as illustrated in Figure 1.
8. Slide the collar up against the plastic bushing and
tighten the set screw to secure it in place (Fig. 1).
9. Install the dash.
10. Install the steering wheel.
11. Install the lights and rubber seals into the new hood.
Note: Use soapy water on the lights and seals to aid in
installing them.
12. Install the new hood.
Updating the Engine
1. Remove and discard the U-bracket that secures the
prop rod to the frame (Fig. 2).
1
2
Figure 2
1.
Pivot brackets
2.
Prop rod U-bracket
2. Remove the two pivot brackets from the frame and
box, removing the box (Fig. 2).
3. Remove the current carburetor assembly and replace it
with the new carburetor.
4. Secure all carburetor components to the following
torque specifications:
•
Blower housing M8: 150 in.-lb.
•
Blower housing M6: 60 in.-lb.
•
Intake to cylinder head: 150 in.-lb.
•
Carburetor to intake manifold: 80 in.-lb.
•
Rotating screen to flywheel: 40 in.-lb.


