background image

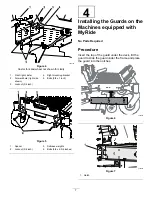
g299302

Figure 19

50-inch decks only

3.

Rotate the baffle until it makes contact with the
mower deck.

g300376

Figure 20

4.

Tilt the chute and install the pin into the hole on
the mower deck as shown in

Figure 21

.

g300377

Figure 21

5.

Pivot the chute back and toward the deck so the
chute is flush with the mower deck.

Note:

Ensure that the retaining hook on the

cute is out of the way so the chute opening
mounts flush to the deck.

6.

On the top of the chute, engage the
hook-shaped latch around the pivot rod of the
deflector assembly and install the rod into the
hole on the mower deck (

Figure 22

).

12


Содержание 79412

Страница 1: ...Form No 3436 959 Rev A 50in or 54in Bagger Zero Turn Radius Riding Mower Model No 79412 Serial No 400000000 and Up Register at www Toro com Original Instructions EN 3436 959 A ...

Страница 2: ...ch signals a hazard that may cause serious injury or death if you do not follow the recommended precautions g000502 Figure 2 1 Safety alert symbol This manual uses 2 words to highlight information Important calls attention to special mechanical information and Note emphasizes general information worthy of special attention Contents Safety 3 Towing Safety 3 Safety and Instructional Decals 4 Setup 5...

Страница 3: ...hine on level ground disengage the drives engage the parking brake shut off the engine and remove the key before leaving the operator s position for any reason including emptying the grass catcher or unclogging the chute If you remove the grass catcher be sure to install any discharge deflector or guard that might have been removed to install the grass catcher Do not operate the mower without eith...

Страница 4: ...whole bagger from the machine open the bagger top and then remove the bag s from the bagger Do not remove the bagger top when it is closed open the bagger top and then remove it decal110 6691 110 6691 1 Thrown object hazard keep bystanders away 2 Thrown object hazard mower do not operate without the deflector discharge cover or grass collection system in place 3 Cutting dismemberment hazard of han...

Страница 5: ...required Installing the guards on the machines equipped with MyRide Stabilizer bracket 1 Carriage bolt 5 16 x 3 4 inch 2 Locknut 5 16 inch 4 Self tapping screw 5 16 x 3 4 inch 2 Bolt 5 16 x 1 inch 2 Pivot frame 1 Hairpin cotter 2 Rod 2 5 Washer 2 Install the attachment mount Latch rod 1 6 Hairpin cotter 1 Install the latch rod Bagger top 1 7 Bagger screen 1 Assemble the bagger top Grass Bag 2 Uppe...

Страница 6: ...ger changes the weight distribution of the machine Operating the machine without the front weights may cause an unstable condition which could result in a loss of control Ensure the front weights are properly installed before operating the machine with the bagger attachment 1 Install the weight mounting brackets to the under side of the frame using 2 bolts 3 8 x 1 inch and 2 locknuts 3 8 inch as s...

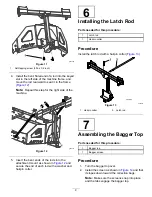
Страница 7: ...knut 3 8 inch g299244 Figure 5 1 Spacer 3 Suitcase weights 2 Locknut 3 8 inch 4 Bolts 5 8 x 2 3 4 inches 4 Installing the Guards on the Machines equipped with MyRide No Parts Required Procedure Insert the top of the guard under the deck tilt the guard to slide the guard under the frame and place the guard into the notches g308505 Figure 6 g308526 Figure 7 1 Notch 7 ...

Страница 8: ...Install the stabilizer bracket to the engine guard using 2 carriage bolts 5 16 x 3 4 inch and 2 locknuts 5 16 inch Figure 9 g300204 Figure 9 1 Carriage bolt 5 16 x 3 4 inch 2 Locknut 5 16 inch 2 Install the pivot frame to the machine frame as shown in Figure 10 Secure the pivot frame to the machine frame using 2 bolts 5 16 x 1 inch and 2 locknuts 5 16 inch g300205 Figure 10 1 Locknut 5 16 inch 2 B...

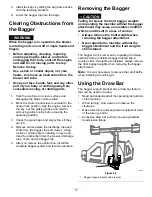
Страница 9: ... 12 and secure the end of each rod with a washer and hairpin cotter 6 Installing the Latch Rod Parts needed for this procedure 1 Latch rod 1 Hairpin cotter Procedure Install the latch rod with a hairpin cotter Figure 13 g033027 Figure 13 1 Hairpin cotter 2 Latch rod 7 Assembling the Bagger Top Parts needed for this procedure 1 Bagger top 1 Bagger screen Procedure 1 Turn the bagger top over 2 Insta...

Страница 10: ...he bagger top to the bagger frame 2 Install the pivot brackets onto the pivot frame Figure 12 3 Secure the bagger top to the pivot brackets with 4 bolts 5 16 x 1 inch and 4 nuts 5 16 inch Note The bagger top is easier to install if 2 people work together g300208 Figure 15 1 Bagger posts 3 Nuts 5 16 inch 2 Bolts 5 16 x 1 inch 4 Lift the bagger top and install the bags by sliding the bag frame hooks...

Страница 11: ...is pointing down and froward in preparation to be mated with the Finishing Kit 9 Installing the Chute Parts needed for this procedure 1 Chute 1 Baffle 50 inch decks only Procedure For 54 inch decks go to Step 3 1 For 50 inch decks remove the existing baffle from the machine Figure 18 g299303 Figure 18 2 Install the new small baffle to the mower deck at the same location in the mower deck as the pr...

Страница 12: ...n in Figure 21 g300377 Figure 21 5 Pivot the chute back and toward the deck so the chute is flush with the mower deck Note Ensure that the retaining hook on the cute is out of the way so the chute opening mounts flush to the deck 6 On the top of the chute engage the hook shaped latch around the pivot rod of the deflector assembly and install the rod into the hole on the mower deck Figure 22 12 ...

Страница 13: ...e Procedure 1 Slide the curved end of the discharge tube into the opening in the bagger top Figure 24 g010641 Figure 24 1 Discharge tube 4 Peg 2 Opening in bagger top 5 Rubber strap 3 Discharge tube flared end 2 Slide the flared end of the discharge tube over the end of the chute Move the rubber retaining strap on the chute snaps over the peg on the discharge tube to secure it Figure 24 3 After th...

Страница 14: ...cause personal injury and property damage Keep the engine and muffler area free of debris accumulation Take care when opening the bagger cover to keep debris from falling onto the engine and muffler area Allow the machine to cool before storing it Be careful when lifting or handling a grass bag that is full To empty the grass bags 1 Park the machine on a level surface and disengage the blade contr...

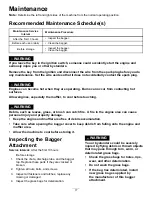
Страница 15: ...milar object carefully remove and clear the obstruction from the mower discharge tube chute and the bagger top 5 After you remove the obstruction install the complete bagger system and resume operation Removing the Bagger CAUTION Failing to remove the front bagger weights and operating the machine without the bagger attachment may cause an unstable condition which could result in a loss of control...

Страница 16: ...it may be necessary to slow the mower ground speed This helps maintain the engine speed and bagging efficiency Mow downhill whenever possible CAUTION As the bagger fills extra weight is added to the back of the machine If you stop and start the machine suddenly on hills you may lose steering control or the machine may tip Do not start or stop suddenly when going uphill or downhill Avoid uphill sta...

Страница 17: ... Debris such as leaves grass or brush can catch fire A fire in the engine area can cause personal injury and property damage Keep the engine and muffler area free of debris accumulation Take care when opening the bagger cover to keep debris from falling onto the engine and muffler area Allow the machine to cool before storing it Inspecting the Bagger Attachment Service Interval After the first 10 ...

Страница 18: ...2 Make sure you remove matted grass from all parts 3 Flush the grass bags with water using garden hose to remove any debris 4 After washing let all of the parts dry thoroughly Storage Storing the Bagger Attachment Note To prevent rapid deterioration of the bag material store the bags where they will dry completely after each use 1 Clean the bagger attachment refer to Cleaning the Bagger Attachment...

Страница 19: ...to restaurants grocery stores hotels schools and hospitals and on a wide variety of products Additionally some online and mail order retailers provide Prop 65 warnings on their websites or in catalogs How do the California warnings compare to federal limits Prop 65 standards are often more stringent than federal and international standards There are various substances that require a Prop 65 warnin...

Страница 20: ......
Отзывы: