


23
4. Remove the left wheel.
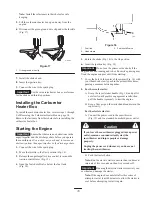
5. Clean the area around the oil drain plug (Fig. 28).
m–4070
1
2
Figure 28
1.
Oil drain plug
2.
Drain extension
6. Slide an oil drain pan below the drain extension and
remove the oil drain plug (Fig. 28).
Note: Place a funnel under the drain extension so the oil
drains directly into the oil drain pan and away from the
snowthrower.
7. Drain the oil.
8. Install the oil drain plug.
9. Install the left wheel.
10. Fill the crankcase with oil. Refer to Filling the Engine
Crankcase with Oil on page 12.
11. Wipe up any spilled oil.
12. Connect the wire to the spark plug.
Lubricating the Snowthrower
Lightly lubricate all moving parts of the snowthrower after
every 15 operating hours and at the end of the
snowthrowing season.
Important
Do not get oil or grease on the rubber wheel
or friction drive plate because the wheel will slip and the
rubber may deteriorate.
1. Stop the engine and wait for all moving parts to stop.
2. Disconnect the wire from the spark plug and ensure that
the wire does not contact the plug (Fig. 16).
3. Drain gasoline from the fuel tank. Refer to Emptying
the Fuel Tank on page 24.
4. Tip the snowthrower forward onto the auger/impeller
housing and block it so that it cannot fall.
5. Remove the four flange-head bolts that secure the
bottom cover and remove the cover (Fig. 26).
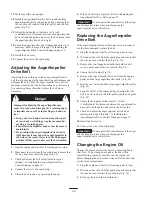
6. Lightly lubricate the snowthrower with light oil as
shown in Figure 29.
887
Figure 29
Important
Do not excessively oil the snowthrower;
extra oil may enter the traction drive and cause the traction
drive belt to slip.
7. Wipe up any excess oil.
8. Grease the snowthrower as shown in Figure 29.
9. Wipe up any excess grease.
10. Install the bottom cover.
11. Return the snowthrower to its upright position.
12. Connect the wire to the spark plug.
Replacing the Spark Plug
Use a Champion RJ-19LM or equivalent spark plug. Install
a new plug after every 100 operating hours.
1. Stop the engine and wait for all moving parts to stop.
2. Clean any debris from around the base of the spark
plug.
3. Disconnect the wire from the spark plug (Fig. 16).
4. Remove the spark plug.
5. Examine the spark plug and replace it if it is cracked,
fouled, dirty, or if the electrodes are worn.
Important
Do not clean the electrodes because grit
could enter the cylinder and damage the engine.
6. Set the gap between the electrodes on the spark plug at
0.030 in. (0.76 mm) as shown in Figure 30.
Содержание 38064
Страница 27: ...27 ...