background image

27

Engine Oil Service

Service Interval/Specification

Change oil:

After the first 8 operating hours.

After every 100 operating hours.

Note: Change oil more frequently when operating
conditions are extremely dusty or sandy.

Oil Type: Detergent oil (API service SE, SF or SG)

Crankcase Capacity: with new filter, 57–1/2 oz. (1.7 l) 

 without new filter, 51 oz. (1.5 l)

Viscosity: See table below

Checking Oil Level

1. Park the machine on a level surface, disengage the

power take off (PTO), chock or block tires, and turn the
ignition key to Off. Remove the key.

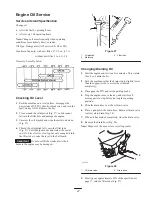
2. Clean around the oil dipstick (Fig. 27) so dirt cannot

fall into the filler hole and damage the engine.

3. Unscrew the oil dipstick and wipe the metal end clean

(Fig. 27).

4. Thread the oil dipstick fully onto the filler tube

(Fig. 27). Pull the dipstick out and look at the metal
end. If oil level is low, slowly pour only enough oil into
the filler tube to raise the level to the Full mark.

Important


Do not overfill the crankcase with oil

because the engine may be damaged.

1

2

3

Figure 27

1.

Oil dipstick

2.

Metal end

3.

Filler tube

Changing/Draining Oil

1. Start the engine and let it run five minutes. This warms

the oil so it drains better.

2. Park the machine so that the drain side is slightly lower

than the opposite side to assure the oil drains
completely.

3. Disengage the PTO and set the parking brake.

4. Stop the engine, remove the key, and wait for all

moving parts to stop before leaving the operating
position.

5. Slide the drain hose over the oil drain valve.

6. Place a pan below the drain hose. Rotate oil drain valve

to allow oil to drain (Fig. 28).

7. When oil has drained completely, close the drain valve.

8. Remove the drain hose (Fig. 28).

Note: Dispose of the used oil at a recycling center.

1

2

m–6574

Figure 28

1.

Oil drain valve

2.

Drain hose

9. Slowly pour approximately 80% of the specified oil,

page 27, into the filler tube (Fig. 27).

Содержание 30432

Страница 1: ...Operator s Manual English EN Form No 3327 400 Mid Size Mower ProLine Gear 17 HP with 52 in Side Discharge Mower Model No 30432 Serial No 230000001 and Up...

Страница 2: ...nstalling the Shift Lever Plate and Fuel Tank 14 Adjusting the Shift Lever Plate 15 Installing the Control Rods 16 Installing the Hairpin Cotter Pins and Washers 17 Checking the Tire Pressure 17 Page...

Страница 3: ...facturers that do not meet American National Standards Institute certification will cause noncompliance of this machine Improper use or maintenance by the operator or owner can result in injury To red...

Страница 4: ...are of the mower discharge direction and do not point it at anyone Do not operate the mower under the influence of alcohol or drugs Use care when loading or unloading the machine into or from a traile...

Страница 5: ...grass can hide obstacles Use slow speed so that you will not have to stop while on the slope Use extra care with grass catchers or other attachments These can change the stability of the machine Keep...

Страница 6: ...6...

Страница 7: ...7 Slope Chart...

Страница 8: ...8...

Страница 9: ...s and instructions are easily visible to the operator and are located near any area of potential danger Replace any decal that is damaged or lost 43 8480 66 1340 67 5360 68 8340 93 1122 95 2814 98 077...

Страница 10: ...10 104 8186 104 8569 105 4111 105 4146 106 5532 106 0699 106 5511 106 0635...

Страница 11: ...s to be hit by thrown objects 3 Do not operate the mower with the deflector up or removed 4 Stop the engine and pick up debris before operating 5 Cutting of hand or foot mower 6 Engine stop 7 Engine r...

Страница 12: ...such equipment on a truck or trailer from a portable container rather than from a gasoline dispenser nozzle If a gasoline dispenser nozzle must be used keep the nozzle in contact with the rim of the f...

Страница 13: ...clamp 1 1 2 2 4 2 1 Installing shift lever plate and fuel tank 3 No parts needed Adjusting the shift lever plate 4 Clevis pin Washer Hairpin cotter pin 2 2 2 Installing the control rods 5 Hairpin cott...

Страница 14: ...e Handle assembly must be installed before fuel tank is installed 2 Step Parts needed for this step 1 Fuel tank with studs installed 1 Shift lever plate 2 Bolts 5 16 x 7 8 inch 2 Lock washers 5 16 inc...

Страница 15: ...onnection 3 Step No parts needed for this step Adjusting the Shift Lever Plate 1 Shift lever to second gear and check alignment of lever in slot of shifter lever plate The clearance between top and bo...

Страница 16: ...ntrol rod length by threading rod in or out of rod fitting until there is a 3 16 to 1 4 inch 5 mm to 6 mm clearance between the control rod and bottom of neutral brake lock Fig 9 3 Install control rod...

Страница 17: ...ssure 7 Step Parts needed for this step 1 Rear weight 2 Capscrews 2 Washers 2 Nuts Installing the Mid Size Weight 1 Remove lag screws securing weight to the shipping crate Remove the weight and discar...

Страница 18: ...blades Blade control switch PTO Pull switch used in conjunction with OPC levers to release blade brake and engage clutch to drive mower blades Gear shift lever Transmission has five forward speeds neu...

Страница 19: ...ngine Starting 1 Make sure spark plug wire s are installed on spark plug s and fuel valve is open 2 Move the shift lever to neutral set the parking brake and turn ignition key to the Run position 3 Mo...

Страница 20: ...ll the engine when The Operator Presence Control OPC levers are released while the machine is in gear and or the mower is engaged The machine is shifted into gear without holding OPC levers The blade...

Страница 21: ...chine unattended even if just for a few minutes Caution Transporting Machines Use a heavy duty trailer or truck to transport the machine Ensure that the trailer or truck has all necessary lighting and...

Страница 22: ...ts and retained by a hairpin cotter Important All four hairpin cotter pins must be in the same hole location and with the correct number of spacers for a level cut 2 1 3 4 2 4 1 5 m 6365 Figure 18 1 C...

Страница 23: ...ecuring handle to rear frame Fig 22 3 Remove the lower flange bolts 3 8 x 1 inch and flange nuts securing handle to rear frame Fig 22 4 Pivot handle to desired operating position and install lower fla...

Страница 24: ...achine can rapidly raise up when the mower is removed This could cause serious injury to you or bystanders Support the rear of the machine when removing the mower from the carrier frame Warning 1 3 2...

Страница 25: ...eck Electric Clutch adjust Engine clean outside 200 Hours Oil Filter change 200 hours or every other oil change Fuel Filter replace Paper Air Cleaner replace1 250 Hours Transmission Couplings grease1...

Страница 26: ...arm water When the element is clean rinse it thoroughly 2 Dry the element by squeezing it in a clean cloth 3 Put one or two ounces of oil on the element Fig 25 Squeeze the element to distribute the oi...

Страница 27: ...w slowly pour only enough oil into the filler tube to raise the level to the Full mark Important Do not overfill the crankcase with oil because the engine may be damaged 1 2 3 Figure 27 1 Oil dipstick...

Страница 28: ...Spark Plug Service Service Interval Specification Check the spark plug s after every 100 operating hours Make sure the air gap between the center and side electrodes is correct before installing the...

Страница 29: ...grease How to Grease 1 Disengage the power take off PTO set the parking brake and turn the ignition key to Off Remove the key 2 Clean the grease fittings with a rag Make sure to scrape any paint off t...

Страница 30: ...uild up of grass dirt or other debris from the cylinder and cylinder head cooling fins air intake screen on flywheel end and carburetor governor levers and linkage This will help insure adequate cooli...

Страница 31: ...e valve Fig 37 Open fuel shut off valve and allow gasoline to drain into a gas can or drain pan Note Now is the best time to install a new fuel filter because the fuel tank is empty Refer to Replacing...

Страница 32: ...ach of the three slots to ensure the plates are parallel to each other m 2600 1 2 3 Figure 40 1 Adjusting nut 2 Slot 3 Feeler gauge Servicing the Brakes Service Interval Specification Before each use...

Страница 33: ...raking pressure 8 Install the trunnion into the hole for the brake rod Fig 41 Tighten the wing nut 9 Secure trunnion to brake lever with washer and hair pin cotter Fig 41 10 Check the brake operation...

Страница 34: ...tate the blades until the ends face forward and backward Fig 43 Measure from a level surface to the cutting edge position A of the blades Fig 44 Note this dimension Front m 1078 A A A Figure 43 MEASUR...

Страница 35: ...1855 Figure 47 1 Blade 2 Balancer Installing the Blades 1 Install the blade onto the spindle shaft Fig 45 Important The sail part of the blade must be pointing upward toward the inside of the mower t...

Страница 36: ...before leaving the operating position 3 Adjust the tire pressure in all tires to specifications on page 30 4 Measure engine deck height at location A Fig 49 5 Measure engine deck height at location B...

Страница 37: ...cations A and B 5 Caster spacers Checking the Deck Front to Rear Pitch 1 Check the tire pressure on both deck and traction unit 2 Position one blade front to rear Fig 52 Measure at C and D locations F...

Страница 38: ...t B m 1078 Figure 55 MEASURE FROM CUTTING EDGE TO A LEVEL SURFACE m 2550 Figure 56 Changing the Side to Side Leveling Changing the side to side leveling is done by adjusting tire pressure Changing the...

Страница 39: ...spring length should not exceed 7 5 8 inches with the paring brake engaged Fig 59 6 Install adjustment bolt assembly and spring 7 Repeat for opposite side m 6595 6 1 2 3 5 4 Figure 59 1 Position A Ne...

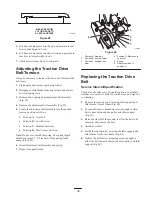
Страница 40: ...Clutch retainer 4 Tension spring 5 Clutch wire connector 6 Pivot bolt 7 Drive pulley 8 Engine deck Replacing the Mower Belt Squealing when the belt is rotating blades slipping when cutting grass fraye...

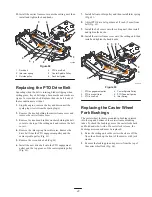
Страница 41: ...worn drive belt Fig 63 6 Install the new drive belt onto the PTO engagement pulley and the top groove of the center spindle pulley Fig 63 7 Install belt onto idler pulley and then install idler sprin...

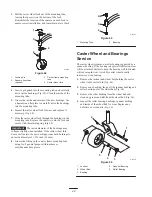
Страница 42: ...f the caster wheel fork does not slide into the new bushings ream both bushings to an inside diameter of 1 126 inch 29 mm 8 Grease the fitting on the carrier frame mounting tube using No 2 general pur...

Страница 43: ...lawn mower unless you install a cover plate a mulch plate or a grass chute and catcher Warning 1 Remove the locknut bolt spring and spacer holding the deflector to the pivot brackets Fig 67 Remove dam...

Страница 44: ...Neutral 2 3 5 4 1 Operator Presence Switch No Operator K1 Interlock Relay BK T Y Y Y GND W MAG REG AC AC IGNITION MODULES SPARK PLUG SPARK PLUG PK PK BU Y BK BLUE PK BK BN BU PK 1 2 5 4 7 8 W OR GY GN...

Страница 45: ...ot store stabilizer conditioned gasoline over 90 days 9 Remove the spark plug s and check its condition refer to Servicing the Spark Plug page 28 With the spark plug s removed from the engine pour two...

Страница 46: ...level in crankcase is low 2 Add oil to crankcase 3 Cooling fins and air passages under engine blower housing are plugged 3 Remove obstruction from cooling fins and air passages Machine does not drive...

Страница 47: ...r 5 Tire pressure is incorrect 5 Adjust tire pressure 6 Blade spindle bent 6 Contact Authorized Service Dealer Blades do not rotate 1 PTO Drive belt is worn loose or broken 1 Install new drive belt 2...

Страница 48: ...ered There is no other express warranty except for special emission system coverage on some products This express warranty does not cover the following Cost of regular maintenance service or parts suc...

Отзывы: