background image

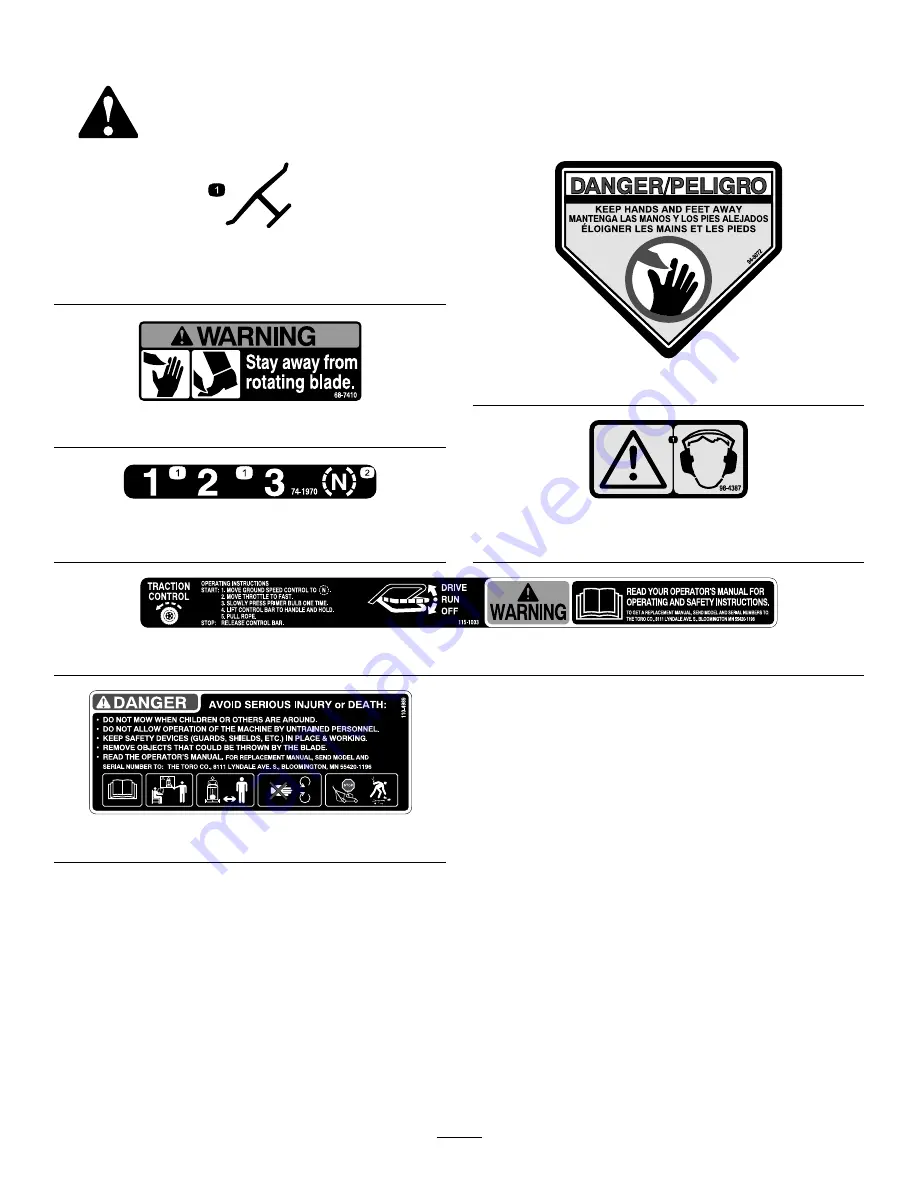
Safety and Instructional Decals

Safety decals and instructions are easily visible to the operator and are located near any area of
potential danger. Replace any decal that is damaged or lost.

Manufacturer’s Mark

1.

Indicates the blade is identified as a part from the original
machine manufacturer.

68-7410

74-1970

1.

Transmission speeds

2.

Neutral

94-8072

98-4387

1.

Warning—wear hearing protection.

115-1003

110-4989

6

Содержание 22190

Страница 1: ...A 21in Heavy Duty Recycler Rear Bagger Lawn Mower Model No 22190 Serial No 310000001 and Up To register your product or download an Operator s Manual or Parts Catalog at no charge go to www Toro com Original Instructions EN ...

Страница 2: ...ltural uses Read this information carefully to learn how to operate and maintain your product properly and to avoid injury and product damage You are responsible for operating the product properly and safely You may contact Toro directly at www Toro com for product and accessory information help finding a dealer or to register your product Whenever you need service genuine Toro parts or additional...

Страница 3: ...5 Maintenance 17 Recommended Maintenance Schedule s 17 Lubrication 18 Lubricating the Pivot Arms 18 Lubricating the Gear Case 18 Engine Maintenance 18 Servicing the Air Filter 18 Changing the Engine Oil 19 Changing the Oil Filter 19 Servicing the Spark Plug 20 Fuel System Maintenance 20 Emptying the Fuel Tank and Cleaning the Fuel Filter 20 Drive System Maintenance 21 Adjusting the Self propel Dri...

Страница 4: ...th The following instructions are from the ANSI OPEI B71 4 2004 standard Training Read the Operator s Manual and other training material If the operator s or mechanic s cannot read English it is the owner s responsibility to explain this material to them Become familiar with the safe operation of the equipment operator controls and safety signs All operators and mechanics should be trained The own...

Страница 5: ...blades after striking objects or if an abnormal vibration occurs Make necessary repairs before resuming operations Keep hands and feet away from the cutting units Look behind and down before backing up to be sure of a clear path Be aware of the mower discharge direction and do not point it at anyone Do not operate the mower under the influence of alcohol or drugs Use care when loading or unloading...

Страница 6: ... located near any area of potential danger Replace any decal that is damaged or lost Manufacturer s Mark 1 Indicates the blade is identified as a part from the original machine manufacturer 68 7410 74 1970 1 Transmission speeds 2 Neutral 94 8072 98 4387 1 Warning wear hearing protection 115 1003 110 4989 6 ...

Страница 7: ...arter rope 3 Discharge tunnel plug 1 Install the discharge tunnel plug 4 No parts required Fill the crankcase with oil Note Determine the left and right sides of the machine from the normal operating position 1 Installing the Handle Parts needed for this procedure 1 Handle 2 Bolt 5 16 x 1 1 4 inches 4 Washer 2 Thin nylon insert locknut 5 16 inch 2 Bolt 5 16 x 1 1 2 inches 1 Carriage bolt 2 Locknut...

Страница 8: ...mounting holes in the latches 3 Insert the carriage bolt through the bag aligning plate and the second hole from the top on the left side of the handle and secure it with a cap locknut Figure 3 4 Slide the bag support rod through the third from the top mounting holes in the handle and secure each end with a cap locknut Figure 3 5 Use cable ties to secure the control cables to the handle Figure 3 2...

Страница 9: ...ing clip on the bottom of the plug clicks into place locking the plug securely into the discharge tunnel Figure 6 Figure 6 1 Spring clip 4 Release the discharge door handle to lock the top of the plug 4 Filling the Crankcase with Oil No Parts Required Procedure The engine crankcase is shipped without oil You must fill it with approximately 22 ounces 0 65 l of oil before starting the engine Refer t...

Страница 10: ...ive should stop If they do not contact an Authorized Service Dealer CAUTION This machine produces sound levels in excess of 85dBA at the operator s ear and can cause hearing loss through extended periods of exposure Wear hearing protection when operating this machine Figure 9 1 Warning wear hearing protection Checking the Engine Oil Level Service Interval Before each use or daily Initially fill th...

Страница 11: ...7 or higher To ensure freshness purchase only the quantity of gasoline that you expect to use in 30 days Using unleaded gasoline results in fewer combustion deposits and longer engine life You may use leaded gasoline if unleaded gasoline is not available Important Do not add oil to the gasoline Important Do not use methanol gasoline containing methanol gasohol containing more than 10 ethanol premi...

Страница 12: ...ans the engine during operation and prevents gum like varnish deposits from forming in the engine during periods of storage Important Do not use fuel additives other than a fuel stabilizer conditioner Do not use fuel stabilizers with an alcohol base such as ethanol methanol or isopropanol 1 Clean around the fuel tank cap Figure 11 Figure 11 1 Oil fill dipstick 3 Air cleaner 2 Fuel tank cap 2 Remov...

Страница 13: ...turn or if the lawn mower is moving too fast for you If you lower the control bar too far the lawn mower stops self propelling Squeeze the control bar closer to the handle to increase the ground speed When you hold the control bar tight against the handle the lawn mower self propels at the maximum ground speed Move the ground speed control to the Neutral N position when you use the lawn mower for ...

Страница 14: ...the rear of the bag frame onto the bag support rod 5 Pull the discharge door handle forward until the pin clears the catch and move the handle rearward until the pin locks in the bag notch Figure 18 Figure 18 1 Pin locked in bag notch Note The discharge door in the lawn mower housing is now open Mowing with the Grass Bag WARNING A worn grass bag could allow small stones and other similar debris to...

Страница 15: ... of the lawn mower deck after each mowing See Cleaning the Underside of the Lawn Mower Housing Keep the engine in good running condition Set the engine speed to the fastest position for the best cutting results WARNING Operating a lawn mower with its engine running at a speed greater than the factory setting can cause the lawn mower to throw a part of the blade or engine into the operator s or bys...

Страница 16: ... than one pass over the leaves For light leaf coverage set all the wheels at the same cutting height setting If there are more than 5 inches 12 7 cm of leaves on the lawn set the front cutting height 1 or 2 notches higher than the rear cutting height This makes it easier to feed the leaves under the lawn mower deck Slow down your mowing speed if the lawn mower does not cut the leaves finely enough...

Страница 17: ...ange the engine oil more often in dusty conditions Check the fuel hose and replace it if necessary Clean under the belt cover Every 100 hours Lubricate the gear case Clean the air cooling fins Change the engine oil and oil filter Check the spark plug Clean the fuel filter Adjust the self propel drive Adjust the blade brake cable Every 300 hours Replace the paper air filter more frequently in dusty...

Страница 18: ...Filter Service Interval Every 25 hours Clean the foam pre cleaner more frequently in dusty conditions Every 300 hours Replace the paper air filter more frequently in dusty conditions Important Do not operate the engine without the air filter assembly extreme engine damage will occur 1 Stop the engine and wait for all moving parts to stop 2 Disconnect the wire from the spark plug Figure 12 3 Remove...

Страница 19: ...th fresh oil Refer to the Filling the Crankcase with Oil 11 Wipe up any spilled oil Changing the Oil Filter Service Interval Every 100 hours Change the engine oil and oil filter 1 Run the engine to warm the oil WARNING Oil may be hot after the engine has been run and contact with hot oil can cause severe personal injury Avoid contacting the hot engine oil when you drain it 2 Stop the engine and wa...

Страница 20: ...the spark plug Fuel System Maintenance Emptying the Fuel Tank and Cleaning the Fuel Filter Service Interval Every 50 hours Check the fuel hose and replace it if necessary Every 100 hours Clean the fuel filter Yearly or before storage Empty the fuel tank The fuel filter screen element is located inside the fuel tank 1 Stop the engine and wait for it to cool down Important Drain gasoline from a cold...

Страница 21: ...stop turning and the control bar is about one inch 2 5 cm from the handle Figure 26 Figure 26 1 1 inch 2 5 cm Controls System Maintenance Adjusting the Blade Brake Cable Service Interval Every 100 hours Whenever you install a new blade brake cable assembly adjust it 1 Stop the engine and wait for all moving parts to stop 2 Disconnect the wire from the spark plug 3 Check the adjustment of the cable...

Страница 22: ...rformance install a new blade before the cutting season begins During the year file down any small nicks to maintain the cutting edge DANGER A worn or damaged blade can break and a piece of the blade could be thrown into the operator s or bystander s area resulting in serious personal injury or death Inspect the blade periodically for wear or damage Replace a worn or damaged blade Removing the Bla...

Страница 23: ...n Mower Housing To ensure the best performance keep the underside of the lawn mower housing clean Be especially careful to keep the kickers free of debris Figure 32 Figure 32 1 Kickers Washing Method Service Interval Before each use or daily 1 Position the lawn mower on a flat concrete or asphalt surface near a garden hose 2 Start the engine 3 Hold the running garden hose at handle level and direc...

Страница 24: ...the plug from the discharge tunnel and clean it after each use Always be sure that the discharge tunnel door closes securely when you release the handle If the debris prevents the discharge door from closing securely clean the inside of the discharge tunnel and the door thoroughly WARNING Grass clippings and other objects can be thrown from an open discharge tunnel and cause serious injury or kill...

Страница 25: ...wly rotate the engine several times using the starter rope to distribute the oil 5 Install the spark plug but do not connect the wire to the spark plug General Information 1 Clean the lawn mower housing Refer to Clean under the Lawn Mower Housing 2 Clean any dirt and chaff from the cylinder cylinder head fins and blower housing 3 Remove grass clippings dirt and grime from the external parts of the...

Страница 26: ...t the wire to the spark plug 2 The spark plug is pitted fouled or the gap is incorrect 2 Check the spark plug and adjust the gap if necessary Replace the spark plug if it is pitted fouled or cracked 3 The throttle lever is not in the Fast position 3 Move the throttle lever to the Fast position Engine runs rough 4 The air filter element is dirty and is restricting the air flow 4 Clean the air filte...

Страница 27: ...e self propel drive cable is out of adjustment or is damaged 1 Adjust the self propel drive cable Replace the cable if necessary Lawn mower does not self propel 2 There is debris under the belt cover 2 Clean the debris from under the belt cover 27 ...

Страница 28: ...expense Instructions for Obtaining Warranty Service If you think that your Toro Product contains a defect in materials or workmanship follow this procedure 1 Contact any Authorized Toro Service Dealer to arrange service at their dealership To locate a dealer convenient to you refer to the Yellow Pages of your telephone directory look under Lawn Mowers or access our web site at www Toro com You may...

Отзывы: