background image

4

– Replace all fuel tank and container caps securely.

– If you must drain the fuel from the fuel tank, do it

outdoors.

Replace faulty mufflers.

Before using, always visually inspect the blades, blade

bolts, and cutter assembly for wear or damage.

Replace worn or damaged blades and bolts in sets to

preserve balance.

On multibladed lawn mowers, use care as rotating one

blade can cause the other blades to rotate.

Operation

Do not operate the engine in a confined space where

dangerous carbon monoxide fumes can collect.

Mow only in daylight or in good artificial light.

Always be sure of your footing on slopes.

Walk; never run.

Keep a firm hold on the handle.

For wheeled rotary lawn mowers, mow across the face

of slopes, never up and down.

Exercise extreme caution when changing the direction

on slopes.

Do not mow excessively steep slopes.

Use extreme caution when reversing or pulling the

lawn mower toward you.

Before and while moving backward, look behind and

down for small children.

Stop the blade(s) if you must tilt the lawn mower for

transportation when crossing surfaces other than grass

and when transporting the lawn mower to and from the

area to be mowed.

Never operate the lawn mower with damaged or

missing guards or shields, or without safety devices

(such as deflectors and grass catchers) in place.

Do not change the speed settings on the engine.

Disengage all blade and drive clutches before starting

the engine.

Start the engine carefully according to instructions and

with feet well away from the blade(s).

Do not tilt the lawn mower when starting the engine,

unless you must tilt the lawn mower to start it. In this

case, do not tilt it more than absolutely necessary and

lift only the part which is away from the operator.

Do not start the engine when standing in front of the

discharge chute.

Do not put your hands or feet near or under rotating

parts. Keep clear of the discharge opening at all times.

Never pick up or carry a lawn mower while the engine

is running.

Stop the engine and disconnect the spark-plug wire:

– before clearing blockages or unclogging the chute;

– before checking, cleaning, or working on the lawn

mower;

– after striking a foreign object. Inspect the lawn

mower for damage and make repairs before starting

and operating the lawn mower; and

– if the lawn mower starts to vibrate abnormally

(check it immediately).

Stop the engine:

– whenever you leave the lawn mower; and

– before refuelling.

Reduce the throttle setting during engine run-out and,

if the engine has a shutoff valve, turn the fuel off after

mowing.

Stop the blade(s) when crossing gravel drives, walks,

or roads.

Shut the engine off and wait until the blade comes to a

complete stop before removing the grass catcher.

Do not operate the lawn mower while under the

influence of alcohol or drugs.

If the lawn mower should start to vibrate abnormally,

stop the engine and check immediately for the cause.

Vibration is generally a warning of trouble.

Slopes are a major factor related to slip and fall accidents

which can result in a severe injury. If you feel uneasy on a

slope, do not mow it.

Watch for holes, ruts, or bumps. Tall grass can hide

obstacles.

Do not mow near drop-offs, ditches, or embankments.

You could lose your footing or balance.

Do not mow on wet grass. Reduced footing could

cause slipping.

Содержание 22168TE

Страница 1: ...Operator s Manual Original Instructions EN Register your product at www Toro com Form No 3351 321 Rev B ProLine 53cm Heavy Duty Recycler Rear Bagging Lawn Mower Model No 22168TE 250000001 and Up ...

Страница 2: ... Lubricating the Pivot Arms 22 Adjusting the Self propel Drive 22 Changing the Engine Oil 22 Servicing the Spark Plug 23 Page Lubricating the Gear Case 23 Adjusting the Blade Brake Cable 23 Servicing the Wheels 24 Storage 25 Preparing the Fuel System 25 Preparing the Engine 25 General Information 25 Removing the Lawn Mower from Storage 25 Accessories 25 Troubleshooting 26 Introduction Read this ma...

Страница 3: ...ting it Never allow children to operate the lawn mower Local regulations may restrict the age of the operator Never allow adults unfamiliar with these instructions to operate the lawn mower Never mow while people especially children or pets are nearby Stop the lawn mower if anyone enters the area Tragic accidents can occur if the operator is not alert to the presence of children Children are often...

Страница 4: ...ower when starting the engine unless you must tilt the lawn mower to start it In this case do not tilt it more than absolutely necessary and lift only the part which is away from the operator Do not start the engine when standing in front of the discharge chute Do not put your hands or feet near or under rotating parts Keep clear of the discharge opening at all times Never pick up or carry a lawn ...

Страница 5: ...er attempt to make wheel height adjustments while the engine is running Grass catcher components are subject to wear damage and deterioration which could expose moving parts or allow objects to be thrown Frequently check the components and replace them with the manufacturer s recommended parts when necessary Lawn mower blades are sharp and can cut Wrap the blade s or wear gloves and use extra caut...

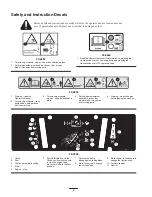
Страница 6: ...hours 93 6655 1 Warning read the Operator s Manual 2 Thrown object hazard keep bystanders a safe distance from the machine 3 Thrown object hazard mower keep the deflector in place 4 Cutting dismemberment hazard of hand or foot mower blade stay away from moving parts 5 Warning stop the engine before leaving the machine 98 2048 1 Choke 2 Fast 3 Continuous variable setting 4 Slow 5 Engine stop 6 Set ...

Страница 7: ...he machine from the normal operating position Loose Parts DESCRIPTION QTY USE Handle Bolts 5 16 18 x 1 1 4 inch Bolts 5 16 18 x 1 1 2 inch Carriage bolt Washers Locknuts Thin nylon insert locknuts Bag support rod Bag aligning plate Cap locknuts Cable ties 1 2 2 1 4 2 2 1 1 3 4 Installing the handle ...

Страница 8: ...ng plate and into the second from the top mounting holes in the handle and secure each end with a cap locknut Fig 2 4 Insert the carriage bolt through the bag aligning plate and the top hole on the left side of the handle and secure it with a cap locknut Fig 2 5 Use a cable tie to secure the control cables to the left handle below the bag support rod 6 Use cable ties to secure the brake cable to t...

Страница 9: ...e filler neck but do not rotate the cap clockwise to secure it then remove it 6 Read the oil level on the dipstick Fig 6 7 If the oil level reading is below the lower limit mark on the dipstick remove the dipstick and slowly pour only enough oil into the filler hole to raise the oil level to the upper limit mark on the dipstick Fig 6 Important Do not overfill the crankcase with oil and run the eng...

Страница 10: ...with its wheels on the ground If this is not possible then refuel such equipment on a truck or trailer from a portable container not from a gasoline dispenser nozzle If you must use a gasoline dispenser nozzle keep the nozzle in contact with the rim of the fuel tank or container opening at all times until fueling is complete Use a fuel stabilizer conditioner regularly during operation and storage ...

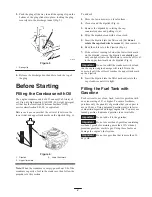
Страница 11: ...gure 9 1 Fuel valve 3 Move the throttle control to the Choke position Fig 8 Note Do not use the choke when the engine is warm 4 Hold the control bar to the handle Fig 8 5 Pull the starter handle Fig 8 lightly until you feel resistance then pull it sharply Allow the rope to return to the handle slowly 6 When the engine starts move the throttle control to the Fast position and set the ground speed c...

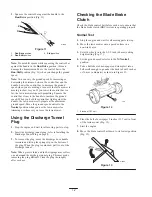
Страница 12: ... and wait for all moving parts to stop 2 Insert the discharge tunnel plug refer to Installing the Discharge Tunnel Plug on page 8 3 To remove the plug move the discharge door handle rearward and lift up the spring clip on the bottom of the plug When the plug is unlocked pull it out of the discharge tunnel Note When grass is thick and lush clippings may collect on and around the discharge tunnel pl...

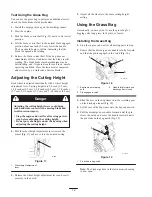
Страница 13: ...ote This intermediate position C is not the normal operating position of the blade control bail However it helps to detect a sticking BBC system early enough to prevent an unsafe condition later 4 Release the blade control bail Position B in Fig 16 Note If you hear a loud bang you have raised the blade control bail too high Repeat steps 2 through 4 above but do not raise the blade control bail as ...

Страница 14: ...d result in serious injury Stop the engine and wait for all moving parts to stop before adjusting the cutting height Do not put your fingers under the housing when adjusting the cutting height 1 Pull the wheel height adjustment lever toward the wheel Fig 17 and move it to the desired setting m 225 1 Figure 17 1 Wheel height adjustment lever 2 Release the wheel height adjustment lever and seat it s...

Страница 15: ...s Review the safety instructions and read this manual carefully before operating the lawn mower Clear the area of sticks stones wire branches and other debris that the blade could hit and throw Keep everyone especially children and pets away from the area of operation Avoid striking trees walls curbs or other solid objects Never deliberately mow over any object If the lawn mower strikes an object ...

Страница 16: ...e or more of the following Sharpen the blade Walk at a slower pace while mowing Raise the cutting height on your lawn mower Cut the grass more frequently Overlap cutting swaths instead of cutting a full swath with each pass Set the cutting height on the front wheels one notch lower than the rear wheels For example set the front wheels at 2 1 4 inches 5 7 cm and the rear wheels at 2 3 4 inches 7 0 ...

Страница 17: ...e dulls quickly in rough or in sandy conditions Refer to Maintaining the Blade on page 20 Clean the blade brake clutch shield Remove grass clippings and debris from under the belt cover Refer to Cleaning under the Belt Cover on page 22 Have an authorized engine servicing dealer check and adjust the flywheel brake pad 75 Hours Adjust the self propel drive system Refer to Adjusting the Self propel D...

Страница 18: ...at concrete or asphalt surface near a garden hose 2 Attach a quick disconnect coupling sold separately to the end of the garden hose 3 Attach the coupling to the washout fitting Fig 21 1 2 3 m 2858 Figure 21 1 Washout fitting 2 Quick disconnect coupling 3 Garden hose 4 Turn the water on high 5 Start the engine and let it run for 2 minutes 6 Stop the engine and wait for all moving parts to stop 7 T...

Страница 19: ...ing is true The discharge tunnel plug is locked securely in the discharge tunnel The grass bag is locked in place The optional side discharge chute is locked in place The discharge tunnel door is locked in place Servicing the Air Cleaner Inspect the air cleaner elements after every time you use the lawn mower Clean the cover base and foam and paper elements after every 25 operating hours Replace t...

Страница 20: ...k 4 Tip the lawn mower onto its right side air cleaner up Fig 23 m 796 1 2 3 4 Figure 23 1 Blade 2 Blade nuts 3 Accelerator 4 Anti scalp cup Inspecting the Blade Carefully examine the blade for sharpness and wear especially where the flat and the curved parts meet Fig 24A Because sand and abrasive material can wear away the metal that connects the flat and curved parts of the blade check the blade...

Страница 21: ...out the accelerator Warning 2 Return the lawn mower to its upright position 3 Connect the wire to the spark plug Cleaning the Blade Brake Clutch Shield Clean the BBC blade brake clutch shield at the end of each mowing season to ensure the best performance and to prevent parts from degrading Clean the BBC shield when you sharpen the blade because you need to remove the blade in order to remove the ...

Страница 22: ... 2 or 3 pumps of 2 multi purpose lithium base grease Fig 29 Note Applying grease with excessive pressure may damage the seals Adjusting the Self propel Drive If the lawn mower does not self propel or has a tendency to creep forward when the control bar is more than 1 1 2 inches 3 8 cm from the handle adjust the wheel drive control knob on the rear of the gear box Fig 30 m 228 1 Figure 30 1 Control...

Страница 23: ...the engine and wait for all moving parts to stop 2 Disconnect the wire from the spark plug Fig 7 3 Clean around the spark plug 4 Remove the spark plug from the cylinder head Important Replace a cracked fouled or dirty spark plug Do not clean the electrodes because grit entering the cylinder can damage the engine 5 Set the gap on the plug to 0 030 inch 0 76 mm Fig 32 m 110 1 Figure 32 1 0 030 inch ...

Страница 24: ...alf 6 Plastic cover rear wheels only 7 Lug 8 Bearing 2 9 Bolt 4 Separate the wheel halves from the tire by removing 4 bolts and 4 locknuts Fig 35 Note If you remove the bearings from the bearing hub assembly remove them by pressing on the bearing spacer Fig 35 Assembling the Wheels 1 Position the tire onto one wheel half aligning the lugs on each Fig 35 2 Place the bearing hub assembly into the ce...

Страница 25: ...the oil 5 Install the spark plug but do not connect the wire to the spark plug General Information 1 Clean the lawn mower housing Refer to Cleaning under the Housing on page 18 2 Clean any dirt and chaff from the cylinder cylinder head fins and blower housing 3 Remove grass clippings dirt and grime from the external parts of the engine the shrouding and the top of the lawn mower housing 4 Check th...

Страница 26: ...The fuel cap vent hole is plugged 3 The air cleaner elements are dirty and are restricting the air flow 4 The underside of the lawn mower housing contains clippings and debris 5 The spark plug is pitted fouled or the gap is incorrect 6 The engine oil level is low or the oil is dirty 1 Drain and fill the fuel tank with fresh gasoline 2 Clean the fuel cap vent hole or replace the fuel cap 3 Service ...

Страница 27: ...using contains clippings and debris 1 Place all 4 wheels at the same height 2 Sharpen and balance the blade 3 Change the mowing pattern 4 Clean under the lawn mower housing Discharge chute plugs 1 The throttle lever is not in the Fast position 2 The cutting height is too low 3 You are mowing too fast 4 The grass is wet 5 The underside of the lawn mower housing contains clippings and debris 1 Move ...

Страница 28: ......

Отзывы: