background image

4

Replace faulty mufflers.

Before using, always visually inspect the blades, blade
bolts, and cutter assembly for wear or damage. Replace
worn or damaged blades and bolts in sets to preserve
balance.

On multibladed lawn mowers, use care as rotating one
blade can cause the other blades to rotate.

Operation

Do not operate the engine in a confined space where
dangerous carbon monoxide fumes can collect.

Mow only in daylight or in good artificial light.

Always be sure of your footing on slopes.

Walk; never run.

Keep a firm hold on the handle.

For wheeled rotary lawn mowers, mow across the face
of slopes, never up and down.

Exercise extreme caution when changing the direction
on slopes.

Do not mow excessively steep slopes.

Use extreme caution when reversing or pulling the lawn
mower toward you.

Before and while moving backward, look behind and
down for small children.

Stop the blade(s) if you must tilt the lawn mower for
transportation when crossing surfaces other than grass
and when transporting the lawn mower to and from the
area to be mowed.

Never operate the lawn mower with damaged or
missing guards or shields, or without safety devices
(such as deflectors and grass catchers) in place.

Do not change the speed settings on the engine.

Disengage all blade and drive clutches before starting
the engine.

Start the engine carefully according to instructions and
with feet well away from the blade(s).

Do not tilt the lawn mower when starting the engine,
unless you must tilt the lawn mower to start it. In this
case, do not tilt it more than absolutely necessary and
lift only the part which is away from the operator.

Do not start the engine when standing in front of the
discharge chute.

Do not put your hands or feet near or under rotating
parts. Keep clear of the discharge opening at all times.

Never pick up or carry a lawn mower while the engine
is running.

Stop the engine and disconnect the spark-plug wire:

before clearing blockages or unclogging the chute;

before checking, cleaning, or working on the lawn
mower;

after striking a foreign object. Inspect the lawn
mower for damage and make repairs before starting
and operating the lawn mower; and

if the lawn mower starts to vibrate abnormally
(check it immediately).

Stop the engine:

whenever you leave the lawn mower; and

before refuelling.

Reduce the throttle setting during engine run-out and, if
the engine has a shutoff valve, turn the fuel off after
mowing.

Stop the blade(s) when crossing gravel drives, walks, or
roads.

Shut the engine off and wait until the blade comes to a
complete stop before removing the grass catcher.

Do not operate the lawn mower while under the
influence of alcohol or drugs.

If the lawn mower should start to vibrate abnormally,
stop the engine and check immediately for the cause.
Vibration is generally a warning of trouble.

Slopes are a major factor related to slip and fall accidents
which can result in a severe injury. If you feel uneasy on a
slope, do not mow it.

Watch for holes, ruts, or bumps. Tall grass can hide
obstacles.

Do not mow near drop-offs, ditches, or embankments.
You could lose your footing or balance.

Do not mow on wet grass. Reduced footing could cause
slipping.

Maintenance and Storage

Keep all nuts, bolts (especially blade attachment bolts),
and screws tight to ensure that the lawn mower is in
safe working condition.

Never store the lawn mower with gasoline in the tank
inside a building where fumes may reach an open flame
or spark.

Allow the engine to cool before storing the lawn mower
in any enclosure.

To reduce the fire hazard, keep the engine, muffler,
battery compartment, and gasoline storage area free of
grass, leaves, or excessive grease.

Содержание 20833

Страница 1: ...Operator s Manual International English GB Form No 3327 277 48 cm Rear Bagging Walk Power Lawn Mower Model No 20833 Serial No 220000001 and Up ...

Страница 2: ... Emptying the Fuel Tank 20 Folding the Handle 20 Storage 20 Preparing the Fuel System 20 Page Preparing the Engine 21 General Information 21 Removing From Storage 21 Troubleshooting 22 Introduction Read this manual carefully to learn how to operate and maintain your product properly The information in this manual can help you and others avoid injury and product damage Although Toro designs and pro...

Страница 3: ...operate the lawn mower Local regulations may restrict the age of the operator Never allow adults unfamiliar with these instructions to operate the lawn mower Never mow while people especially children or pets are nearby Stop the lawn mower if anyone enters the area Tragic accidents can occur if the operator is not alert to the presence of children Children are often attracted to the lawn mower and...

Страница 4: ...r or under rotating parts Keep clear of the discharge opening at all times Never pick up or carry a lawn mower while the engine is running Stop the engine and disconnect the spark plug wire before clearing blockages or unclogging the chute before checking cleaning or working on the lawn mower after striking a foreign object Inspect the lawn mower for damage and make repairs before starting and ope...

Страница 5: ...n necessary Lawn mower blades are sharp and can cut Wrap the blade s or wear gloves and use extra caution when servicing them Do not change the speed settings on the engine If you must drain the fuel from the fuel tank do it outdoors To ensure the best performance and safety purchase only genuine Toro replacement parts and accessories Maintain or replace safety and instruction decals when necessar...

Страница 6: ...and wait for all moving parts to stop before you leave the lawn mower unattended 100 4355 1 Cutting height levels Setup Note Determine the left and right sides of the machine from the normal operating position Installing the Handle Folding or unfolding the handle improperly can pinch stretch or damage one or more of the cables Any pinched stretched or damaged cable may cause an operational failure...

Страница 7: ...ection 4 Install the upper handle section onto the lower handle section with the oval head bolts and the handle knobs as shown in Figure 2 Tighten the handle knobs securely Note Ensure that the cables and the electrical jacket are routed as illustrated in Figure 3 m 4842 1 2 Figure 3 1 Cables 2 Electrical jacket Installing the Starter Rope Pull the starter rope through the rope guide on the handle...

Страница 8: ...ing the Fuel Tank with Gasoline For best results use clean fresh lead free gasoline including oxygenated or reformulated gasoline with an octane rating of 87 or higher To ensure freshness purchase only the quantity of gasoline that you expect to use in 30 days Unleaded gasoline burns cleaner extends engine life and promotes good starting You may use leaded gasoline if unleaded gasoline is not avai...

Страница 9: ...ods of storage Important Do not use fuel additives other than a fuel stabilizer conditioner Do not use fuel stabilizers with an alcohol base such as ethanol methanol or isopropanol 1 Clean around the fuel tank cap Fig 6 1 1626 Figure 6 1 Fuel tank cap 2 Remove the cap from the tank 3 Fill the fuel tank with unleaded gasoline to within 1 4 to 1 2 inch 6 to 13 mm from the top of the tank Do not fill...

Страница 10: ...not stop properly contact your Authorized Service Dealer Using the Self propel Drive To operate the self propel drive simply walk forward with your hands on the upper handle and your elbows at your sides and the lawn mower will automatically keep pace with you The faster you walk the farther the handle will slide and the faster the lawn mower will propel Fig 11 m 4206 Figure 11 To slow down the dr...

Страница 11: ...of the grass blades to the letters on the wheel The letter on the SmartWheel that matches the tips of the grass blades is the proper cutting height 4 Press down on the red button and hold the cutting height adjustment handle to move the cutting height up or down Fig 13 m 4781 1 2 Figure 13 1 Cutting height adjustment handle 2 Red button 5 Lift up or press down on the handle and use the pointer and...

Страница 12: ...move the grass bag refer to Removing the Grass Bag on page 12 and close the rear door Danger If the rear door does not close completely the lawn mower could throw objects causing serious personal injury or death If you cannot close the rear door because the grass clippings clog the discharge area stop the engine wait for all moving parts to stop and remove the grass clippings with a stick not your...

Страница 13: ...pearance If the grass is too long and the leaves clump on top of the lawn the lawn mower may plug and cause the engine to stall Alternate the mowing direction This helps disperse the clippings over the lawn for even fertilization If the finished lawn appearance is unsatisfactory try one or more of the following Sharpen the blade Walk at a slower pace while mowing Raise the cutting height on your l...

Страница 14: ... Adjusting the Self propel Drive Cable on page 16 and to Lubricating the Self propel Drive on page 17 50 Hours Change the engine oil 1 Refer to Changing the Engine Oil on page 17 Sharpen or replace the blade maintain it more frequently if the edge dulls quickly in rough or in sandy conditions Refer to Maintaining the Blade on page 18 Check for leaks in the fuel system and or a deteriorating fuel h...

Страница 15: ...e to dry out the lawn mower and its components 6 Stop the engine and wait for all moving parts to stop If the underside of the lawn mower deck has excessive grass buildup wait for 30 minutes and repeat steps 2 through 6 above Scraping Method Tipping the lawn mower may cause the fuel to leak from the carburetor or the fuel tank Gasoline is extremely flammable highly explosive and under certain cond...

Страница 16: ... spark plug after every 25 operating hours Use a Champion RJ19LM spark plug or equivalent 1 Stop the engine and wait for all moving parts to stop 2 Disconnect the wire from the spark plug Fig 8 3 Clean around the spark plug 4 Remove the spark plug from the cylinder head Important Replace a cracked fouled or dirty spark plug Do not clean the electrodes because grit entering the cylinder could damag...

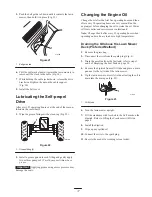
Страница 17: ...hours and then after every 50 operating hours or every season Run the engine just before changing the oil to warm the oil Warm oil flows better and carries more contaminants Note Change the oil after every 25 operating hours when operating under a heavy load or in high temperatures Draining the Oil above the Lawn Mower Deck Preferred Method 1 Remove the grass bag 2 Disconnect the wire from the spa...

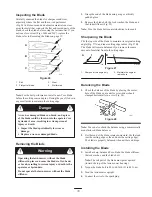
Страница 18: ...upright 8 Fill the crankcase with fresh oil to the Full mark on the dipstick Refer to Filling the Crankcase with Oil on page 8 9 Install the dipstick 10 Wipe up any spilled oil 11 Connect the wire to the spark plug 12 Recycle the used oil according to local codes Maintaining the Blade A straight sharp blade provides the best cutting performance Regularly inspect and sharpen the blade The blade is ...

Страница 19: ...e blade stiffener Warning 1 Grasp the end of the blade using a rag or a thickly padded glove 2 Remove the blade bolt the lock washer the blade and the blade stiffener Fig 25 Note Turn the blade bolt counterclockwise to loosen it Sharpening the Blade File the top side of the blade to maintain its original cutting angle Fig 27A and inner cutting edge radius Fig 27B The blade will remain balanced if ...

Страница 20: ...ch stretch or damage the cables Handle the cables with care when folding or unfolding the handle Do not use the lawn mower if one or more of the cables are pinched stretched or damaged Contact your Authorized Service Dealer Warning 1 Loosen the handle height adjustment knobs that secure the handle to the lawn mower 2 Loosen the knobs that secure the upper handle section to the lower handle section...

Страница 21: ...page 17 7 Tighten all nuts bolts and screws 8 Touch up all rusted or chipped paint surfaces with paint available from an Authorized Service Dealer Removing From Storage Folding or unfolding the handle improperly can pinch stretch or damage one or more of the cables Any pinched stretched or damaged cable may cause an operational failure that results in an unsafe operating condition Do not pinch str...

Страница 22: ...he fuel cap vent hole is plugged 3 The air filter element is dirty and is restricting the air flow 4 The underside of the lawn mower deck contains clippings and debris 5 The spark plug is pitted fouled or the gap is incorrect 6 The engine oil level is low or the oil is dirty 1 Drain and fill the fuel tank with fresh gasoline 2 Clean the fuel cap vent hole or replace the fuel cap 3 Clean the air fi...

Страница 23: ...4 The underside of the lawn mower deck contains clippings and debris 1 Place all four wheels at the same height 2 Sharpen and balance the blade 3 Change the mowing pattern 4 Clean the underside of the lawn mower deck Discharge chute plugs 1 The cutting height is too low 2 You are mowing too fast 3 The grass is wet 4 The underside of the lawn mower deck contains clippings and debris 1 Raise the cut...

Страница 24: ......
Отзывы: