
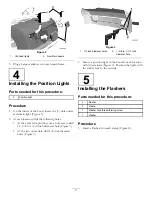


Figure 4
1.
Frame tube
4.
Washer face thread
forming screw
2.
Clamp
5.
Flasher
3.
Washer
2. Mount the clamps to the frame tube with a washer
and a Washer face thread forming screw (Figure 4).
3. Locate the vehicle wire harness labeled flasher and
plug the connectors into the flashers.
6
Installing the Tail Lights
Parts needed for this procedure:
2
Tail light
Procedure
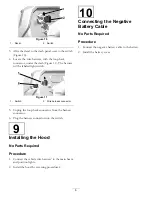
1. Remove the fasteners securing the tail lights to the
rear fender brackets (Figure 5).
Figure 5
1.
Old Tail light
2.
New Tail light
2. Unplug the wire harness connectors from the tail
light connectors. Remove the lights.
3. Plug the wire harness connectors to the new tail light
connectors.
4. Mount the tail lights to the fender brackets with the
fasteners previously removed (Figure 5). Position the
lights with the amber lens to the outside.
7
Installing the Signal Controller
Parts needed for this procedure:
2
Pan head screw, #6 x 2.5 inches
2
Hex nut, #6
2
Lock nut, #6
1
Signal mount bracket
Procedure
1. Remove
one
of the two screws and nuts securing the
signal controller housing halves together (Figure 6).
Install a #6 x 2.5 inch pan head screw and #6 hex
nut. Repeat the procedure on the other screw and
nut.
Do no remove both screws and nuts at the
same time.
4
Содержание 07315
Страница 7: ...Notes 7...
Страница 8: ......


