


Adjusting the Height of Cut
Note:
For heights of cut greater than 2.54 cm (1 inch) install
the High Height-of-Cut Kit.
1.
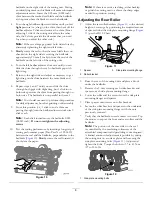
Loosen the locknuts securing the height-of-cut brackets
to the cutting-unit side plates (
).
Figure 15
1.
Adjusting screw
3.
Height-of-cut bracket
2.
Locknut
2.
Loosen the nut on the gauge bar (
) and set
the adjusting screw to the desired height of cut. The
distance between the bottom of the screw head and the
face of the bar is the height of cut.
Figure 16
1.
Gauge bar
4.
Holes used for setting the
height of groom (HOG)
2.
Height-adjusting screw
5.
Hole not used
3.
Nut
3.
Hook the screw head on the cutting edge of the
bedknife and rest the rear end of the bar on the rear
roller (
4.
Rotate the adjusting screw until the front roller contacts
the gauge bar (
). Adjust both ends of roller
until the entire roller is parallel to the bedknife.
Figure 17
Important:
When set properly, the rear and front
rollers will contact the gauge bar and the screw
will be snug against the bedknife. This ensures
that the height of cut is identical at both ends of
the bedknife.
5.
Tighten the nuts to secure the adjustment. Do not
overtighten the nuts—just enough to remove any play
from the washer.
11
Содержание 03621
Страница 20: ...Notes 20 ...
Страница 21: ...Notes 21 ...