Service and Repairs
Note:
Refer to the
for additional component repair
information.
Battery Storage
If you store the machine for more than 30 days:
1. Ensure that the key switch is in the OFF position. Remove the battery and
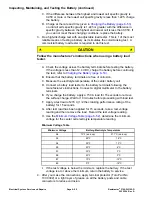
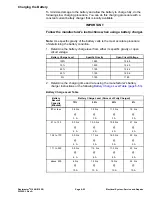
charge it fully; refer to
Servicing the Battery (page 6–49)
.
2. Either store the battery on a shelf or on the machine.
3. Disconnect the cables if the battery is kept on the machine.
4. Store the battery in a cool atmosphere to avoid quick deterioration of the
battery charge.
5. To prevent the battery from freezing during storage, ensure that you charge it
fully; refer to
Servicing the Battery (page 6–49)
.
Battery Care
1. The battery-electrolyte level must be properly maintained. The top of the
battery must be kept clean. If the machine is stored in a location where the
temperatures are extremely high, the battery will discharge more rapidly than
if the machine is stored in a location where the temperatures are cool.
WARNING
The gases are explosive; also, they can cause nausea.
• Wear safety goggles and rubber gloves when working with
electrolyte. Charge the battery in a well ventilated place so that
the gasses produced while charging can dissipate.
• Keep open flames and electrical sparks away from the battery;
do not smoke.
• Disconnect the charger from the electrical outlet before
connecting or disconnecting charger leads to or from the
battery posts.
IMPORTANT
Do not remove battery fill caps while cleaning.
2. Check the battery condition weekly or after every 50 hours of operation.
Keep the terminals and entire battery case clean because a dirty battery
will discharge slowly.
A. Clean the battery by washing entire case with a solution of baking soda
and water. Flush the battery case with clear water.
B. Coat the battery posts and cable connectors with the battery terminal
protector (refer to
Special Tools (page 2–13)
) or petroleum jelly to prevent
corrosion.
3. Tighten the battery cables on the battery terminals to provide a good
electrical contact.
Reelmaster
®
3100-D/3105-D
Page 6–47
Electrical System: Service and Repairs
20252SL Rev A
Содержание 03200 Reelmaster 3100-D
Страница 4: ...NOTES NOTES Page 4 Reelmaster 3100 D 3105 D 20252SL Rev A ...
Страница 6: ...g341979 Figure 1 Preface Page 6 Reelmaster 3100 D 3105 D 20252SL Rev A ...
Страница 10: ...Preface Page 10 Reelmaster 3100 D 3105 D 20252SL Rev A ...
Страница 20: ...Safety Safety and Instructional Decals Page 1 10 Reelmaster 3100 D 3105 D 20252SL Rev A ...
Страница 44: ...Specifications and Maintenance Special Tools Page 2 24 Reelmaster 3100 D 3105 D 20252SL Rev A ...
Страница 88: ...g344528 Figure 28 Hydraulic System Hydraulic Schematic Page 5 12 Reelmaster 3100 D 3105 D 20252SL Rev A ...
Страница 89: ...g344526 Figure 29 Reelmaster 3100 D 3105 D Page 5 13 Hydraulic System Hydraulic Schematic 20252SL Rev A ...
Страница 198: ...g345756 Figure 95 Hydraulic System Service and Repairs Page 5 122 Reelmaster 3100 D 3105 D 20252SL Rev A ...
Страница 204: ...g345782 Figure 99 Hydraulic System Service and Repairs Page 5 128 Reelmaster 3100 D 3105 D 20252SL Rev A ...
Страница 224: ...Hydraulic System Service and Repairs Page 5 148 Reelmaster 3100 D 3105 D 20252SL Rev A ...
Страница 308: ...Wheels Brakes and Chassis Service and Repairs Page 7 30 Reelmaster 3100 D 3105 D 20252SL Rev A ...
Страница 376: ...Universal Groomer Optional Service and Repairs Page 9 22 Reelmaster 3100 D 3105 D 20252SL Rev A ...
Страница 382: ...Page A 6 20252SL Rev A Reelmaster 3100 D 3105 D Drawing 122 1522 Rev A Sheet 1 of 1 Electrical Schematic g346835 ...
Страница 383: ...Reelmaster 3100 D 3105 D Drawing 122 1523 Rev B Sheet 1 of 2 20252SL Rev A Page A 7 Wire Harness Drawing CV g346834 ...
Страница 384: ...Page A 8 20252SL Rev A Reelmaster 3100 D 3105 D Drawing 122 1523 Rev A Sheet 2 of 2 Wire Harness Drawing g346833 ...
Страница 385: ......

