background image


Page 1


Step One:


Begin on the driver side of the vehicle by locating the 
forward most leaf spring perch, just to the rear of the cab.   
 
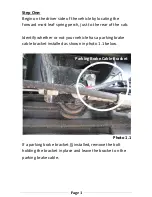
Identify whether or not your vehicle has a parking brake 
cable bracket installed as shown in photo 1.1 below. 


If a parking brake bracket IS installed, remove the bolt 
holding the bracket in place and leave the bracket on the 
parking brake cable. 


Photo 1.1 

Parking Brake Cable Bracket 

Содержание F2012

Страница 1: ...IMPORTANT OWNER OPERATOR INSTALLATION INSTRUCTIONS Part F2012 Version 8 8 7 2015 BY JL TECH SUPPORT 800 246 8132 ...

Страница 2: ... driving conditions on or off road A rubber bed mat is recommended to protect the truck bed and camper but is not a requirement to maintain the Torklift legendary lifetime warranty Suspension To significantly reduce body roll sag and sway Torklift strongly recommends the StableLoad Torklift International StableLoads improve safety handling and to help level your truck More information can be found...

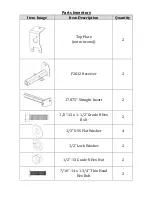
Страница 3: ...Item Description Quantity Top Plate not mirrored 2 F2012 Receiver 2 17 875 Straight Insert 2 1 2 13 x 1 1 2 Grade 8 Hex Bolt 2 1 2 USS Flat Washer 4 1 2 Lock Washer 2 1 2 13 Grade 8 Hex Nut 2 7 16 14 x 1 3 4 Thin Head Hex Bolt 2 ...

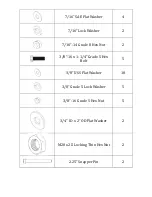
Страница 4: ... Lock Washer 2 7 16 14 Grade 8 Hex Nut 2 3 8 16 x 1 1 4 Grade 5 Hex Bolt 5 3 8 USS Flat Washer 10 3 8 Grade 5 Lock Washer 5 3 8 16 Grade 5 Hex Nut 5 3 4 ID x 2 OD Flat Washer 2 M20 x 2 5 Locking Thin Hex Nut 2 2 25 Snapper Pin 2 ...

Страница 5: ...st to the rear of the cab Identify whether or not your vehicle has a parking brake cable bracket installed as shown in photo 1 1 below If a parking brake bracket IS installed remove the bolt holding the bracket in place and leave the bracket on the parking brake cable Photo 1 1 Parking Brake Cable Bracket ...

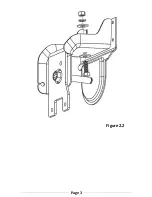
Страница 6: ...g bolt as shown in figure 2 1 Install one 1 2 13 x 1 1 2 Hex Bolt with one 1 2 USS Flat Washer up through the spring perch and Top Plate Secure with one 1 2 USS Flat Washer one 1 2 Lock Washer and one 1 2 Hex Nut Reference figure 2 2 Leave the hardware assembly hand tight at this time Ensure that the Top Plate is flush to the front and top of the spring perch Figure 2 1 ...

Страница 7: ...Page 3 Figure 2 2 ...

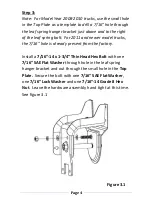
Страница 8: ...1 and newer model trucks the 7 16 hole is already present from the factory Install a 7 16 14 x 1 3 4 Thin Head Hex Bolt with one 7 16 SAE Flat Washer through hole in the leaf spring hanger bracket and out through the small hole in the Top Plate Secure the bolt with one 7 16 SAE Flat Washer one 7 16 Lock Washer and one 7 16 14 Grade 8 Hex Nut Leave the hardware assembly hand tight at this time See ...

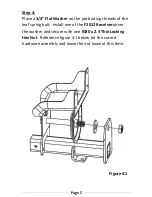
Страница 9: ...truding threads of the leaf spring bolt Install one of the F2012 Receivers over the washer and secure with one M20 x 2 5 Thin Locking Hex Nut Reference figure 4 1 below for the correct hardware assembly and leave the nut loose at this time Figure 4 1 ...

Страница 10: ... the F2012 Receiver to the Top Plate using two 3 8 16 x 1 1 4 Hex Bolts four 3 8 Flat Washers two 3 8 Lock Washers and two 3 8 16 Hex Nuts Reference Figure 5 1 below and leave the hardware hand tight as this time Figure 5 1 ...

Страница 11: ... Next torque the 7 16 14 x 1 1 2 Grade 8 Hex Bolt to 40ft lbs 54 N m c Next torque the M20 x 2 5mm Thin Hex Nut to approximately 70 ft lbs 95 N m A torque wrench will not fit between the leaf spring hanger and vehicle frame d Finally torque the 3 8 16 x 1 1 4 Hex Bolts to 20 ft lbs 27 N m ...

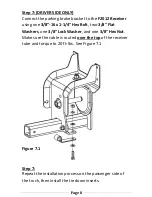
Страница 12: ...16 x 1 1 4 Hex Bolt two 3 8 Flat Washers one 3 8 Lock Washer and one 3 8 Hex Nut Make sure the cable is routed over the top of the receiver tube and torque to 20 ft lbs See Figure 7 1 Step 7 Repeat the installation process on the passenger side of the truck then install the tie down inserts Figure 7 1 ...

Страница 13: ...int to the front of the truck and the shorter side of the rear insert should point towards the rear of the truck DRIVERS SIDE FRONT DRIVERS SIDE REAR Once installed attach the TorkLift directional stickers to the face of the bullet plate on the insert as a reminder IMPORTANT NOTE Your tie down inserts are designed to have clearance inside of the receiver This is to account for road debris as well ...

Страница 14: ...ft will replace FREE OF CHARGE any part which proves defective in material or workmanship when presented to Torklift TRANSPORTATION CHARGES PREPAID by purchaser at the address above THIS WARRANTY IS LIMITED TO DEFECTIVE PARTS REPLACEMENT ONLY LABOR CHARGES AND OR DAMAGE INCURRED IN INSTALLATION OR REPLACEMENT AS WELL AS INCIDENTAL AND CONSEQUENTIAL DAMAGES CONNECTED THEREWITH ARE EXCLUDED This war...

Страница 15: ...ments of your time to complete the Product Registration Warranty Card on the next page When registering your newly purchased TorkLift products you can be assured that your contact information is secure and that you and your product are getting the attention and respect that you deserve Thank you again for choosing TorkLift quality products Register for your lifetime warranty and receive a free Tor...

Страница 16: ...Page 12 OFFICIAL WARRANTY REGISTRATION CARD PLEASE FILL OUT THIS FORM COMPLETELY AND RETURN TO TORKLIFT WITHIN 30 DAYS OF PURCHASE ACCOMPANIED BY A COPY OF YOUR ORIGINAL RECEIPT ...

Отзывы: