

Neutral
Ground
Ceiling box
Load
Neutral (White)
Remote (Blue)
Load (Red)
Black capped Not Used
Ground (Green)
Black
Ground (Green)
Neutral (White)
Travel (Red)
Travel (Red)
Travel (Black)
Load (Black)
Red
Remote (Blue)
Travel (Black)
Neutral (White)
Remote (Blue)
POWER
Load (Red)
Hot (Black)
Ground (Green)
Travel (Red)
Travel (Black)
4-Way Wiring
Air Gap Switch not
functional at this
location
TDODS5-120
TDS3K
TDS3K
This Air Gap Switch
is functional at this
location
Occupancy (OCC) Mode (Default): Auto ON/ Auto OFF
The lights will automatically turn on when motion is detected by the PIR sensor and keep the lights on
as long as motion is still detected. When motion is no longer detected, the device will start the countdown
(Time Delay) and when time expires, the device will automatically turn the lights OFF.
Vacancy (VAC) Mode: Manual ON/ Auto OFF
The lights will not turn on automatically when motion is detected by the PIR sensor. The dimmer buttons
must be used to turn the lights on. Once lights are on, motion detected by the PIR sensor will keep the
lights on. When motion is no longer detected, the device will start the countdown (Time Delay) and when
time expires, the device will automatically turn the lights OFF.
Within 30 seconds of the lights automatically turning off, if motion is detected
then the lights will turn on.
To switch between Occupancy mode and Vacancy mode
OPERATING MODES
Occupancy mode is indicated by the LED indicator flashing RED when motion is detected. To switch
between Vacancy and Occupany modes, press and hold down both the UP and DOWN bottons for 5
seconds, until the LED indicator flashes TWO times for Vacancy mode and FOUR times for Occupancy
mode.
Vacancy mode is indicated by the LED indicator flashing RED when motion is detected. To switch to
Vacancy mode, press and hold down both the UP and DOWN bottons for 5 seconds, until the LED indicator
flashes TWO times
Manual Control: Dimming and ON/OFF
Turn ON the lights: Tap the UP button. The lights will turn ON to the last used brightness level.
Turn OFF the lights
:
Tap the DOWN button. The lights will turn OFF completely and save the
brightness level.
Turn the brightness level UP (brighten): Hold down the UP button. The brightness level will gradually
increase until button is released.
Turn the brightness level DOWN (dim): Hold down the DOWN button. The brightness level will
gradually decrease until button is released.
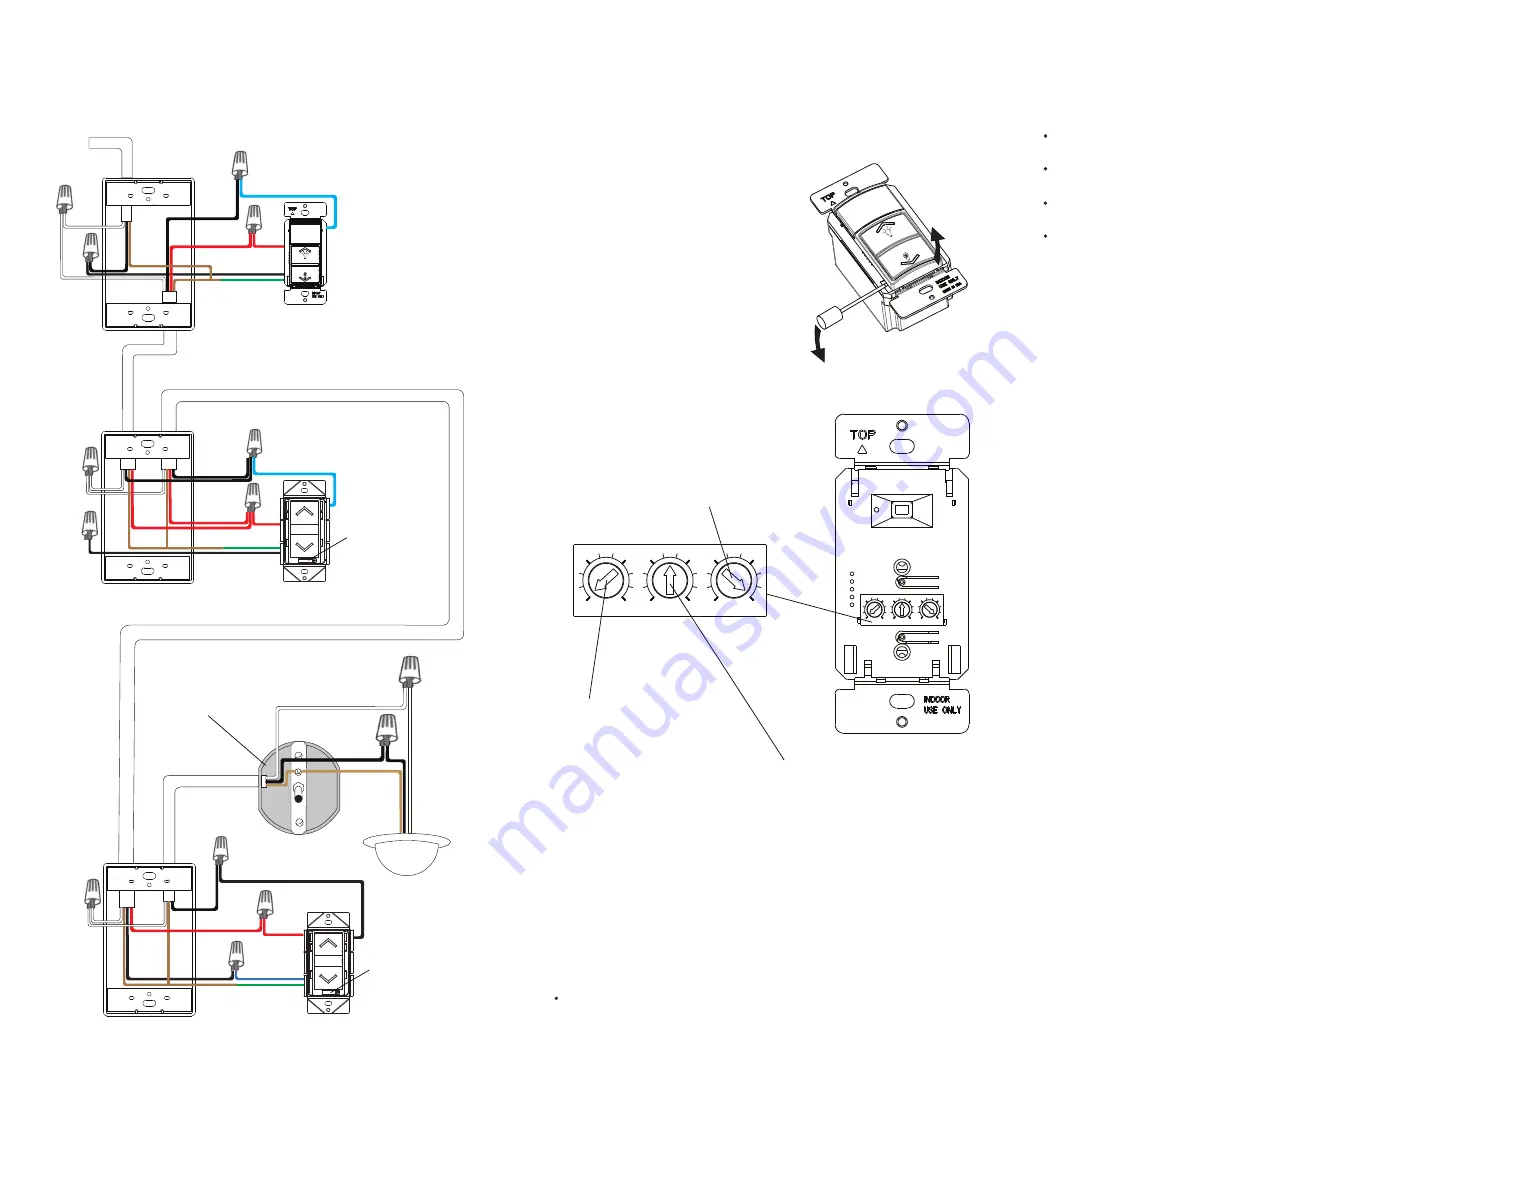
Once you have completed the wiring, we recommend that you turn on the power, then test and adjust the settings
to your desire before installing the wallplate. The adjustment dials are located under the face cover, which can be
removed by prying the face cover off from the indents located at the bottom corner of the face covers. See diagram
below.
POWER UP AND TEST BEFORE WALLPLATE
The Load does not turn On when a person walks in the room:
The Load does not turn Off:
The Load turns on when its not desired:
NOTE: There is a 3 minute warm-up time at initial power-up.
The load may turn on/off several times during the warm-up.
1. Make sure power is turned on at the panel.
2. Make sure a GFCI switch nearby or at the panel is not tripped.
3. Push Manual On/Off Button: if the load turns on, then reset the Ambient Light Level.
4. Check the wiring connection for loose wire cap.
5. Switch may be in VACancy mode. Switch it to Occupancy mode if auto on (always) is the desired
operation.
1. Motion may be detected. The time delay constantly restarts its countdown after the last motion
detected. To verify proper operation, turn the Time Delay Knob to 15s (Test Mode) and make sure
there is no motion (no LED flashing). Tape may be used to cover the fresnel lens while testing.
2. Check for significant heat source emitting within six feet (two meters) such as high wattage light bulb,
portable heaters or HAVC vents.
3. Check the wiring. Make sure the HOT and LOAD wires aren't reversed.
1. Motion may be detected. The time delay constantly restarts its countdown after the last motion
detected. To verify proper operation, turn the Time Delay Knob to 15s (Test Mode) and make sure
there is no motion (no LED flashing). Tape may be used to cover the fresnel lens while testing.
2. Check for significant heat source emitting within six feet (two meters) such as high wattage light bulb,
portable heaters or HAVC vents.
3. If Manual operation of push-button is desired, select VAC mode on the Mode Switch.
TROUBLESHOOTING
OPEN CONTROL PANEL
Remove the cover to expose the control panel. Insert the tip
of a flat screwdriver into the gap and pry the cover off.
To reinstall, simply align the cover and snap back on.
1
2
3
4
1
2
3
4
RANGE
LIGHT
TEST
TIME
10
Min
20
Min
Min
30
Ambient Light Level Dial
Default position: Daylight (100% at position 4)
Adjustable: Daylight to 30Lux (Counter clockwise)
Note:
Position 4 means that the sensor will turn the lights on
even when the room is already bright.
Position 1 means the sensor will not turn the lights on
until the brightness in the room drops to 30 lumens or below.
Time Delay Dial
Default position: 15 Seconds (Test mode)
Adjustable: from 15 Seconds to 30 Minutes
(clockwise)
Range Dial (Sensor Sensitivity)
Default position: Center at 65%
Adjustable: 30% (Position 1) to 100% (Position 4)


