Topfield TF6000F Скачать руководство пользователя страница 41

6.1 Firmware Update

37

6.1

Firmware Update

6.1.1

From The Satellite

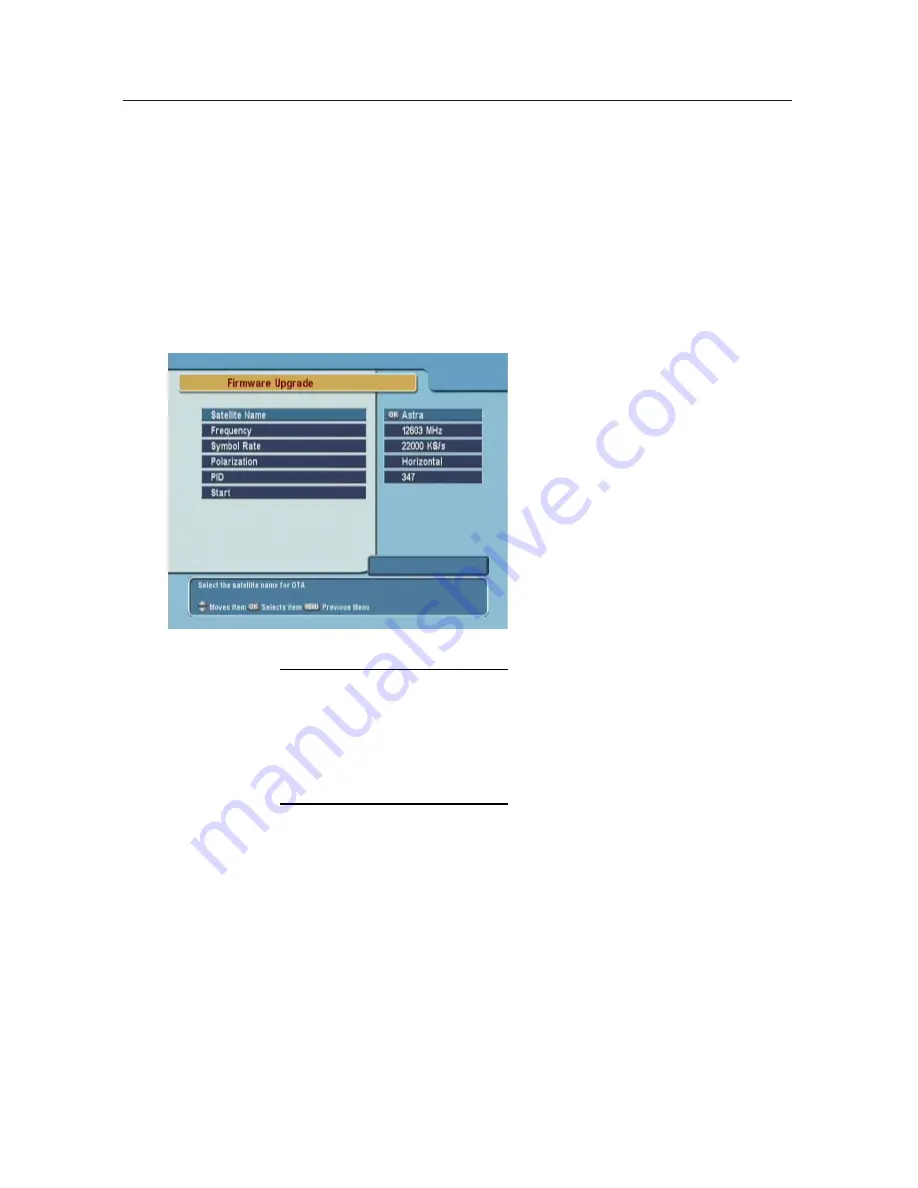
You can update the firmware using the method called OTA
(Over The Air). OTA is a standard for the transmission and
reception of application-related information in a wireless com-
munications system.

To update the firmware by OTA,
press the

Installation

>

Firmware

Upgrade

menu.

The information of the satellite
available to update the digital re-
ceiver’s firmware by OTA is as
follows.

Satellite

Astra

Frequency

12603 MHz

Symbol Rate

22000 KS/s

Polarity

Horizontal

PID

347

The satellite for OTA can be
changed. You can get the infor-
mation at the Topfield website,

http://www.i-topfield.com

.

6.1.2

From a Personal Computer via RS232 Port

It is possible to transfer a new firmware to the digital receiver
from a personal computer connecting them by a RS232 cable
to update the firmware. The firmware transfer program,

TFD-

Down

is needed to use this method of update, which is avail-

able at the Topfield website,

http://www.i-topfield.com

.

How to update the firmware with this method is as follows.

Содержание TF6000F

Страница 1: ...TOPFIELD TF6000F User Manual Digital Satellite Receiver Free To Air...

Страница 2: ...Installation 5 2 1 Packing Contents 5 2 2 Safety Precautions 5 2 3 The Connection Panel 7 2 4 Connecting The Digital Receiver 7 2 4 1 Connecting to The Satellite Antenna 7 2 4 2 Connecting to The TV...

Страница 3: ...3 4 Language Setting 24 3 5 Audio and Video Setting 25 3 6 Menu Display Transparency 26 3 7 Display Time of The Information Box 26 3 8 Position of The Information Box 26 4 Listing Services 28 4 1 Edi...

Страница 4: ...e Update 37 6 1 1 From The Satellite 37 6 1 2 From a Personal Computer via RS232 Port 37 6 1 3 From another Digital Receiver via RS232 Port 38 6 2 Data Transfer 39 A Information 40 A 1 Operational Fun...

Страница 5: ...all assigned their own frequencies instead sev eral television and radio are transmitted by a single transpon der To help you with the choice and settings for satellite services a selection of televi...

Страница 6: ...atest which will be provided by Top eld Refer to Section A 1 on page 40 for detailed features 1 2 Controlling The Digital Receiver You can control the digital receiver with the remote control and the...

Страница 7: ...favorite ser vice list 6 Menu button displays the menu or escapes to a higher level menu out of a submenu 7 Exit button escapes from any menu 8 Guide button displays program guides if available 9 Inf...

Страница 8: ...eletext button selects sound track and mode enables subtitle display and enables teletext dis play if available 19 Pause button keeps a picture from the programme on the air as it is 20 UHF button dis...

Страница 9: ...batteries AAA 1 5 V 1 user manual 2 2 Safety Precautions Please read the following safety precautions carefully for your safety The mains supply must be 90 to 250 volt Check it before connecting the...

Страница 10: ...nting a safety risk Do not place the digital receiver close to heating units or in direct sunlight as this will impair cooling Place the digital receiver on a hard level surface Do not lay any objects...

Страница 11: ...oadcast input socket from conventional aerial antenna 6 RF OUT AV output socket for television 7 RS232 Serial port for rmware update and data transfer 2 4 Connecting The Digital Receiver There are som...

Страница 12: ...the digital receiver and the cor responding input sockets on the television or audio appliance RS 232 LNB OUT LNB IN R AUDIO LVIDEO RF OUT RF IN 2 4 3 Connecting to The TV by RF Cable Connect the aeri...

Страница 13: ...s properly to remote con trol commands the batteries may be at Be sure to remove used batteries The manufacturer accepts no liability for dam age resulting from leaking batteries Note Batteries includ...

Страница 14: ...atellite list which is listed in alphabetical order Select one of the preprogrammed satellites that corresponds to the direction of the antenna If a desired satellite is not in the list then select Ot...

Страница 15: ...it is possible to connect up to 4 antennas Set the DiSEqC 1 0 to Disable and select an item in DiSEqC1 1 If you use a DiSEqC1 1 switch and DiSEqC 1 0 switches it is possible to connect up to 16 antenn...

Страница 16: ...lect Other Search Mode The Auto mode uses the information the digital receiver has To use the Manual mode you have to know in advance the fre quency symbol rate and polarization type of the transponde...

Страница 17: ...vailable and this parameter is set to on the information of the transponder you want to search will be found PID PID Packet Identi er is a set of numbers that identi es the transport streams packets f...

Страница 18: ...onder of which signal is strong Motorized DiSEqC 1 2 Set this parameter to enable if you have DiSEqC 1 2 antenna DiSEqC Command Mode To nely tune the position of the antenna for better reception selec...

Страница 19: ...t and West position Limit Off Remove the limitation Reset Reset all the stored position of the motor relative to the 0 position 2 6 4 USALS Setting USALS is very convenient mo torized DiSEqC system th...

Страница 20: ...atitude of your location You can select the angle South or North by b dor numeric but tons Reference Position This menu makes go to the reference position Move After searching the position you want by...

Страница 21: ...a c bor dbuttons you can select satellite Frequency By pressing OK button you can see the all frequencies of transpon ders of a satellite and can select a frequency Or by pressing a c b or d buttons y...

Страница 22: ...aor c button Add New TP In case of new transponder information is added by broad caster you can add new TP transponder information and en joy new services Before adding new TP information you should k...

Страница 23: ...second is to reset the parameters of Motorized DiSEqC 1 2 2 6 7 System Recovery To restore the preference settings and lists select the Installa tion Factory Setting menu All the data and system setti...

Страница 24: ...g menu The exact local current time can be adjusted by using the Mode the Local Time and the Time Off set submenus Mode By using b d you can select on of the Auto Manual mode The Auto mode updates the...

Страница 25: ...of the local time zone from the GMT For example if the local area is Seoul the time dif ference from the GMT is 9 insert 9 00 The time is adjustable by using b dbuttons 15 minutes at a time 3 2 Timer...

Страница 26: ...ekend Weekly and Every Week day Date Select the recording start date by pressing b d but tons Wakeup Time Select the wakeup time b dbuttons and 0 to 9 buttons are available Duration Select the recordi...

Страница 27: ...to everyone Total Block Access to no one without PIN code If the service is limitation free the block function will not work 4 18 age Inaccessible for viewers within each minimum age limit if a maturi...

Страница 28: ...s avail able for the menu subtitle and audio To set the languages se lect the System Setting Lan guage Setting menu Menu Language It is an item for changing the language of the Main menu Se lect the l...

Страница 29: ...tomatic PAL NTSC selection set it to Multi TV Aspect Ratio Select your TV screen format Select 4 3 or 16 9 mode by using b dbuttons Display Format If you have a TV set with the 4 3 picture format and...

Страница 30: ...ue on the TV If you do not there will be no picture and sound 3 6 Menu Display Transparency To adjust the transparency level of the menus and the other on screen display select the System Setting OSD...

Страница 31: ...3 8 Position of The Information Box 27 To adjust the position of the information box select the Sys tem Setting Info Box Position menu...

Страница 32: ...isting Services 4 1 Editing The Services List To edit the service list select the Organizing Services menu Browse Press OK button Now browsing through the Organizing Ser vices is possible Press assign...

Страница 33: ...ode Lock You can restrain and lock the services From here locking and later unlocking services in any of the lists is possible e g in order to prevent children from watching it If a locked service is...

Страница 34: ...sic and Sports Up to 30 lists including these lists can be added and renamed When delet ing a service select a service in the Fav Services section and press the assigned button on the help message To...

Страница 35: ...he service list with the help window will be dis played Select one of the services you want to enjoy By pressing the 0 button instead of OK button satellite se lection window will appear You can selec...

Страница 36: ...st which appears on pressing the FAV button 5 2 Information Box Press the information button on the remote control to see the program information The Information box displays as fol lows Service Numbe...

Страница 37: ...ressing the information button once more 5 3 Electronic Program Guide To display the information about currently being broadcasted as well as those that will be broad casted next press GUIDE button on...

Страница 38: ...the Information Box There are VBI insertion mode and software emulation mode in teletext In the VBI in sertion mode which is always on you can watch the teletext with your TV using the remote control...

Страница 39: ...used for multifeed function too If the multifeed is available in current service Multifeed Track will be displayed rst You can change the display to Sound Track selection menu by pressing the sound b...

Страница 40: ...as a stable and convenience rmware to use However a new rmware may be released to improve the digital receiver The latest rmware and the update program are available at Top eld website http www i top...

Страница 41: ...ware by OTA is as follows Satellite Astra Frequency 12603 MHz Symbol Rate 22000 KS s Polarity Horizontal PID 347 The satellite for OTA can be changed You can get the infor mation at the Top eld websit...

Страница 42: ...on to select the new rmware le 2 Press Download button to start the le transfer 3 Press Stop button to cancel the le trans fer 6 1 3 From another Digital Receiver via RS232 Port It is possible to tran...

Страница 43: ...ice information to the digital re ceiver from another digital receiver connecting them by a RS232 cable only if they are the same model The method is as follows 1 Plug a RS232 cable into the RS232 por...

Страница 44: ...al menu provided Service switching time less than 1 second Service list editable Favorite service list editable Favorite service groups available up to 30 Automatic selection of color model 256 color...

Страница 45: ...LNB Power Polarization Vertical 13 5 VDC Horizontal 18 5 VDC Current Max 500 mA with overload pro tection 22 kHz Tone Frequency 22 1 kHz Amplitude 0 65 0 2 V Demodulation QPSK Input Symbol Rate 1 to...

Страница 46: ...4 83 NTSC TV standard PAL G I K NTSC M Table A 5 Speci cations of Power Supply Input Voltage 90 to 250 VAC 50 60 Hz Type SMPS Power Consumption Running Max 24 W Standby 9 W Protection Separate interna...

Страница 47: ...13 Censorship 23 Center extract 25 Change PIN Code 23 Conditional Access System 13 D Date 22 Disable 11 DiSEqC 1 0 11 DiSEqC 1 1 11 Download 38 Duration 22 E East 16 Every Weekday 22 Every Weekend 22...

Страница 48: ...ing 20 Locked 24 Longitude 16 Low Noise Block 10 M Manual 12 21 Mode 20 22 Mono 25 Motorized DiSEqC 1 2 14 Movie 30 Multi 25 multipicture 32 multipicture selection 32 Music 30 N Network Information Ta...

Страница 49: ...ice Search 12 SMATV 12 South 16 Space 18 Sports 30 Stereo 25 Stop 38 Store 15 19 System Setting 20 21 23 27 T TFD Down 37 Time Offset 20 Total Block 23 Transfer Data to Other IRD 39 Transfer Firmware...

Страница 50: ...46 WEEE Information...

Страница 51: ...47...

Страница 52: ...48...

Страница 53: ...49...

Страница 54: ...50...

Страница 55: ...51...

Страница 56: ...52...

Страница 57: ...53...

Страница 58: ...tal receiver which this manual explains So some explanations and illustrations in this manual could be different from the real digital receiver Copyright 2005 TOPFIELD Co Ltd English Version http www...

Отзывы: