Topfield TF 5400 PVR Combo Скачать руководство пользователя страница 19

2.4 Connecting up your digital receiver

13

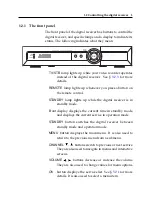
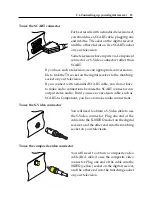
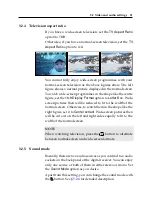
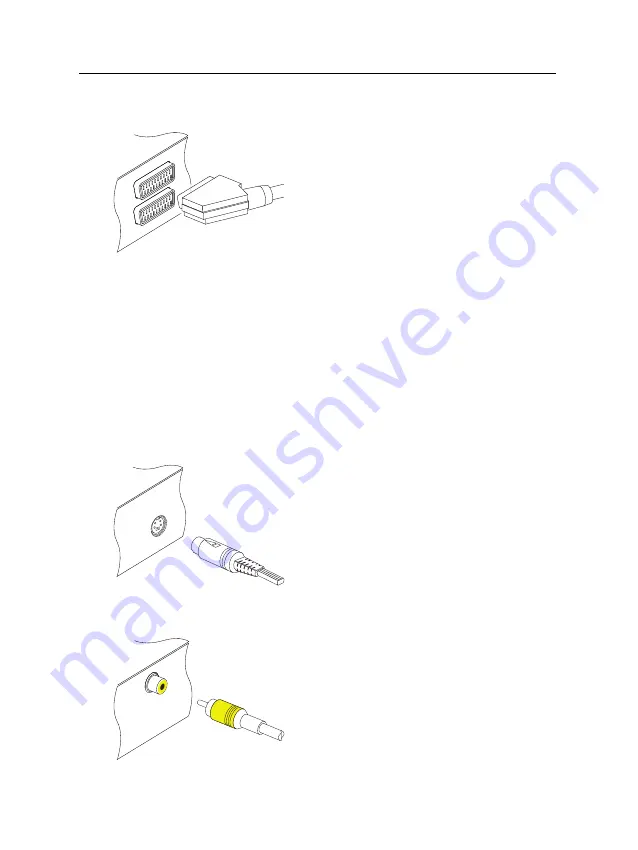
To use the SCART connector

For best results with a standard television set,
you should use a SCART cable, plugging one
end into the

TV

socket on the digital receiver

and the other end into a free SCART socket
on your television.

Some televisions have inputs via Component
connector or S-Video connector rather than
SCART.

If you have such a television, use an appropriate conversion ca-
ble to link the

TV

socket on the digital receiver to the matching

socket on your television.

If you connect with a standard SCART cable, you do not have
to make audio connections because the SCART connector can
output stereo audio. But if you use a conversion cable, such as
SCART-to-Component, you have to make audio connections.

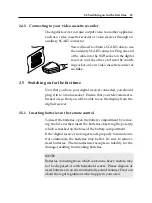
To use the S-Video connector

You will need to obtain a S-Video cable to use

the S-Video connector. Plug one end of the
cable into the

S-VIDEO

socket on the digital

receiver, and the other end into the matching
socket on your television.

To use the composite video connector

You will need to obtain a composite video

cable (RCA cable) to use the composite video
connector. Plug one end of the cable into the

VIDEO

(yellow) socket on the digital receiver,

and the other end into the matching socket
on your television.

Содержание TF 5400 PVR Combo

Страница 1: ...TOPFIELD TF 5400 PVR User Guide Digital Satellite Terrestrial Receiver Personal Video Recorder...

Страница 2: ......

Страница 3: ...Setup 8 2 1 Unpacking 8 2 2 Safety precautions 8 2 3 Rear panel connections 10 2 4 Connecting up your digital receiver 11 2 4 1 Connecting the antenna 12 2 4 2 Connecting to your television 12 2 4 3 C...

Страница 4: ...splay 25 3 6 To turn on the time shift feature 26 3 7 To use MediaHighway programme guide 26 4 Service Search 28 4 1 Searching satellite broadcasting services 28 4 1 1 Configuring LNB settings 28 4 1...

Страница 5: ...ow to use on screen keyboard 53 6 4 Transferring receiver data 53 7 Recording and Playing 55 7 1 Recording a programme 56 7 1 1 Instant recording 56 7 1 2 Current programme recording 58 7 1 3 Timer re...

Страница 6: ...sequence 69 7 3 7 To play back a scrambled recording 69 7 4 Editing a recording 70 7 5 Copying a recording 70 7 6 MP3 playback 71 7 7 Transferring recording files 71 7 8 Formatting the hard disk 73 8...

Страница 7: ...ana logue broadcasts however digital broadcasts are not all as signed to their own frequencies instead multiple television broadcasts are transmitted through a single frequency The fre quency in digit...

Страница 8: ...hours of television in case of 250 gigabytes in excellent picture and sound quality Time shift is a special technical feature available on the TF 5400 PVR You can pause the programme you are watch in...

Страница 9: ...ghts up while the digital receiver is in standby mode Front display displays the current time in standby mode and displays the current service in operation mode STANDBY button switches the digital rec...

Страница 10: ...details 4 switches the output of the TV SCART socket between the digital receiver and the device connected to the VCR SCART socket See 3 2 3 for more details 5 is used to set a sleep timer 6 Numeric...

Страница 11: ...FAV displays the favourite lists 17 is used to select a subtitle track 18 EXIT is used to exit the current screen 19 displays teletext 20 is used to start reverse playback Subsequent presses increase...

Страница 12: ...See 5 6 for information about picture in picture 31 is used to make a bookmark during playback or time shift 32 is used to jump to next bookmark position or to jump forward by 30 seconds 33 is used t...

Страница 13: ...nsterted The front of the digital receiver has two common interfaces To watch a pay service you should take the following steps 1 Purchase a conditional access module and a subscription card for the p...

Страница 14: ...o batteries for the remote control AAA 1 5 V One SCART to component cable One S Video cable A copy of this user guide NOTE Accessories may vary according to your local area 2 2 Safety precautions Plea...

Страница 15: ...igi tal receiver When placed in a cabinet make sure there is a minimum space of 10 centimetres around it For the physical specification of the digital receiver refer to Table 2 2 Protect the power cor...

Страница 16: ...nal input socket for the first tuner 2 IF OUT Satellite broadcasting signal output socket through the first tuner 3 ANT Terrestrial broadcasting signal input socket for the second tuner 4 RF LOOP OUT...

Страница 17: ...pecifications VIDEO Composite video CVBS output AUDIO Left right audio output S VIDEO Super video S Video output TV CVBS S Video RGB YUV video output Left right audio output VCR CVBS video output Left...

Страница 18: ...from your terrestrial antenna to the ANT connec tor 2 4 2 Connecting to your television Between all the following connectors of the digital receiver we recommend you to use the first connector to get...

Страница 19: ...ct with a standard SCART cable you do not have to make audio connections because the SCART connector can output stereo audio But if you use a conversion cable such as SCART to Component you have to ma...

Страница 20: ...e S PIDF socket on the digital receiver and the other end into the matching socket on your audio system To use the RF connector If your television does not have any video and audio input you will need...

Страница 21: ...nsure that your television set is turned on so that you will be able to see the display from the digital receiver 2 5 1 Inserting batteries in the remote control To insert the batteries open the batte...

Страница 22: ...te control If the picture is good you can skip to 4 1 4 to search for the available television and radio services Otherwise you may need to temporarily connect the composite video connector VIDEO to y...

Страница 23: ...title track should be output Select the System Setting Lan guage Setting menu You should see a screen like the left figure Menu language The digital receiver supports many menu languages Dutch English...

Страница 24: ...ny available language no subtitle will be displayed Apart from this setting you can select a subtitle track with the button See 5 2 5 for detailed description Audio language Set the 1st Audio Language...

Страница 25: ...1 for television standard of your local area If you have a PAL television you have to set the TV Type option to PAL In that case if you switch to a service of the NTSC standard the digital receiver wi...

Страница 26: ...RGB colour model provides the best video quality with little difference from the YUV colour model but the CVBS colour model does the least So RGB would be most desirable for this option 3 2 3 Video ca...

Страница 27: ...pictures then will be reduced to fit to the width of the normal screen Otherwise to watch them in the shape like the right figure set it to Center extract Wide screen pictures then will be cut out on...

Страница 28: ...Iran Israel Italy Kuwait Latvia Libya Lithuania Luxem bourg Netherlands New Zealand Norway Portugal Slovakia Slovenia Spain Sweden Switzerland Syria Yugoslavia PAL I Hong Kong Macao Republic of Irelan...

Страница 29: ...to Table 3 2 3 Make sure that your local time is correctly displayed on the Local Time option To set the local time yourself set the Mode option to Manual and enter your local time to the Local Time o...

Страница 30: ...rid GMT 2 00 South Africa Kaliningrad GMT 3 00 Baghdad Riyadh Moscow St Petersburg GMT 3 30 Tehran GMT 4 00 Abu Dhabi Muscat Baku Tbilisi GMT 4 30 Kabul GMT 5 00 Ekaterinburg Islamabad Karachi Tashken...

Страница 31: ...can lock If the Time Setting item is set to Locked you have to enter the per sonal identification number when accessing the Time Setting menu If you enter a wrong number you cannot use the menu To re...

Страница 32: ...can reverse and pause live television as if playing back a recording To enable this feature select the System Setting menu and then set the Time Shifting option to Enable See 5 5 for how to use this...

Страница 33: ...Set the MediaHighway EPG option to On to activate this feature then the other options become enabled Set the Satellite Name and Home Transponder options to available ones and set the Tuner Select opti...

Страница 34: ...antenna settings according to your antenna system in the following order 1 Configure LNB settings Refer to 4 1 1 2 Set the position of your desired satellites if you have a motorized antenna You can c...

Страница 35: ...to configure the LNB settings You should see a screen like the left figure Pressing the OK button on the Satellite Name option displays the satellite list in alphabetic order Select the satellite towa...

Страница 36: ...te Equipment Control switches It is possible to connect several antennas to one digital receiver by DiSEqC switches A DiSEqC 1 0 switch allows switching between up to four satellite sources and a DiSE...

Страница 37: ...satellite perform the following steps 1 Choose your desired satellite at the Satellite Name op tion 2 Set the DiSEqC Command Mode option to User 3 Set the Motor Control option to Goto Then the antenna...

Страница 38: ...C 1 2 it is no longer required to manually search and store every satellite position Just pointing to a known satellite position is enough This position will act as a central point The USALS will then...

Страница 39: ...he changed position is automatically saved At this time you had better check the receiving quality of every transponder and choose the best one at the Transponder or Frequency option It will be helpfu...

Страница 40: ...owing steps 1 Choose your desired satellite at the Satellite Name op tion 2 Set the Search Mode option to Manual 3 Choose your desired transponder at the Frequency op tion or enter it with the numeric...

Страница 41: ...he packet identifiers of your desired service at the PID option with the numeric buttons A packet iden tifier is used to verify audio and video streams Searching every service of SMATV system To searc...

Страница 42: ...the Installation Terrestrial Search menu You should see a screen like the left figure If you have an antenna booster you should set the Antenna Sup ply 5V option to On to supply power to it You shoul...

Страница 43: ...es list with each tuner If a certain service is registered on only one tuner it may be impossible to watch one service while recording You can copy entries of one tuner s services list to the other tu...

Страница 44: ...lation Factory Setting menu and then you are asked for confirmation If you select Yes service entries favourite entries and timer events will all be deleted and preference options will be reset to the...

Страница 45: ...on Press it again to restore the sound to previous level 5 2 Watching television To change services press the P or P button Pressing the button switches to the previously viewed service In ad dition y...

Страница 46: ...meric buttons puts the highlight bar on its entry You can switch between the television services list and the radio services list by pressing the button Pressing the button performs an alphabetic brow...

Страница 47: ...on number to watch or unlock it To delete the highlighted service select the Delete option then you are asked for confirmation If you select Yes it will be deleted If you want to restore it as before...

Страница 48: ...light bar on a desired group and press the V button a highlight bar appears on its favourite services list Once you select a desired service with the OK button it will be presented Otherwise to select...

Страница 49: ...g tuner Transponder information Signal level and quality Programme name Programme classification symbol Programme summary Broadcasting time Current time In addition you might see the following symbols...

Страница 50: ...be marked on the infor mation box Pressing the button displays available subtitle tracks Once you select a subtitle track it will be displayed 5 2 6 Viewing teletext On some services such information...

Страница 51: ...sts press the button To switch it back press the button again Pressing the button displays the programme guide in the form of a spreadsheet To switch it back press the button again You can make a time...

Страница 52: ...ed time shifted tele vision Then you can skip com mercials until you catch up to the live broadcast In order to use the time shift feature the Time Shifting option must be set to Enable See 3 6 When e...

Страница 53: ...ime shift see 7 1 5 To end time shift press the button The live pro gramme will be presented When time shift option is disabled and pause is kept for more than 10 seconds the time shift feature will b...

Страница 54: ...le services in the services list may be limited 4 Pressing the button moves the sub screen counter clockwise and pressing the button moves it clock wise 5 Pressing the SAT button swaps the main pictur...

Страница 55: ...list Select the Organizing Satellite Services menu You should see a screen like the left figure There are editing options on the left column and service entries on the right column Once you put the h...

Страница 56: ...Press the OK button to fix it You can lock some services to prevent your children from watching them To lock a service select the Lock option and select a desired service then the selected service ge...

Страница 57: ...t Favourite list centre Services list right The services list contains all available services whereas the favourite list contains only chosen services that have been added to the highlighted group As...

Страница 58: ...ore entries 3 Press the button and the highlight bar get moved to the favourite list You can delete a favourite entry with the OK button 4 To select another group press the button again By pressing th...

Страница 59: ...he cursor to the right of the desired letter on the input line and then select the Del key You must select the Save key to complete naming otherwise if you press the EXIT button it will not be named 6...

Страница 60: ...l receiver 2 Turn on the source digital receiver 3 Select the Installation Transfer Firmware Transfer Data to Other IRD menu then you get asked for confirmation select Yes 4 To start the data transfer...

Страница 61: ...record two different services while playing back a previously recorded programme You can record two different services while watching one of them using the time shift feature See 5 5 for the time shif...

Страница 62: ...efore you can only change to a limited number of services while the two programs are being recorded CAUTION Do not move the digital receiver nor pull out the plug while it is running It may cause dama...

Страница 63: ...and press the OK button the recording will end at the specified time If the information about the next programme is provided by the electronic programme guide the After this program and After next pr...

Страница 64: ...tarted it is put on the recorded programme list even though it is not finished yet The recording file is named after its service name with a suffix of a number To view the recorded programme list pres...

Страница 65: ...finished Pressing the OK button on the File Name option displays the on screen keyboard with which you can specify a file name for the timer recording If you do not specify anything it will be named a...

Страница 66: ...der or suchlike in this case 2 If you want a radio programme set the Type option to Radio otherwise set it to TV 3 If you record a satellite programme set the Tuner Select option to Satellite otherwis...

Страница 67: ...tion displays the on screen keyboard with which you can specify a file name for the timer recording If you do not specify anything it will be named after the service name See 6 3 for how to use the on...

Страница 68: ...he P and P buttons 4 To make a timer event without recording press the OK button the letter P is displayed To make a timer event with recording press it once more or alternatively press the button the...

Страница 69: ...to record pay service programmes with the subscrip tion card so that they can be recorded in descrambled form In that case you can enjoy them without the subscription card like free service ones To re...

Страница 70: ...ded programmes list there are an MP3 list and a TAP list To view other lists press the or but ton See 7 6 for MP3 playback See Chapter 8 for description about TAP You can play move delete rename and l...

Страница 71: ...is displayed on it If you select a locked recording to play it back you will be asked for your personal identification number 7 2 4 To rename a recording To change the name of a recording perform the...

Страница 72: ...the list of recorded pro grammes 2 Put the highlight bar on a desired recording 3 Press the OK button to start playback 4 To stop playback press the button During a playback you can enjoy the followi...

Страница 73: ...n To hide the progress bar press the button again 7 3 2 To play in slow motion To watch in slow motion during a playback press the button If you press it repeatedly the playback speed changes in 3 ste...

Страница 74: ...u will see a small dot appear above the progress bar like in the picture above 3 To jump forward to next bookmark press the button 4 To jump to first bookmark press the button then the button 5 To del...

Страница 75: ...eps 1 Press the button to display the list of recorded pro grammes 2 Select each desired recording with the button once a recording is selected it gets numbered 3 Press the OK button to start playback...

Страница 76: ...the beginning scene of the part you want to edit by holding down the or button 3 Press the button then the pointer starts to blink 4 Move to the end scene the part is marked in purple 5 Press the but...

Страница 77: ...how to transfer MP3 files to the digital receiver from your computer refer to 7 7 To play a MP3 file perform the following steps 1 Press the button and then the or button to display the MP3 list 2 Put...

Страница 78: ...er 4 Turn on the digital receiver 5 Run Altair then its screen will appear like the figure below The instructions on how to use Altair are as follows 1 Select files to transfer The left panel shows fi...

Страница 79: ...ed differ ently from the standard MPEG format Visit http www videolan org or http www elecard com where you can find a MPEG player able to play them back If you wish to author DVDs with them visit htt...

Страница 80: ...s is http www windriver com Some variants of GCC compiler also might be available as a compiler for TAPs You can get the Application program Interface API libraries for TAPs from the Topfield website...

Страница 81: ...screen of a TAP Image Viewer which displays image files of BMP GIF and JPG for mat This TAP is available from the website http www i topfield com In the program file list you can use a variety of fil...

Страница 82: ...an update utility which runs on most versions of Windows from the Topfield website http www i topfield com 9 1 Checking the firmware information You have to check the firmware information of your dig...

Страница 83: ...9 1 Checking the firmware information 77 NOTE You can only update with firmwares of which system identifi cation is identical to that of yours Otherwise you will fail in firmware update...

Страница 84: ...rmware applicable to your digital receiver from the Topfield website 2 Plug one end of a USB cable into the USB port on the digital receiver and the other end into the matching port on your com puter...

Страница 85: ...oad a new firmware applicable to your digital receiver from the Topfield website 2 Turn off the digital receiver 3 Plug one end of a RS 232 cable 9 pin D sub cable into the RS 232 port on the dig ital...

Страница 86: ...cable 9 pin D sub cable into the RS 232 port on the dig ital receiver and the other end into the matching port on the other digital receiver 3 Turn on the source digital receiver if not already on 4 S...

Страница 87: ...ing the Start option starts firmware update Satellite Astra 19 2 E Frequency 12603 MHz Symbol Rate 22000 KS s Polarisation Horizontal PID 347 On the left table is presented the transponder information...

Страница 88: ...12 Antenna Supply 5V 36 Astra 81 AUDIO L 14 AUDIO L R 10 AUDIO R 14 Auto 34 36 Auto Start 75 Button 4 C band 28 CAM 7 CAS only 36 37 CAS FTA 41 51 Censorship 25 Center extract 21 Change PIN Code 25 C...

Страница 89: ...EPG 26 27 Menu Language 17 Mini A 30 Mode 23 61 mono 21 Motor Control 31 32 Motorized DiSEqC 1 2 31 Motorized DiSEqC 1 3 32 Move 33 50 Movement 31 multifeed 45 My Latitude 32 My Longitude 32 Network...

Страница 90: ...Store 32 subtitle 44 Symbol Rate 34 35 System ID 76 System Setting 25 26 TAP 74 tap 74 teletext 44 television services list 50 Terrestrial Search 36 TFD Down 79 TFDN USB 78 Time 65 time format 23 Tim...

Страница 91: ...85 Wind River 74...

Страница 92: ......

Страница 93: ......

Страница 94: ...either the retailer where they purchased this product or their local government office for details of where and how they can dispose this product for environmentally safe recycling Business users shou...

Отзывы: