background image


23


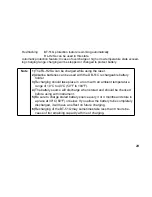
Red flashing

: BT-51Q protection feature is working automatically.


RL-H2Sa can be used in this state.

Automatic protection feature; In case of overcharge or high or low temperature state exceed-
ing charging range, charging will be stopped or changed to protect battery.


Note

1)


The RL-H2Sa can be charged while using the laser.


2)


Alkaline batteries can be used with the DB-51C rechargeable battery 
holder.


3)


Recharging should take place in a room with an ambient temperature 
range of 10°C to 40°C (50°F to 104°F).


4)


The battery source will discharge when stored and should be checked 
before using with instrument .


5)


Be sure to charge stored battery source every 3 or 4 months and store in 
a place at 30°C (60°F) or below. If you allow the battery to be completely 
discharged, it will have an effect on future charging.


6)


Recharging of the BT-51Q may sometimes take less than 9 hours be-
cause of its remaining capacity at time of charging.  

Содержание RL-H2Sa

Страница 1: ...INSTRUCTION MANUAL ROTATING LASER RL H2Sa POWER MANU ON ENT X Y RL H2Sa x100 rpm...

Страница 2: ......

Страница 3: ...check that the instrument is functioning cor rectly with normal performance 1 Vibration and Impact Protection When transporting the instrument provide protection to minimize risk of severe vibration...

Страница 4: ...mend that you become familiar with the meaning of these Warnings and Cautions before continuing Injury refers to hurt burn electric shock etc Physical damage refers to damage to equipment structure or...

Страница 5: ...r attempt to repair the instrument yourself Laser beams can be dangerous They can cause eye injury Do not stare into beam or view directly with optical instruments Risk of fire or electric shock Do no...

Страница 6: ...from the batteries If this oc curs wash off with copious amounts of water and seek medical attention Damaged or broken carrying cases may fall open causing injury or damage to the laser Do not use a c...

Страница 7: ...for consequential damage and loss of profits by any disaster an earthquake storms floods etc fire accident or an act of a third party and or a usage in other than usual conditions 4 The manufacturer...

Страница 8: ...ified as a Class 3A IIIA Laser Product This is a simple product to operate and does not require training from a laser safety officer In case of any failure do not disassemble the instrument Contact TO...

Страница 9: ...ht Alert function 16 To activate the height alert function 16 Aligning Direction of Grade 17 Entering Grade 18 How to enter grade 19 Masking Laser beam shutter 21 Maintaining Power Sources 22 Installi...

Страница 10: ...le battery 1pc 3 DB 51C Rechargeable battery holder 1pc 4 AD 9B 7C AC DC converter 1pc 5 LS 70B Laser Sensor 1pc 6 Laser Sensor holder model 3 1pc 7 Carrying case 1pc 8 Instruction manual 1vol Please...

Страница 11: ...9 Nomenclature and Functions RL H2Sa POWER MANU ON ENT X Y RL H2Sa x100 rpm Handle Rotary head Battery compartment lock Battery holder Grade alignment sights Beam aperture Control Panel...

Страница 12: ...ey Auto leveling indicator Rotation control key Y axis key Arrow keys Y axis grade display Masking direction indicator Rotation speed Arrow key for Mask quadrant 4 Arrow key for Mask quadrant 2 Change...

Страница 13: ...desired speed See Changing rotation speed on page 16 4 Set the electronic beam shutter mask for spe cific quadrants if desired See Masking Laser beam shutter on page 21 5 Turn on LS 70 laser sensor If...

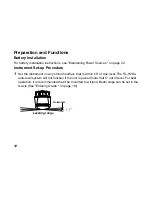
Страница 14: ...up Procedure 1 Set the instrument on any smooth surface that is within 5 of true level The RL H2Sa auto level system will not function if the unit is placed more that 5 out of level For best operatio...

Страница 15: ...head stops and no beam is emitted from the laser Recharge the battery BT 51Q Ni MH rechargeable battery or replace the dry batteries with new ones The laser will shut down a few minutes after the bli...

Страница 16: ...active and emits the laser beam To turn automatic leveling off To turn OFF the auto leveling function manual mode press the Auto Manual leveling con trol pad twice in quick succession The manual mode...

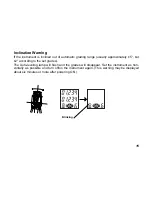
Страница 17: ...ally approximately 5 but 2 according to the set grades The Auto leveling lamp will flash and the grades will disappear Set the instrument as hori zontally as possible and turn off on the instrument ag...

Страница 18: ...to leveling lamp will flash The elevation height of instrument should be verified and re established if necessary To activate the height alert function To activate the height alert function depress an...

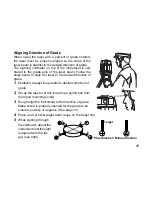
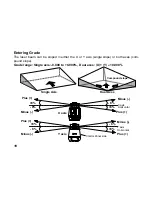
Страница 19: ...the desired direction of grade 1 Establish a target line parallel to desired direction of grade 2 Set up the laser over this line drop a plumb bob from the tripod mounting screw 3 Rough align the inst...

Страница 20: ...is single slope or both axes com pound slope Grade range Single axis 8 000 to 8 000 Dual axes X Y 10 000 Single Axis Dual Axes Compound slope X axis Y axis X axis Horizontal Y axis Horizontal Minus Pl...

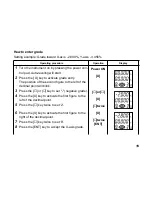
Страница 21: ...ade entry The position of the second figure to the left of the decimal point will blink Power ON X 3 Press the or key to set negative grade 4 Press the X key to activate the first figure to the left o...

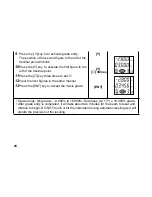
Страница 22: ...e key three times to set 3 12 Input the next figures in the same manner 13 Press the ENT key to accept the Y axis grade Y Y 3times ENT Grade range Single axis 8 000 to 8 000 Dual axes X Y 10 000 grade...

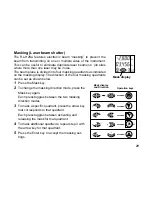
Страница 23: ...ection of the four masking quadrants can be set as shown below 1 Press the Mask key 2 To change the masking direction mode press the Mask key again Each press toggles between the two masking direction...

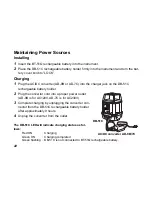
Страница 24: ...ttery holder 2 Plug the convertor cord into a proper power outlet AD 9B is for AC120V AD 7C is for AC230V 3 Complete charging by unplugging the converter con nector from the DB 51C rechargeable batter...

Страница 25: ...he DB 51C rechargeable battery holder 3 Recharging should take place in a room with an ambient temperature range of 10 C to 40 C 50 F to 104 F 4 The battery source will discharge when stored and shoul...

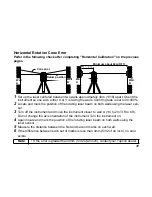
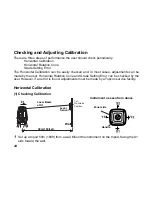
Страница 26: ...can be made by the user Horizontal Rotation Cone and Grade Setting Error can be checked by the user However if an error is found adjustments must be made by a Topcon service facility Horizontal Calib...

Страница 27: ...Loosen the tripod screw rotate the instrument 180 degrees and re secure it on the tripod 7 Turn the unit on again and allow auto leveling to complete Confirm the grade is set to 00 000 8 Position the...

Страница 28: ...rn off the laser Turn the laser back on by pressing the Power button down while pressing the X AXIS but ton This activates the X axis calibration mode Confirm that rotation speed is set to 1 2 After t...

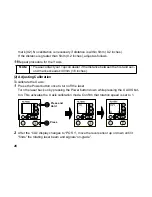
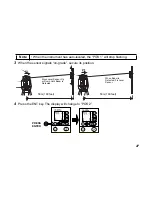
Страница 29: ...on 4 Press the ENT key The display will change to POS 2 Note When the instrument has auto leveled the POS 1 will stop flashing Move Level Sensor Up or Down Until Beam is Detected When Beam is Detected...

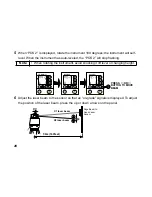
Страница 30: ...lashing 6 Adjust the laser beam to the sensor so that an on grade signals is displayed To adjust the position of the laser beam press the up or down arrows on the panel Note When rotating the instrume...

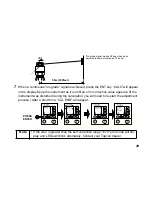
Страница 31: ...rument was disturbed during the calculation you will need to re start the adjustment process After a short time CAL END will appear Note If the error is greater than the self correction range E72 erro...

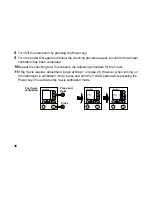
Страница 32: ...n completed 10 Repeat the checking and if necessary the adjusting procedure for the Y axis 11 If the Y axis requires adjustment begin at Step 1 on page 26 However when turning on the instrument in cal...

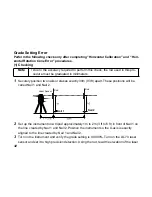
Страница 33: ...r 3 Turn off the instrument and move the instrument closer to wall A 1m to 2m 3 ft to 6 ft Do not change the axis orientation of the instrument Turn the instrument on 4 Again locate and mark the posit...

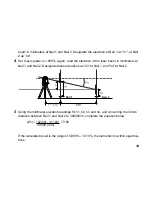
Страница 34: ...1m to 2m 3 ft to 6 ft in front of Nail 1 on the line created by Nail 1 and Nail 2 Position the instrument so the X axis is exactly aligned to the line created by Nail 1 and Nail 2 3 Turn on the instr...

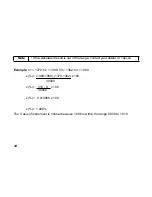
Страница 35: ...ters at Nail 1 and Nail 2 Designate these elevations as h3 at Nail 1 and h4 at Nail 2 5 Using the millimeter elevation readings for h1 h2 h3 and h4 and converting the 30mm distance between Nail 1 and...

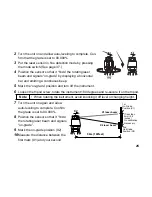
Страница 36: ...The X axis of instrument is normal because 1 006 is within the range 0 990 to 1 010 Note If the calculated result is out of the range contact your dealer or Topcon x 1390 1080 1370 1362 x 100 x 310 8...

Страница 37: ...ent after use Use a clean cloth moistened with a neutral detergent or water Never use an abrasive cleaner ether thinner benzene or other solvents Always make sure instrument is completely dry before s...

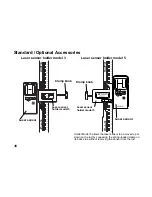
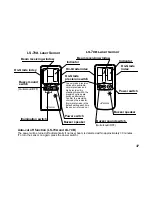
Страница 38: ...r sensor to be moved up or down on the rod by squeezing the spring loaded clamp on its back side without removing the sensor from the rod Laser sensor Clamp knob Laser sensor holder model 5 POWER 160...

Страница 39: ...switch the precision options are switched alternately Confirm the precision choice by the indicator Normal precision is the default setting each time the sensor is turned on On Grade precision switch...

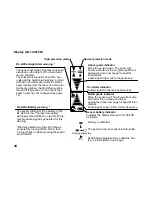
Страница 40: ...ignal is generated for this warning Above grade indicator Move the sensor down The arrow will become shorter as the on grade position is approached see next page for specific information Audio signal...

Страница 41: ...er beam Move sensor in direction of arrow to receive laser Replacing Battery LS 70A 70B 1 Press the lid in the direction of the arrow to lift 2 Remove the battery and replace with a new 9v alkaline ba...

Страница 42: ...page 17 on top of the instrument and provides greater accuracy in aligning the laser to the direction of grade The scope can be swiveled and locked in place so its aimed toward any of the four beam a...

Страница 43: ...new D cell alkaline batteries making sure each is placed in the proper direction as indicated 3 Replace the battery holder DB 51 and turn the knob to Lock Note Replace all 4 batteries with new ones D...

Страница 44: ...ected Turn the instrument OFF and ON again E62 Abnormal operation of internal vertical angle detecting system has occurred Turn the instrument OFF and ON again E72 Calibration error is greater than se...

Страница 45: ...de setting range Single axis 8 000 to 8 000 Dual axes X Y 10 000 Power supply 4 D cell batteries DC6 V Rechargeable battery BT 51Q Continuous operating time 20 C Alkaline dry batteries Approx 45 hours...

Страница 46: ...9V alkaline dry battery Auto shut off delay Approx 30 minutes without beam detection Operating temperature 20 C to 50 C 4 F to 122 F Continuous operating time at 20 C 68 F Alkaline manganese dry batte...

Страница 47: ......
Страница 48: ...0 Japan Phone 3 3558 2520 Fax 3 3960 4214 http www topcon co jp 31327 90050 RL H2Sa 0103 3C TOPCON GREAT BRITAIN LTD HEAD OFFICE Topcon House Kennet Side Bone Lane Newbury Berkshire RG14 5PX U K Phone...

Отзывы: