background image

15

English

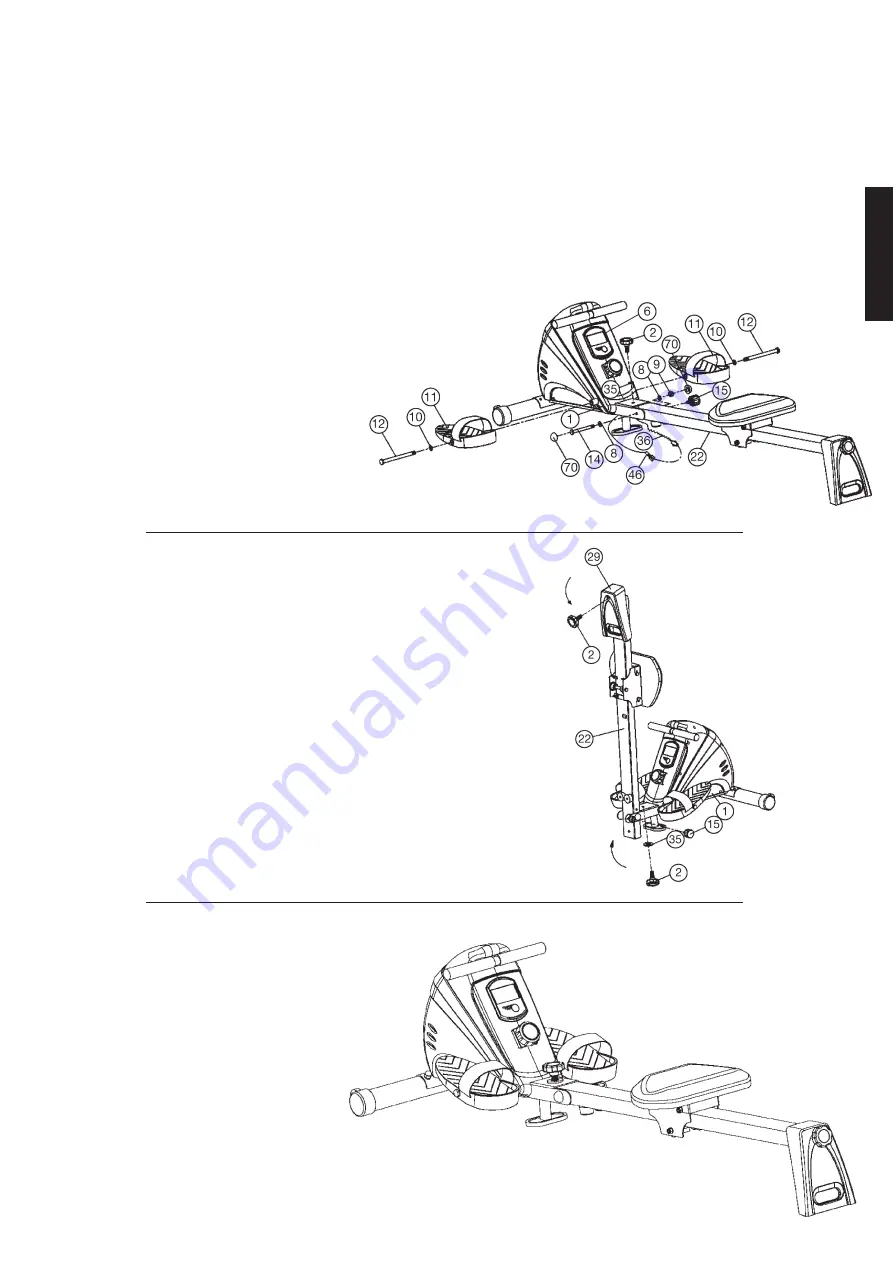
Step 5:
1.  To storage the item, screw out the hand grip screw (2) totally 

and turn/pull the quick release (15) to unlock the seat rail (22). 
Fold up the seat rail (22) into vertically position and secure this 
position with turn/pull the quick release (15) at bottom side of 
main frame (1).

2.  The rear foot (29) can fold up too, by removing the hand grip 

screw (2).

Step 6:
Checks
1. Check the correct installation and function of all screwed 
and plug connections. Installation is thereby complete.
2. When everything is in order, familiarise yourself with the 
machine at a low resistance setting and make your indivi-
dual adjustments.
Note:
Please  keep  the  tool  set  and  the  instructions  in  a  safe 
place as these may be required for repairs or spare 
parts orders becoming necessary later.

Step 4:
Attach the seat rail (22) and pedals (11) at main frame (1).
1. Place the seat rail (22) against the main frame (1) and connect 

the sensor cable (36) with connection cable (46).

2. Place the seat rail (22) into the holder of main frame (1), so that 

the holes pattern and screw the seat rail (22) at main frame (1) 
by using screw M10x100 (14), washer (8) and nut (9). 

  (Don’t  tighten  too  much,  the  seat  rail  (22)  should  be  fold  up 

easily.) 

3. Secure the seat frame (22) during training by screw in the hand 

grip screw (2) with washer (35). 

4. Put a washer (10) and a pedal (11) on screw M12x155 (12) and 

tighten the pedals (11) at main frame (1) into appropriate posi-
tion.

5. Take the computer (6) that has been preassembled at main co-

ver and insert the batteries (Type “AA”-1.5 V pencells) by wat-
ching for the right polarity on the back of the computer (6).

  (Batteries for the computer are not included in this item. Please 

buy them at your located market.) At the bottom of the compu-
ter is in the middle an arrest which the computer can be unlo-
cked and removed from the case.

Содержание Christopeit Sport 1560

Страница 1: ... and exercise instructions for Order No 1560 GB D Heimsport Trainingsgerät Rudergerät Lugano Notice de montage et d utilisation du No de commande 1560 Montage en bedieningshandleiding voor Bestellnummer 1560 F NL Инструкция по монтажу и эксплуатации заказа 1560 RU ...

Страница 2: ...tzung solange es noch nicht in Stand gesetzt wurde 9 Bei der Einstellung von verstellbaren Teilen auf die richtige Position bzw die markierte maximale Einstellposition und ordnungsgemässe Sicherung der neu eingestellten Position achten 10 Sofern in der Anleitung nicht anders beschrieben darf das Gerät nur immer von einer Person zum Trainieren benutzt werden und die Trainings leistung sollte insges...

Страница 3: ...3 ...

Страница 4: ... 9989 CR 9 Selbstsichernde Mutter M10 2 14 25 39 9981 10 Unterlegscheibe 13 26 2 12 39 9986 CR 11 Fußschale 2 12 36 1260 10 BT 12 Sechskantschraube M12x155 2 1 11 39 10331 CR 13 Sitz 1 18 36 1260 11 BT 14 Sechskantschraube M10x100 1 1 22 39 10453 CR 15 Schnellverschluss 1 1 36 1260 09 BT 16 Selbstsichernde Mutter M8 3 19 39 9918 CR 17 Unterlegscheibe 8 16 5 19 39 9862 CR 18 Sitzschlitten 1 13 22 3...

Страница 5: ...hsmutter M10x1 2 63 39 9820 SW 62 Mutter M10x1 5 52 63 39 9820 63 Achse 1 52 36 1560 06 BT 64 Feder 1 48 36 1260 39 BT 65 Distanzbuchse 1 63 36 1260 31 BT 66 Gummieinsatz 2 63 36 1560 07 BT 67 Unterlegscheibe 12 24 2 63 39 9986 CR 68 Schraube 3 5x18 3 69 39 9909 69 Deckel 1 48 36 1260 32 BT 70 Schraubenkappe 17 2 9 14 36 9988108 BT 71 Fußschutz Mitte 1 1 36 1260 33 BT 72 Kantenschutz 1 60 36 1260 ...

Страница 6: ... 2 Schieben Sie den Sitzrahmen 22 in richtiger Richtung durch den Sitzschlitten 18 sodass sich 4 Rollen der Sitzhalterung oben auf der Oberseite und 2 Rollen unten auf der Unterseite des Sitzschlittens 18 befinden 3 Schrauben Sie anschließend an vorgesehener Stelle unter dem Sitzrahmen 22 die Gummianschläge 24 wieder fest ein 4 Montieren Sie den Stahlwinkel 44 wie dargestellt am Sitzrah men 22 mit...

Страница 7: ...gund setzen Sie die Batterien Type AA 1 5V unter Beachtung richtiger Polarität auf der Rückseite des Computers 6 ein Batterien für den Computer liegen nicht im Liefe rumfang bei Bitte beziehen Sie diese im Handel Am unteren Rand des Computers befindet sich mit tig eine Arretierung womit der Computer entriegelt und aus dem Gehäuse entnommen werden kann Schritt 6 Kontrolle 1 Alle Verschraubungen und...

Страница 8: ...te 4 Kalorien Anzeige Es wird der aktuelle Stand der verbrauchten Kalorien angezeigt Eine Speicherung der zuletzt erreichten Werte in dieser Funktion erfolgt 5 Schläge Total Anzeige Es wird die Summe der zurückgelegten Ruderschläge aller Trainingsein heiten angezeigt Die Daten dieser Anzeige werden nur bei Auswechseln der Batterien gelöscht 6 SCAN Funktion Wird diese Funktion ausgewählt werden im ...

Страница 9: ...rbindungskabel auf ordnungsgemäßen Sitz Der Computer zählt nicht und schaltet sich durch Beginn des Trainings nicht ein Fehlender Sensorimpuls aufgrund nicht ordnungsgemä ßer Position des Sensors Überprüfen Sie den Abstand von Sensor zum Magneten Ein Magnet ist am Sitzschlitten befestigt und sollte im Abstand von kleiner als 5mm am Sensor vorbeikommen Trainingsfläche in mm für Gerät und Benutzer F...

Страница 10: ... die Körpertemperatur und die Sauerstoffzufuhr langsam gesteigert werden Dieses ist durch gymnastische Übungen über eine Dauer von fünf bis zehn Minuten möglich Danach sollte das eigentliche Training Trainings Phase beginnen Die Trainingsbelastung sollte erst einige Minuten gering sein und dann für eine Periode von 15 bis 30 Minuten so gesteigert werden daß sich der Puls im Bereich zwischen 70 und...

Страница 11: ... should be appropriate for the trainer must support your feet firmly and must have non slip soles 12 WARNING If you notice a feeling of dizziness sickness chest pain or other abnormal symptoms stop training and consult a doctor 13 Never forget that sports machines are not toys They must therefore only be used according to their purpose and by suitably informed and instructed persons 14 People such...

Страница 12: ...2 SI 23 Tension belt 1 5 48 36 1260 05 BT 24 Cushion 4 22 36 9903 26 BT 25 Hexagon bolt M10x95 1 22 39 10456 CR 26 Screw M6x15 4 13 18 39 10120 VC 27 Screw 4 2x8 4 28 29 39 10188 28 Protect cover 1 28 36 1260 20 BT 29 Rear foot 1 22 33 1260 03 SI 30 Carriage bolt M8x75 2 1 33 39 10019 CR 31 Arc washer 2 30 39 9966 CR 32 Cap nut M8 2 30 39 9900 CR 33 Front bottom tube 1 1 33 1260 04 SI 34 End cap w...

Страница 13: ...er right 1 1 60L 36 1560 02 BT 61 Axle nut M10x1 2 63 39 9820 SW 62 Nut M10x1 5 52 63 39 9820 63 Axle 1 48 36 1560 06 BT 64 Spring 1 48 36 1260 39 BT 65 Axle sleeve 1 63 36 1260 31 BT 66 Crank Cover 2 63 36 1560 07 BT 67 Washer 12 24 2 63 39 9986 CR 68 Screw 3 5x18 3 69 39 9909 69 End cap 1 48 36 1260 32 BT 70 Screw cap 17 2 9 14 36 9988108 BT 71 Rubber pad 1 1 36 1260 33 BT 72 Over lay 1 60 36 12...

Страница 14: ...t rail 22 1 Remove the cushion pads 24 and steel angle 44 from seat rail 22 2 Push the slide rest 18 with preassembled seat 13 through the seat rail 22 as showed in Figure Step 2 so that 4 pulleys can roll onto the top side and 2 pulleys can roll onto the bottom side of seat rail 22 3 Fix the cushion pads 24 at appropriate position on bottom side of seat rail 22 4 Put the steel angle 44 at appropr...

Страница 15: ...t rail 22 and pedals 11 at main frame 1 1 Place the seat rail 22 against the main frame 1 and connect the sensor cable 36 with connection cable 46 2 Place the seat rail 22 into the holder of main frame 1 so that the holes pattern and screw the seat rail 22 at main frame 1 by using screw M10x100 14 washer 8 and nut 9 Don t tighten too much the seat rail 22 should be fold up easily 3 Secure the seat...

Страница 16: ... status of the consumed calories is displayed The values last attained by this function are stored 5 Schläge Total display The current rowing beats of all trainings sessions are displayed The values last attained by this function are stored 6 SCAN function If this function is selected the current values of all functions are displayed successively in a constant sequence approx every 5 seconds Keys ...

Страница 17: ...ng hours you should spray some oil at the thread of the handlebar bolts and to the thread of quick release for fold up function Troubleshooting If you cannot solve the problem with the following information please contact the authorized service center Problem Possible Cause Solution Computer has no value at Display if you press any key No Batteries insert or batteries empty Check the position of b...

Страница 18: ... phase and the cool down phase The body temperature and oxygen intake should be raised slowly in the warm up phase This can be done with gymnastic exercises lasting five to ten minutes Then the actual training training phase should begin The training exertion should be relatively low for the first few minutes and then raised over a period of 15 to 30 minutes such that the pulse rate reaches the re...

Страница 19: ...ment Les chaussures d entraînement doivent être choisies en fonction de l appareil doivent systématiquement bien tenir le pied et posséder une semelle antidérapante 12 RESPECT Si des sensations de vertige des nausées des douleurs dans la poitrine ou d autres symptômes anormaux se font sentir arrêter l entraînement et consulter un médecin adapté 13 Il faut savoir que les appareils de sport ne sont ...

Страница 20: ...30 39 9966 CR 32 Ecrou capuchon M8 2 30 39 9900 CR 33 Tube d appui avant 1 1 33 1260 04 SI 34 Capuchon avec rôle 2 33 36 9220 06 BT 35 Rondelle 10 20 1 2 39 9989 CR 36 Capteur 1 22 46 36 1260 12 BT 37 Vis 3x10 2 47 39 10076 SW 38 Revêtement den Pied arrière 1 29 36 1260 22 BT 39 Aimant 1 18 36 1260 24 BT 40 Câble plat 270J 1 77 36 1560 04 BT 41 Roulement de billes 608z 8 42 36 1260 16 BT 42 Roulet...

Страница 21: ...Vis 4 2x18 8 34 36 9111 38 BT 60L Revêtement gauche 1 1 60R 36 1560 01 BT 60R Revêtement droite 1 1 60L 36 1560 02 BT 61 Ecrou d axe M10x1 2 63 39 9820 SW 62 Ecrou M10x1 5 52 63 39 9820 63 Axe 1 48 36 1560 06 BT 64 Serrage de l étrier magnétique 1 48 36 1260 39 BT 65 Tube d espacement 1 63 36 1260 31 BT 66 Insert en caoutchouc 2 63 36 1560 07 BT 67 Rondelle 12 24 2 63 39 9986 CR 68 Vis 3 5x18 3 69...

Страница 22: ... de siège 18 sur le châssis de siège 22 dans la direction représentée de sorte que quatre roulettes de la transport de selle 18 se retrouvent au dessus du cadre et montage de deux en dessous sur le fixation 18 3 Prenez les butoirs en caoutchouc 24 et vissez les à châssis de siège 22 4 Monter l équerre d acier 44 comme indiqué sur le châssis de siège 22 par le vis 45 de telle sorte que lors du plia...

Страница 23: ... ne sont pas jointes dans le volume des livraisons S il vous plaît appliquez celui ci dans le commerce Au bas de l ordinateur est au milieu d une arrestation dont l ordinateur peut être déverrouillé et retiré du dossier Français Étape n 6 Contrôle 1 Vérifier si les assemblages et connexions ont été effectués correctement et fonctionnent Le montage est maintenant terminé 2 Si tout est en ordre se f...

Страница 24: ... coup de rames par minute 4 Affichage KALORIEN affichage des calories Permet d afficher l état actuel des calories consommées Cette fonction permet de sauvegarder les valeurs obtenues jusqu à présent 5 Affichage Schläge Total affichage du nombre total de Coup des rames Permet d afficher le niveau actuel des parcourus pour l ensemble des unités d entraînement ainsi que celui de l unité actuelle d e...

Страница 25: ...onctionnement vous erriez au peu d huile de au fil de la vis de poignée étoile et sur les filets de la libération rapide Corrections Si vous ne pouvez pas résoudre en utilisant les informations énumérées à l dysfonctionnement s il vous plaît contactez votre revendeur ou fabricant Problème Cause Possible Solution L ordinateur ne s allume pas en appuyant sur un bouton Pas de piles ou de batteries in...

Страница 26: ...possible en effectuant de la gymnastique pendant cinq à dix minutes L entraînement proprement dit phase d entraînement devant commen cer ensuite Choisir une faible résistance pendant quelques minutes puis accroître entre 15 et 30 minutes de sorte que le pouls se situe entre 70 et 85 de son maximum Afin de faciliter la circulation après la phase d entraînement et d éviter des courbatures ou des mus...

Страница 27: ...r moeten trainingskledij en schoenen gedragen worden die voor een fitnesstraining met het toestel geschikt zijn De kleding moet zodanig zijn dat deze omwille van de vorm bijvoorbeeld lengte ervan tijdens de training niet kan blijven hangen De trainingschoenen moeten in overeenstemming met het trainingstoestel gekozen worden uw voeten in principe een vaste passing geven en een slipvrije zool hebben...

Страница 28: ... 30 39 9966 CR 32 Dop moer M8 2 30 39 9900 CR 33 Voorste voetbuis 1 1 33 1260 04 SI 34 Voetkappen met transportrol 2 33 36 9220 06 BT 35 Onderlegplaatje 10 20 1 2 39 9989 CR 36 Sensor 1 22 46 36 1260 12 BT 37 Schroef 3x10 2 47 39 10076 SW 38 Voetdap achter 1 29 36 1260 22 BT 39 Magneet 1 18 36 1260 24 BT 40 Flakke riem 270J 1 77 36 1560 04 BT 41 Kogellaager 608z 8 42 36 1260 16 BT 42 Zadle rol bow...

Страница 29: ...rol 1 74 36 1260 28 BT 59 Schroef 4 2x18 8 34 36 9111 38 BT 60L Bekleding links 1 1 60R 36 1560 01 BT 60R Bekleding rechts 1 1 60L 36 1560 02 BT 61 Asmoer M10x1 2 63 39 9820 SW 62 Moer M10x1 5 52 63 39 9820 63 As 1 48 36 1560 06 BT 64 Veer 1 48 36 1260 39 BT 65 Afstandsbus 1 63 36 1260 31 BT 66 Rubberenring 2 63 36 1560 07 BT 67 Onderlegplaatje 12 24 2 63 39 9986 CR 68 Schroef 3 5x18 3 69 39 9909 ...

Страница 30: ...legplatje 31 en moeren 9 Stap 2 Montage van het zadelglijder 18 met zadel 13 op het zadel frame 2 1 Schroef uit de eindstops 24 en ontmantelen de staalhoek 44 van den zadelframe 22 2 Schuiv de zadelframe 22 door de zadelglijder 18 in de goede richting zodat 4 rollen zijn aan de bowensezijd and 2 rollen zijn lagerzijd 3 Schroef den eindstops 24 aan de lagerzijd van de zadelframe 22 vast 4 Schroef i...

Страница 31: ...achterste voet 28 om de achterste voet 29 terug te trekken Stap 4 Montage van de zadelframe 22 en voetschaal 11 op het ba sisframe 1 1 Plaatz de zadelframe 22 aan de basisframe 1 en verbind de stekkers van den sensorkabel 36 and verbindingskabel 46 2 Monteer de zadelframe 22 op het basisframe 1 Gebruik daar voor een schroef M10x100 14 twee onderlegplatjes 8 en een moer 9 Niet draai de moer 9 zodat...

Страница 32: ... aantal verbruikte calorieën wordt weergegeven De laatst bereikte waarde bij deze functie wordt automatisch opgeslagen 5 Schläge Total weergave De actuele stand van de afgelegde roeislagen van alle trainingsunits tot dan toe incl de actuele trainingsunit wordt weergegeven De laatst bereikte waarde bij deze functie wordt automatisch opgeslagen 6 SCAN functie Wanneer deze functie wordt geselecteerd ...

Страница 33: ...ijfsuren moet je op een gegeven oliespray om de draad van de sterförmige schroev en op de schroefdraad van de zadel sluitschroef Fixes Als u niet kunt oplossen met behulp van de genoemde storing informatie kunt u contact opnemen met uw dealer of Fabrikant Probleem Mogelijke oorzaak Oplossing De computer wordt niet ingeschakeld door het indrukken van een knop Geen batterijen of accu s geplaatst lee...

Страница 34: ... beginnen De trainingsbelasting moet de eerste minuten laag zijn en dan gedurende een periode van 15 tot 30 minuten zo toenemen dat de hartslag zich tussen de 70 en 85 van de maximale hartslag bevindt Om de bloedsomloop na de trainingsfase te ondersteunen en om spierpijn of verrekte spieren te voorkomen moet de trainingsfase door een cooling down worden gevolgd Hierbij moeten vijf tot tien minuten...

Страница 35: ... головокружение тошнота боли в груди и другие аномальные симптомы прервать тренировку и обратиться к соответствующему врачу 13 Следует принципиально учесть что спортивные снаряды не игрушки Поэтому их разрешается использовать только в соответствии с назначением и лицами которые располагают соответствующей информацией и которые прошли соответствующий инструктаж 14 Таким лицам как дети инвалиды и лю...

Страница 36: ...5 Болт с шестигранной головкой M10x95 1 22 39 10456 CR 26 Болт M6x15 4 13 18 39 10120 VC 27 Болт 4 2x8 4 28 29 39 10188 28 Обшивка ножки 1 28 36 1260 20 BT 29 Задняя ножка 1 22 33 1260 03 SI 30 Замковый болт M8x75 2 1 33 39 10019 CR 31 Гнутая подкладная шайба 2 30 39 9966 CR 32 Колпачковая гайка M8 2 30 39 9900 CR 33 Передняя ножка 1 1 33 1260 04 SI 34 Колпачки ножек с транспортными роликами 2 33 ...

Страница 37: ...0R Обшивка справа 1 1 60L 36 1560 02 BT 61 Осевая гайка M10x1 2 63 39 9820 SW 62 Г айка M10x1 5 52 63 39 9820 63 Ось 1 48 36 1560 06 BT 64 Пружина 1 48 36 1260 39 BT 65 Промежуточная втулка 1 63 36 1260 31 BT 66 Резиновая продкладка 2 63 36 1560 07 BT 67 Подкладная шайба 12 24 2 63 39 9986 CR 68 Болт 3 5x18 3 69 39 9909 69 Крышка 1 48 36 1260 32 BT 70 Колпачок на болт 17 2 9 14 36 9988108 BT 71 Об...

Страница 38: ...ом направлении через салазки сиденья 18 так чтобы 4 ролика крепление сиденья находились сверху на верхней стороне и 2 ролика снизу на нижней стороне салазок сиденья 18 3 После этого крепко прикрутите резиновые стопоры 24 на предусмотренное место под рамой сиденья 22 4 Смонируйте стальные уголки 44 как показано на рисунке на раму сиденья 22 с помощью болтов 45 чтобы при складывании рамы сиденья 22 ...

Страница 39: ...станьте компьютер 6 из обшивки и вставьте батарейки Тип AA 1 5V принимая во внимание полярность Батарейки для компьютера не прилагаются Пожалуйста купите батарейки в магазине В нижней части компьютера посередине находится арретир с помощью которого можно разблокировать компьютер и вынуть его из обшивки Шаг 5 Функции складного механизма 1 Чтобытренажерсложитьтренажер выкрутитегрибовидный болт 2 пов...

Страница 40: ...ледних результатов в этой функции 3 Функция SCHLAEGE MINUTE КОЛИЧЕСТВО ГРЕБКОВ минутах Показывается количество сделанных гребков в минутзу 4 Функция KALORIEN КАЛОРИИ Указывается фактическое количество израсходованных калорий Производится запись в память последних результатов в этой функции 5 Функция SCHLAEGE TOTAL Общее количество гребков Индикация суммы количества гребков в ходе всех тренировок Д...

Страница 41: ...еское обслуживание Мы рекомендуем после каждых 50 часов пользования про ве рять болтовые соединения и после каждых 100 часов поль зования смазывать резьбу винта руля и затвора маслом из распылителя Исправление неполадок Если проблема не может быть решена с помощью нижестоящих указаний пожалуйста обратитесь в центр где вы купили тре нажер Проблема Возможная причина Решение Компьютер не включается л...

Страница 42: ...в этом положении на 20 секунд повторите другой рукой Наклонитесь вперед не сгибая ног и попытайтесь достать пальцами рук до пола Выполняйте упражнение 2 раза по 20 секунд Сядьте на пол и вытяните одну ногу Наклонитесь вперед и попробуйте достать ступню Выполняйте упражнение 2 раза по 20 секунд В положении широкого выпада обопритесь руками в пол и потяните мышцы ног Через 20 секунд поменяйте ногу П...

Страница 43: ...ания его нормальной физической формы Трехразовые тренировки необходимы для улучшения Вашей физической формы и уменьшения веса Идеальная частота тренировок 5 раз в неделю 3 Планирование тренировок Каждая тренировка должна состоять из трех фаз разогрев разминка непосредственно тренировка и остывание после тренировки заключительная фаза Температура тела и поступление кислорода в организм должно медле...

Страница 44: ...lbestellungen oder Reparaturen wenden Sie sich bitte an unsere Service Abteilung Service Top Sports Gilles GmbH Tel 49 0 2051 6067 0 Friedrichstrasse 55 info christopeit sport com Fax 49 0 2051 6067 44 D 42551 Velbert http www christopeit sport com by Top Sports Gilles GmbH D 42551 Velbert Germany ...

Отзывы: