background image

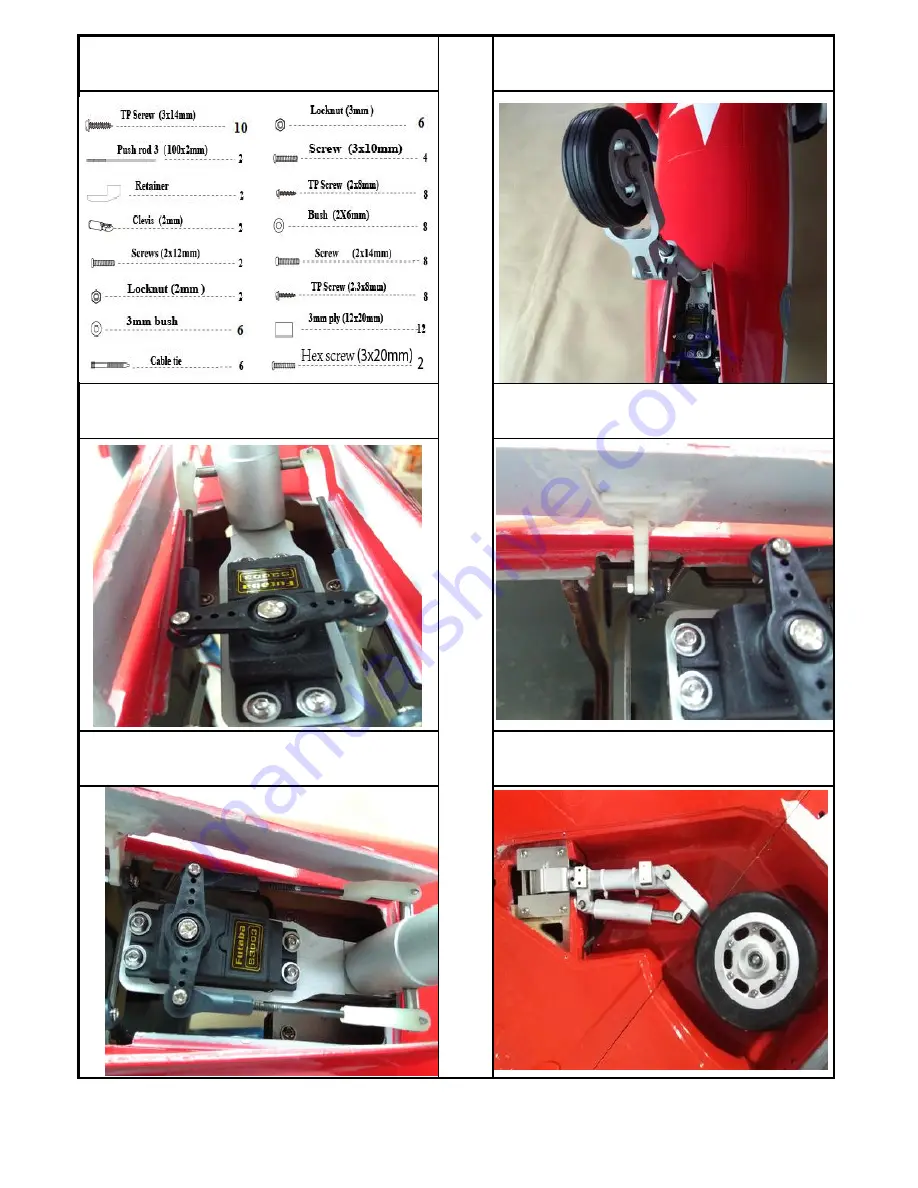
Accessory list for the installation of the retracts.

52. Fix the nose retract to the fuselage with screws.

50. Assemble the servo to the retracts and connect the 

linkages.

53. Connect the hatch hinge to the clevis on the Alu sash 

with screw.

51. Put the retract to the appropriate position from inner 

fuselage.

54. Assemble the main retracts.

第 13 页

Содержание Super galeb G-4 ARF

Страница 1: ...1...

Страница 2: ...2...

Страница 3: ...3...

Страница 4: ...f aileron 3 Fix the fiber horns to the slots in the aileron with epoxy glue 1 Sanding the fiber horns 4 Fix the fiber horns to the slots in the aileron with epoxy glue 2 Sanding the fiber horns 5 The...

Страница 5: ...the slots in the flap with epoxy glue 9 Servo assembled ready for aileron 7 Assemble the servos to the servo trays 10 Servo assembled ready for aileron 8 Assemble the servos to the servo trays 11 Ser...

Страница 6: ...horns in the wings assembled finished 13 Apply glue to the slots of flaps and epoxy the horn to them 16 Apply instant type AB glue to the horns covers 14 Assemble the linkage to the horns with screws...

Страница 7: ...e the horns to the slots in the rudder 18 Apply instand type AB glue to the slots in the rudder vertical fin 21 Assemble the servo to the vertical fin 19 Assemble the rudder to the vertical fin and ma...

Страница 8: ...he servo arms with the linkage and locked each side with screws 24 Measure the same length on the surface of the vertical and mark it out as picture Accessory list for the installation of belly speed...

Страница 9: ...vo to the appropriate position in the fuselage 31 Epoxy the pinned hinges to the wheel doors carefully 30 Connect the belly speed brake to servo arms with the linkage and locked each side with screws...

Страница 10: ...glue to the pinned hinges to make sure them don t come off during flying 34 Drill holes to appropriate position in the wheel doors and lock the wheel doors with screws 37 Trim slots to appropriate po...

Страница 11: ...ts Accessory list for the installation of belly speed brake 40 Connect the linkage to the fiber horn with screws and locknuts 42 Ready for assembly the stabilizers 41 Connect the linkage to the servos...

Страница 12: ...ner 47 Lock the vertical fin with screw 45 Connect the pushrod to the servo 48 The picture after the vertical fin assembled 46 Apply AB glue to the hole in the vertical and assemble the vertical tube...

Страница 13: ...retract to the fuselage with screws 50 Assemble the servo to the retracts and connect the linkages 53 Connect the hatch hinge to the clevis on the Alu sash with screw 51 Put the retract to the approp...

Страница 14: ...e the wheel cover to the main retracts 58 Lock the wing with schrews 56 The picture when the retracts up Accessory list for the installation of bomb 57 Lock the wing with schrews 59 Fix the bomb with...

Страница 15: ...nose 62 Assemble the turbine engine to the fuselage 61 Assemble the antenna to the fuselage 63 Assemble the fuel tank to the fuselage Accessory list for the installation of the fuel tank and tail pip...

Страница 16: ...65 Assemble the canopy to the fuselage 66 The photo when the model assemble completely 16...

Страница 17: ...l surface to the values in the diagrams These values fit general flight capabilities Readjust according to your needs and flight level 69 Check all the datas well make sure all sections glue tightly O...

Страница 18: ...18...

Отзывы: