


PHOTO W
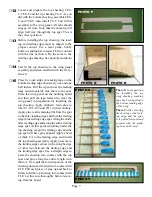
Installing and connecting the servos could not be
simpler. Mount a servo into each servo hole in the
fuselage with the lead side facing forward, pull the
servo leads forward into the wing opening. Install
one Eazy Connector into the outboard hole of each
servo arm and install the supplied push rod. Insert the
Z-bend end into the control horn and the straight end
into the Eazy connector. Secure it with a screw. Plug
the rudder servo into channel one of your receiver
and plug the elevator servo into channel two of your
receiver. Turn on your radio and receiver and check
that all surfaces are neutral when the sticks and trims
are neutral. Adjust your pushrods at the Eazy con-
nector if needed to achieve this. Check your throws,
you should have about 3/8” up and down on the el-
evator (when measured at the center of the trailing
edge) and about ½” left and right on the rudder.
Flying
You have had a great time building your Li’l Pup and you have learned some new skills along the way but now
is the time you have been working for. Flying your own creation. I cannot emphasize enough the importance of
seeking help if you have no experience or have not soloed. You can contact any club and they will arrange to help
you get up to speed so you can enjoy the greatest hobby-sport on the planet. To locate a club in your area and get a
contact number, ask at your local hobby shop or check the Academy of Model Aeronautics web site (http://www.
modelaircraft.org/) For information on a club and sanctioned flying site near you.
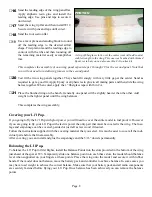
Photo W:
To simplify working on your Li’l Pup, a handy
plywood stand is included. This stand will keep the model
stable on the bench as well as during transport in the car.
When your ready to fly, just pull it off and go.
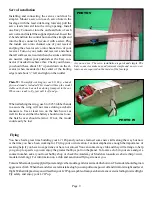
Servo Installation
As you can see , The servo installation is quick and simple. The
Eazy connector makes any adjustment simple and no servo ex-
tensions are required on the inside of the fuselage.
PHOTO V
Page 9
To launch the model, just apply full power and give the model a gentle toss aimed at the horizon. The model should begin an
aggressive climb. When the model is several mistakes high you can pull some power off and trim for straight and level
flight. With a little practice you will see that your Li’l Pup is capable of many aerobatic maneuvers including inverted flight.
Fly safely and enjoy your Li’l Pup.
When attaching the wing, use 6 to 8 #33 rubber bands
to assure the wing will not move during acrobatic
maneuvers. Use at least two on the hatch cover as
well. In the event that the battery should come loose,
the hatch cover should retain it. If not, the model
could easily be lost.


