STEP 2
:
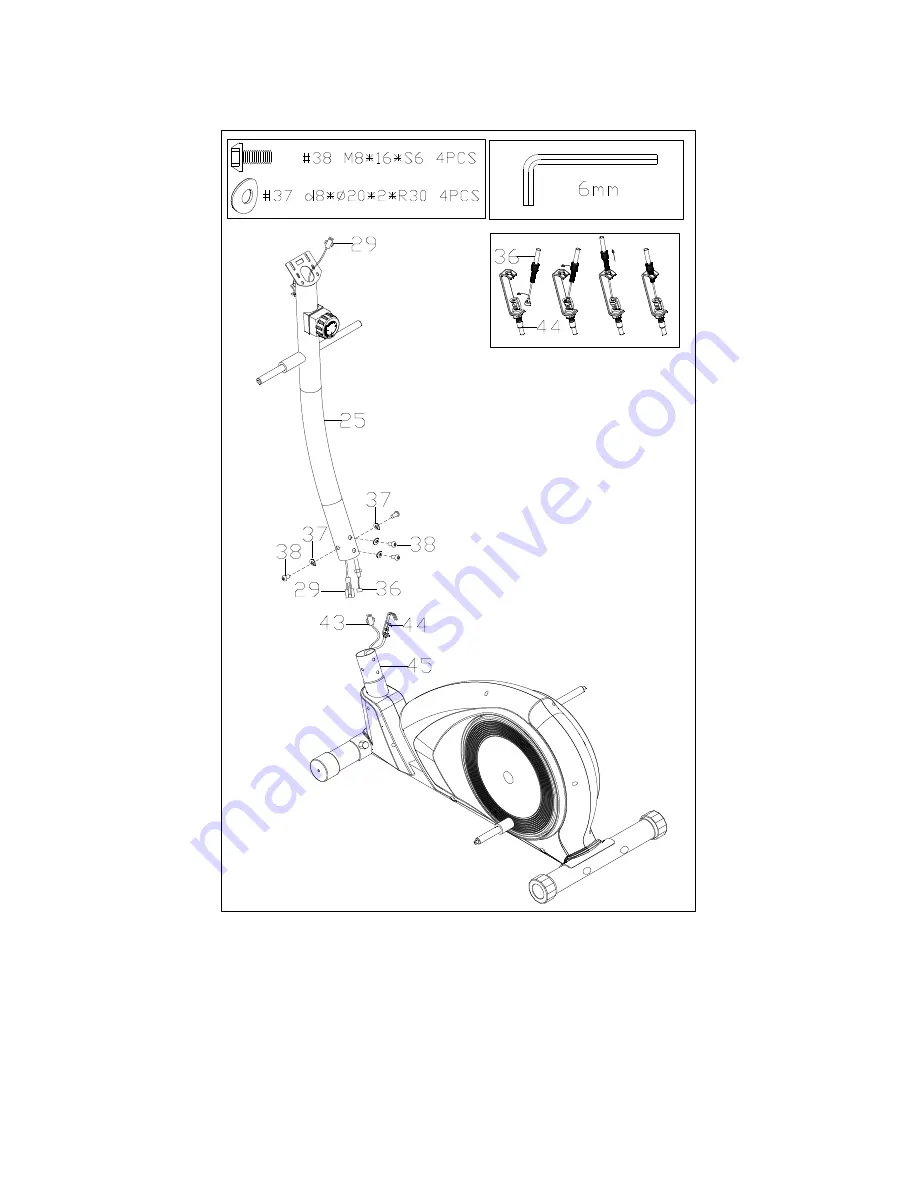
a.
Connect trunk wire(29) with sensor wire (43); Connect well the tension control (36)
with the tension wire lower(44)
b.
Insert handle bar post (25) into main frame (45), and then secure them with bolts (38)
and arc washers (37).
Страница 1: ...Edizione Revisione 00 INSTRUCTION 08 16 00 ...
Страница 2: ...L 22 23 24 25 24 23 22 22 17 18 20 8 19 27 28 21R 31 32 33 33 34 35 35 34 33 33 31 32 36 37 38 37 38 39L 41 42 29 36 43 44 45 37 37 46 41 47 48 47 41 41 51 34 35 53L 54 51 34 35 53R 54 56 57 22 22 23 60 60 23 22 22 57 56 39R S13 S14 S15 S13 S14 S17 S19 1 16 16 16 16 16 16 30 49 64 65 30 49 64 65 58 58 59 59 ...
Страница 3: ...10 55 13 S17 2 31 Hex bolt M8 75 13 S14 2 32 Spacer Φ14 Φ8 3 59 2 33 Spacer 1Φ 32 3 Φ28 16 Φ14 3 4 34 Washer d8 Φ16 1 5 6 35 Nylon Nut M8 H7 5 S13 6 36 Tension Control 1 37 Arc washer d8 Φ20 2 R30 8 NO DESCRIPTION Q TY 38 Bolt M8 16 S6 4 39L R End cap Φ60 Φ70 95 2 40 Front stablizer 1 41 Bolt M8 73 20 H5 4 42 Bolt ST3 10 2 43 Sensor wire 1 44 Tension wire lower 1 45 Main frame 1 46 Nut M8 H16 S13 ...
Страница 4: ...STEP 1 Secure front stabilizer 40 and rear stabilizer 48 to main frame 45 with bolts 41 arc washers 37 and nuts 46 ...
Страница 5: ... Connect trunk wire 29 with sensor wire 43 Connect well the tension control 36 with the tension wire lower 44 b Insert handle bar post 25 into main frame 45 and then secure them with bolts 38 and arc washers 37 ...
Страница 6: ... 19 8 20 19 8 20 8 d8 2PCS 20 d8 Φ32 2 2PCS 19 M8 16 S14 2PCS 16 16 16 S13 4PCS 25 Attach the Coupler Bar 21L R to the axle of handle bar post 25 and then secure them with Hex bolts 19 spring washers 8 and washers 20 ...
Страница 7: ...6 59 59 59 S18 2PCS 16 S13 4PCS Secure the connecting rod 52L R on the L R crank axle of main frame 45 with nuts 56 and washers 57 the last put the cap 59 on Tighten the Coupler bar 21L R with the connecting rod 52L R with Hex bolt 31 Washer 34 and nylon nut 35 then put the cap 16 on ...
Страница 8: ...STEP 5 17 18 18 17 18 Φ8 27 5 H4 M6 4PCS 17 M6 16 S5 4PCS S5 14L 21R 21L 14R Secure handle bar 14L R to Coupler bar 21L R with bolts 18 and bolts 17 ...
Страница 9: ...STEP 6 Secure pedal 53L R to connecting rod 52L R with Hex bolts 54 washers 34 and nuts 35 ...
Страница 10: ...ar 4 to handle bar post 25 with bolts 9 and spring washers 8 then cover the handlebar clamp cover 10 on b Connect the wire of computer 1a with the trunk wire 29 c Lock computer 1 on the handle bar post 25 with bolts 28 d Then insert the handle pulse wire 12 into the hole on the back of the computer 1 ...
Страница 11: ... b a B How to adjust the rear end cap The mashine is uneven you can adjust it by rotation the end cap please refer to the picture The risistance can be adjusted through the tension control Increase the risistance by rotation towards Reduce by trunning towards ...
Страница 12: ...ntact pads and the computer will show your current heart beat rate in beats per minute BPM on the LCD after 3 4 seconds Remark During the process of pulse measurement because of the contact jamming the measurement value may be higher than virtual pulse rate during the first 2 3 seconds then it will return to normal level To ensure testing accuracy it is suggested that user test pulse during stop p...
Страница 13: ...GARLANDO SPA Via Regione Piemonte 32 Zona Industriale D1 15068 Pozzolo Formigaro AL Italy www toorx it info toorx it ...