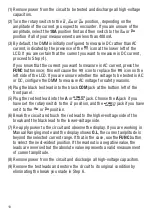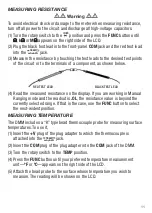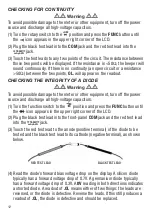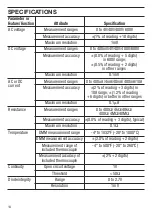
PRODUCT OVERVIEW
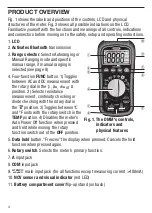
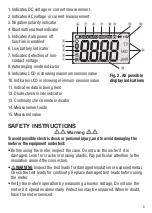
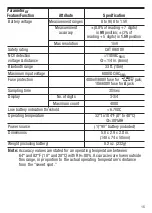
Fig. 1 shows the labels and positions of the controls, LCD and physical
structures of the meter. Fig. 2 shows all possible indications on the LCD.
Familiarize yourself with the functions and meanings of all controls, indications
and connectors before moving on to the safety, setup and operating instructions.
1.
LCD
2.
Activates Bluetooth
transmission
3.
Range selector
. Selects Autoranging or
Manual Ranging mode and specific
manual range, if manual ranging is
selected (see page 8)
4. Four-function
FUNC
button. 1) Toggles
between AC and DC measurement with
the rotary dial in the
,
,
or
position. 2) Selects resistance
measurement, continuity checking or
diode checking with the rotary dial in
the
position. 3) Toggles between ºC
and ºF units with the rotary switch in the
TEMP
position. 4) Disables the meter’s
Auto Power Off function when pressed
and held while moving the rotary
function switch out of the
OFF
position.
5.
Data hold
button. “Freezes” the display when pressed. Cancels the hold
function when pressed again.
6.
Rotary switch
. Selects the meter’s primary function.
7.
A
input jack
8.
COM
input jack
9.
main input jack (for all functions except measuring current >400mA)
10.
NCV sensor and visual indicator
(red LED)
11.
Battery compartment cover
/flip-up stand (on back)
TEMP
mAµAV
Ω
µA
A
mA
Ω
4
햲
햵
햶
햳
햽
햻
햴
햺
햷
햸
햹
Fig. 1. The DMM's controls,
indicators and
physical features


