NAEP0011-R00 Rev 171012
©
TOOLSAND
2017 All Rights Reserved
Page 2 of 2
TOOLSAND
, a brand of Trepmall, LLC, 11625 Custer Rd, Suite 110362, Frisco, TX 75035
1-888-600-8808, [email protected], toolsand.com/support
www.toolsand.com/support
If you have any questions or need technical support for your
TOOLSAND
product, please don’t hesitate to
contact us:
Questions?
There are four small indicator lamps on your worklight which can show you the remaining battery capacity or
the charging status.
Indicating the Remaining Battery Capacity
1. Press and release the power button.
2. Observe the four indicator lamps.
3. If none of the indicator lamps are lit and the main LED light does not turn on, your battery is completely
drained and should be recharged immediately.
4. If one indicator lamp is lit, your remaining battery capacity is between 0% and 25%.
5. If two indicator lamps are lit, your remaining battery capacity is between 25% and 50%.
6. If three indicator lamps are lit, your remaining battery capacity is between 50% and 75%.
7. If four indicator lamps are lit, your remaining battery capacity is between 75% and 100%.
Indicating the Charging Status
1. Turn your LED worklight off and connect the AC or DC charging adapter to begin charging the battery.
2. Observe the four indicator lamps.
3. If the 1st indicator lamp is blinking, the battery charge is between 0% and 25%.
4. If the 1st indicator lamp is lit, and the 2nd lamp is blinking, the battery charge is between 25% and 50%.
5. If 1st and 2nd indicator lamps are lit, and the 3rd lamp is blinking, the battery charge is between 50% and
75%.
6. If 1st, 2nd and 3rd indicator lamps are lit, and the 4th lamp is blinking, the battery charge is between 75%
and 100%.
7. If all indicator lamps are lit, the battery charge is 100% and charging is complete. You should disconnect
the charging adapter at this time.
NAE0002-A1
NAE0001-AH1
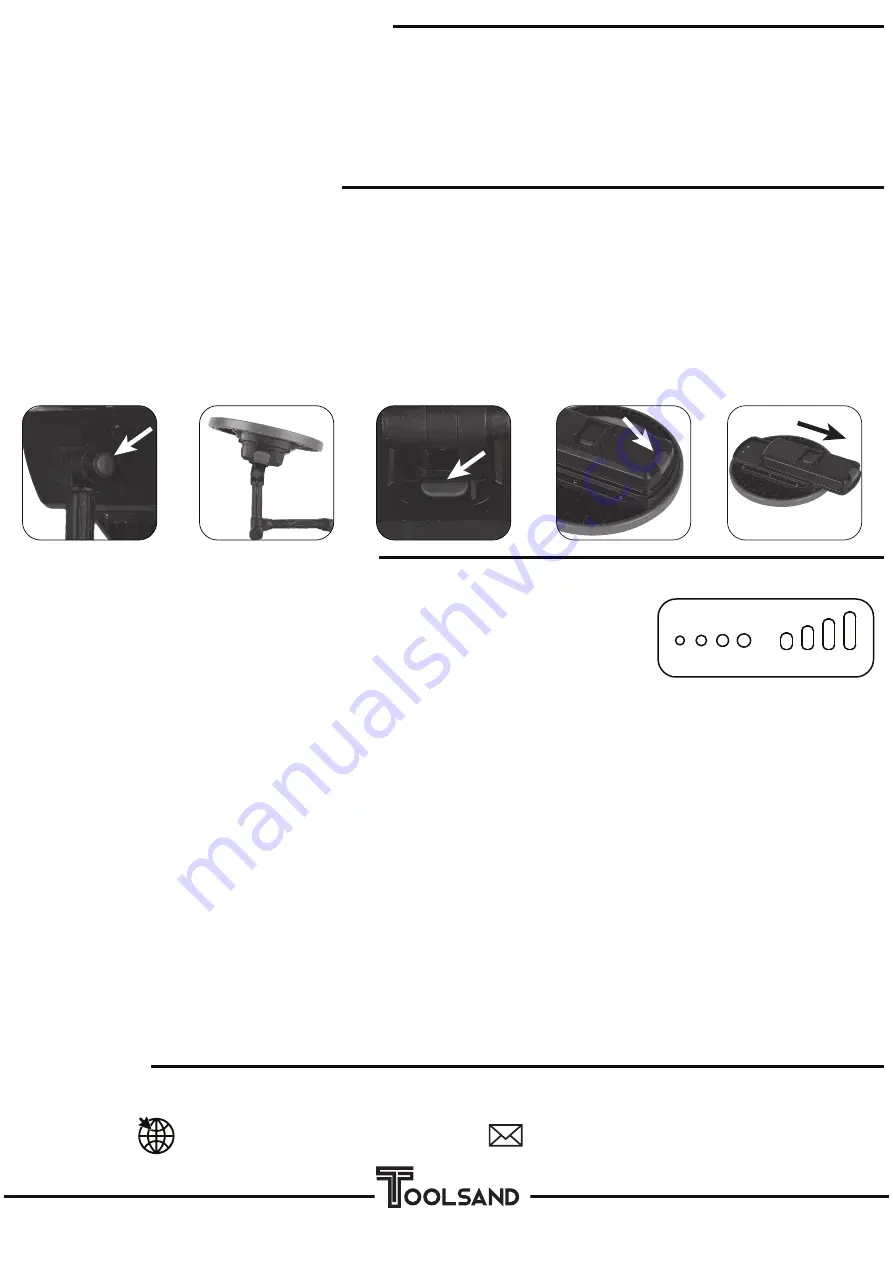
Indicator Lamps
Capacity and Charge Indicators
The battery pack on the NAE0001-AH1 worklight is removable and replaceable allowing you to purchase
additional battery packs for extended operating time. To replace the battery pack on the NAE0001-AH1 work-
light please follow these steps:
1. Press the round, red “PRESS” button on the back of the light (1A). Rotate the light so it is pointing up (1B).
2. Press and hold the small red “Press” button on the bottom-middle of the battery pack (2A). Slide the mount-
ing base off the battery pack by sliding it over the red “Press” button while you are holding it down.
3. Press and hold the red button at the end of the battery pack (3A). Slide the battery pack off the light (3B).
4. Slide the new battery pack on the light, reinstall the mounting base and readjust the mounting angle to your
desired position using the round, red “PRESS” button.
Changing Your Battery Pack
3B
3A
2A
1B
1A
Example
: adjusting your worklight to the lowest brightness level
1. With the light off, press the red power button two times. This will set the brightness at the highest level.
2. Press and hold the red power button. After about 2 seconds, the light will blink off-on-off-on.
3. Continue to hold the power button until the brightness dims. When it has reached the lowest brightness
level, the light will blink off-on-off-on. Release the power button immediately after it begins to blink.
4. Your worklight is now at the lowest brightness level.
Dimming Your Worklight (cont’d)