


- 20 -
6. CHANGING ACCESSORIES
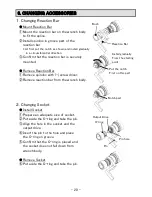
1.Changing Reaction Bar
●Mount Reaction Bar
①Mount the reaction bar on the wrench body
to fit the spline.
②Install spirolox in groove part of the
reaction bar.
* At first put the notch as shown and install gradually
in a circumferential direction.
③Confirm that the reaction bar is securely
mounted.
●Remove Reaction Bar
①Remove spirolox with (-) screw driver.
②Remove reaction bar from the wrench body.
2.Changing Socket
●Install Socket
①Prepare an adequate size of socket.
②Put aside the O-ring and take the pin.
③Align the hole in the socket and the
output drive.
④Insert the pin to the hole and place
the O-ring on groove.
⑤Confirm that the O-ring is placed and
the socket does not fall down from
wrench body.
●Remove Socket
⑥Put aside the O-ring and take the pin.
Install gradually
From the starting
point
Reaction Bar
Put the notch
First on this part
Notch part
Bush
Pin
O-ring
Output Drive
Pin hole
Содержание GNR121E-UC
Страница 32: ...IMKA068...


