EN - 14
ASSEMBLY
Before using the fan for the first time, please proceed as follows: carefully unpack the appliance and all components and
remove all packaging material and any promotional stickers.
Keep the packaging (plastic bags and cardboard) out of reach of children.
After unpacking the appliance, carefully check it for external damage that may have occurred during transport.
Assemble the fan in accordance with the instructions.
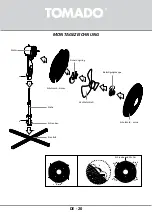
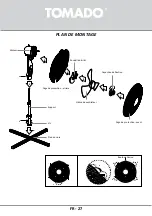
In order to make the assembly process more easy, we recommend removing components [ a ] and [ b ] before you start.
1. Start by placing the cross foot at the pedestal. Place the parts of the cross foot cross-wise on top of one another and
align
the connection base with the screw openings on the cross foot. Mount the pedestal to the cross foot using the screws [ b ].
2. Place the motor section on the pedestal and fasten it with screw [ a ].
3. Place the rear protective guard on the fan.
4. Fasten it by tightening the lock ring.
5. Insert the fan blade onto the fan. Test the fan blade by rotating it by hand. When rotating, the blade should not create
any friction with the lock ring. If it does, remove the fan and repeat all steps from the beginning.
6. Mount the fan blade with the fastening cap. Tighten the fastening cap by turning it to the left - counter-clockwise.
7. Place the front protective guard on the fan and use the clamps to attach it to the rear protective guard.
- Align the front protective guard with the rear protective guard using the positioning clamp [ c ] on the bottom side in
order to attach both parts to each other properly. Use the bolt and nut at the top of the guards to fasten the guards
to each other.
-
Press the clamps [ d ] downwards in order to fasten the front and rear protective guards to each other.
Place the fan on a flat, stable surface. Clean the exterior of the fan using a slightly damp cloth and then wipe it with a dry cloth.
The fan is ready for use.
OPERATING THE PEDESTAL FAN
The range of the remote control is approx. 5 metres at an angle of 30° in front of the fan.
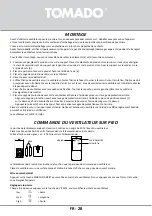
Insert the two supplied AAA 1.5 Volt batteries in the remote control, as indicated in the drawing.
Do take the plus and minus symbols on the inside of the remote control into account.
The remote control has the same function keys as the fan's control panel.
Place the fan on a flat, stable surface. Insert the plug in a wall socket.
Switching on/off
Press the ON/OFF
key to switch on the fan. By pressing the key once more, you switch off the appliance.
Adjusting the speed
With every press on the
SPEED
key you change the speed of the fan:
low
= low
med
= medium
high
= high
batteries
speed
timer
on/ off


